
![]() Microsoft Teams is a collaborative communications platform that incorporates a persistent chat, video calls/meetings, and file sharing (including collaborative editing of documents).
Microsoft Teams is a collaborative communications platform that incorporates a persistent chat, video calls/meetings, and file sharing (including collaborative editing of documents).
For Teams installation and sign-in help, see our Microsoft Teams – Installation & Sign-In article.
For other Teams guides, see the Index of Teams articles.
Teams and Channels
What are Teams and Channels?
In Microsoft Teams, a Team is any group of people, for example, the individuals within your UVM department. A team is made up of Channels, which are topic-specific areas where file sharing, messaging, video/audio calls, and online meetings take place.
For more information, please see this Overview of Teams and Channels from Microsoft.
Creating a Team
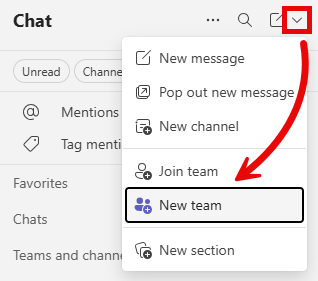
- Expand the New items drop-down menu, and select New team.
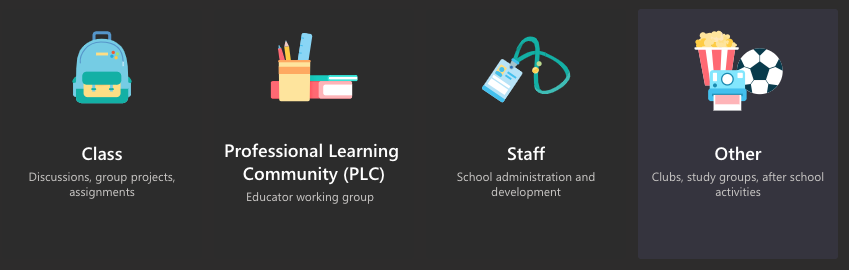
- Choose an appropriate Team template (more info on Team Templates here).
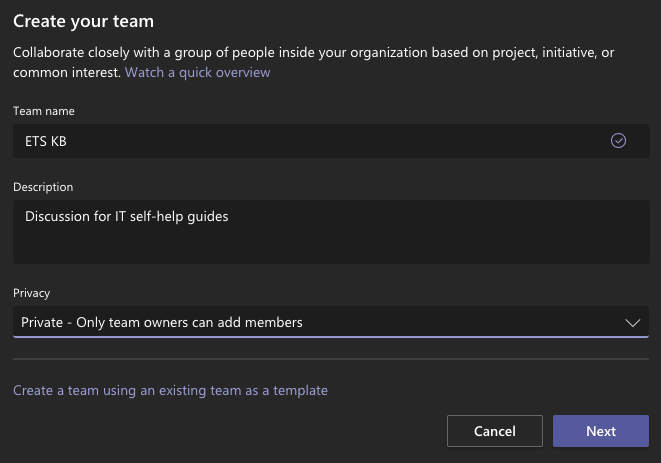
- Give the Team a name, description, and choose whether you’d like to make the Team publicly available to all UVM Teams users, or to make it private (only an owner can add members).

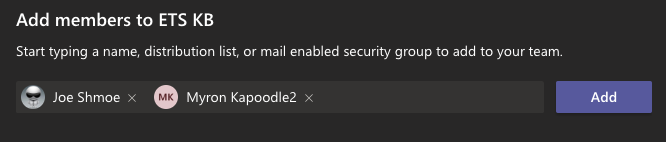
- Add colleagues to your Team.
- To add non-UVM affiliates to your Team, enter their email address. Please note that the email address entered must be provisioned with access to Teams by the external collaborator’s institution.


Check out this video from Microsoft for a closer look.
Creating a Team Channel
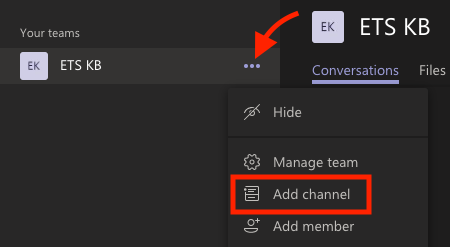
- Click the More options menu to the right of the team you’d like to add a channel to. From the menu that appears, select Add channel.
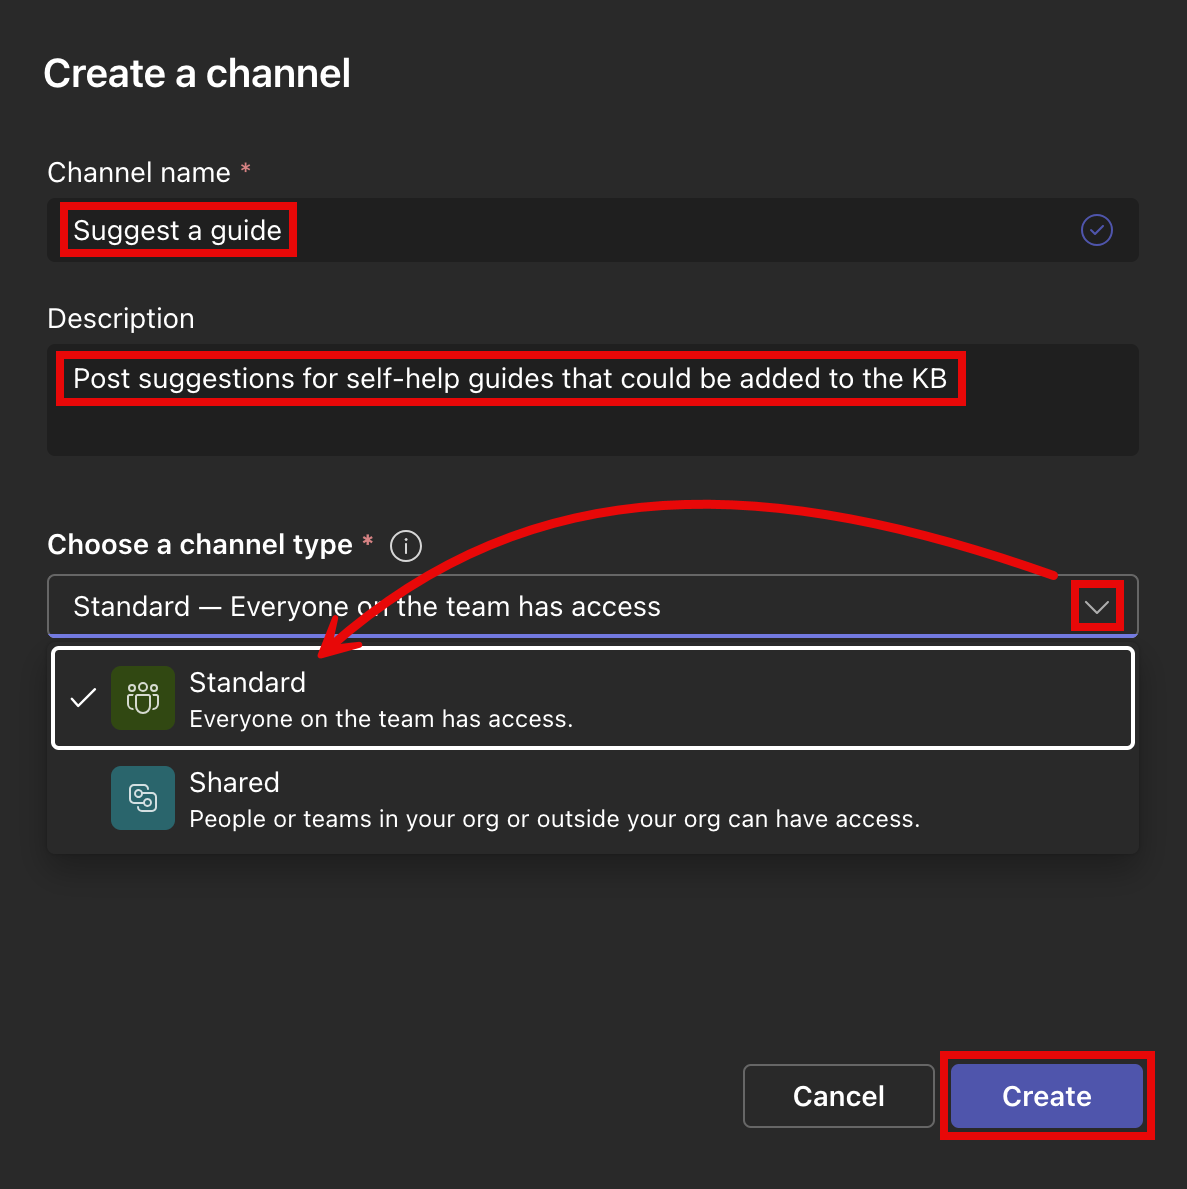
- Give the channel a name, provide a Description of the channel, and Choose a channel type. Then, click Create.

Managing a team
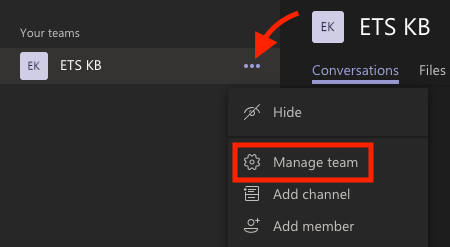
- Click the More options menu to the right of the team you’d like to add a channel to. From the menu that appears, select Manage team.

- From the window that appears you can manage Members, Channels, and Settings for your team.

Inviting an External User to a Team
- Click the More options menu to the right of the team you’d like to add a channel to. From the menu that appears, select Manage team.
- Select the Members tab.
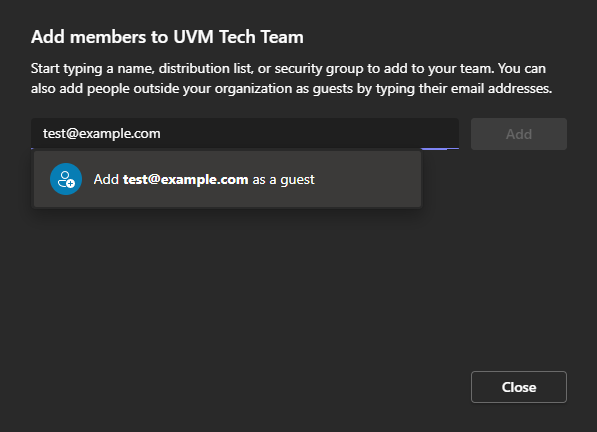
- From the window that appears, click on Add member.
- Type the email address of the guest you would like to add, then click on the prompt to add them as a guest. Click Add to add the guest to your team.
Chat, Video, and Audio Calls
Overview of Microsoft Teams Conversation Methods
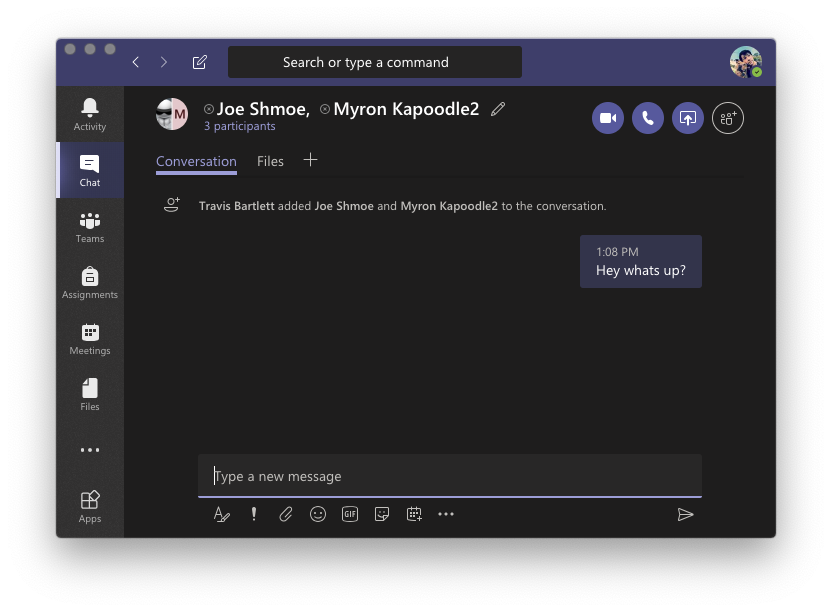
Chat allows private conversations between an individual or group separate from the public Team channel. Chat also enables you to share files and to make video or audio calls directly to all members of the chat.
See the topics on this page for a closer look.
Starting a Chat
- Select the New chat button.
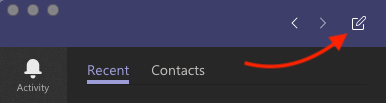
- Enter the name of the person or individuals you want to chat with.

- Send a message to initiate the chat.


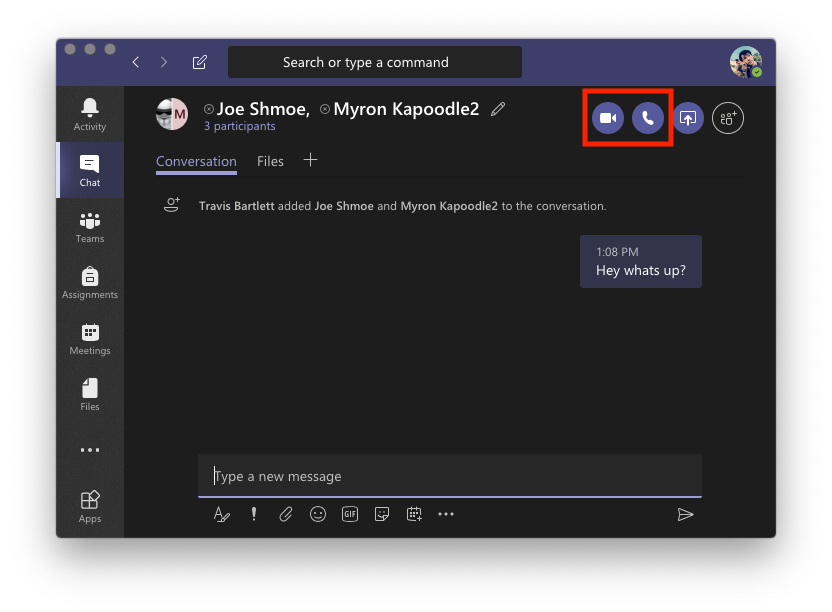
Making Video and Audio Calls from Chat
- Select the video or audio call button to call all members of the current chat.

Working with Files and Documents in Teams
Click here for Microsoft’s First things to know about files in Microsoft Teams article.
Sharing Files
Files can be uploaded to Team channels and chats. To attach a file, look for the icon, select your files, then click upload.
You can also attach files by:
- Click-and-dragging an image or file to the message box of a chat or channel.
- Selecting the Files tab, and clicking the “Share” button.
- Files can be uploaded from your computer, or shared from files within your OneDrive folder.
Collaborating on Files and Documents
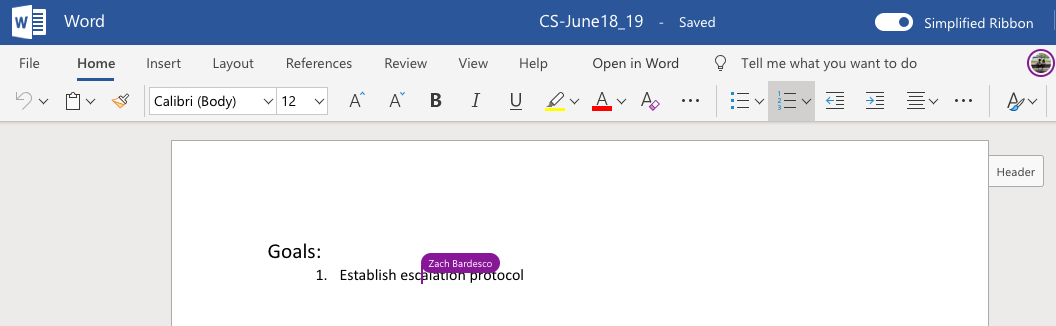
Teams lets you share and edit documents collaboratively, meaning multiple members of your team, chat, or channel can edit the same document in real-time!
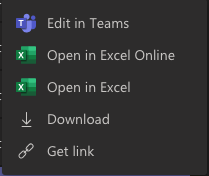
- From a channel or chat, select the Files tab. Locate the file you’d like to edit, then click the More options menu
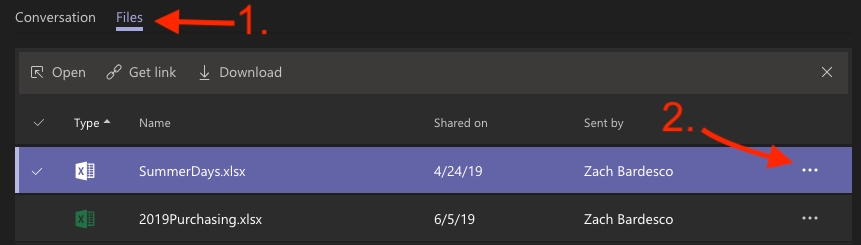
- From the menu that appears, select how you’d like to open the document for editing. Documents can be edited within Teams, Office online, or the Office applications installed on your computer.
- Begin making edits to the file. Others who are editing the file with you will appear as colored flags within the document.


Where are files shared on MS Teams actually stored?
Files that you share in a channel are stored in your team’s SharePoint Online folder. Which can be found in the Files tab at the top of each channel.
Files that you share in a private or group chat are stored in your OneDrive for Business folder and are only shared with the people in that conversation. These will be found in the Files tab at the top of a chat.
Meetings
Viewing Meetings
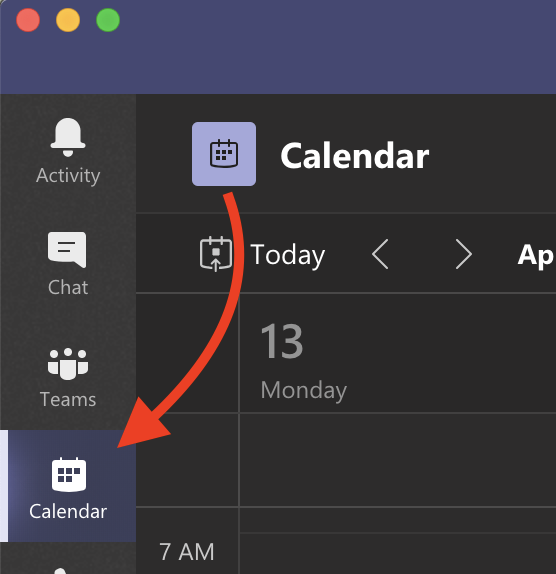
- Select Calendar from the left side-bar. This will display all meetings and appointments for the select day. These meetings are synced with your UVM Exchange calendar.
- Select a meeting invite to see what the meeting’s about, who’s attending, and to respond to the meeting.

Scheduling a Meeting
Source: Microsoft 365 (YouTube)
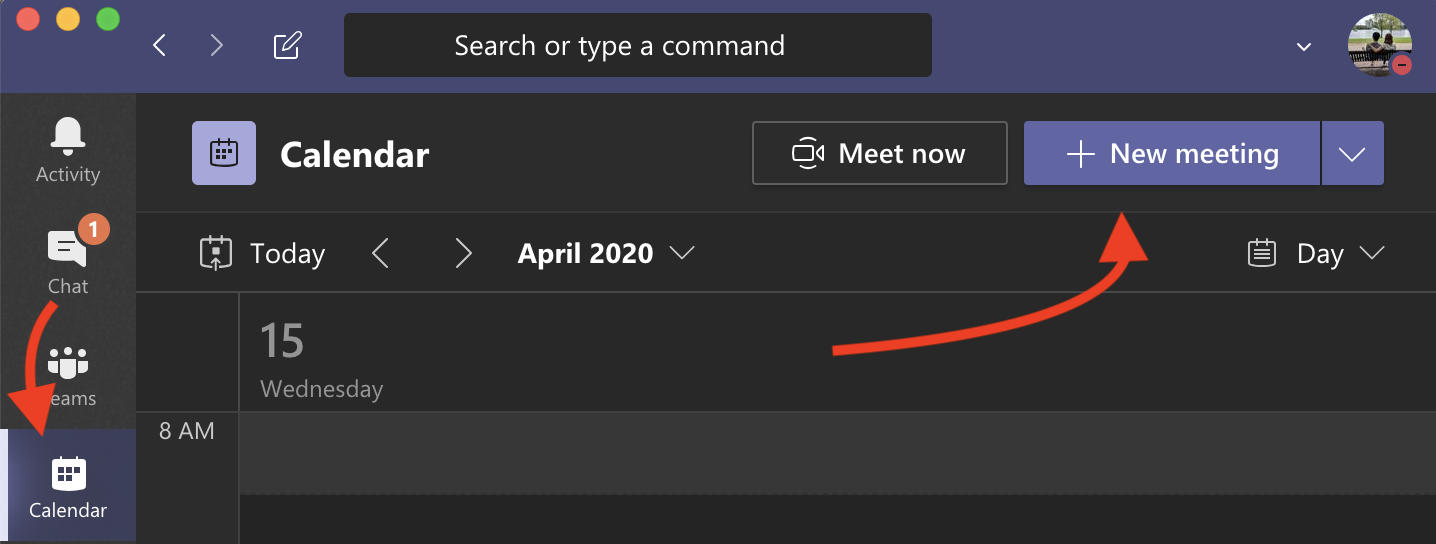
- Select Calendar from the left side-bar. Click the New meeting button.
- Enter a meeting title and add a location, if needed.
- Specify a start and end time, and fill in additional details if needed.
- Use the Add required attendees box to add the names of individuals you’d like to invite to the meeting.
- Your Attendees list will display the availability of each invitee. If needed, use Scheduling assistant (at the top of the meeting editing window) to see your attendees availability in a calendar view.
- The Add channel drop-down can be used to add team channels to meetings. Selecting a channel will allow all members of that team to attend the meeting. Meetings cannot be scheduled in private channels.
Creating an instant meeting
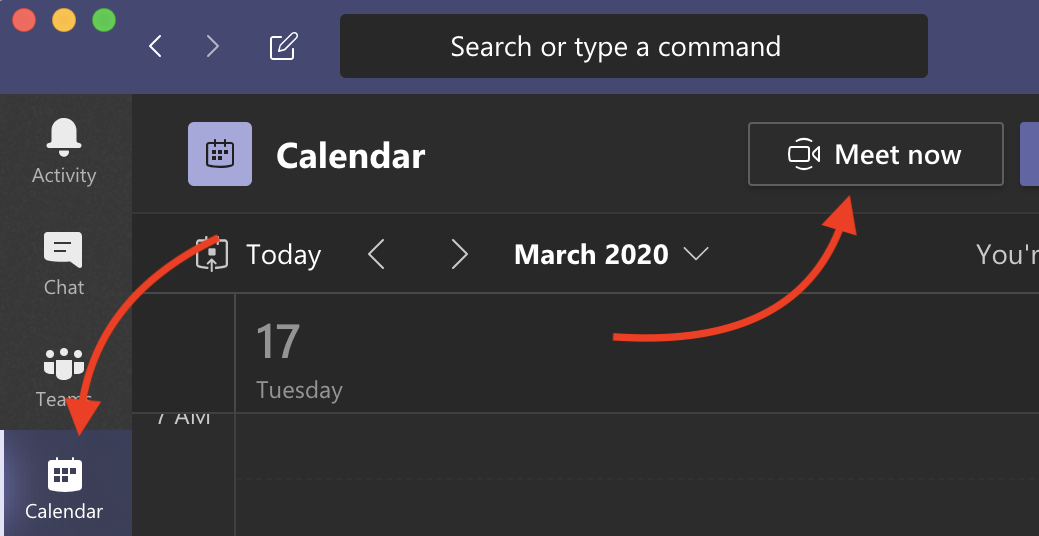
- Select Calendar from the left side-bar, then click Meet now.
- Give your meeting a title by editing the text that says “Meeting with [Your Name]“, choose your audio and video settings, then click the Join now button to initiate the meeting.
- Enter the names of team members you’d like to invite to your meeting.

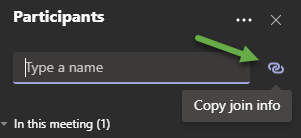
- When inviting a non-UVM affiliate to the meeting, click the icon to copy a link to the meeting. Then email the link to your external collaborator.

- When inviting a non-UVM affiliate to the meeting, click the icon to copy a link to the meeting. Then email the link to your external collaborator.
- That’s it!
Joining a Teams Meeting
-
Select your Calendar and locate the meeting. From the Teams meeting invite, select Join.
- Choose the audio and video settings you want to use.
- Select Join now to enter the meeting.
See Microsoft’s Join a meeting in Microsoft Teams topic for a closer look.
Sharing your screen or windows
Teams allows you to share your entire desktop, an application window, PowerPoint presentations, or the Microsoft Whiteboard. To read more about these options, go to this Show Content in a Teams Meeting article.
See Microsoft’s Show your screen during a meeting video for a closer look.
Recording a meeting
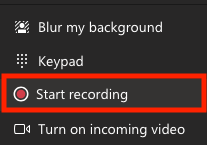
- From an active Meeting, select the “More options” menu ().

- From the menu that appears, select Start recording.
- The recording will end when you leave the meeting. You will receive an email when the recording has finished processing and is ready for viewing.
- Recordings can be viewed, edited, and shared with others on Microsoft Stream.


Meeting attendee limit
The normal maximum participant limit is 300 people. However, additional attendees can still join meetings in a view only mode. This allows up to 10,000 attendees to a given meeting.
After reaching normal meeting capacity, additional attendees will be informed that they are joining the meeting in view-only mode prior to joining the meeting.
Click here for additional information about this feature.
Teams Remote Lectures
For Instructors
Please see our dedicated article for setting up your Class Team, and scheduling and conducting Teams Remote Lectures.
The article linked above has information for creating a class team, generating a Team Code and running remote lectures, but it’s possible some of your students will message you directly in Microsoft Teams.
Chats in Microsoft Teams can be a more efficient method of answering student questions, especially for smaller class sizes. If you opt to accept and respond to direct messages through Teams, configure your Notification Settings so these messages aren’t missed.
If instead, you prefer that students do not contact you directly through Teams chats, consider preemptively speaking with your students about your communication preferences.
For Students
Please see our dedicated article for joining and attending Teams Remote Lectures.
The article linked above details how to utilize a Team Code to join a class team, but you may also be added manually by your instructor or TA. There is no difference in the usage of Microsoft Teams based on how a class team is joined – attending your class lecture and communicating with your classmates, instructor or TAs should be no different.
Additional Configuration and Settings
Changing your Profile Picture
Your Teams profile picture can be changed in Outlook Online.
Please see our dedicated article for instructions on adding or changing your profile picture.
Notification Settings
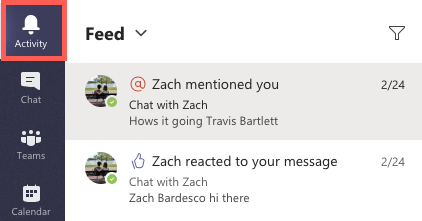
At the time of this writing there are three categories for notifications: Mentions (e.g. when someone @s you), Messages, and Other.
General Notification Settings
To further customize your notification settings, select your profile picture at the top, right corner of Teams, then select Settings > Notifications. From there you can fine-tune what notifications you receive and where those notifications show up.
For each type of notification, you can choose to receive one of these:
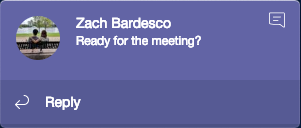
- Banner (a pop-up notification on your screen)

- Banner and email (the frequency of the email notification is set in the Other category)
- Only show in feed (Teams activity feed)
- Off (not available for some categories – will not send notifications)

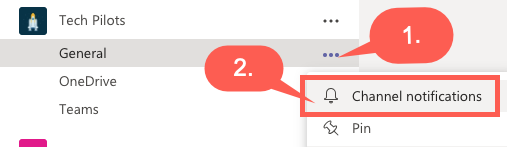
Adjust your channel notifications
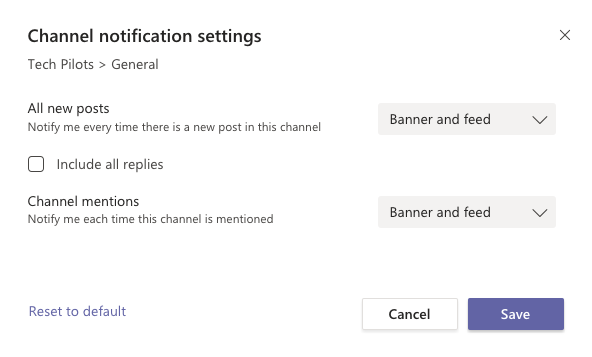
- Hover over a channel in your list of teams, select More options (), and then Channel notifications. From there, you can choose what activity you get notifications for, and where they show up. By default, channel mentions are turned off and all new posts will only show in Activity.

- Select how you’d like to be notified from the drop-down menus. Then click Save.

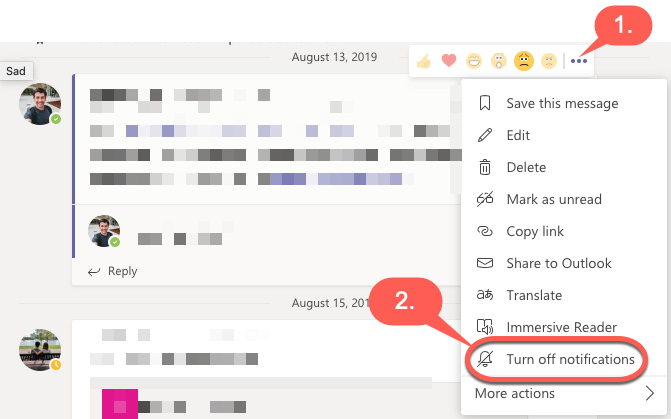
Turn off notifications for specific conversations within a channel
- Go to the beginning of a conversation in a channel, then go to the top right corner of the message and select More options.
 > Turn off notifications. Just like muting a chat, turning off notifications to a channel conversation will stop you from receiving updates for that specific conversation.

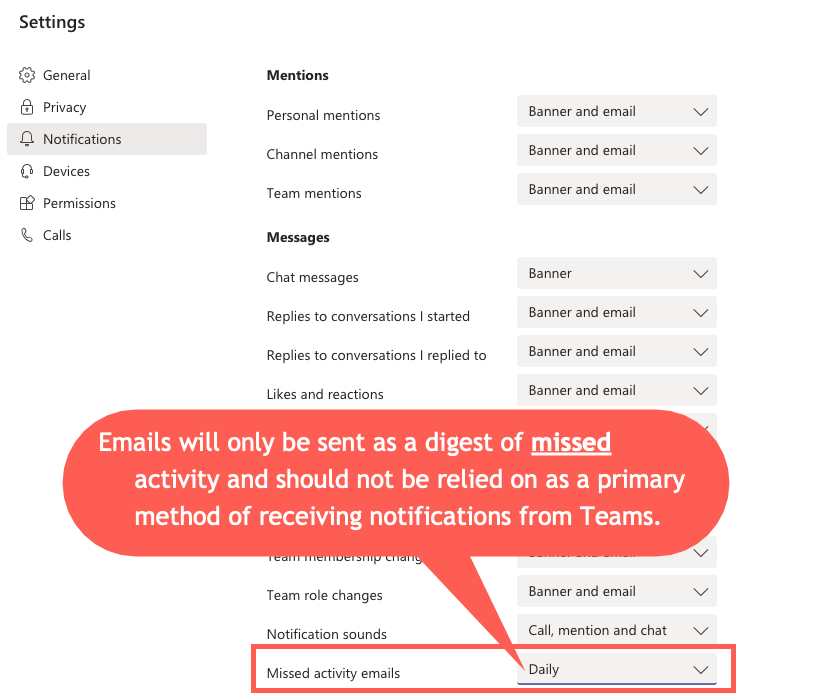
Adjust missed activity email frequency
Microsoft Teams will attempt to send you a digest of missed conversation and chat activity via email.
- Adjust your missed activity emails by selecting your profile picture at the top, right corner of Teams, then select
 Settings >
  Notifications.
 - From the drop-down menu, choose the desired frequency for missed activity emails. This is NOT a replacement for being signed into the Teams client and should not be relied on as the primary method of receiving notifications from Teams.

Teams View Settings
Teams features two options for how you view the various Teams that you’re a member of. By default, Teams will be set to Grid view. You can change this setting from Grid view to List view by following these steps.
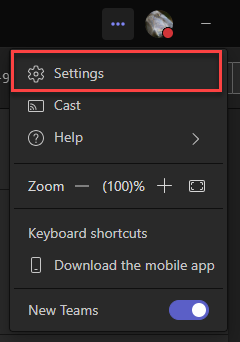
- Click the … icon in the top right corner next to your profile image.

- Click Settings.
- Select Appearance and accessibility from the options list on the left hand side of the menu.
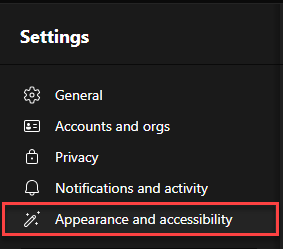
- Under the Layout section in the middle of the options list, you can select between Grid view and List view.
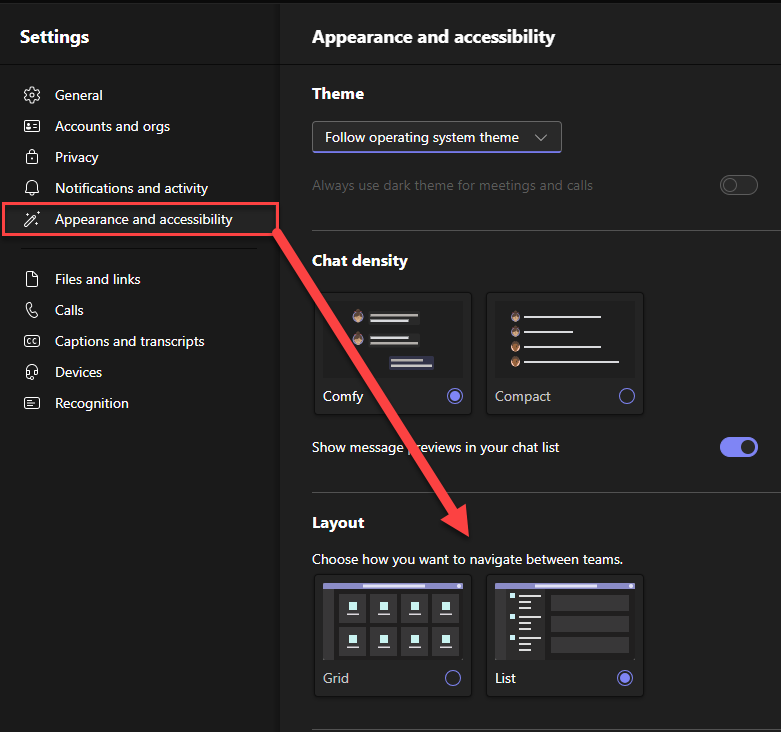
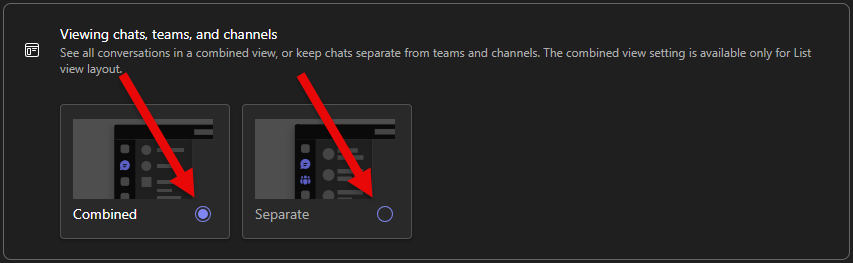
- Under the Viewing chats, teams, and channels section, choose whether you would like Chats and Teams Combined or keep them Separate.
 For more information about the new chat and channels experience in Microsoft Teams, see this Microsoft Support article.
Private Channels
Within a Microsoft Team, a private channel restricts access to its content to a subset of the members of the full Team. People who are not members of the private channel can’t see that it exists, unless they are owners of the parent team. There are limits on the number of private channels that can exist within any given Team, and not all Teams capabilities are available in private channels. Additionally, there’s no way to convert a private channel to a normal channel.
We have encountered several support situations where we had to engage Microsoft Support to recover a resource that was associated with a private channel because we can’t see or manage those groups ourselves.
Instead of a private channel, we strongly encourage creating a new Team for the different set of members. It will have access to all the functionality of MS Teams. We can provide the high level of functional support that our community expects. Team owners can create, archive, and delete their Team in the same way that they manage every other Team. Members won’t be surprised by unanticipated limits or differing behavior.
For additional information on private channels, please see Microsoft’s documentation here.
For help creating a new Team, please see this section.
Archiving and Restoring a Team
If a team is no longer actively used, but should be retained for future reference or reactivation, owners can archive the team. When a team is archived, the conversations and files associated with that team become read-only, but can still be searched by team members.
Archiving a Team
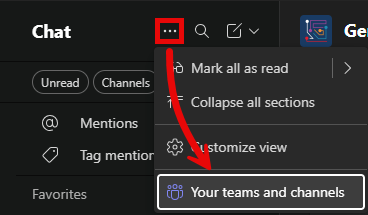
- Expand the More list options () drop-down menu and select Your teams and channels.
- In your list of teams, select the name of the team you want to archive, then click the More options menu ().

- Select Archive team from the options list.

- Click Archive after optionally making the SharePoint site associated with this team read-only.

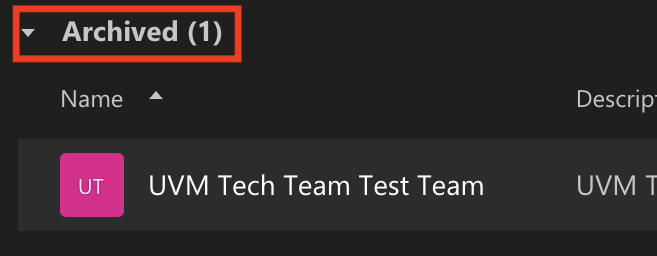
- You should now see your archived team beneath the list of active teams.


Restoring a Team
- Expand the More list options () drop-down menu and select Your teams and channels.
- In your list of Active teams, find the name of the team you want to archive, then click the More options menu .

- Select Restore team from the options list.
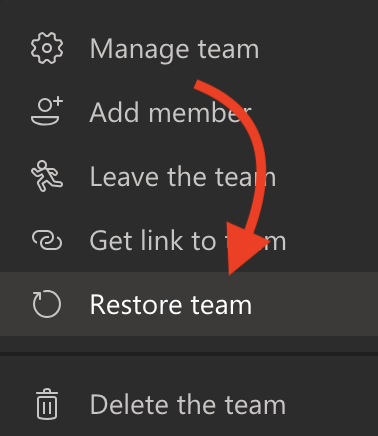
- Your team should now be visible in the list of Hidden teams.

For additional information on Archiving and Restoring teams, please see Microsoft’s documentation.
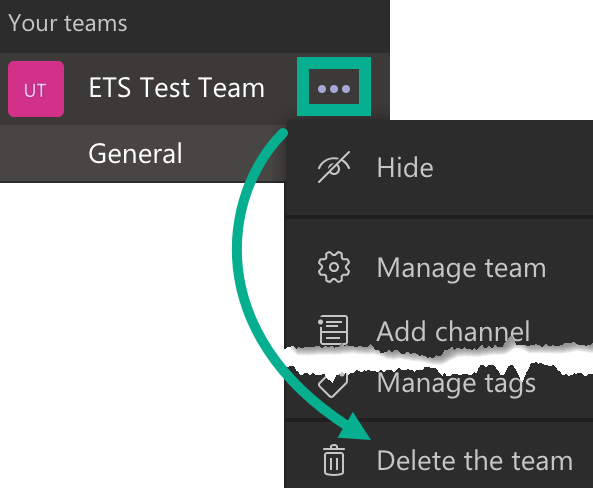
Deleting a Team
If a team is no longer actively used and will not be needed for future reference or reactivation, owners can delete the team.
- Select the Team you’d like to delete, click the More options menu (), then select Delete the team.
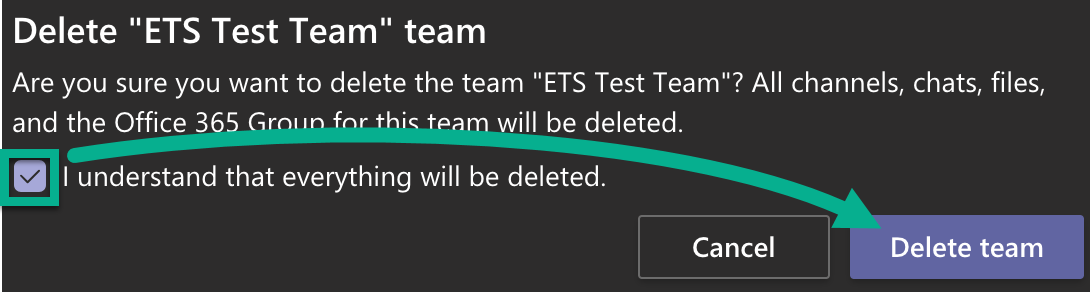
- Read the warning message. If you understand and still wish to proceed, click the checkbox, then click Delete team.


More info and Training Resources
Additional training resources for Students, Faculty and Staff
Additional training resources for UVM Employees (Faculty, Staff, Temps)