
These are step-by-step instructions for recording a screencast with ScreenPal.
Download and install ScreenPal
- Follow these instructions and then return to this article.
Make an outline or script of your screencast
Keep it short. If you’re recording lecture content, do 10-minute or shorter chunks (by topic) so your students can easily (re)find information.
Record a screencast with one of two options:
Record a Spontaneous Screencast (send to SAS for captions)
If you already have slides or content created that you would like to narrate and publish as videos for students, creating an informal, spontaneous screencast is a good solution. Spontaneous recordings provide options for recording your screen, your webcam, or both.
- Launch the downloaded ScreenPal app and click the red Record button in the top right corner. Follow these instructions if necessary.
- Choose whether to record the screen, camera, or both.
- Ensure that you have granted permission for ScreenPal to access your microphone and camera. Follow these instructions if necessary.
Recording a Scripted Screencast (will generate perfect captions)
The Scripted Recording feature allows you to follow the best practice of screencast recording by making audio and video tracks separately. And, starting with a script helps to create a professional product. Scripted Recordings save time because you’ll automatically create accurate closed captions and reduce the need for editing.
- Launch the downloaded ScreenPal app and click the red “Record” button in the top right corner. Follow these instructions if necessary.
- Ensure that you have granted permission for ScreenPal to access your microphone and camera. Follow these instructions if necessary.
- Follow this tutorial.
Edit your screencast, if desired
Do not strive for perfection. These are common editing needs:
- Cut a portion.
- Hide or modify your cursor.
- Overlay text.
- Overlay a shape.
- Add a screenshot.
- Add transitions.
- Adjust the volume.
- Find and fix silence in narration.
- Change the speed.
- Zoom in on the timeline.
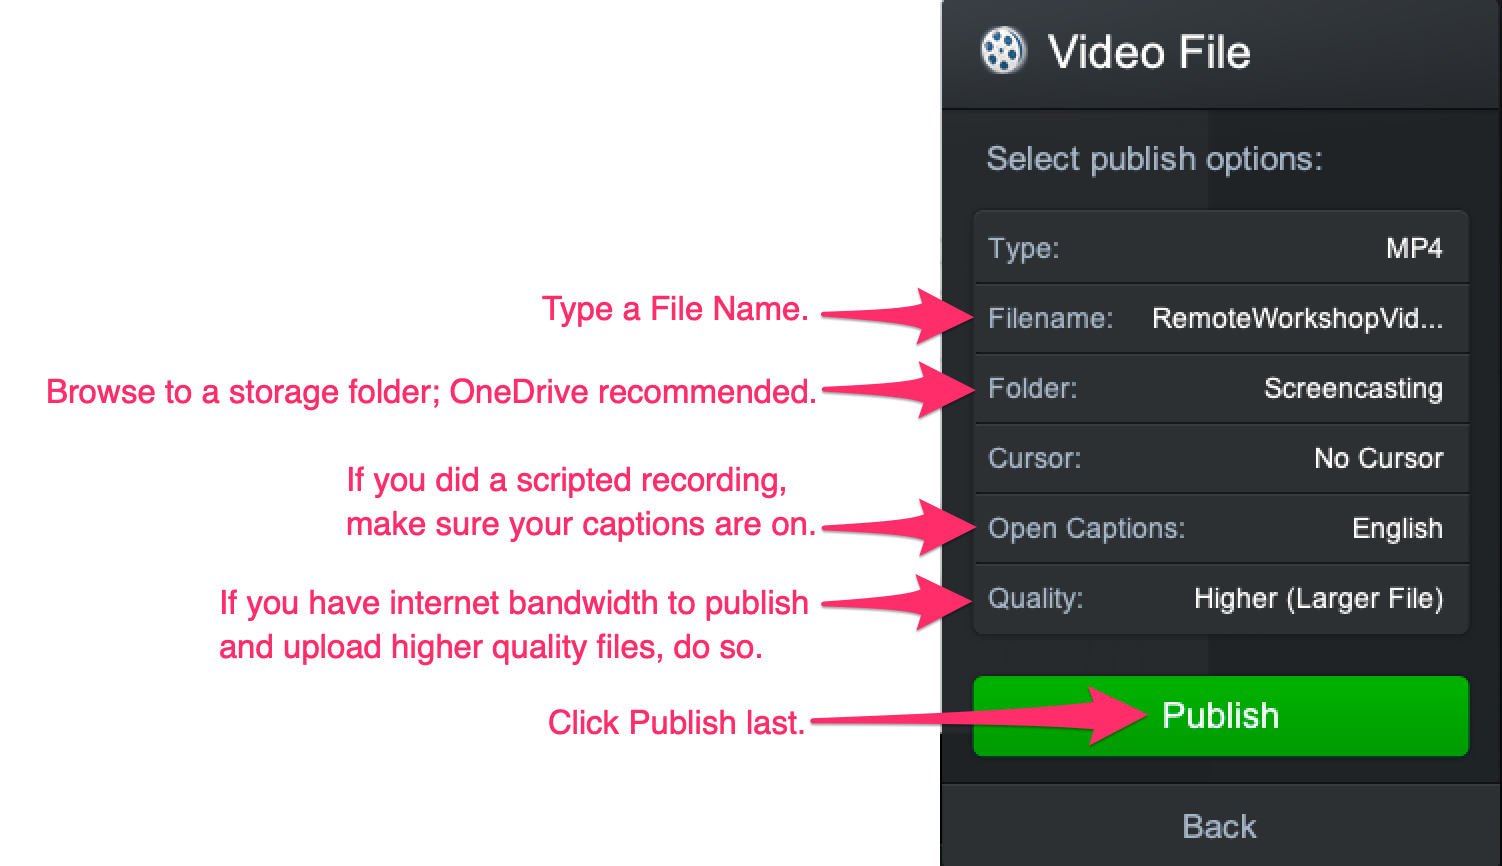
Save your screencast
Save your screencast as an .mp4 file and publish it to a place you will be able to find when browsing. ScreenPal files are large. If you save them to your hard drive, you may run out of room. We recommend exporting compressed files to OneDrive cloud storage (or an external hard drive).
If your .mp4 file is blurry when viewing, save as a higher-quality file, which will take longer to upload to UVM Streaming, but will result in a clearer product.
Add captions to spontaneous screencasts
Send your .mp4 file to Student Accessibility Services for captioning if you created a spontaneous recording. If you recorded a scripted screencast, your captions should already be included in your saved .mp4 file.
Upload your .mp4 to UVM Streaming and share with your students
Follow these instructions to learn how to upload your captioned .mp4 file to UVM Streaming and share your video with students. UVM Streaming is like UVM’s own YouTube channel, but on a UVM Server. By putting files on Streaming, you will not slow down your Brightspace course site. Most frequently, we expect you will be putting links to videos in Brightspace, but you can share the links via email, MS Teams, etc.
Use ScreenPal’s tutorials for more advanced features
Once you get comfortable with ScreenPal, you may want to use more sophisticated features. Check out the entire suite of tutorials offered by ScreenPal to enhance your skills.
Troubleshooting
Disk too full error
If you get the DISK TOO FULL error it means your computer’s hard drive is too full so the recorder can’t record.
Instead of saving ScreenPal projects to your hard drive, we recommend exporting compressed files to OneDrive cloud storage (or an external hard drive).