
There are three different paths to entering grades in your Brightspace course:
Grading in Quick Eval
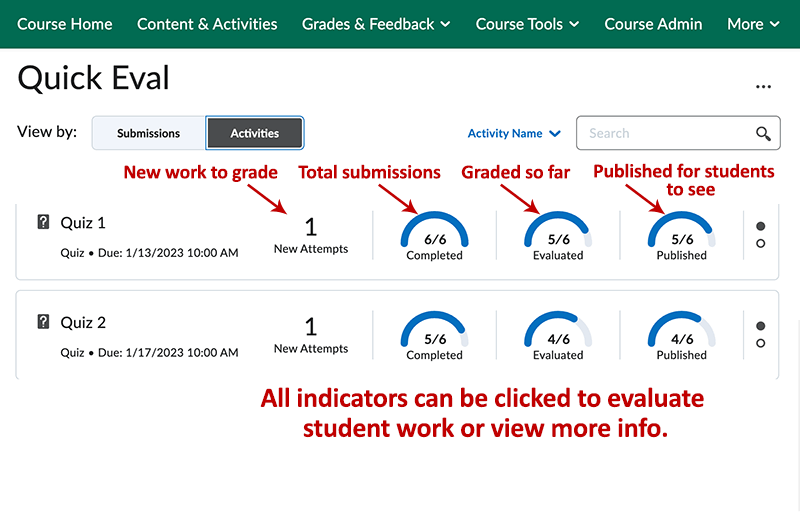
Quick Eval is found by clicking “Grades & Feedback” in the green nav bar. (You can also access this on the Brightspace home page and it will allow you to grade items within all of your courses.) Quick Eval let’s you immediately see all submissions that need to be graded, and as you go, the graded items drop off the Quick Eval list. When you open Quick Eval, you’ll see two tabs (see image below):
–
Grading in the Tool Areas: Assignments, Quizzes, Discussion
If you click on one of the above-mentioned tools, you can target exactly what you want to grade. Each tool has a slightly different set of steps:
Grading in the Assignment Tool without a Rubric
(See this page for grading with rubrics.)
- Go to Course Tools > Assignments.
- Click on the number that appears in the “New Submissions” column.
Or, click the down arrow next to assignment title, and choose “View Submissions.” - Either way, you’ll be able to click on a student’s submission. You can leave Overall feedback on the right, or leave more granular feedback with notation functions in the toolbar. You can enter a grade on the right.
- Before clicking the arrows at the top/right to move to the next student, you must click either “Save Draft” or “Publish.” If you publish the grade, the student will be able to see it (and you can still edit it). If you choose to save a draft of the grade, it means that you can wait until you’ve marked all the submissions to publish them at once (see next step).
- To publish grades that have been saved as drafts, go to the Course Tools/ Assignments and from the down arrow menu, choose “View submissions.” On this page, you can select which drafts to publish or select all by clicking the top/left checkbox. Then, click “Publish Feedback” (which means both grades and feedback).
Grading in the Quizzes Tool
Most question types can be automatically graded, but for questions that you have to grade manually (such as Written Response types), you can access it in a couple of ways.
- Go to Course Tools > Quizzes
- Click the down arrow next to the quiz and choose “Grade.”
- On this page, one option is to begin by clicking the first attempt and scrolling to the question that needs your input. You can leave feedback on an individual question or on the entire quiz (in the field titled “Attempt Feedback”).
- Alternatively, on the page where all attempts are listed, you can click the “Questions” tab and choose the question you want to grade. You can scroll through attempt on that question with the arrows at top/left.
Grading in the Discussions Tool
- Go to Course Tools > Discussions
- Scroll to the topic, click the down arrow, and select “Assess Topic.”
If you’ve attached a rubric to the topic, you can read about grading with rubrics on this page.
Grading via the Grade Book
In Brightspace, the Grade Book does allow grading, but in general the ways described above are more convenient and direct. However, in the Grade Book, you can edit grades, grant exemptions (see more about exemptions below), clear grades, email students, etc.
In certain cases, it’s the only way to give grades, such as when you’re entering grades in a column that’s not associated with a tool-based assessment, for example class participation.
- Go to Grades & Feedback > Grades.
- For quick edits, click “Switch to Spreadsheet View” (the button toggles back and forth between “Standard View” and “Spreadsheet View.”) The spreadsheet allows you to enter or modify grades.
- For more options, click the down arrow at the top of the column and choose “Enter Grades.”
- In cases where student work was submitted in Brightspace, an icon appears in students’ cells. To see the Assignments and Discussion submissions, click the icon. For Quizzes, click the icon and then click “Completion Summary” and choose the Attempt.
Granting Exemptions
Instructors can grant exemptions for work by grade item or by student.
Exemptions by Grade Item
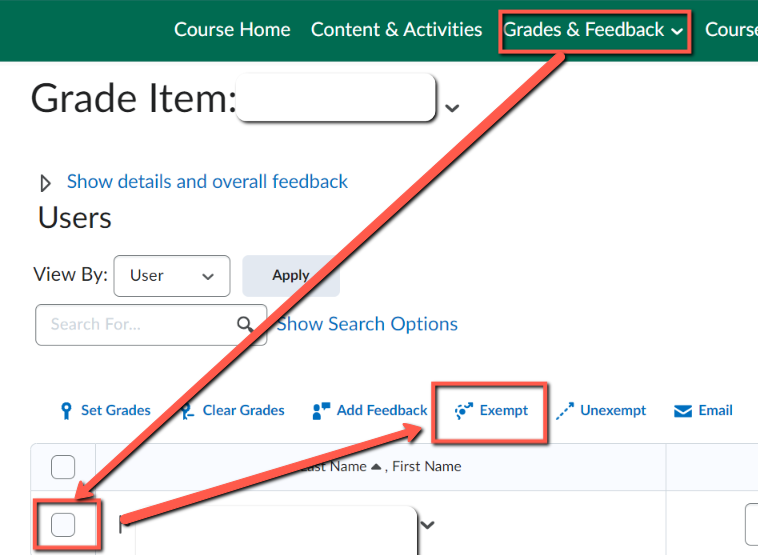
- Go to Grades & Feedback > Grades.
- Scroll sideways to the grade item to be exempted.
- In the column header, click the down arrow.
- Choose Enter Grades.
- Check the box next to each student to be exempted.
- Click “Exempt” from the row of blue links just above the columns. (You can also check “Unexempt” from there to reverse it.)
- Save and close
Exemptions by Student
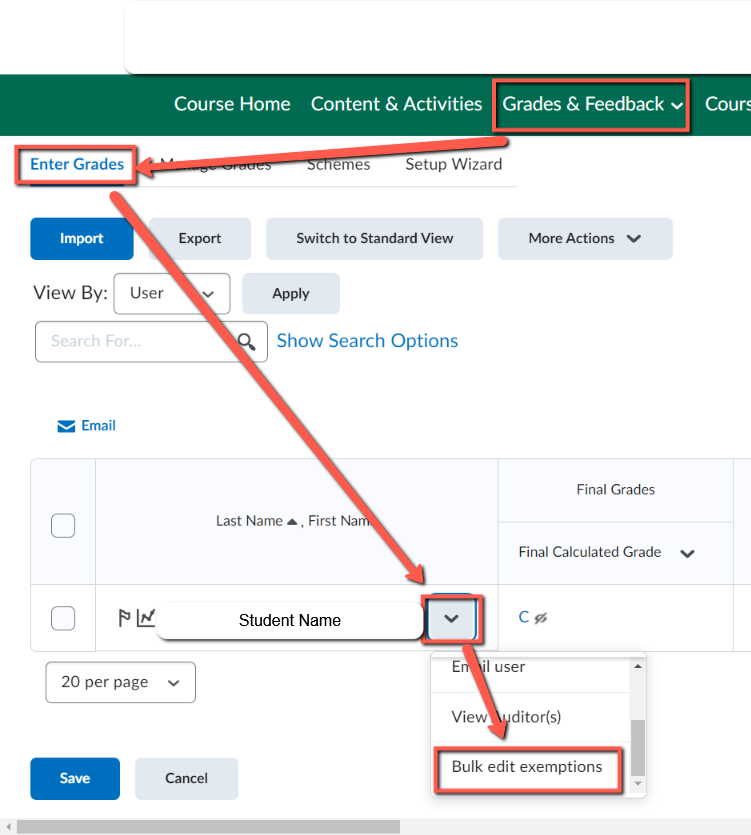
- Go to Grades & Feedback > Grades.
- Scroll down to the student and click the down arrow next to their name.
- Choose Bulk Exemptions.
- Select the grade items to be exempted by checking the box next to each.
- Save.
For more information about exemptions, please see documentation on the Brightspace Community web site.