What is Navigate360?
Navigate360 is an advising platform developed by the Education Advisory Board (EAB). Navigate consolidates academic performance information while creating a centralized record of a student’s interactions with advisors and support offices across campus. Navigate360 pulls data from Banner on a nightly feed, ensuring advisors have access to relevant academic performance information when working with students.
How do I request access to Navigate360?
Requesting initial access to Navigate360 can be done by completing the Banner Request form, which can be completed at this link. If you already have access and want to request additional Navigate360 Permissions, please email us at StudentSuccess@uvm.edu. For additional information regarding requesting access please review this guide (pdf).
I submitted a grade for this student in Banner. Why don’t I see it in Navigate360?
Navigate360 pulls information from Banner on a nightly feed. Please ensure 24 hours have passed since inputting grade information, or removing a hold from a student’s record, in Banner before reviewing Navigate360.
I have removed a hold from a student’s record. Why do I still see it in Navigate360?
Navigate360 pulls information from Banner on a nightly feed. Please ensure 24 hours have passed since inputting grade information, or removing a hold from a student’s record, in Banner before reviewing Navigate360.
Which students are included in Navigate360? How can I find a particular student?
Navigate360 displays academic information for undergraduate students enrolled at UVM since Fall 2017. Navigate does not include information for graduate and continuing education students who do not have undergraduate records. Students for whom you are the primary or secondary advisor in Banner will be displayed under "My Advisees" on your Staff Home.
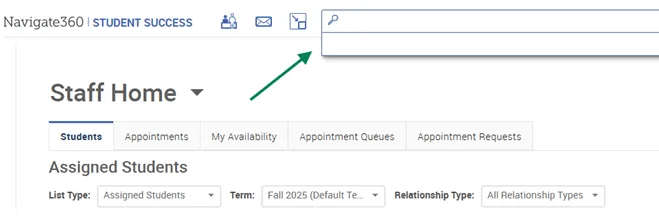
Want to find a record for a student who isn’t an advisee? Use the quick search option by selecting the magnifying glass in the top right of any Navigate360 screen. Note: Faculty/Professors will not be able to search for students outside of their current class rosters.
Want to find a record for a student currently disenrolled? Select the option to "include inactive students" when conducting an Advanced Search, accessed via the magnifying glass on the navigation toolbar (left side of screen).
Think student information is missing? Contact StudentSuccess@uvm.edu.
How can I find a student by major or minor?
To find students with a particular major or minor, use the Advanced Search feature (magnifying glass on left side of screen). To search for students by major, click the "Area of Study" filter set, then select the "Major (In Any of These)" textbox. Results will populate as you type. To search for students by minor, click the "Student Information" filter set, then select the "Category" textbox. Results will populate as you type. Minors are displayed as Categories in Navigate360. They are displayed at the bottom of a student profile overview page. As with every Advanced Search, Faculty/Professors cannot find students outside of their current class rosters.
Interested in seeing a student’s major history? Select the triangle checkbox (if visible) next to the major listed in the center of a student profile overview. Note: if there isn’t a triangle indicating a drop-down menu, there is no major history to be reviewed.
How can I find students who are no longer my advisees or who are now inactive students?
Use the Quick Search function (search bar at the top of the screen) to find a student by name, Student ID number, or NetID:
How do I identify students registered for less than 12 credits in Navigate360?
For those with Dean or Chair access in Banner, please review this guide.
How can I determine if a student has enrolled for a future term?
Use the Quick Search function (search bar at the top of screen) to find a student by name or NetID:
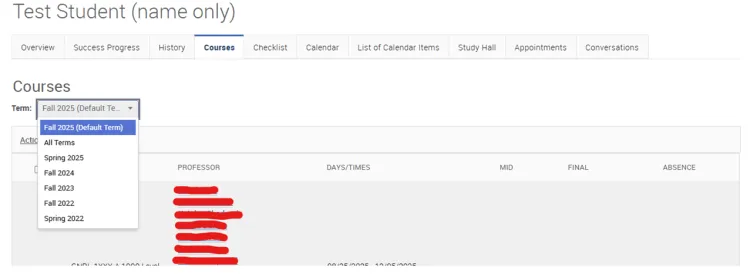
Select the appropriate student profile. Select the Courses tab on the student profile, then under the Term Field select the term you wish to view. Please note that future terms will not display unless a student is registered for a given term:
Who determines what level of access I have?
Your user role and access permissions in Navigate360 have been set up to mirror your current level of access in the Banner Student Information System. If you have a question about your user role or access, please contact StudentSuccess@uvm.edu.
What are Notes and Summary Reports?
Notes are used to append documents to student records or leave comments unrelated to specific advising appointments. Summary Reports are used to detail an interaction between a staff member and student. While notes may only be visible to staff members with specific access permissions, summary reports are broadly visible. Both are retained and reviewed directly via a student’s profile. Although students do not have access to notes and summary reports, remember that a student may always request to view these entries (per FERPA).
I am creating a campaign. What should I name my appointment campaign?
It depends on the purpose of your campaign! Consult your department for guidance. All campaigns should include your college/school/department and your last name.
I am creating a campaign. I don’t see my name listed as an option for the campaign organizer. Why is that?
There is a discrepancy between your availability and your campaign settings. Review your availability by selecting the "My Availability" tab on your home page. Pay close attention to the care unit, location, and service for which you are available. Ensure that the care unit, location and service you select match your campaign settings. These fields are exactly the same in availability and campaign settings - your answers should be, too.
How can I cancel an appointment?
Select the "Upcoming Appointments" tab on your home page. From there, select the appointment you would like to cancel using the checkboxes next to the left of appointment details. Finally, open the "Actions" menu above your appointment list, select "Cancel Appointment," and confirm your cancellation on the pop-up screen that follows. In the "Cancel Upcoming Appointment" menu that follows, you will have the option to select who is cancelling the appointment (either yourself or the student) and a reason for cancellation.
How do I create a buffer between my appointments since Navigate360 seems to schedule back to back time slots?
Advise students that your appointments will be ending earlier than originally scheduled (e.g., appointments scheduled from 9:00-9:30am will end at 9:20am). You may leave a comment in your availability or within a campaign message to clarify this.
How long are appointments associated with different services?
When setting your availability for Appointments, the majority of services (i.e., appointment reasons) correspond with 30 minute appointment lengths. For additional information about which services involve different appointment lengths, please review this document. Note: appointment lengths associated with campaigns are customizable, regardless of service.
How can I use my Personal Availability Link (PAL)?
Your PAL must first be associated with one or more of your availabilities. Select the "My Availability" tab on your Staff or Professor Home. You can associate multiple availabilities with your PAL by using the actions dropdown menu and using “Add Time”. Alternatively you can edit an existing Availability to associate it with your PAL.
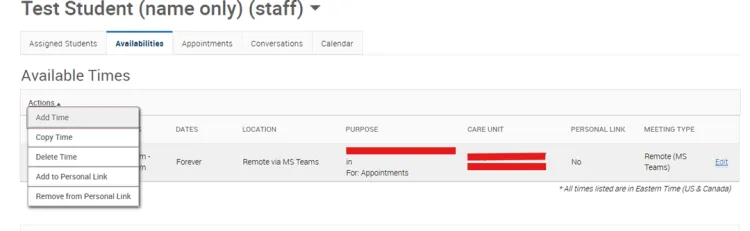
After associating one or more availabilities with your PAL, a new link will appear below your "Available Times" menu, as seen in the third image. You may also identify which of your availabilities are currently associated with your PAL by reviewing the Personal Link column of your "Available Times" menu.

Once live, you may use your PAL in email signatures or text messages to more easily assist students in identifying times to meet with you. PALs do not change; you will use the same link after adding or removing availabilities from your PAL. Note that you may use your PAL for multiple appointment reasons (e.g., Academic Advising, Course Registration Advising).
How do I view a student's course instructors for previous semesters within the Class Info tab?
With the class info tab opened, change the active semester (top right corner of the screen). The page will then refresh, displaying a student’s course instructors for the selected semester.
Why should I sync Outlook and Navigate360 calendars? How can I sync calendars?
Syncing your Outlook and Navigate360 calendars ensures you won’t be double-booked when meeting with students, creating campaigns or attending staff meetings. After syncing your calendars, your Outlook appointments will display in Navigate360 as 'busy' times, while any appointments scheduled through Navigate360 will be displayed in full detail on your Outlook calendar. To set up your calendar sync, click the calendar icon in the left-hand navigation bar. Then click the Settings and Sync button on the right side of the new page. Select "Set-up Sync" in the center of the page. Complete the remaining steps using your UVM Outlook credentials. Have an issue with calendar sync? Send an email to StudentSuccess@uvm.edu.
Whom do I contact if I have another question?
Your question may have already been asked and answered by another member of the EAB community. Select the question mark icon in the top right corner of any page to access the Help Center. From the Help Center, you can search for your question in community forums or in walkthroughs developed by EAB staff. Need further assistance? You can reach the UVM Navigate360 Team via StudentSuccess@uvm.edu.