
Microsoft Exchange and Outlook allow you to grant another person, known as a delegate, permission to receive and respond to meeting requests or to send e-mail messages on your behalf. You can also grant additional permissions that allow your delegate to read, create, or have full control over items in your Exchange mailbox.
Adding Delegate Permissions
Outlook (Windows)
- Open the Outlook (classic) application.
- Click the File menu in the top left corner of the Outlook window. Under the Info tab, click on Account Settings then select Delegate Access.

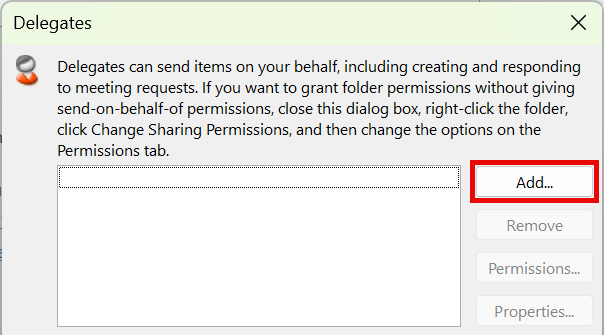
- The Delegates window will appear. Click Add.
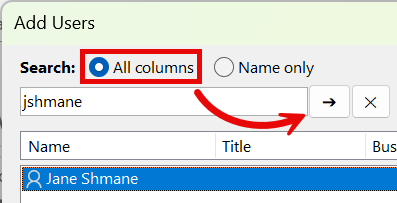
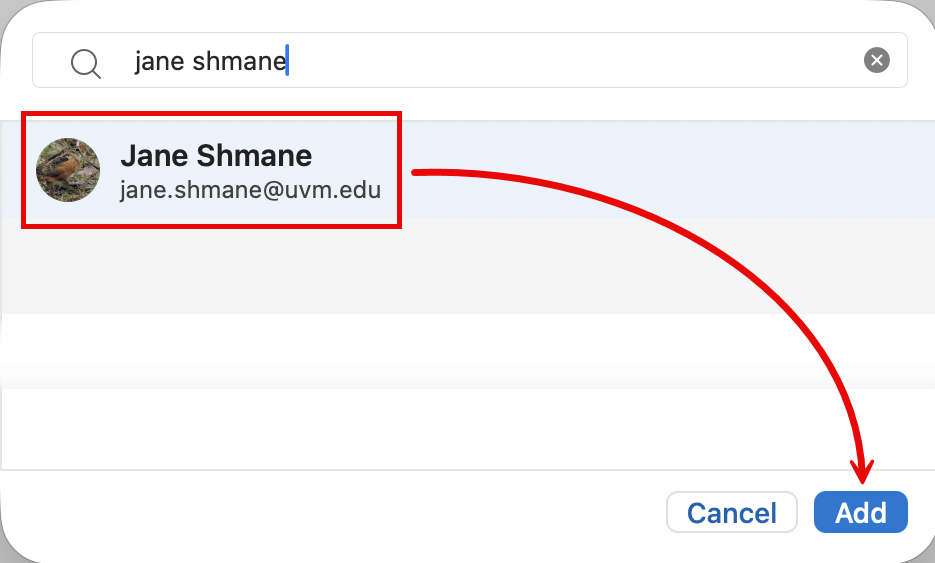
- Use the Search field to find the user you’d like to add as a delegate. If you are searching by NetID, make sure to select the All columns option. Click the arrow button () or hit Enter to search.
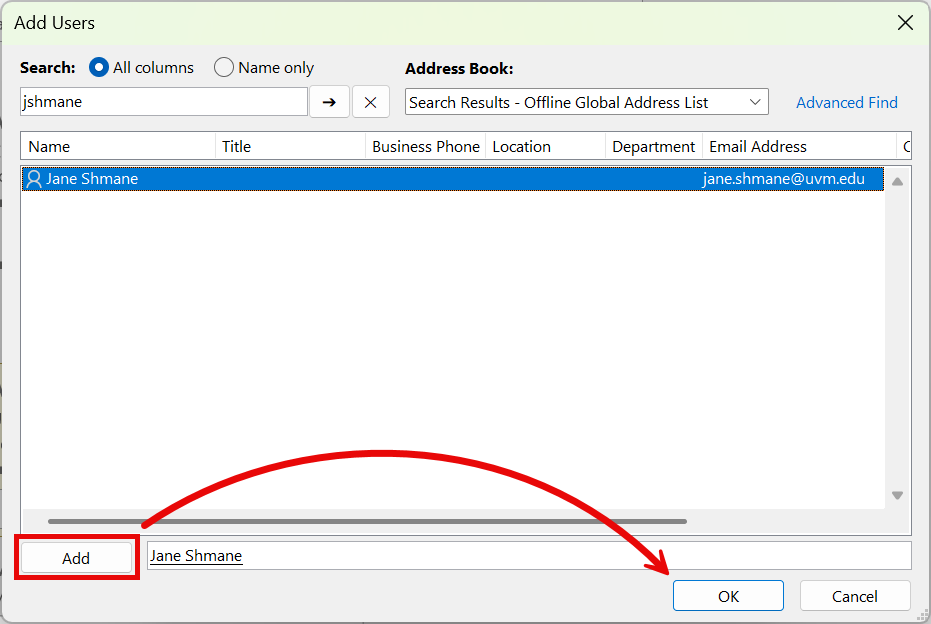
- Select the user you wish to add as a delegate from the search results, then click the Add button. Click OK to continue.
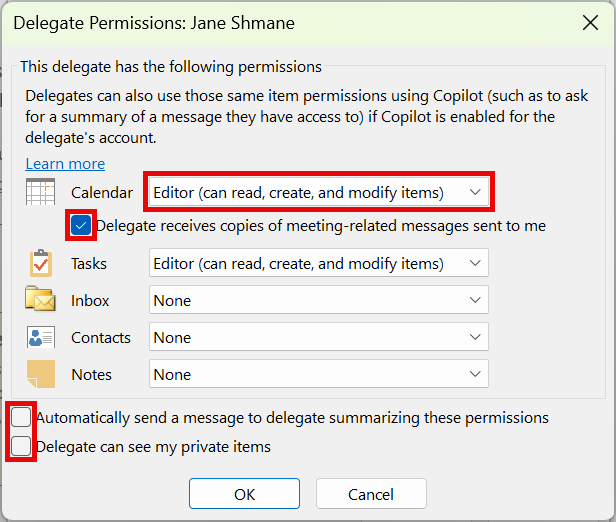
- The Delegate Permissions window is where you configure the specific permissions your delegate will have.
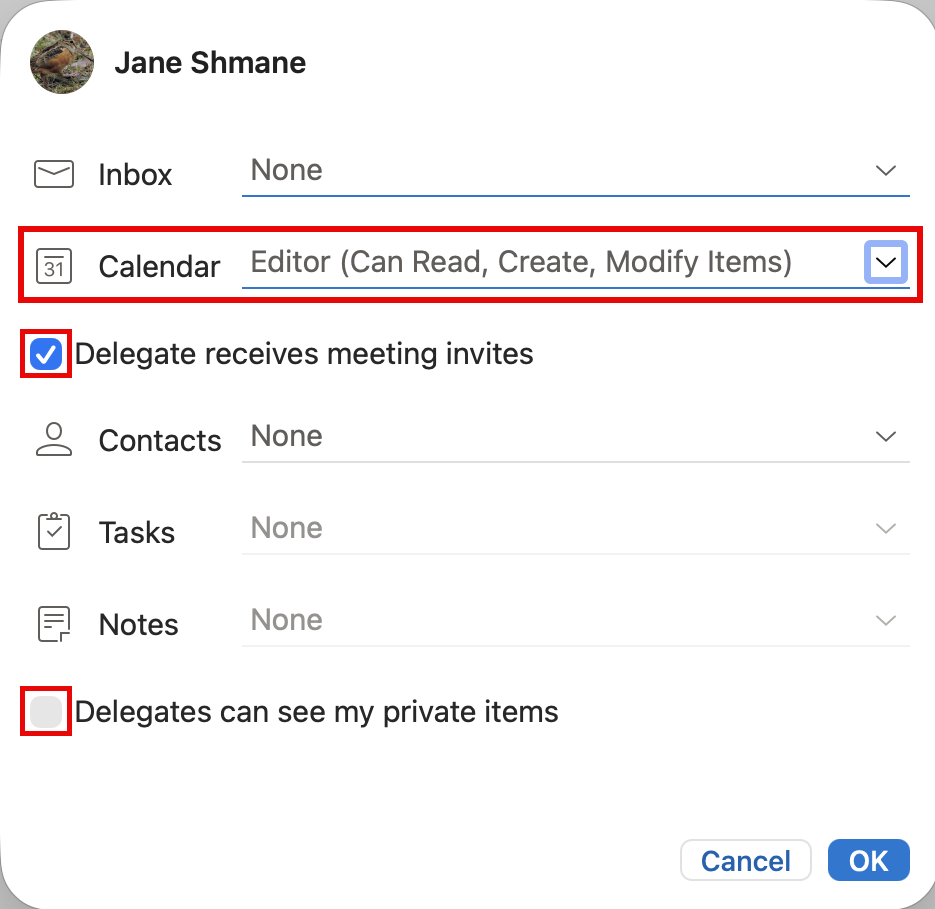
- Delegate permissions can be set for Calendar, Tasks, Inbox, Contacts, and Notes. Most delegates will only need Calendar access.
- There are four Delegate permissions levels: Editor, Author, Reviewer, and None. We recommend using the default Editor permission. If you think your circumstances require a different configuration, please contact the UVM Tech Team so we can discuss the proper setup.
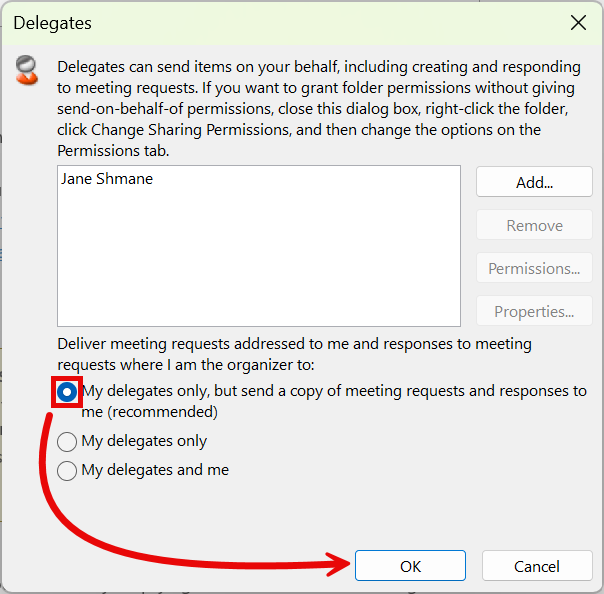
- If your delegate will be managing your calendar for you, you’ll want to check the Delegate receives copies of meeting-related messages sent to me checkbox. This checkbox will send your meeting request to the delegate. The delegate can then decide to accept, decline, or ask for the meeting to be scheduled at a different time on your behalf.
- Using the checkboxes below, decide if your delegate should receive an email summarizing these changes now and if they should be able to see your private items. Click OK.
- Delegate permissions can be set for Calendar, Tasks, Inbox, Contacts, and Notes. Most delegates will only need Calendar access.
- Once you’ve added a delegate to your account, you’ll be able to choose how you would like to handle your meeting related emails. We recommend sending meeting invites to your delegate, but also choosing to receive a copy yourself. Click OK again.
That’s it. You’ve successfully granted Delegate permissions to another user.
Outlook (macOS)
- Open the Microsoft Outlook application.
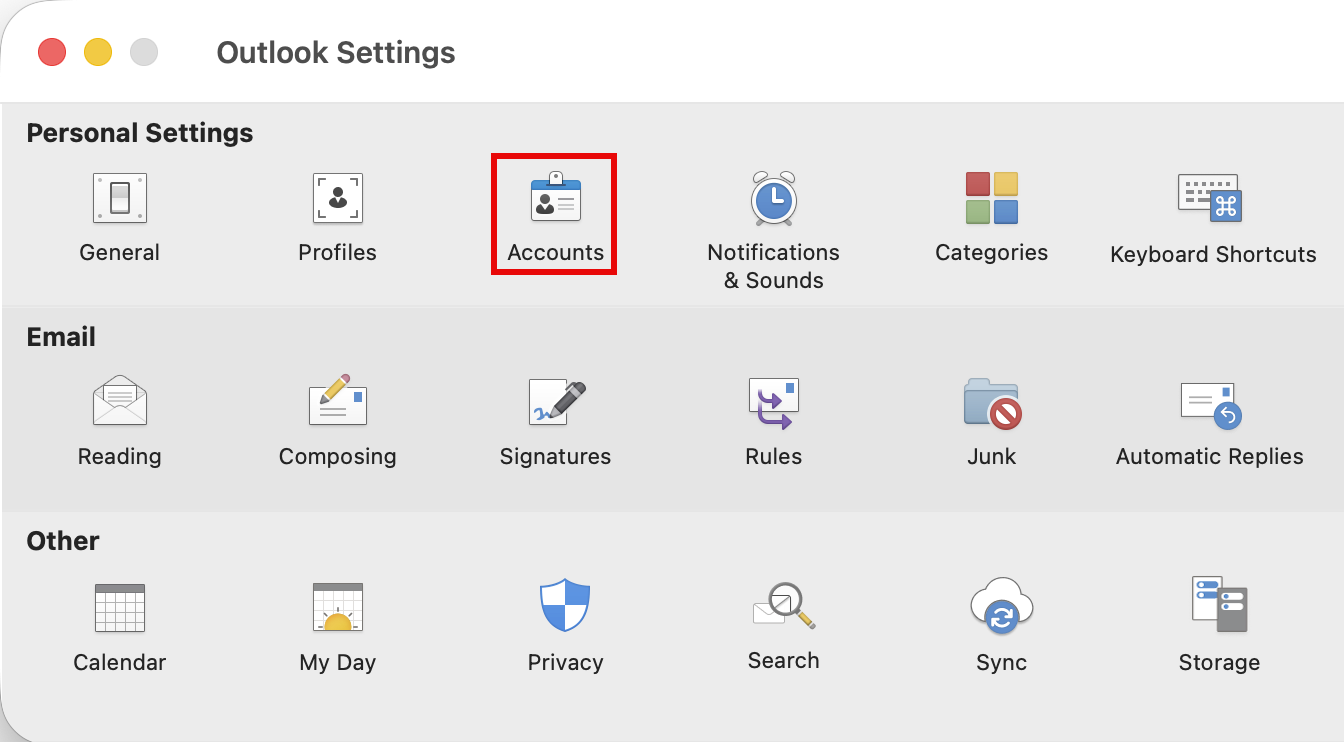
- Click the Outlook menu in the top left corner of your screen, then click on Settings….
- From the Outlook Settings window, click on Accounts.
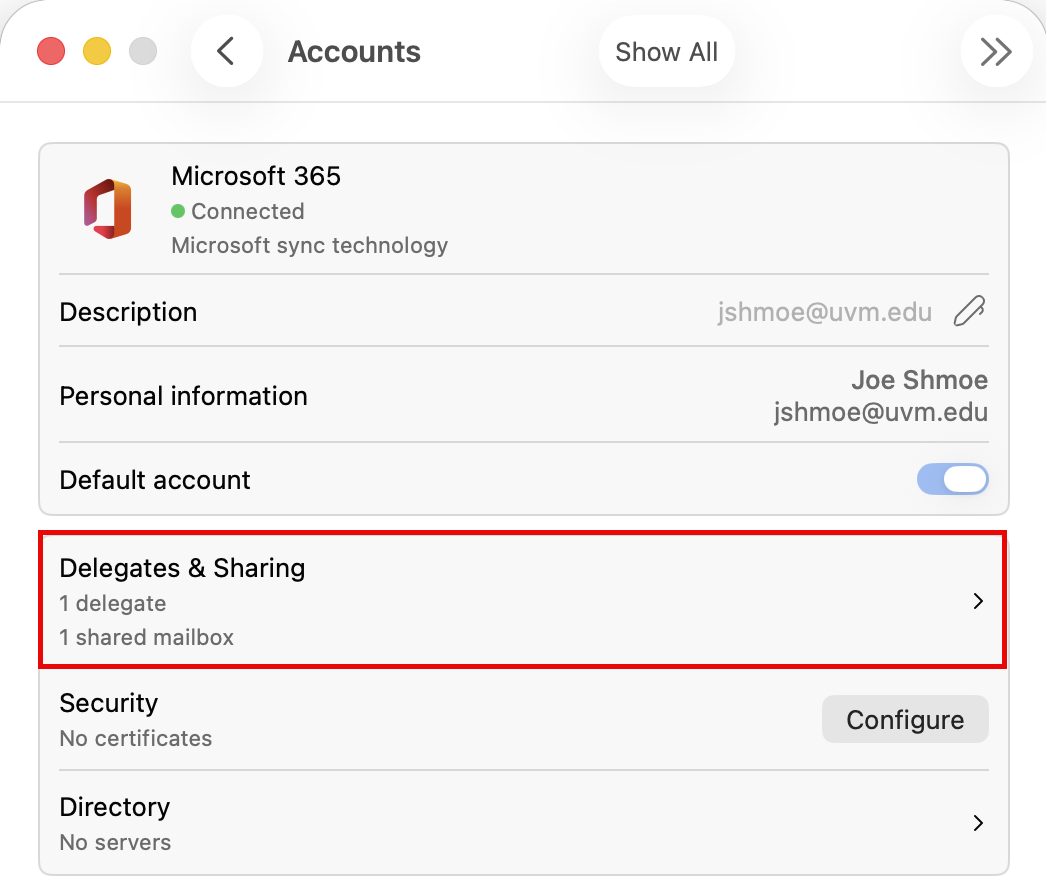
- From the Accounts window, select your Microsoft 365 account, then click Delegates & Sharing.
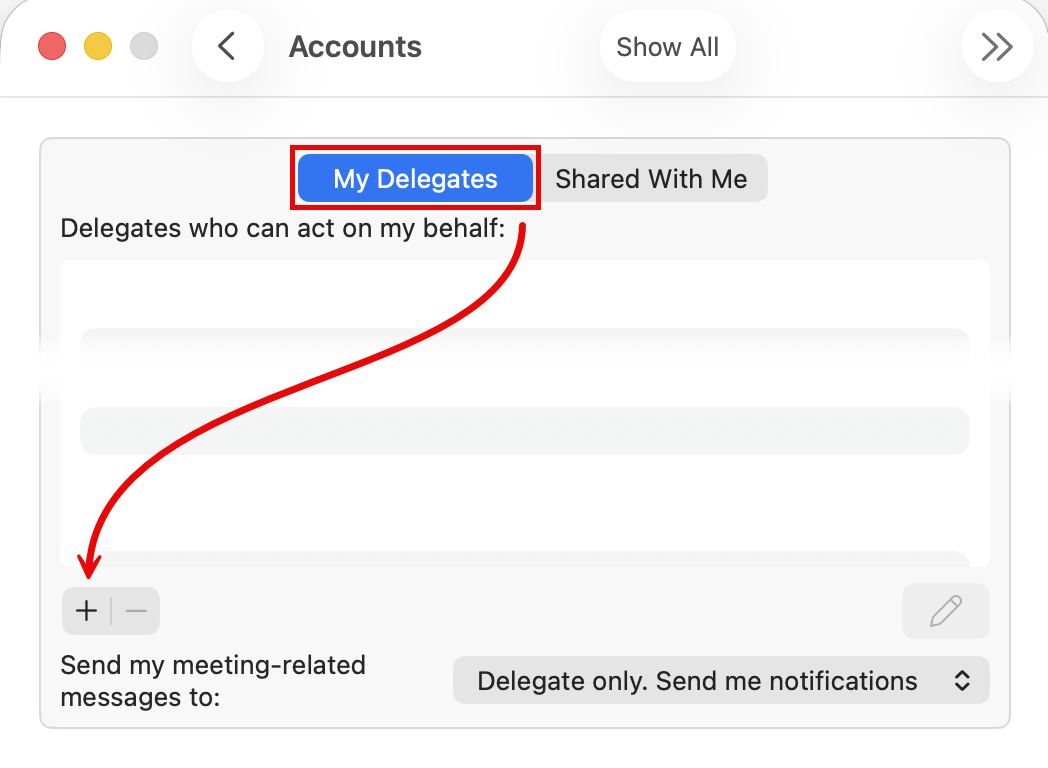
- Select the My Delegates tab, then click the + symbol.
- Use the Search field to find the user you’d like to add as a delegate. Select the user you wish to add as a delegate from the search results, then click the Add button.
- The Delegate Permissions window is where you configure the specific permissions your delegate will have.
- Delegate permissions can be set for Calendar, Tasks, Inbox, Contacts, and Notes. Most delegates will only need Calendar access.
- There are four delegate permissions levels: Editor, Author, Reviewer, and None. We recommend using default Editor permission. If you think your circumstances require a different configuration, please contact the UVM Tech Team so we can discuss the proper setup.
- If your delegate will be managing your calendar for you, check the Delegate receives meeting invites checkbox. This checkbox will send your meeting request to the delegate. The delegate can then decide to accept, decline, or ask for the meeting to be scheduled at a different time on your behalf.
- If you delegate should see your private items, check the Delegates can see my private items checkbox. Click OK.
- Delegate permissions can be set for Calendar, Tasks, Inbox, Contacts, and Notes. Most delegates will only need Calendar access.
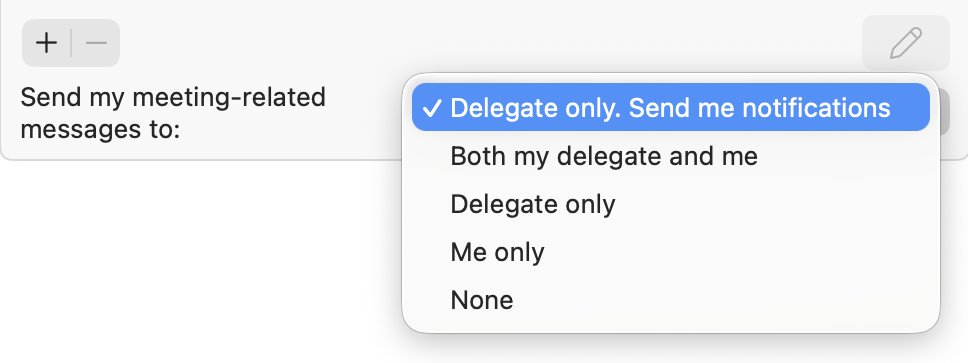
- Once you’ve added a delegate to your account, you’ll be able to choose how you would like to handle your meeting-related emails. We recommend Delegate only. Send me notifications, but choose the option that makes the most sense for your use case. Close the Accounts window.
That’s it. You’ve successfully granted Delegate permissions to another user.
Outlook Online
- Log in to Outlook Online and switch to the Calendar view.
- Make sure the Calendars pane is open to the left of the event view. If it’s not, toggle it with the ≡ button.
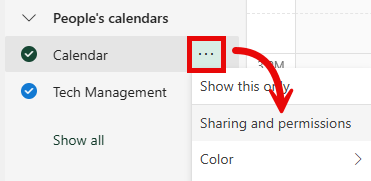
- Hover your mouse of your default Calendar and click the ⋯ button (Your default calendar is named “Calendar“). From drop-down menu that appears, click Sharing and permissions.
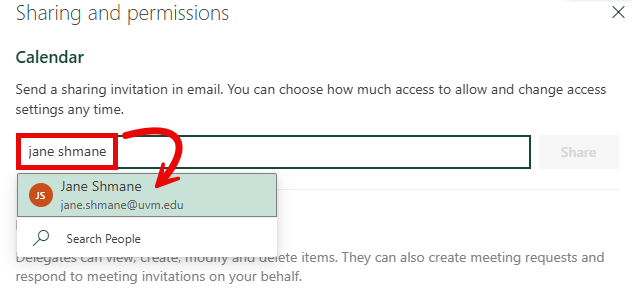
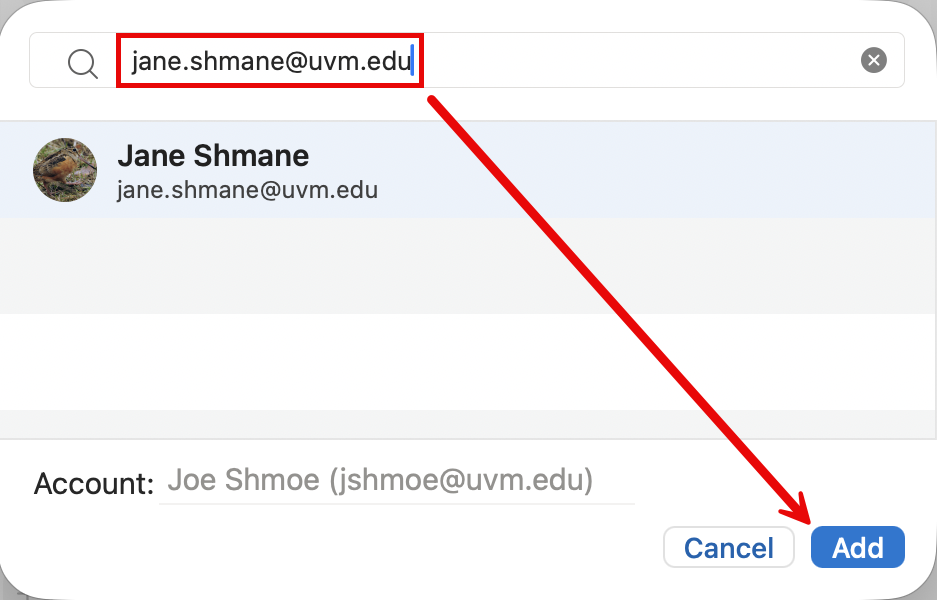
- Enter the name of the user you wish to grant delegate permissions to, and then click the delegate’s user listing in the search results.
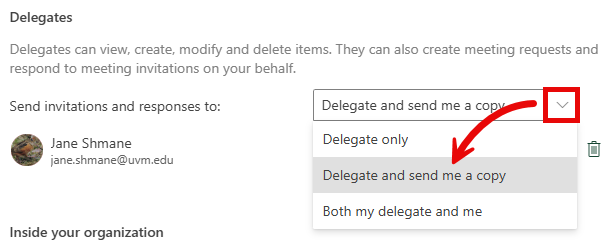
- Select your desired behavior for who to Send invitations and responses to:
- Delegate only – Only your delegate will receive meeting requests and notifications.
- Delegate and send me a copy (recommended) – this option will send your meeting invitation emails to your delegate, you will only receive a notification of meeting requests and response.
- Both my delegate and me – both you and your delegate will receive meeting requests and notifications.
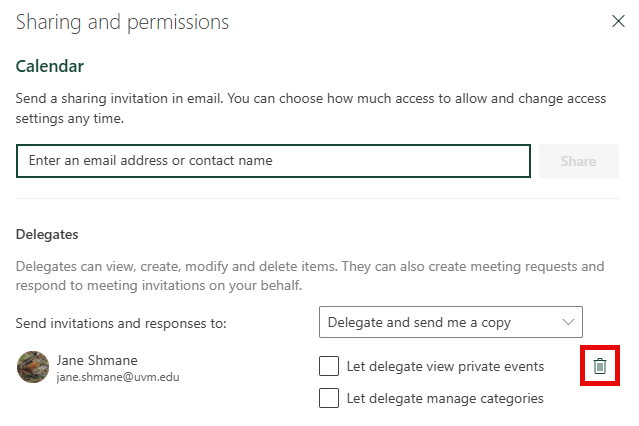
- Choose whether the delegate should be able to view private events and manage categories. Check the corresponding box(es) if desired.
- The Sharing and permissions menu can now be closed. To verify that the delegate’s permissions have been set correctly, the delegate should add the account in their Outlook app; see Opening a Delegate Account.
Opening a Delegate Account
(new) Outlook (Windows)
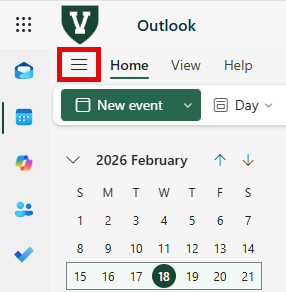
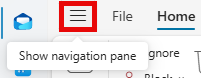
- From the Mail tab of the Outlook app, click the hamburger icon () to Show the navigation pane.
- Hover your mouse over your @uvm.edu mailbox, click the ellipsis menu icon (), and select Add shared folder or mailbox.
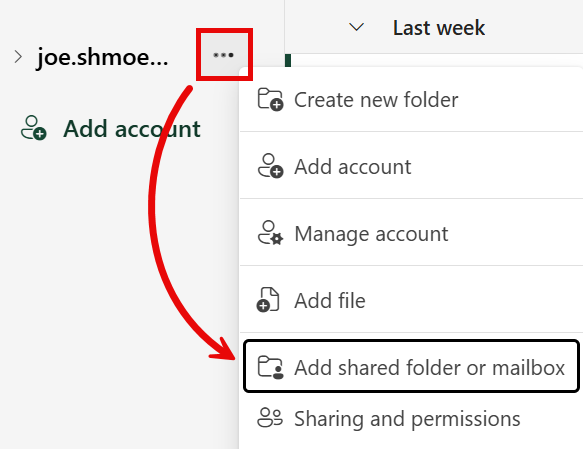
- Type all or part of the Shared Mailbox name into the search box, and select the account from the drop-down results that appears. Click Continue.

- The new mailbox will appear in the navigation pane on the left side of the Outlook window. You may have to scroll down.
Outlook (classic) (Windows)
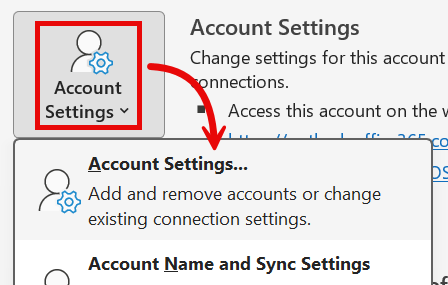
- Open the Outlook (classic) application, then click File.
- Select Account Settings > Account Settings….
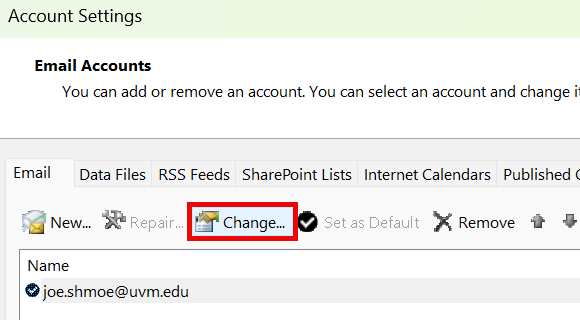
- Click Change…
- Click More Settings.

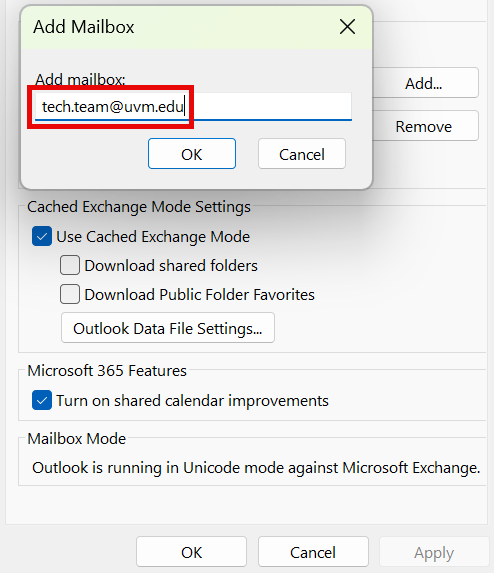
- Select the Advanced tab, make sure the Download shared folders checkbox is NOT checked, then click Add…
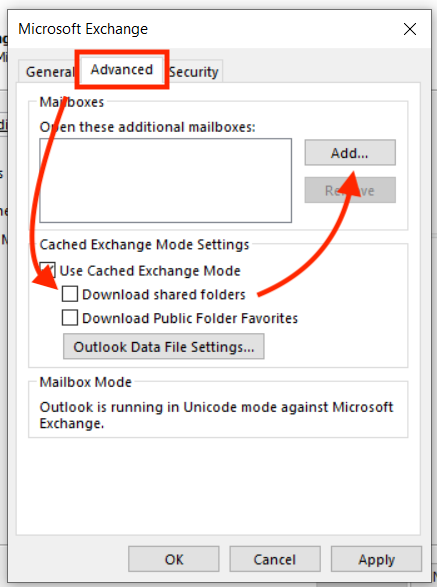
- Type in the email address for the account you have delegate access to, click OK, and then OK again.

Outlook (macOS)
- Open the Outlook application.
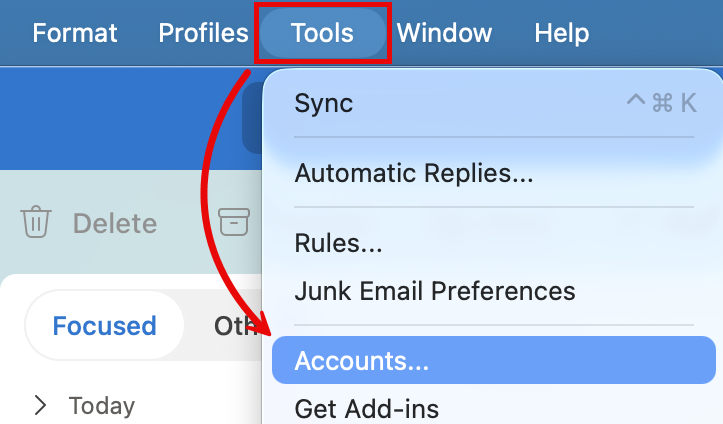
- Select Tools > Accounts….
- From the Accounts window, select your Microsoft 365 account, then click Delegates & Sharing.
- Select the Shared With Me tab, and then click the + button.
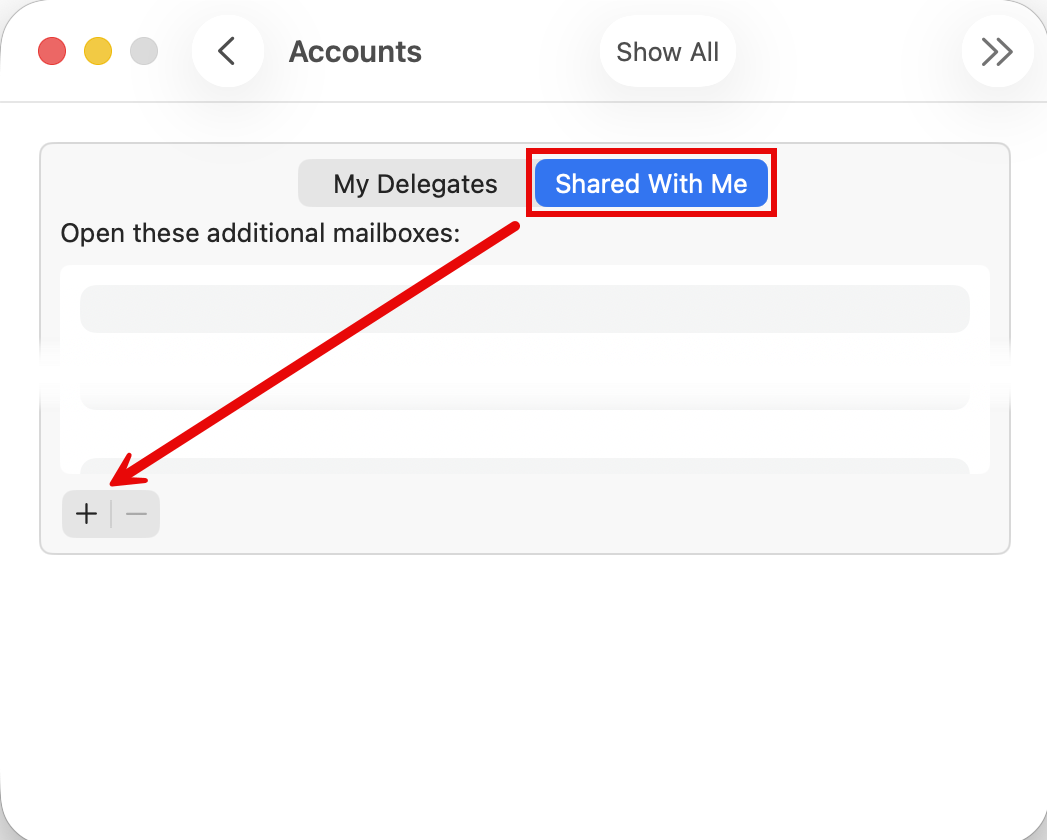
- Type in the email address for the account you have delegate access to, then click Add.
- Close the Accounts window.
Outlook Online
- Log in to Outlook Online and switch to the Calendar view.
- Make sure the Calendars pane is open to the left of the event view; if it’s not, toggle it with the ≡ button.
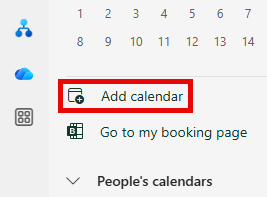
- Click the Add calendar button above your list of calendars in the Calendars pane.
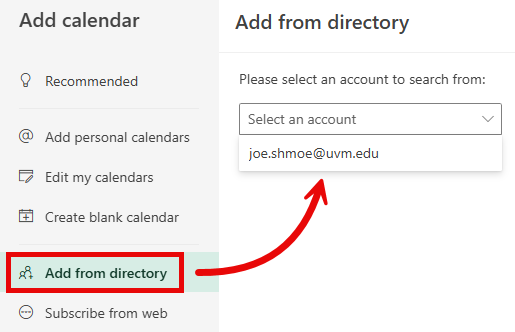
- Click the Add from directory button, then select your own account from the drop-down.
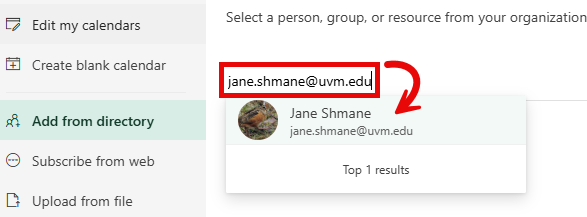
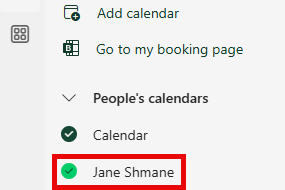
- Type in the name or email address for the shared mailbox, select it from the results, and then click Add.
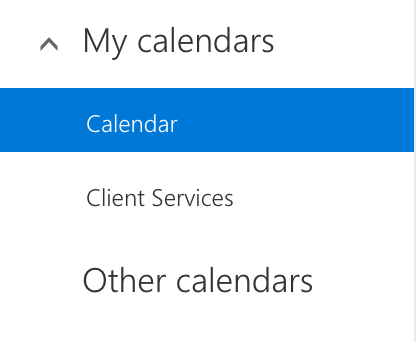
- A success message should show at the bottom of the Add calendar pane, which can now be closed. Now that it is added, the shared calendar should now be visible in the People’s calendars group in the Sidebar.
Removing Delegate Permissions
Outlook (Windows)
- Open the Outlook (classic) application.
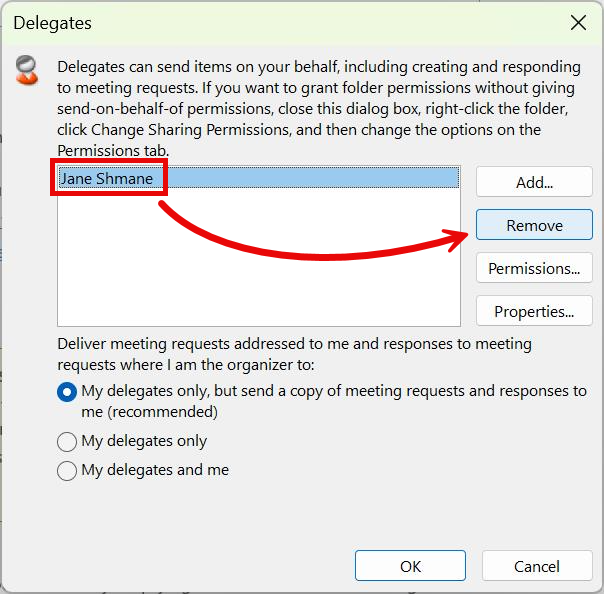
- Click the File menu in the top left corner of the Outlook window. Under the Info tab, click on “Account Settings” then select Delegate Access.
- The Delegates window will appear. Click on the delegate you wish to remove, click Remove, then OK.
Outlook (macOS)
- Open the Microsoft Outlook application.
- Click the Outlook menu in the top left corner of your screen, then click on Settings…. From the Outlook Settings window, click on Accounts.
- From the Accounts window, select your Microsoft 365 account.
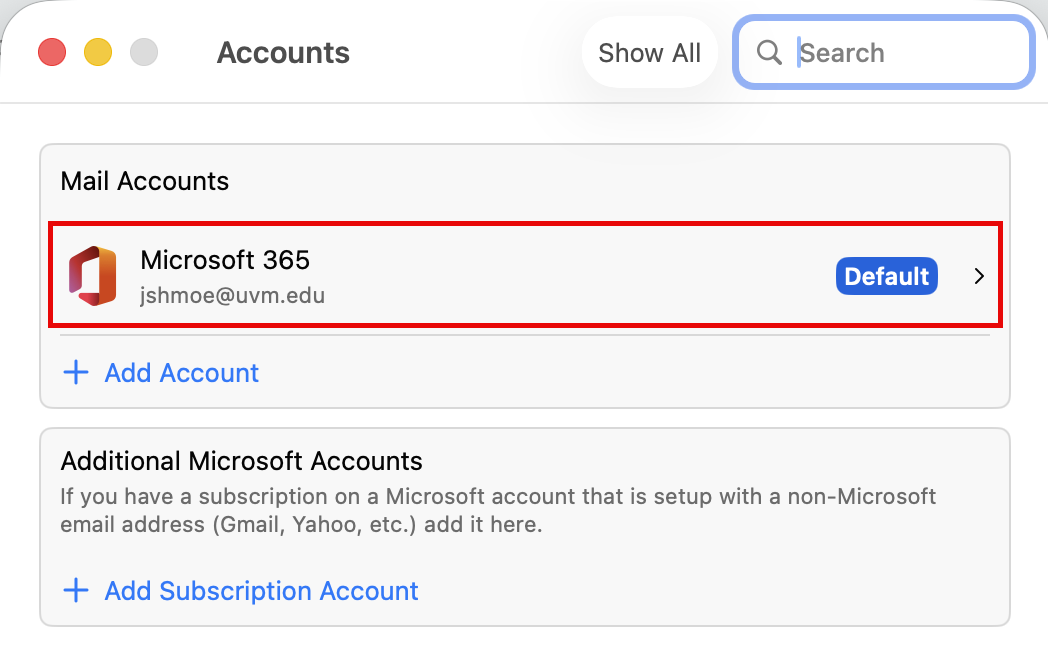
- Click Delegates & Sharing.
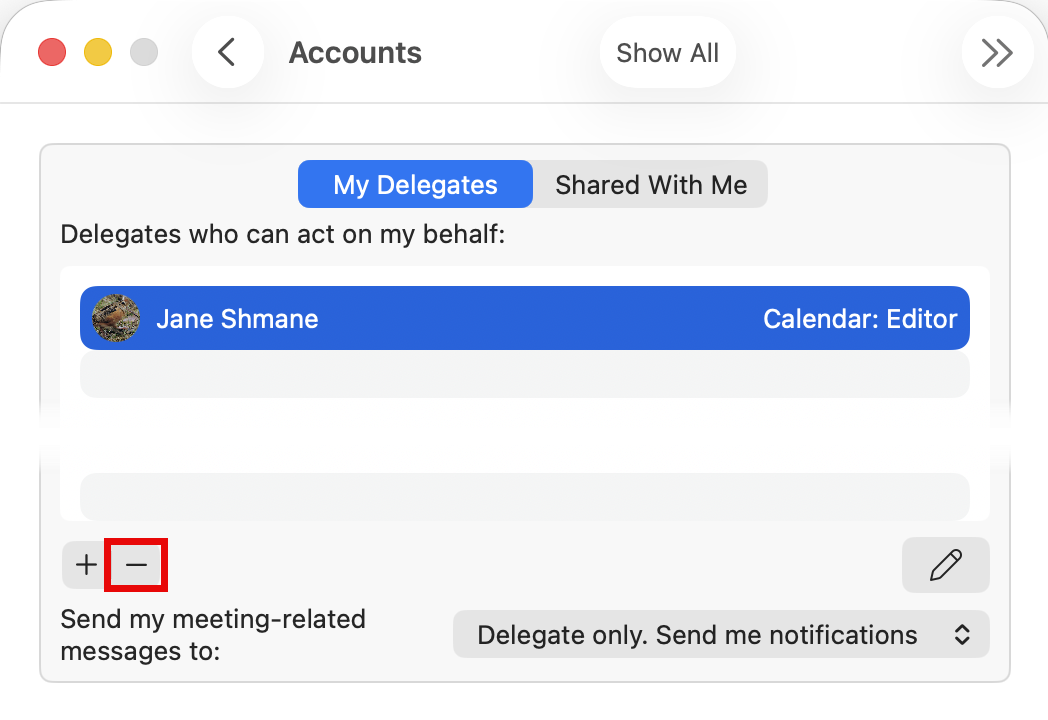
- Select the Delegates tab, click the delegate you wish to remove, then click the symbol.
Outlook Online
- Log in to Outlook Online and switch to the Calendar view.
- Make sure the calendars pane is open to the left of the event view; if it’s not, toggle it with the ≡ button.
- Click on the ⋯ button next to the calendar you wish to change delegate permissions for (Your default calendar is named “Calendar”). From the drop-down menu that appears, click Sharing and permissions.
- This will bring up the permissions window for that calendar. Click the wastebasket () symbol next to the delegate you wish to remove.
- Close the Sharing and permissions window.
“Send As” or “Send on Behalf” only Permissions
In some cases, a mailbox owner may elect to grant only Send As or Send on Behalf permissions to their mailbox instead of full access through delegate permissions.
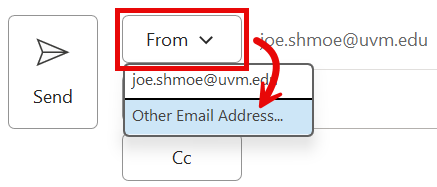
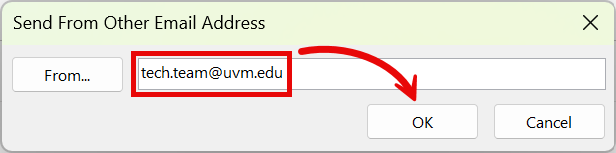
macOS
- When composing a new email, click the down arrow () in the right of the From box, then select Other email address….
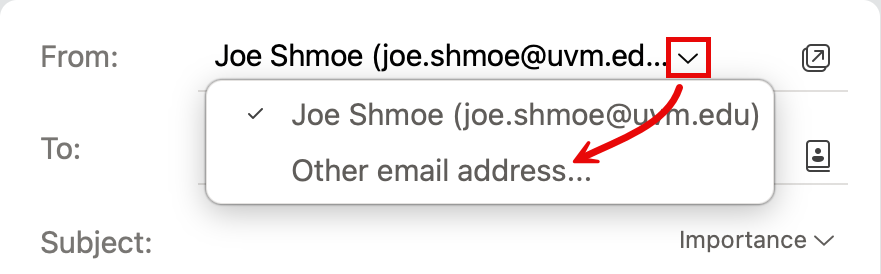
- Enter the email address of that account you have permission to send as, select it, and click OK.
Windows - Outlook Classic
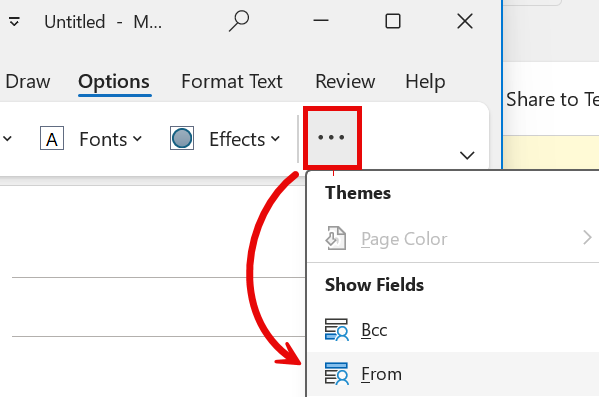
- While composing a new email, ensure the From option is selected in the Options tab. You likely have to click the ellipsis button () to Show additional Fields.
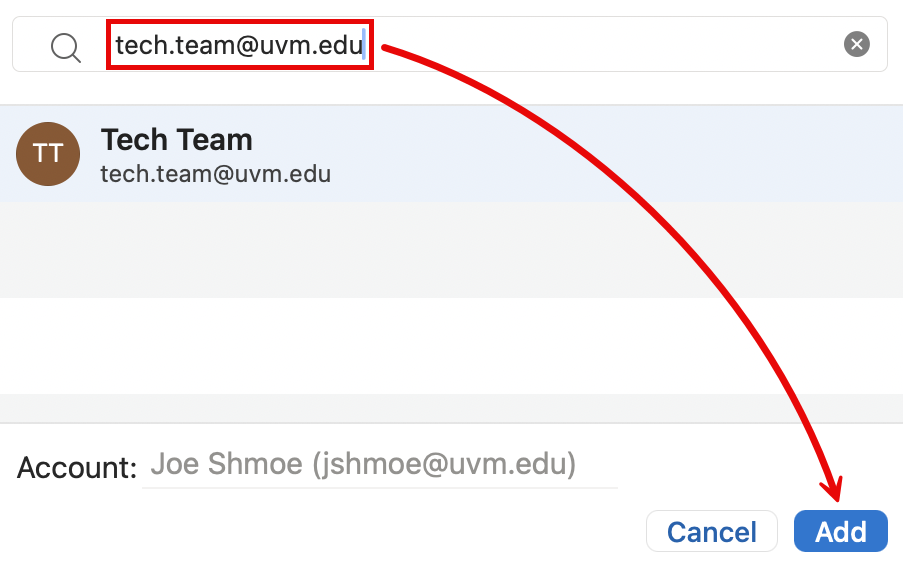
- Click the down arrow to the right of the From box, and select Other email address.
- Enter the email address of the account you have permission to send as, and click OK.
Windows - New Outlook
While composing a new email, ensure the Show From box is checked in the Options tab. Then, click the down arrow () to the right of the From box, select Other email address, and select the email address of the account that you have permission to send as.