
![]() The Cisco Jabber client is a communications software that allows you to answer and make phone calls directly from your computer or mobile device. A physical desk phone is no longer required (although, you can continue to use one if that is your preference).
The Cisco Jabber client is a communications software that allows you to answer and make phone calls directly from your computer or mobile device. A physical desk phone is no longer required (although, you can continue to use one if that is your preference).
Installation & Sign-In
Company Portal (Windows)
If you have a UVM-owned and managed Windows PC, the preferred method for downloading and installing the Cisco Jabber app is through another app called Company Portal, which should already be installed.
- Click the button, search for Company Portal, and Open it up.
- Search or browse within the Company Portal app for Cisco Jabber, select it, and click Install.
- When the installation has finished, click the button, search for Cisco Jabber, and Open it up.
- Enter your UVM email address, then click Continue.
- Enter your UVM NetID and password, then click Sign In.
Managed Software Center (macOS)
If you have a UVM-owned and managed Apple computer running macOS, the preferred method for downloading and installing the Cisco Jabber app is through another app called Managed Software Center, which should already be installed.
- open Managed Software Center from your Applications folder, or by searching “Managed Software Center” in spotlight search.
- Search or browse within the Managed Software Center app for Cisco Jabber, and click Install.
- When the installation has finished, open Jabber from your Applications folder, or by searching “Jabber” in spotlight search.
- Enter your UVM email address, then click Continue.
- Enter your UVM NetID and password, then click Sign In.
UVM Software Portal (macOS & Windows)
- Download the Cisco Jabber client from the UVM Software Portal.
- Alternatively, copy the installer to your computer from the shared drive location: \\files.uvm.edu\shared\software\Apps\Cisco Jabber Client\Windows\
Click here for instructions on connecting to the Shared Drive.
- Alternatively, copy the installer to your computer from the shared drive location: \\files.uvm.edu\shared\software\Apps\Cisco Jabber Client\Windows\
- Once the download has completed, run the installer.
- When the installation has finished, click the button, search for Cisco Jabber, and Open it up.
- Enter your UVM email address, then click Continue.
- Enter your UVM NetID and password, then click Sign In.
iOS
- Install Cisco Jabber from the Apple AppStore.
- Once installed, open the Jabber app.
- Tap ACCEPT.
- Swipe through intro screens, then tap GET STARTED. You should now be prompted to hit Allow on 5 permissions prompts. You must hit allow on these prompts for the app to have full functionality.
- Enter your UVM email address, then click Continue.
- Enter your UVM NetID and password, then click Sign In.
Android
- Install Cisco Jabber from the Google Play Store.
- Once installed, open the Jabber app.
- Tap ACCEPT.
- Swipe through intro screens, then tap GET STARTED. You should now be prompted to hit Allow on 5 permissions prompts. You must hit allow on these prompts for the app to have full functionality.
- Enter your UVM email address, then click Continue.
- Enter your UVM NetID and password, then click Sign In.
Get Started
Select which devices are used for calls
By default, Jabber may use your desk phone for all calls even if you initiate the call using the Jabber application. To change this, follow the instructions below:
Click on the phone and call forwarding preferences icon ![]() at the bottom left of the main Jabber window.
at the bottom left of the main Jabber window.
- If you would like to use your computer for calls (and have incoming calls ring on both your computer and desk phone), select Use my computer for calls.
- To use only your desk phone for calls, select Use my desk phone for calls.
- To send all calls straight to voicemail, select Forward calls to > Voicemail
- To send all calls to a different phone number, select Forward calls to > New number… then enter the extension for the UVM number you wish to forward calls to (e.g., 62604).
Calls cannot be forward to non-UVM phone numbers.
Place a call
Place a call using the search or call bar
- From the Search or call bar, type in either a phone number, name of an existing contact, or name of a user in the directory.
- Click the phone icon
 to place the call.
Place a call using the keypad
- Click the Calls icon
 .
. - Select the keypad icon
 .
. - Enter a phone number using the keypad.
- Click the phone icon to place the call.
Answer a call
When the Jabber application is running on your computer, incoming calls will display a notification on your screen. You can click Answer or Decline (Decline will send the call to voicemail).
Check your voicemail
- Click the voicemail icon
 .
. - Press the play button to listen to a voicemail.
- To delete voicemail after listening either hit the Delete key on your keyboard, or right click on the message and select Delete from the list of options.
You can also use this menu to return the call or perform other actions with the voicemail.
Add a contact
Add a contact from the UVM directory
- From the Search or call bar, type in the name of the UVM person you would like to add as a contact.
- Hover over the name of the person you are trying to add, then click the add contact icon
 .
.
The Add New Contacts window should now pop up. - Use the Add to: drop down menu to select the contact group to which you’d like to add the new contact.
See Create a contact group for instructions on creating contact groups. - Click Add.
Add a non-UVM contact
- Click the gear icon
 at the top right of the Jabber window and select File > New > Custom contact.
 - Enter a phone number for the contact and any other information you want to include, then click Create.
Create a contact group
You can create groups for your contacts (e.g., My department, Project team, etc.) to organize your contacts. You can place contacts in multiple groups.
To create a new contact group:
- Click the gear icon
 at the top right of the Jabber window and select File > New > Group.
 - Type in a name for the group in the Group name: field.
- Click Create.
Transfer a call
- Click the more call options icon
 in the active call window.
 - Select Transfer. The current call will be put on hold.
- Type the name of the person or the phone number to which you want to transfer the call in the search box.
- Click the person you are trying to reach from the list of results or click the phone icon .
This will start a call with the selected number. - Click Transfer to complete the transfer.
Start a conference call
Start a conference call from contacts
- Select multiple contacts by holding Ctrl (Windows) or ⌘ (macOS).
- Right-click any of the selected contacts and select Start conference call.
- Once the call window opens, click the phone icon
 next to a participant’s name to call their number.
The conference call will be put on hold when adding participants after the first caller has been connected. - When the participant picks up, the join icon
 will appear. Click the join icon to connect them and resume the conference call.
Add participants to an ongoing call
- Click the more call options icon in the active call window.
- Select Conference.
The call will switch to the conference view. - In the Invite participants bar, type in either a phone number, name of an existing contact, or name of a user in the directory.
- For a number not found in your contacts or the UVM directory, hit enter and it will begin calling the number immediately.
- For a number found in your contacts or the UVM directory, select them from the list of results, then click the phone icon next to a their name to call their number.
The conference call will be put on hold when adding participants after the first caller has been connected.
- When the participant picks up, the join icon will appear. Click the join icon to connect them and resume the conference call.
Adjust ringer volume
- Click the gear iconat the top right of the Jabber window and select Options… from the resulting menu.
The Preference window will pop up. - Select Audio from the options on the right.
- Adjust the Ringer/Alerts slider as needed.
Change which audio devices on computer play ringtone
If calls are set to ring on your computer, they will ring on all audio output devices by default.
- Click the gear iconat the top right of the Jabber window and select Options… from the resulting menu.
The Preference window will pop up. - Select Audio from the options on the right.
- Under Ringers/Alerts select the audio device you want to play the ringer when receiving calls.
- Click Apply.
Change which audio devices are used for calls
These settings are for the audio devices/microphones connected to your computer. To use your desk phone for calls, see Select which devices are used for calls (above).
- Click the gear iconat the top right of the Jabber window and select Options… from the resulting menu.
The Preference window will pop up. - Select Audio from the options on the right.
- Select the audio devices you would like to use for calls under the Speaker and Microphone drop down menus.
- Click Apply.
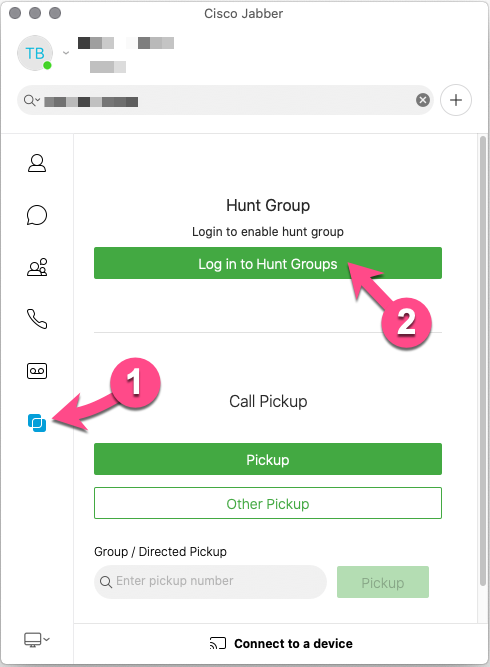
Hunt Groups (for call centers)
To use a hunt group, it will need to have been set up previously with UVM Telecommunications.
To join a hunt group:
- Click the Hunt Group & Pickup icon
 .
. - Click Log in.
You should now be able to receive calls from the Hunt Group.

Intrado E911 Softphone Location Manager
The Intrado E911 Softphone Location Manager enables emergency 911 services to accurately identify the location of a caller using Cisco Jabber. This application consists of 911 Remote Location Manager (RLM) and Enterprise Softphone Locator (ESL).
The 911 Remote Location Manager (RLM) runs on both Windows and macOS operating system. It works in conjunction with the Cisco Jabber phone client to interact with and detect locations.
When working remotely, you’ll be prompted to add addresses to ensure your location is correctly identified for emergency situations. When working on campus, your location will be automatically identified via the ESL.
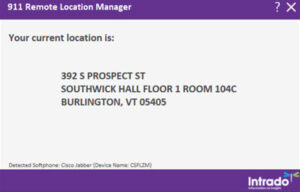
On Campus E911
When you use Cisco Jabber on campus on either a wired or wireless connection, the E911 Softphone Locator (ESL) works with the Remote Location Manager to automatically share your location with the 911 call center.
When you start Cisco Jabber while on campus and connected to the network, after a few minutes, your location will update. Your location may also update if you move to a different location on campus and connect to a different wireless access point or data jack.
When your location updates, you may see the following pop-up:
Click I Agree, and then you’ll see one of the following:
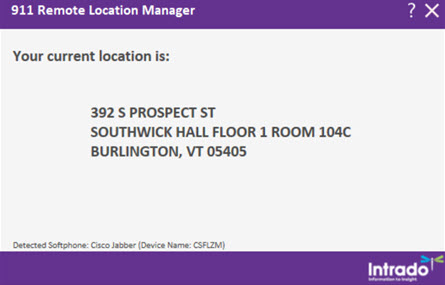
- Your current location is: Office Location
This indicates your location was successfully detected.
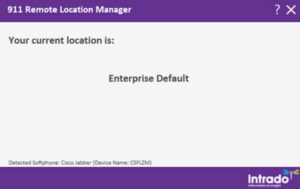
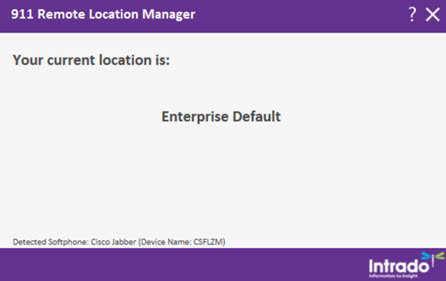
- Your current location is: Enterprise Default
This is the default location, indicating that ESL has not yet updated your physical location.
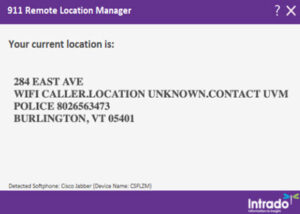
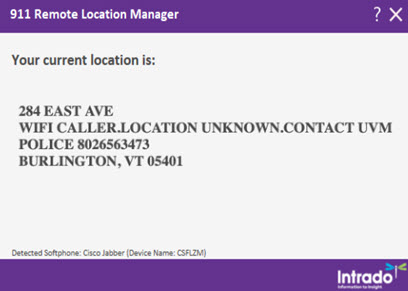
- Your current location is: Office Location with WIFI CALLER.LOCATION UNKNOWN
This indicates that ESL has not yet updated your wireless location.
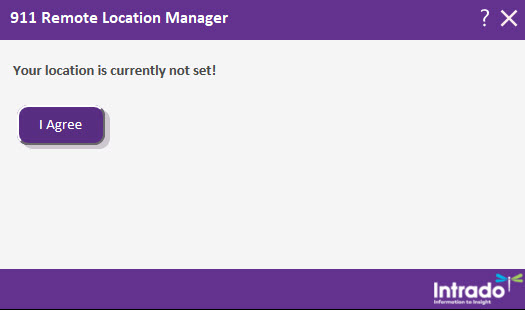
Off Campus E911
The 911 Remote Location Manager (RLM) runs as a standalone application, but requires Cisco Jabber to interact with and detect locations. When working remotely, you should add or update your address to ensure your location is correctly identified for emergency situations.
When RLM detects that you’re connecting to a new network, you’ll see a popup saying Your location is currently not set.
Click I Agree, and then you’ll see one of the following:
- There is no address configured for your current location

- Your current location is: Office Location

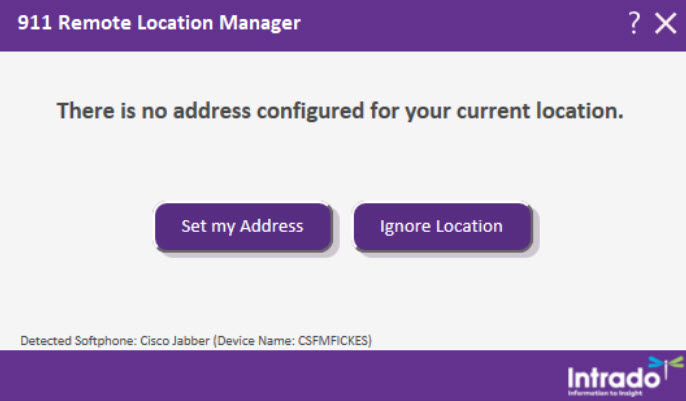
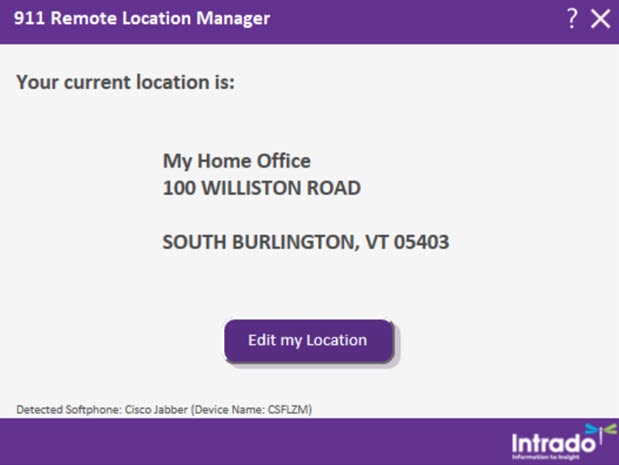
To submit or update your address, click Set my Address or Edit my Location, enter your address, and then click Save.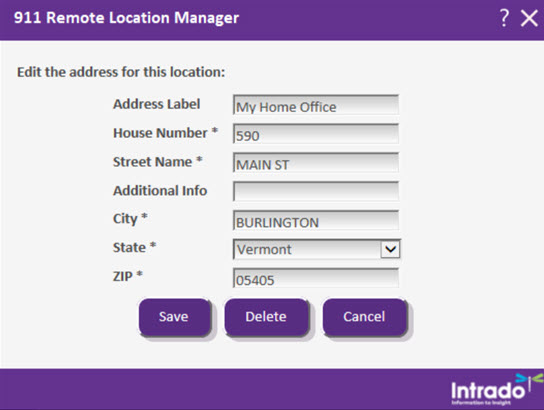
The location you entered should continue to show as your current location until a network change is detected.
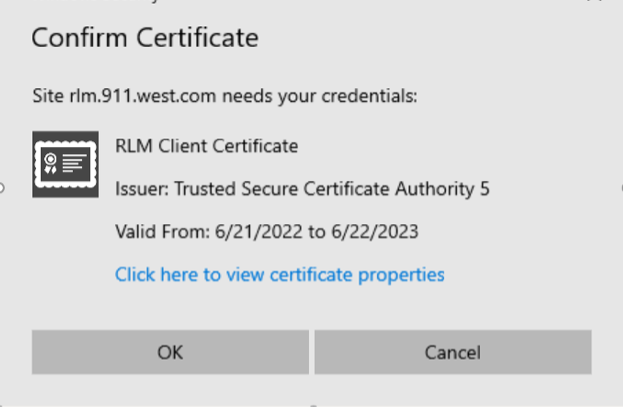
RLM Certificate
When connected to Cisco Jabber remotely, if you are not connected to sslvpn(2) through the Cisco VPN, you may see the following prompt. Click OK to proceed.
Troubleshooting
Connection to Multiple Services failed error
This error is most often received by an off-campus user who is trying to sign into the Jabber client without being connected to the UVM VPN, but it may be caused in other events as well.
Use this guide for connecting to the Cisco Secure Client app to connect to the UVM VPN, then try again.
It may take a moment for phone services to connect after connecting to the VPN.