Course content in Brightspace is organized by Modules that are, essentially, folders. Modules organize the units of your course, for example, Week 1, Week 2, Week 3. The content items within the modules can include readings, links to activities, Powerpoints, and so on.
(The links in the righthand sidebar of this page correspond to the image below.)
1. Go to Content & Activities
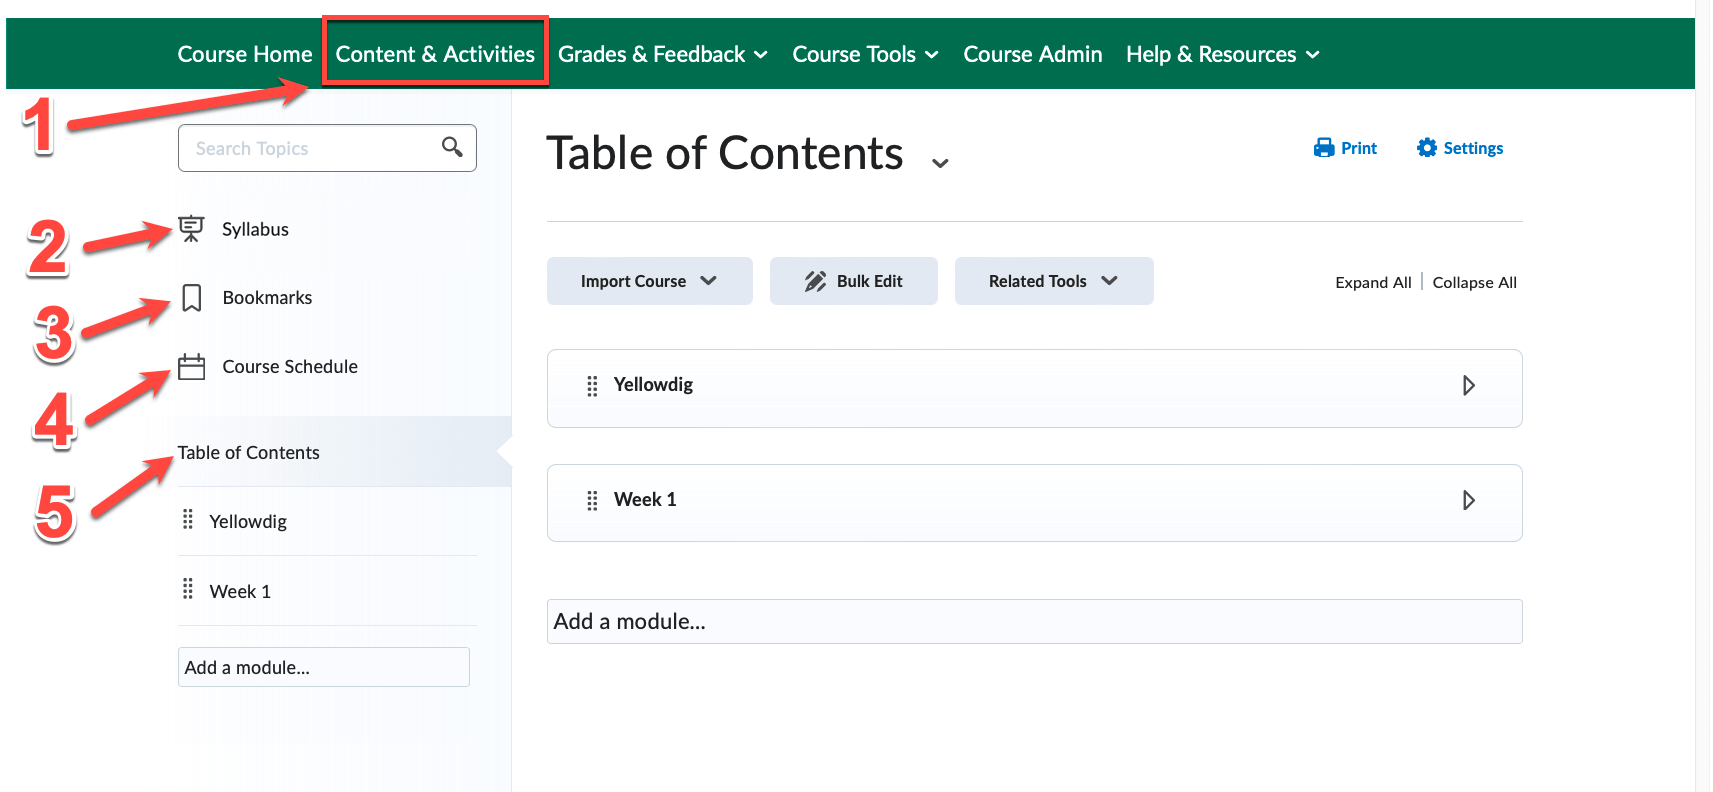
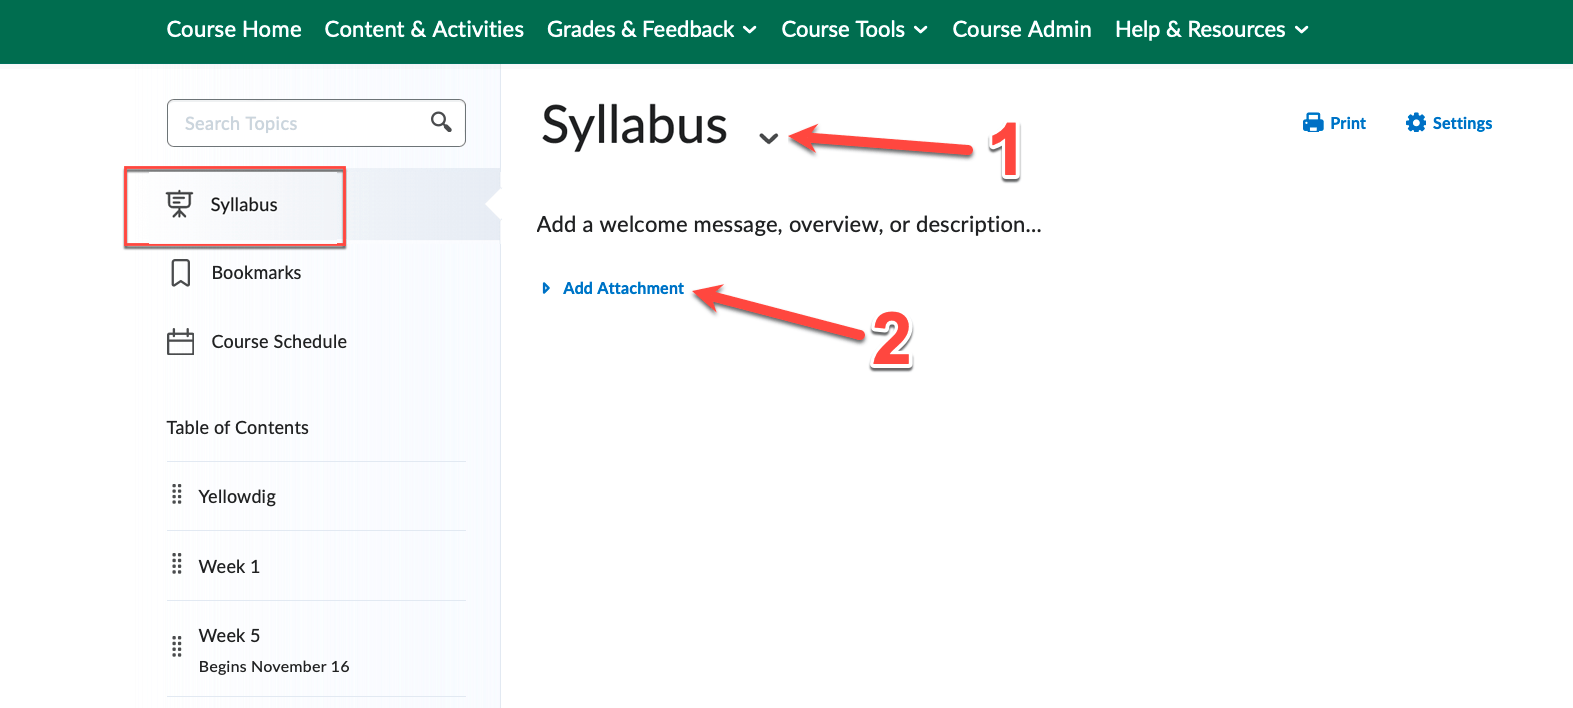
2. Syllabus
Instructors have these options:
- Add a file attachment by dragging the file from your computer onto the upload target, or by clicking “Add Attachment” from the Syllabus page and browsing your computer.
- If desired, add descriptive text beneath the Syllabus title.
- If nothing is added to the syllabus page, the link will be hidden from students.
Note about what students see:
Assuming you’ve added the syllabus to your page, the first time a student clicks on Content & Activities they land on the syllabus page. Then, subsequently and throughout the course period, when they click on Content & Activities they’ll land on the page they last visited.
3. Bookmarks
 Bookmarks are unique to each person in the course. Students will find bookmarks helpful when they want to return to a certain page in the course. To bookmark something, click the “Add Bookmark” icon (see right) while viewing the content topic.
4. Course Schedule
The Course Schedule page lists course material start dates, due dates, end dates, and other course events for the next seven days. If you set availability dates or a due date for a course item, it appears on the Course Schedule page and in the Calendar tool.
The dates listed on the Course Schedule page are not exclusive to Content topics; upcoming events include all events within the course from the Calendar tool. Click Full Schedule to view all past, current, and future course events. The number beside the Upcoming link indicates how many upcoming events you have.
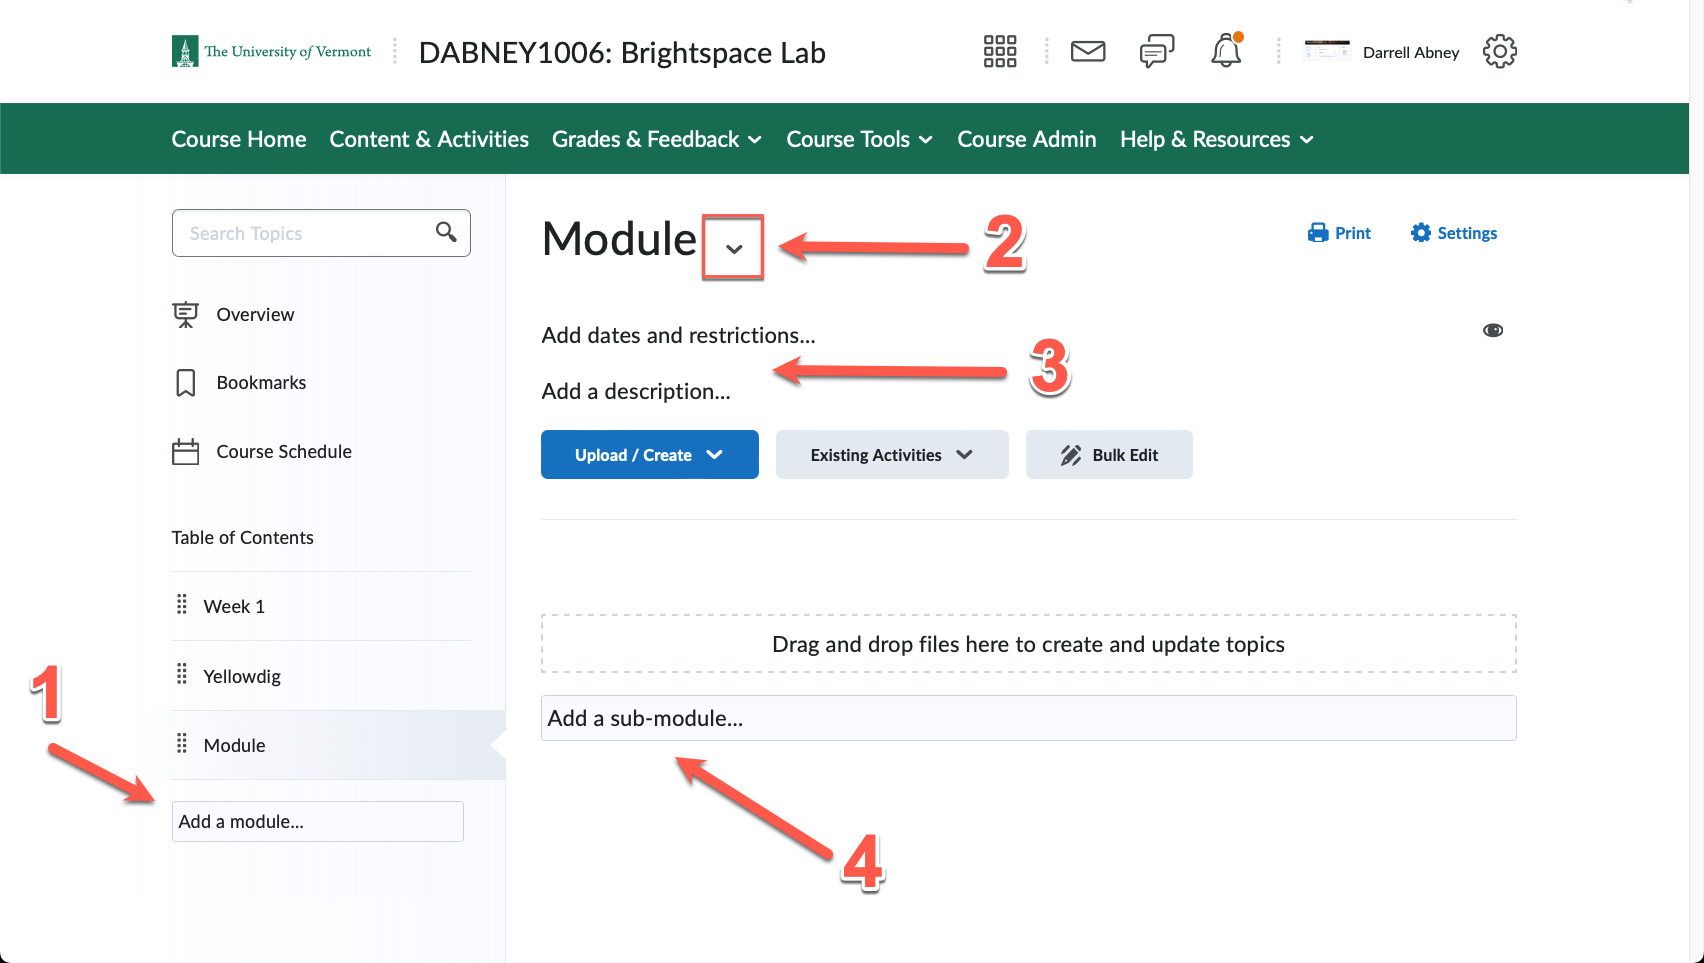
5. Table of Contents: Setting Up and Organizing
The Table of Contents panel lists all the Modules (and submodules) in your course.
Add Modules and choose Completion Tracking settings
Modules are essentially folders that contain content and activities, so you must create a Module before you can add content to your course. (Note: Brightspace refers to content items as “Topics.”) You can also create sub-modules (modules within modules) to establish a deeper hierarchy.
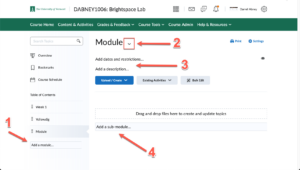
- Go to the Table of Contents and click on Add a module. Enter a title and press return/enter.
- To edit, move, or delete that module, look to the page body and click on the dropdown icon next to the Module’s title. You can also move modules by clicking the small dot-grid symbol next to it in the left menu and dragging it between other modules or dropping it into another module.
- To add dates and restrictions, or add a description for the module, click on the area below the module title. For more details visit our Knowledge Base article on managing dates.
- To add a sub-module click on the Add a sub-module button.
Completion Tracking
Completion tracking benefits both instructors and students. It enables instructors to view a student’s progress and it helps students track their own progress as they complete course activities such as readings or quizzes.
Click on the “Settings” button in the upper-right corner of Content & Activities and scroll down to see the three options for Completion Tracking setup:
- Automatic Completion: This setting means that Brightspace automatically marks whether learners have completed a topic when the student clicks to view it. For some activities, automatic tracking requires users to participate in a discussion, submit an assignment, or complete an quiz or survey before it’s marked as completed. On the downside, the automatic setting will also mark a reading as complete if they simply click on it, even if they have not read it.
- Manual Completion: We like this option the best because it lets the student check off each topic as they complete it. This is voluntary for them, so you may need to explain that marking things as complete will help them, and you, track their progress.
- Not required
Note: Changing an automatically-tracked topic to manual completion resets completion tracking for that topic. This means that learners might have to return to the topic to mark it complete, but they do not need to resubmit files or assessment activities.
Add Content to Modules
Content (sometimes referred to as “topics”) include PDFs, docs, images, quizzes, assignments, discussion links, PowerPoints, etc. To add content:
- Drag and drop files from your computer onto the upload target on the module page, or
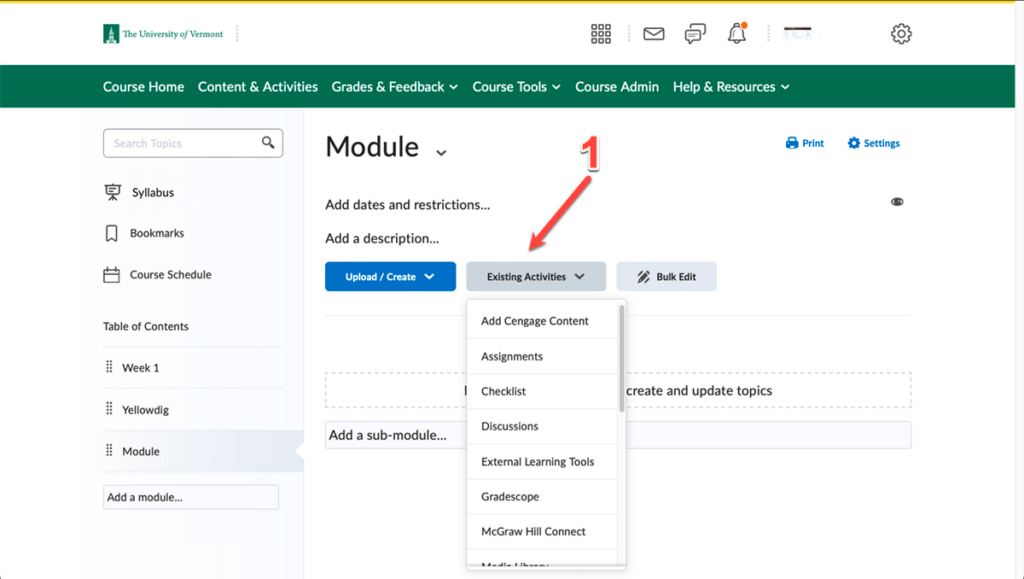
- Click the buttons “Upload/Create” and “Existing Activities”
NOTE: The number beside each module name in the left menu indicates the number of topics contained in the module. It remains static for instructors, but for students, this number decreases if completion tracking is activated, so they can see at a glance what’s left for them to do. And the instructor can track how each student is progressing, as well, by going to Grades & Feedback > Class Progress.
Recommended Organization
In order for students to be able to take advantage of completion tracking, it’s best to keep each activity, e.g. reading, quizzes, assignments, or discussions, separated within the module. While it is possible to link everything within a single file, this prevents completion tracking. It can also be helpful to students, if you have weekly readings and other activities, to put them into weekly modules, for example “Wk 3: Sept 9-13, Topic Name.”
There are multiple ways to add content to a module. The primary benefits of our suggestions below are that you can provide students with context for the files you’re linking to.
Brightspace is designed for students to navigate through modules using the Next/Back arrows. If you follow these suggestions, when they click the Next arrow, and they’ll see a page where you’ve written, “Here’s a PDF or Word doc I want you to read because…xyz.” Then they will be able to click the link to the file that you’ve included. (While Brightspace has more direct methods to adding files, we don’t recommend them in most cases, because you don’t have a clear way to provide context for the content you’re linking to.)
– Add Content: Files
This option allows you to enter a description or context for the PDF or doc you’re linking to.
- In the Module, click Upload/Create
- Click “Create a File”
- Enter a page title
- In the main text box, write the context for why you’re asking them to read the PDF, if desired.
- Click Insert Stuff in the toolbar
- Select My Computer and then Choose File to browse for the file
- Click Upload, Insert, and then Save and Close
Pros and Cons of this alternative for Word documents
Cons: Even if you add a description, students won’t see it unless they scroll to the very bottom of the page. Therefore, you might consider adding your description or context at the top of the Word document itself.
- Click Upload/Create
- Choose Upload Files > My Computer
- Click Upload, select the file, and click Add
- Click Add Description at bottom
- To also add a description that appears on the module list, click the down arrow next to the file name in the module.
- Choose Edit Properties in Place
- Add a description or context here, as well as dates of availability if desired
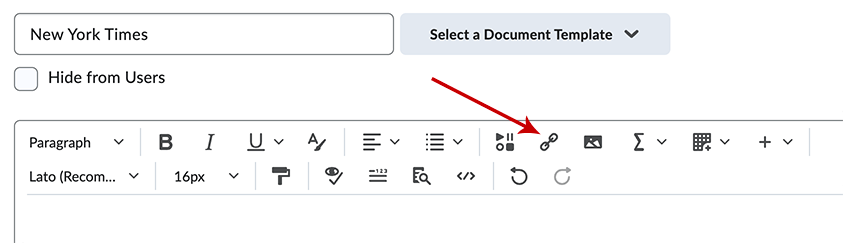
– Add Content: Web Links
You might think that the best way to add a link is to click the Upload/Create button and then, “Add a Link” but we don’t recommend that! Why? Because when students navigate through the module components using the “next” or “back” arrows, they suddenly land at an external website with no explanation of why. So the best way to add a link is to:
- In the Module, click Upload/Create
- Click Create a file
- Enter a page title
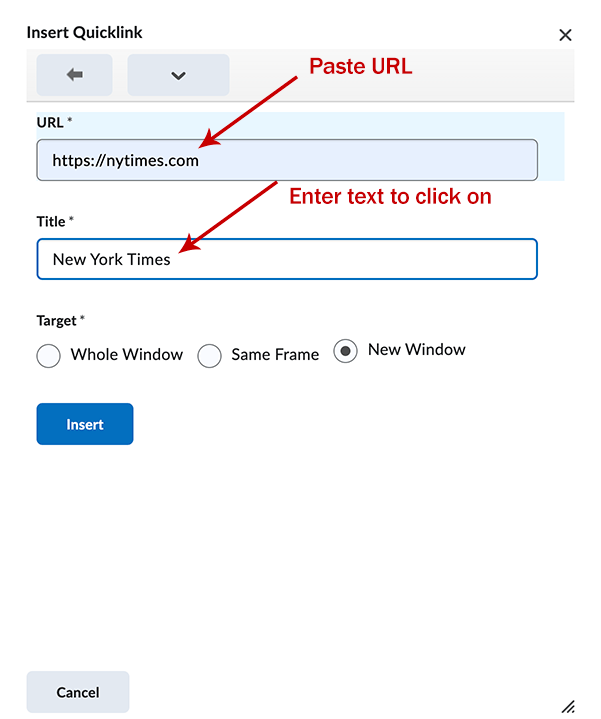
- Click the link icon in toolbar. (See image.)
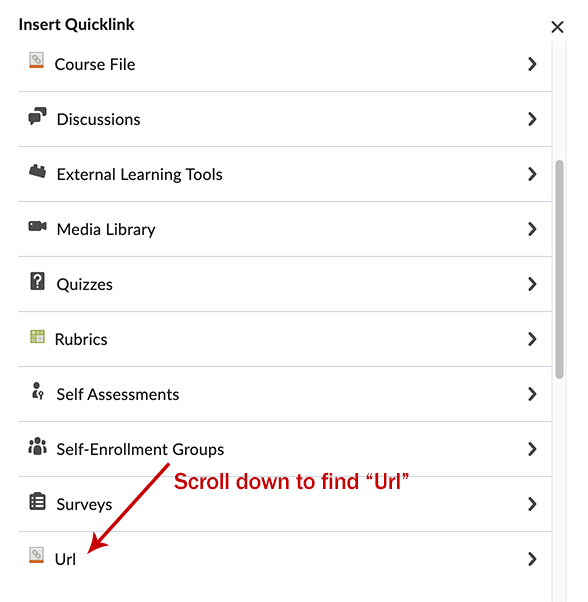
- Scroll down and click Url from the list. (See image.)
- Paste in the URL and enter what the link text should say. (See image.)
- Click Insert. Then click Save and Close
– Add Content: Existing Activities or Third Party Tools
- Click on the Existing Activities button within the Module and select one of the tools listed, or choose External Learning Tools where more are listed.

– Add Content: Audio/Video
If you have a video already created, upload it to a streaming service such as UVM Streaming, Microsoft Stream (log in with UVM NetID here: Office.com) or YouTube and follow these steps:
- Click Upload/Create
- Choose Video or Audio
- Do not choose Upload
- Under Web Video or Audio, enter the URL (web address) to the video.
- After you’ve saved it, return to the module page where you’ve added the media file and click the down arrow > “Edit properties in place” to add a description which will appear to students under the video player.
If you’d like to record yourself for up to 30 minute, Brightspace will caption the video for you.
- Click Upload/Create
- Choose Create a File
- Give the page a title and then choose Insert Stuff from the text box toolbar.
- On the Insert Stuff options list, choose Audio/Video Note
- Click record on either the audio or video view
- For it to be captioned, you must choose the language type
- Save and Close – processing the media will take some minutes but after you’ve saved it you can leave that page.
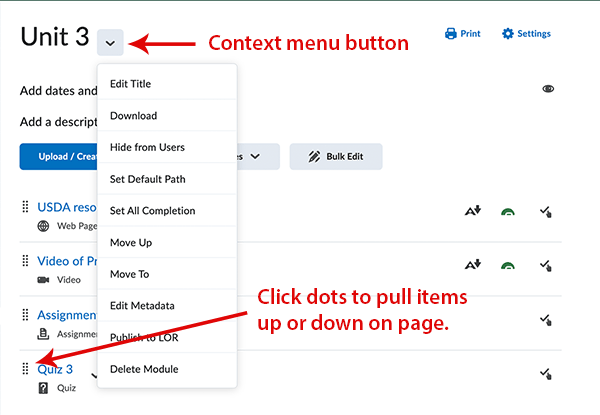
Editing, reorganizing, and deleting content
The ubiquitous “Context Menu” button displays many options for editing. To reorganize items, you can also drag them into place using the icon of dots on the left of each title. See image below.