
Your data may be stored on a wide variety of different physical media, such as an internal or external hard drive or a USB flash drive. Before repurposing or recycling a laptop, desktop, or other computing system, it’s critical to protect your data by securely erasing or disposing of the physical storage.
Options for Securely Erasing/Destroying Data
| Method | Description | Drive Type |
|---|---|---|
| Physical Drive Destruction | Computer hard drives and storage media can be brought to the Computer Clinic and submitted for destruction. Hard drives will be removed from computers and destroyed. The computer will be returned to you and will require a Surplus Pickup Request to dispose of the electronic waste properly.
|
Any storage media (Recommended) |
| Securely erasing an Encrypted Volume | Volumes encrypted with FileVault 2 or BitLocker can be securely erased without the need to write zeros throughout the entire disk. | Solid State and spindle disk drives (Recommended) |
| ATA Secure Erase command | Software used to securely erase data. | Solid State and most modern spindle disk drives |
| SSD Manufacturer utilities | Use software provided by the manufacturer of the drive to erase an SSD. Many manufacturers offer software that allows for securely erasing the drive. | Solid State Disks |
| Disk Zero-ing software | Software used to write zeros bit for bit across an entire drive, securely erasing all data on the disk. | Traditional magnetic spindle disk hard drives |
Recommended Methods
Physical Drive Destruction
Computer hard drives and storage media can be brought to the Computer Clinic and submitted for destruction. Hard drives will be removed from computers and physically destroyed.
Computers will be returned to you (with the hard drive removed) and will require a Surplus Pickup Request to dispose of the electronic waste properly.
If your computer does have have removable storage media (NVMe soldered to the system board) the guides below may required to securely erase your data.
This service is provided by Enterprise Technology Services at no cost to departments.
Securely erase a BitLocker encrypted volume
BitLocker encrypted disks enable you to quickly sanitize the device by deleting the encryption key, which renders the data on the drive irretrievable. To sanitize the contents of a BitLocker encrypted disk, follow the steps outlined below.
- This guide assumes that you are not booted to the disk that you’re attempting to securely erase. You must connect the target disk to another machine booted to Windows to complete these steps.
- Windows installation media can also be used to delete volumes similar to this process, but steps are not provided here.
- Connect the target disk to the computer.
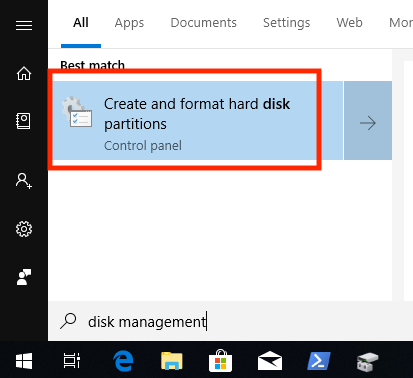
- Press the on your keyboard, search for the Disk Management program.
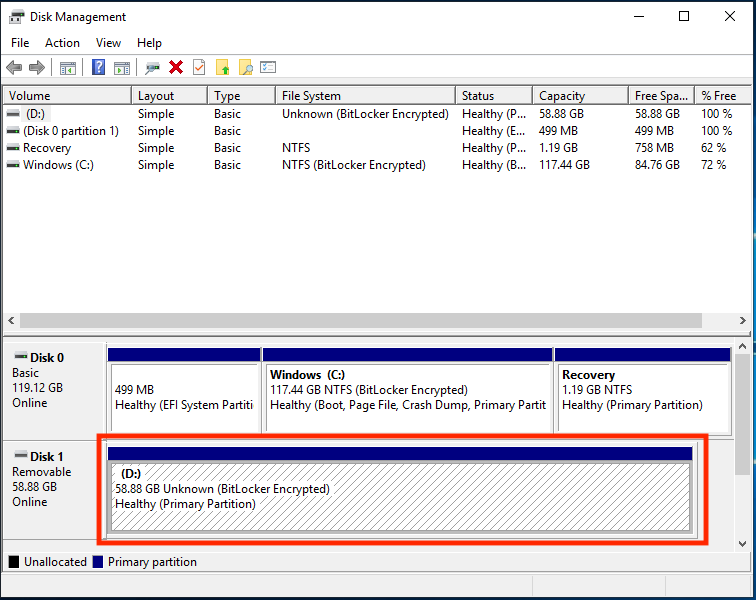
- Verify that the target disk is BitLocker Encrypted. In this example, D: is the target disk.
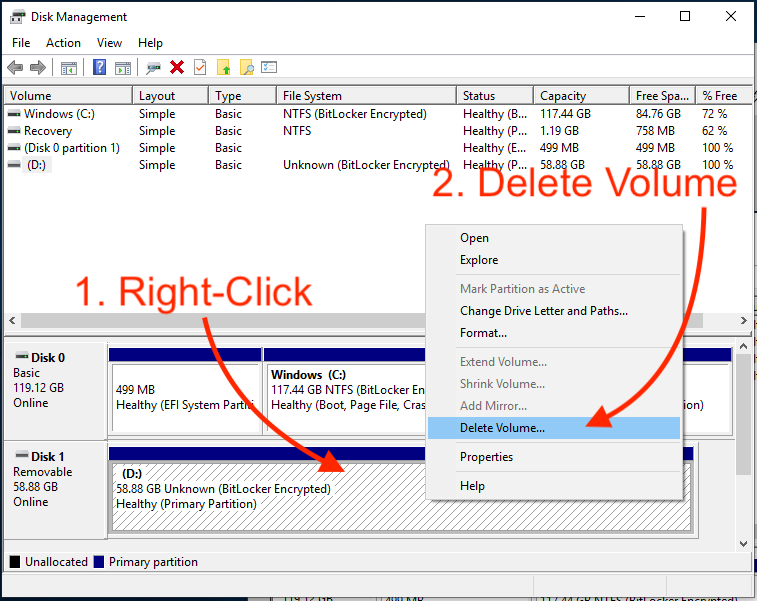
- Right-click on the target volume, from the menu that appears select Delete Volume.
- If your disk has more than one partition, repeat this step until the disk is completely unallocated space.
- If your disk has more than one partition, repeat this step until the disk is completely unallocated space.
Securely erase a FileVault 2 encrypted volume
FileVault encrypted disks enable you to quickly sanitize the device by deleting the encryption key, which renders the data on the drive irretrievable. To sanitize the contents of a FileVault encrypted disk, follow the steps outlined below.
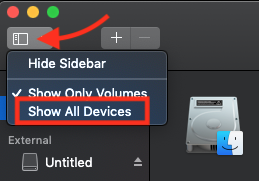
- APFS and HFS+ encrypted volumes are housed within a logical “container” disk within the physical disk’s available space. By default, Disk Utility only displays available volumes. To display physical disks and containers, click the “Sidebar” menu and select “Show All Devices“.
- Verify that the target volume is encrypted with FileVault by selecting the volume from the Sidebar and viewing its details. If you find that the volume is not encrypted, you may want to use one of the “Alternative Methods” for securely erasing data below. If the machine does not have a removable hard drive, ETS recommends encrypting the disk first, and then proceeding with this guide.

- After confirming the disk is encrypted, the disk can be reformatted. It is important to understand that simply reformatting the encrypted Volume is not enough.
- Seagate Expansion Media = Physical disk
- Container disk3 = Logical container disk
- Macintosh HD = Logical Volume

- To securely sanitize data on the disk, the entire container must be deleted. To delete the container, select the Physical disk from the Sidebar. In this particular example, the Physical disk is “Seagate Expansion Media”. When the physical disk has been selected, click the “Erase” button.

- The default options should work, click the “Erase” button to wipe the container and securely sanitize the disk.

Alternative Methods
ATA Secure Erase command
One of the most efficient ways to securely erase a disk is to issue an ATA Secure Erase command. When a Secure Erase is issued against an SSD all of its cells will be marked as “empty”, restoring it to a factory default state. Most modern magnetic spindle disk drives also support the command.
- Boot to SystemRescueCD on the machine you’d like to securely erase.
- On Dell systems, you may need to temporarily disable “Secure Boot”.To disable Secure Boot, tap F12 at boot, then select the “Change Boot Mode Setting”. From the options that appear, select “UEFI with Secure Boot disabled”.
- SystemRescueCD will boot to a shell prompt.

- SSD drives are locked down with a “security freeze” set by BIOS at boot. To “un-freeze” a disk we can simply put the computer to sleep for a moment with the following command. After the command has been issued, tap the power button to wake your computer and continue to the next step.
echo -n mem > /sys/power/state
- List all connected disks with the following command:
lshw -class disk
This will display details of all connected disks, including the “logical name” of each disk. Locate the “logical name” of the target disk and replace
/dev/sdXin the commands below with that name. - Set a security password that will be used to erase the disk. In this case, the password is set to NULL.
hdparm --user-master u --security-set-pass NULL /dev/sdX
- To securely erase the disk run the following command:
hdparm --user-master u --security-erase NULL /dev/sdX
- In testing, the average time for SECURITY ERASE completion was less than two minutes for a 256GB SSD. Note that spindle disk drives will take considerably longer (hours) to complete.
- When the command completes, verify the disk has been wiped.
Manufacturer-provided Utilities for SSDs
To securely erase data, hard disk drives fill the occupied space on the drive with a file consisting of zeroes or execute multiple writes of different characters. However, solid-state drives use wear-leveling algorithms that evenly distribute data among SSD blocks, which means that data is constantly moved around on the drive so the blocks will be worn at an equal rate. Standard secure deletion tools damage SSDs by performing an unnecessary number of additional writes without being able to tell where the data is written.
To securely erase data from a solid-state drive, use one of the following methods:
- Manufacturer-specific software if possible, use software provided by the manufacturer of the drive to erase an SSD. Many manufacturers offer software that allows for securely erasing the drive, as well as other functions such as updating firmware or checking the health of the drive. Use the instructions provided by the manufacturer to erase the SSD. The following manufacturers provide software to securely erase an SSD:
- Corsair SSD Toolbox
- Crucial Storage Executive
- Intel Solid-State Drive Toolbox
- OCZ Toolbox
- Samsung Magician Software
- SanDisk SSD Toolkit
If you cannot locate the manufacturer of your SSD, or if the manufacturer does not provide software for securely erasing the drive, you can try using a generic utility, or submit the drive for physical destruction at the Computer Clinic.
Data Duplicator (dd) command
- Boot to SystemRescueCD on the machine you’d like to securely erase.
- On Dell systems, you may need to temporarily disable “Secure Boot”.To disable Secure Boot, tap F12 at boot, then select the “Change Boot Mode Setting”. From the options that appear, select “UEFI with Secure Boot disabled”.
- SystemRescueCD will boot to a shell prompt.
- List all connected disks with the following command:
lshw -class disk
This will display details of all connected disks, including the “logical name” of each disk. Locate the “logical name” of the target disk and replace
/dev/sdXin the commands below with that name. - To write zeros to the target disk and display it’s progress, use the command below:
dd if=/dev/zero | pv | dd of=/dev/sdX
- When the dd command completes, verify the disk has been wiped.
macOS Disk Utility for Spindle Disk drives
Mac OS X has retained the following built-in options for securely removing data:
- For whole file systems, use the Disk Utility app, which can be found in any of the following places:
- In the
Applications/Utilities/folder on your hard drive. - Booting to Internet Recovery (
Command+Option+RorCommand+R)
In Disk Utility, choose the file system you want to wipe, and then select the tab. If you have a hard disk drive, select to choose the security level of the erasure.
- In the