
The following article provides instructions for Konica Minolta printers. For Kyocera printers, please see this article. Instructions for CEMS printing can be found here (students) and here (fac/staff). For help with printing in the Howe Library, please see the library webpage. Requests for help with College of Medicine printers should be directed to COMTS.
Printer Delivery and Setup Process
To obtain a new printer, contact SymQuest or UVM Purchasing.
For help with new printer delivery and initial setup, please reach out to the UVM Tech Team who will redirect your request to the appropriate support hub.
Windows
CAMPUS Domain-Joined Computers
This is the easiest method of connecting to a UVM-managed printer, but requires the computer be joined to the CAMPUS domain. You can tell if your computer is domain-joined by restarting the device and then clicking Other User before logging in. If it’s domain-joined it will say “Sign in to: CAMPUS” below the password field.
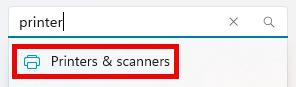
- Open the Windows Settings app. One way to do this is to hold down the Windows key on your keyboard and tap the I key (+I).
- Open the Bluetooth & devices > Printers & scanners menu. One way to do this is to use the Find a setting search box.
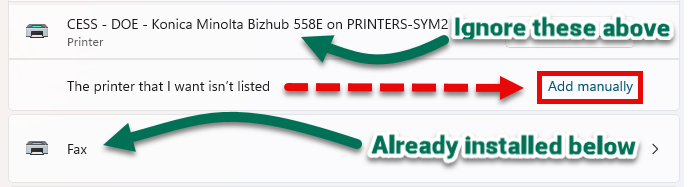
- Click Add device.

- Scroll down to the bottom of the list of available printers but above the list of printers already installed on your device, and click Add a new device manually.
- Select Find a printer in the directory, based on location or feature. Click Next.
- Use any one of the three available search fields to find your printer. I prefer to use the Location field entering the building name, but you can also use the Name field entering the abbreviation for your department name. Hit Enter or click Find Now to show the results. Double-click the printer from the search results that matches the department name and model you were expecting.

- Once “you’ve successfully added [the printer]”, click Next.
- Click Print a test page or just click Finish.
Manual Setup (Non-Domain-Joined Computers)
This method does not require your computer to be on the CAMPUS domain, but it does require Administrator permission.
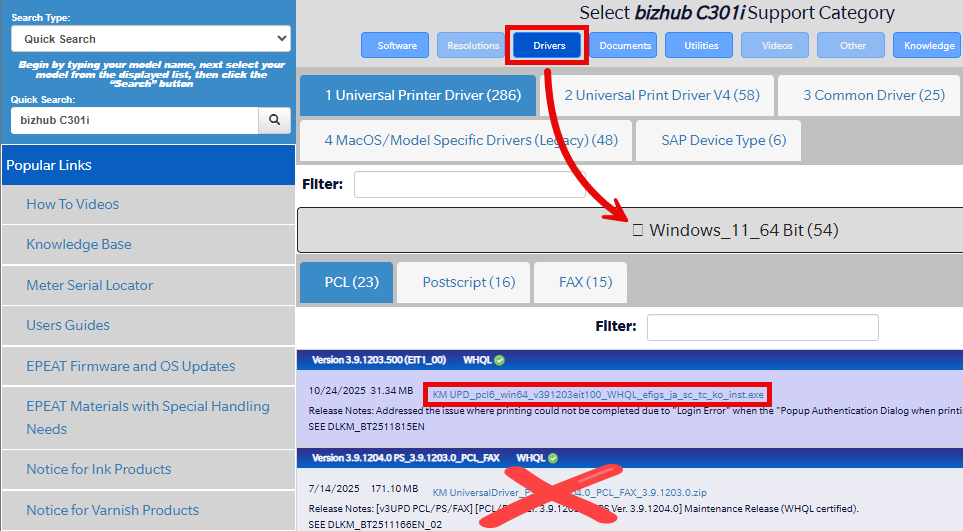
- Navigate to the Konica Minolta Self-Help Product Support page.
- Enter the first few characters of the model number of your printer into the Quick Search field, select it from the drop-down menu that appears, and click the magnifying glass icon ().
- Click Drivers and expand the Windows_11_64 BIT section. Click the download link for the top option (or at least the top-most option that does not include “_FAX” in the name).
- Open the downloaded file and click Extract. Note the location of the extracted downloaded files.
- Open the Windows Settings app. One way to do this is to hold down the Windows key on your keyboard and tap the I key (+I).
- Open the Bluetooth & devices > Printers & scanners menu. One way to do this is to use the Find a setting search box.
- Click Add device.
- Scroll down to the bottom of the list of available printers but above the list of printers already installed on your device, and click Add a new device manually.
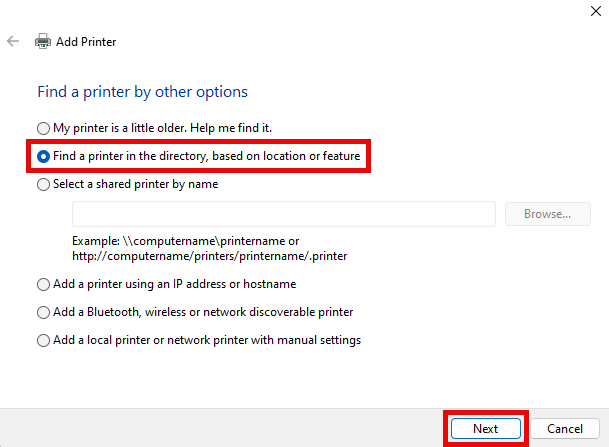
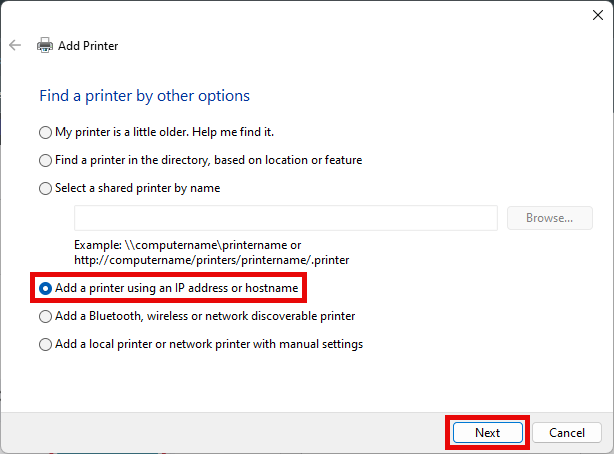
- Select Add a printer using an IP address or hostname. Click Next.
- Select TCP/IP Device from the Device type drop-down menu, enter the IP address in the Hostname or IP address field. Click Next.
- Click Have Disk… and then click Browse….
- Navigate to the location of the extracted driver files, open the folder beginning with “KM_“, then the Driver folder, and then the Win_x64 folder. Select the only file shown, and click Open.
- Click OK, and then Next once or twice. Once given the opportunity to enter a Printer name, enter the Room number where the printer is located, like “Waterman 123A”, or whatever you like. This is the name you will select for all future print jobs. Click Next.
- Once You’ve successfully added [the printer], click Finish.
Enter Authentication/Account Tracking Password
Print codes, also known as Account Tracking or Job Accounting, is a feature that limits who can print to a device to only those in possession of a valid PIN or print code. If this is enabled on your department’s printer, you must enter the correct code using the following instructions before printing. The code could be something shared among your department. Some departments use your phone extension other unique code to keep track of individual users’ printer use.
- Open the Windows Settings app. One way to do this is to hold down the Windows key on your keyboard and tap the I key (+I).
- Open the Bluetooth & devices > Printers & scanners menu. One way to do this is to use the Find a setting search box.
- Select the printer, and then click Printing preferences.
- The next step depends on the version of the print driver installed. Try selecting the Basic tab, and then clicking Authentication/Account Track….
- Under Account Track, enter the abbreviation for your Department Name, and the Password (your print code). Click Verify.
- Click OK a few times.
macOS
Downloading and Installing Drivers
Drivers enable your computer’s Operating System to interact with physical devices, including a printer or copier.
For most printers, your operating system will provide generic printer drivers as the default selection when adding a printer. However, your Konica Minolta or Kyocera printer may have additional functionality in the form of a punch unit, automatic stapler, or account tracking. To utilize these functions, you must download and install the appropriate driver.
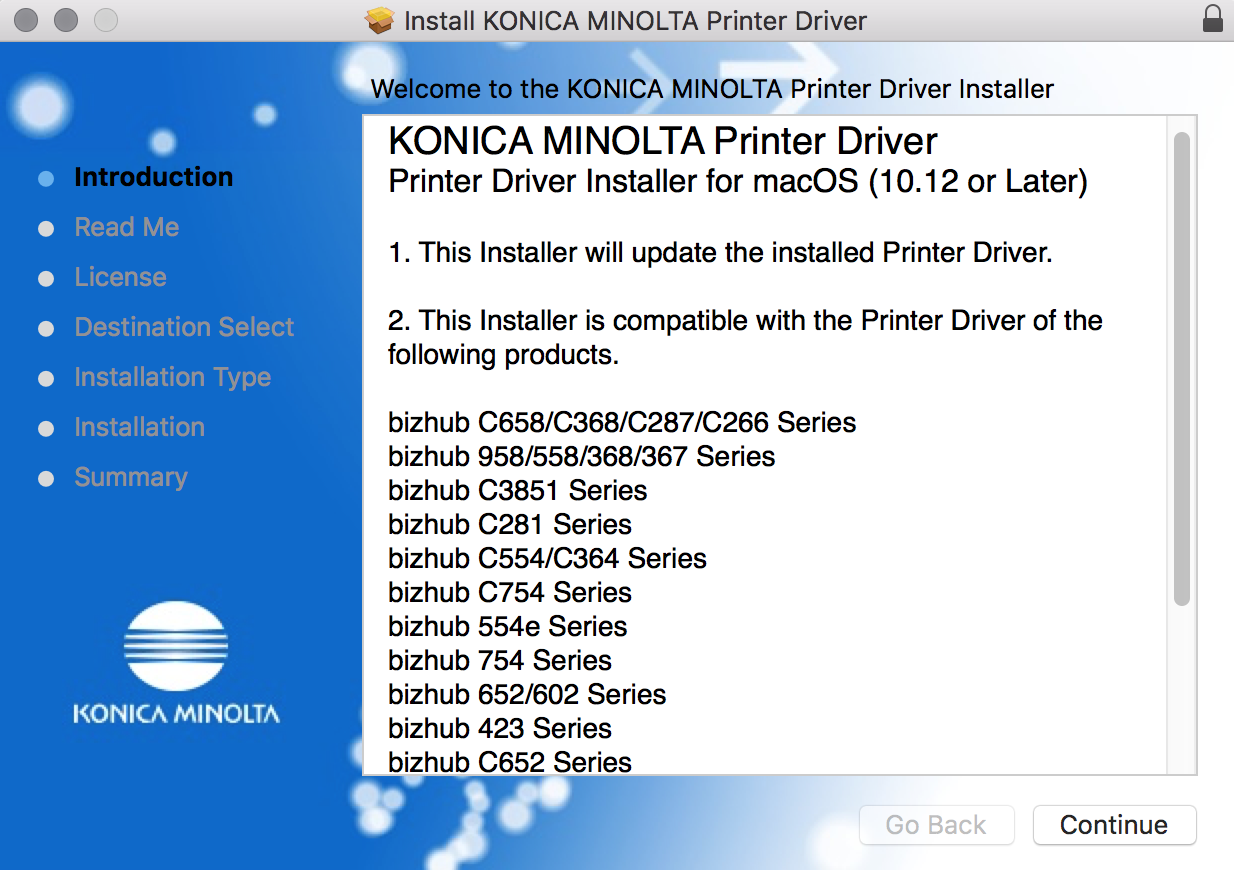
Below are instructions for finding and installing drivers for Konica Minolta printers.
- Visit the Konica Minolta support site: https://onyxweb.mykonicaminolta.com/OneStopProductSupport
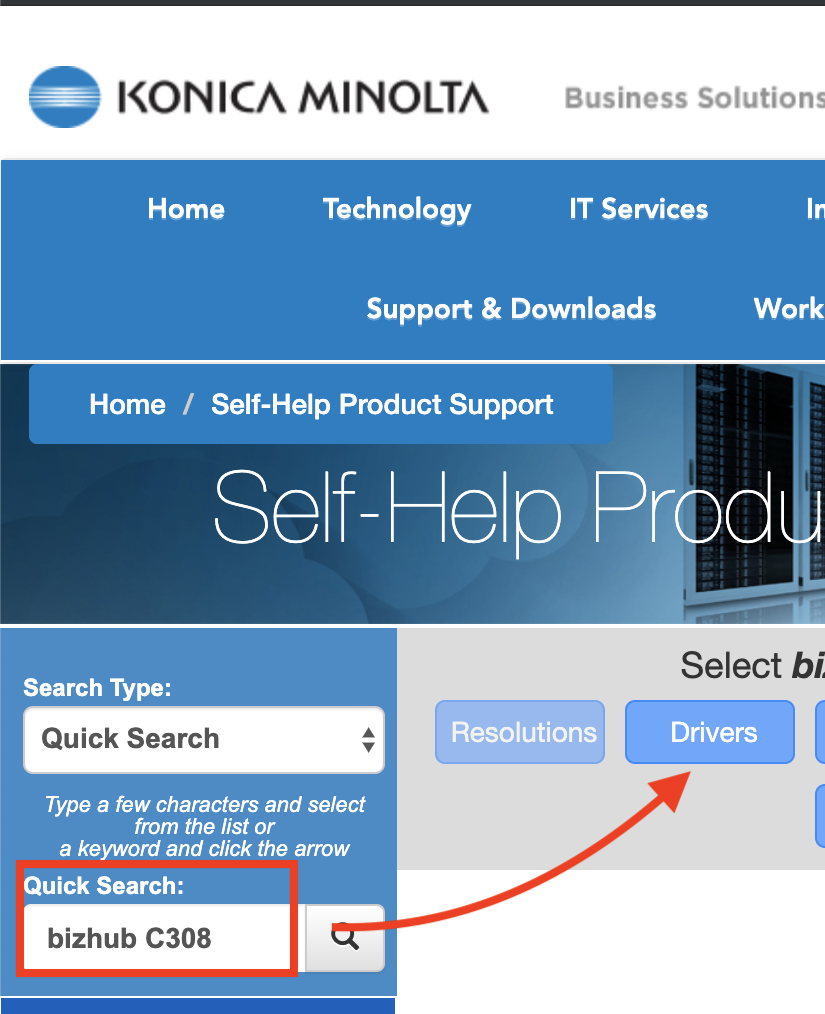
- Using the Quick Search field, search for the model name and number for your printer, and then select Drivers. In this case, we entered “bizhub C308”.
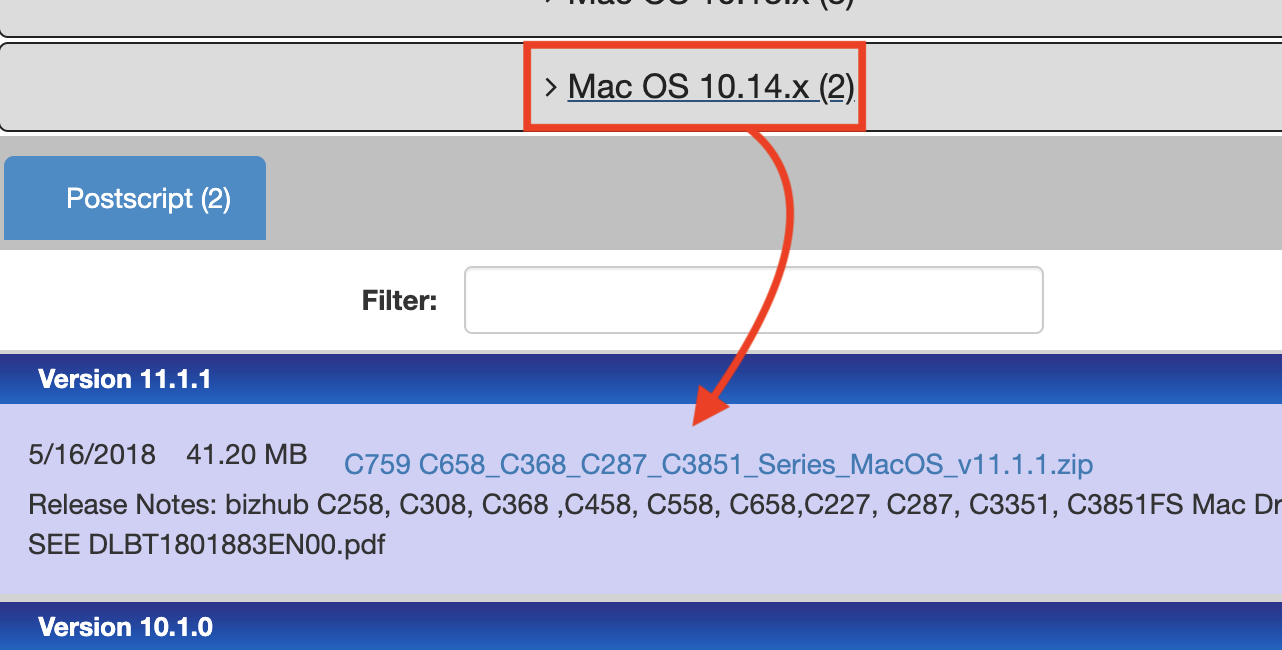
- Select the OS version that matches the Operating System on your computer, and then click on the most recent compatible driver for your printer to download it. These will usually be .zip files. In this case, we chose MacOS 10.14 and downloaded the Version 11 driver.
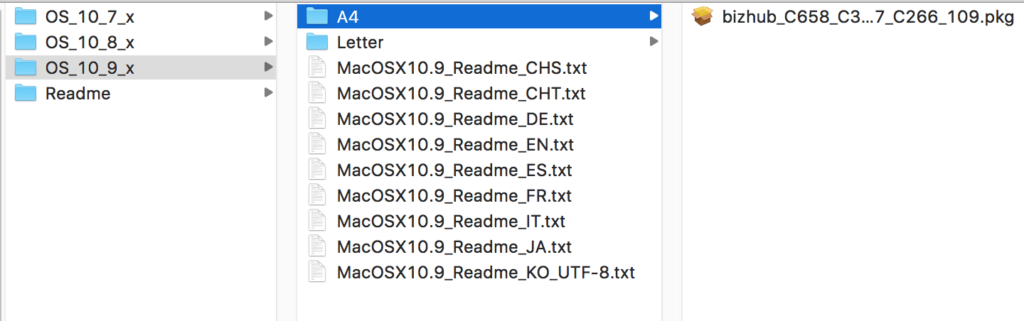
- Find the driver in your downloads folder and double-click it. This will unzip the driver, creating a new folder. Navigate the new folder to find the package install file. For this case, the path to the package install file is as follows:
- OS_10_9_x -> A4 -> biizhub_C658_C3…7_C266_209.pkg
- OS_10_9_x -> A4 -> biizhub_C658_C3…7_C266_209.pkg
- Double-click the package to run it, and then proceed through the install wizard.


Adding a Printer to Your Computer
The Tech Team suggests installing a printer on a macOS computer by IP address. If you are using a Konica Minolta or Kyocera printer and do not know the IP address of that printer, see instructions on the manufacturer’s website for information on obtaining the IP address.
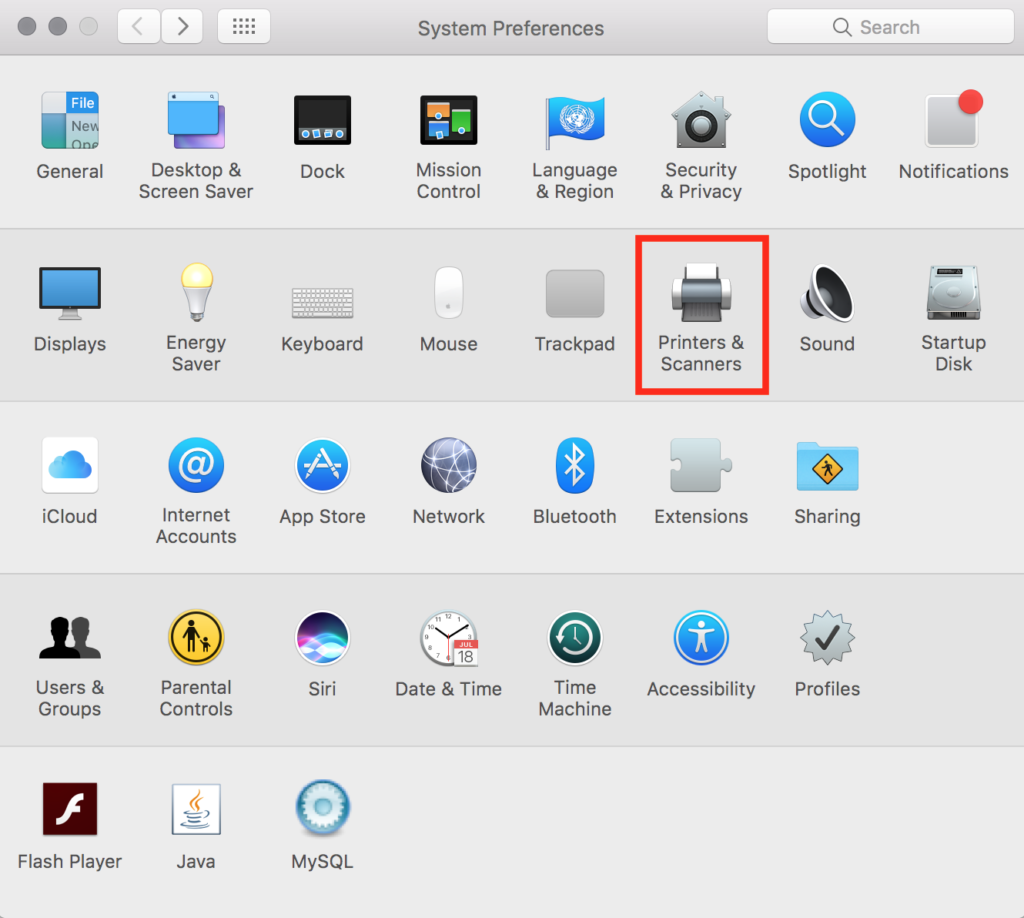
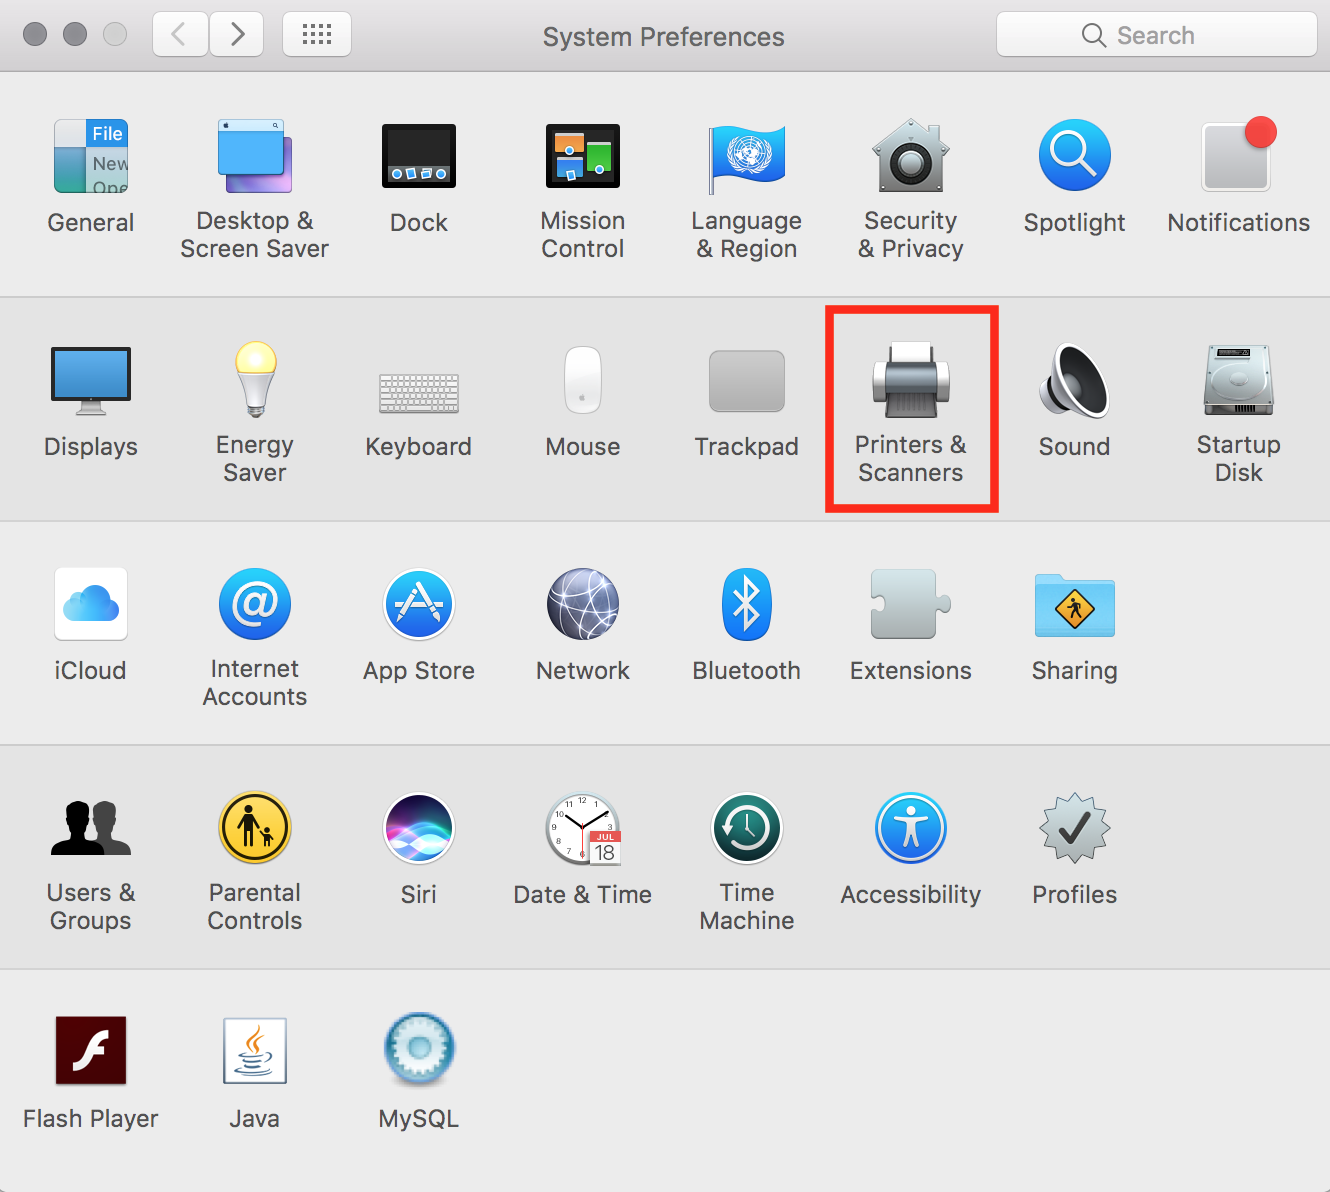
- Open System Preferences and click Printers & Scanners.
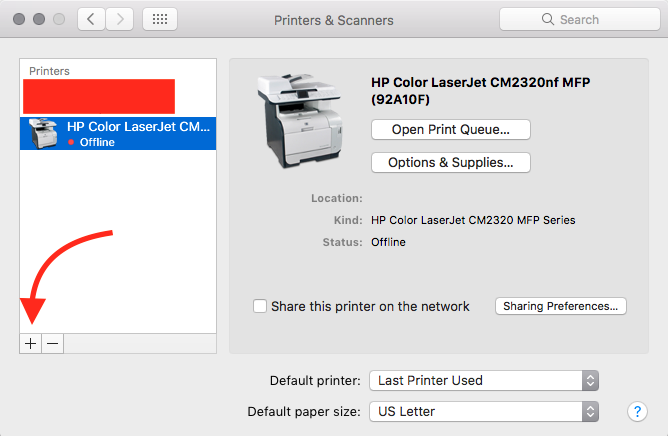
- Click the plus sign (+) to add a new printer.
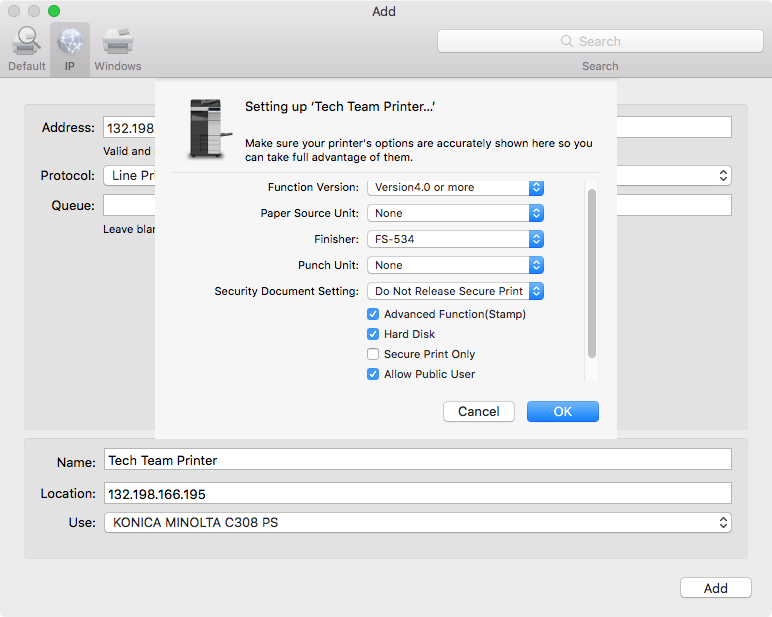
- Select IP from the options along the top of the page, and then fill in the following fields:
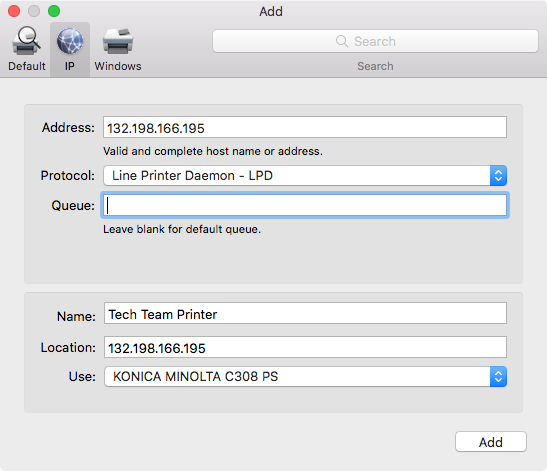
- Address: Enter the IP Address of the printer.
- Protocol: For Network Printers, select Line Printer Daemon – LPD.
- Queue: Leave this empty.
- Name: Change the name to best identify the printer. Example: Tech Team Printer.
- Location: Enter the IP Address in the location.
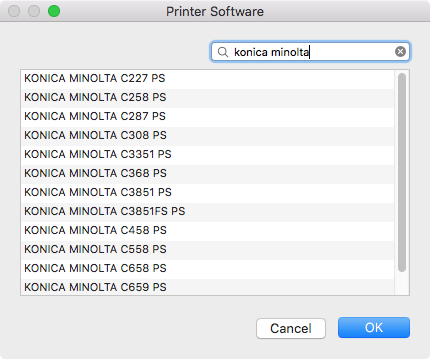
- Use: Click the dropdown, and choose Select Software.
- Search for and select the appropriate driver for your printer, then click OK.
- Click Add.
- Configure the printer’s options, and then click OK.
Configure Automatic Passwords/Print Codes
- In a Microsoft Office application (Microsoft Word, Microsoft Excel, etc.), press command-p to access print settings.
- Click the Copies & Pages option, then select Output Method from the dropdown menu.
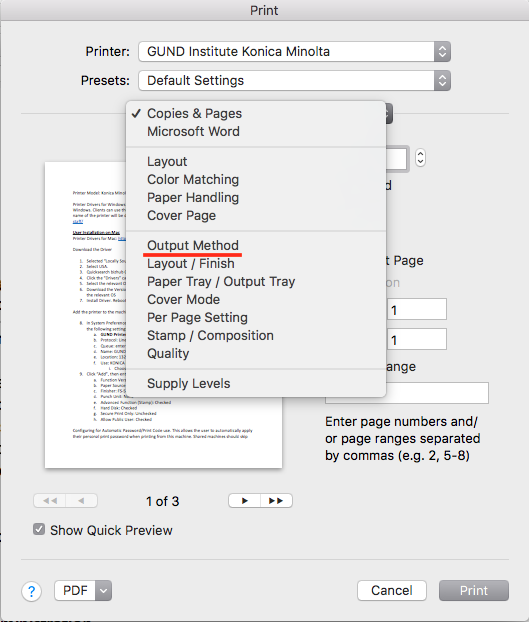
- Check the Account Track setting.
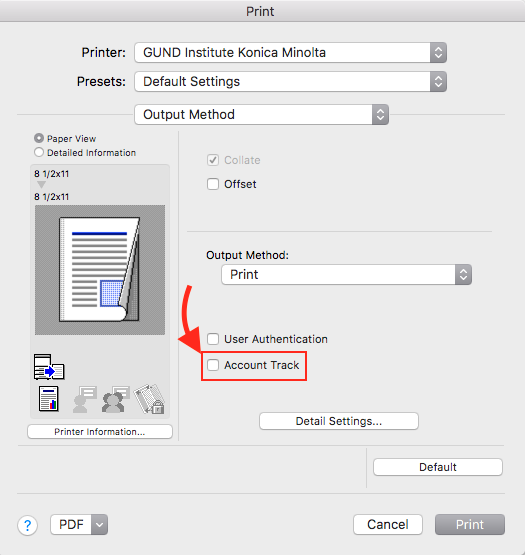
- The following dialogue box will pop up.
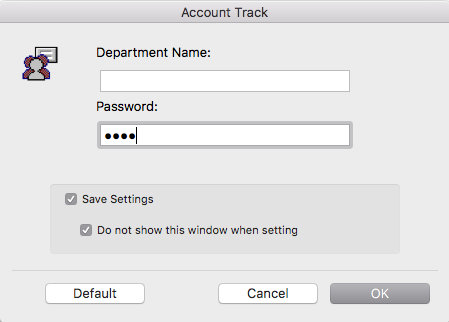
- Keep the Department Name empty.
- Enter the user’s password/print code in the Password field.
- Check the Save Settings and Do not show this window when setting options.
- This allows the user to automatically apply their personal print password when printing from this computer. Shared computers should skip this section.
- Press OK
- Close the print settings.
Advanced Configuration, Troubleshooting, and Descriptions
Clearing a Jammed Queue
In situations where a job becomes stuck, and manually deleting the job on the sever does not work, you may need to manually remove all jobs from the print queue.
Services | Print Spooler | Stop
- Open the C:\Windows\System32\spool\PRINTERS directory
- select all items and delete them.
- Restart the Print Spooler
General Printer Driver Information
A printer driver is a set of files that enable the printer and your operating system to communicate with each other. All printers require drivers, regardless of how you obtain them or what way you use them. Default drivers may provide sufficient functionality for most printing needs, but we recommend installing Konica Minolta’s Universal Print Driver or printer-specific drivers when possible.
You can find Operating System specific instructions in the macOS and Windows sections below. The download site for Konica Minolta is: https://www.biz.konicaminolta.com/download/driver.html.
In general, we use:
- Windows – PCL6 drivers
- macOS – PS drivers
You will require administrator privileges to install drivers. See the sections on Windows or macOS for printer installation and configuration above.
Scanning to a Network Shared Folder
When you scan a document or picture, the result can be a PDF or image file such as a TIFF. If that file exceeds the 20MiB limit on emails (typically around 40 pages), the document will cannot be sent. To work around this limitation, save the document directly to a file share.
This is accomplished by assigning the printer a username and password with which to authenticate. These credentials are given rights to a department shared folder where the generated files can be saved. These credentials, server information, and directory path are all stored in an address book entry on the printer.
- Request a Service Account
Email the dhcp@uvm.edu account and request a service account be created for your printer. The account will have an odd looking name in the form of sa_deptacronymcopier (e.g. sa_etskonmin, sa_absckyoc) that we refer to as a Service Account (sa_). This account has extremely limited access and exists solely for the purpose of depositing files in one location. - Create a Destination Folder for your Scans
A suitable location must be created as the destination of the address book entry. A small group may choose something similar to S:\departmentname\scans. However, any path(s) can be used, but the deeper in a directory hierarchy or the more paths you use (i.e. separate, per person scan locations), the more complex and high maintenance the setup becomes. - Grant Folder Access to your Service Account
To authorize the service account to drop files into your destination folder(s), the account must be authorized at each step along the path to the folders. The lower in your hierarchy of file folders, the easier this is.- First, grant entry into the departmental share but no deeper and give the account only traversal rights to the folder. This can often be accomplished by using a security group with “ListTop” in the name. These vary in naming, but the implication is that any members can list files in but no farther, thus top layer only. If such a group does not exist, you can create your own and use it. The alternative is to add the service account to the root folder with traversal rights to this folder only using the advanced security tab.
- If the next step is the destination itself (simplest scenario, e.g. S:\dept\scans), add the service account to the folder, and grant that account read and write access.
- Otherwise, continue adding the service account to all intermediate folders down to your scan folder, giving traversal rights to this folder only at each step. When you arrive at the destination scan folder, grant read and write, but not the advanced this folder only inheritance option, in case you intend to use the complex setup of one scan folder per person.
- Create an Address Book Entry
Create a new address book entry, selecting SMB as the type. A display name will be needed. For the simple scenario of a single destination, consider using “Scan2Shared” as it displays well on most copier consoles and conveys meaning well. Choose the alphabetic range it will appear in (i.e. PQRS) and make sure the Main checkbox is set. Set the checkbox for “Please check to enter host name.” and enter files.uvm.edu as the host name. You may also use the direct name of the file server if you know where your department share is hosted, but it will change the path slightly and may break if your share is moved to another server.
The File Path field will be something of the form “shared\dept\scans” if using the server name of files.uvm.edu. If you did not use the DFS version of the server name, opting to directly point to your share on a specific server, it would resemble “dept\scans” removing the “shared part” of the name. This was necessary for older copiers prior to Konica Minolta. The User ID will be the service account name and the password will typically be something very long and require pasting into this field. OK that form to complete the setup. Unfortunately, there is no “Test” button as with previous copier brands, so confirming a working address book entry requires actually scanning a document and checking for success or listening to a failure beep sequence from the copier itself.
Service account credentials are stored in the Address Book entry on the copier. The password is not visible and can only be changed.
There is no test button as with the previous Kyocera copiers.
Konica Minolta copiers are capable of traversing Distributed File Services (DFS) pointers, so scanning to \\files\shared\department\Scanner folder would be the normal choice.
Fax Forwarding
If your copier has the fax board option installed as part of your contract, the default behavior is to print all incoming faxes. A paperless and convenient option to this is fax forwarding. You may choose to have incoming faxes converted to PDF format and emailed or saved to an address or location. You may even create a group including any combination of addresses from the copier’s address book.
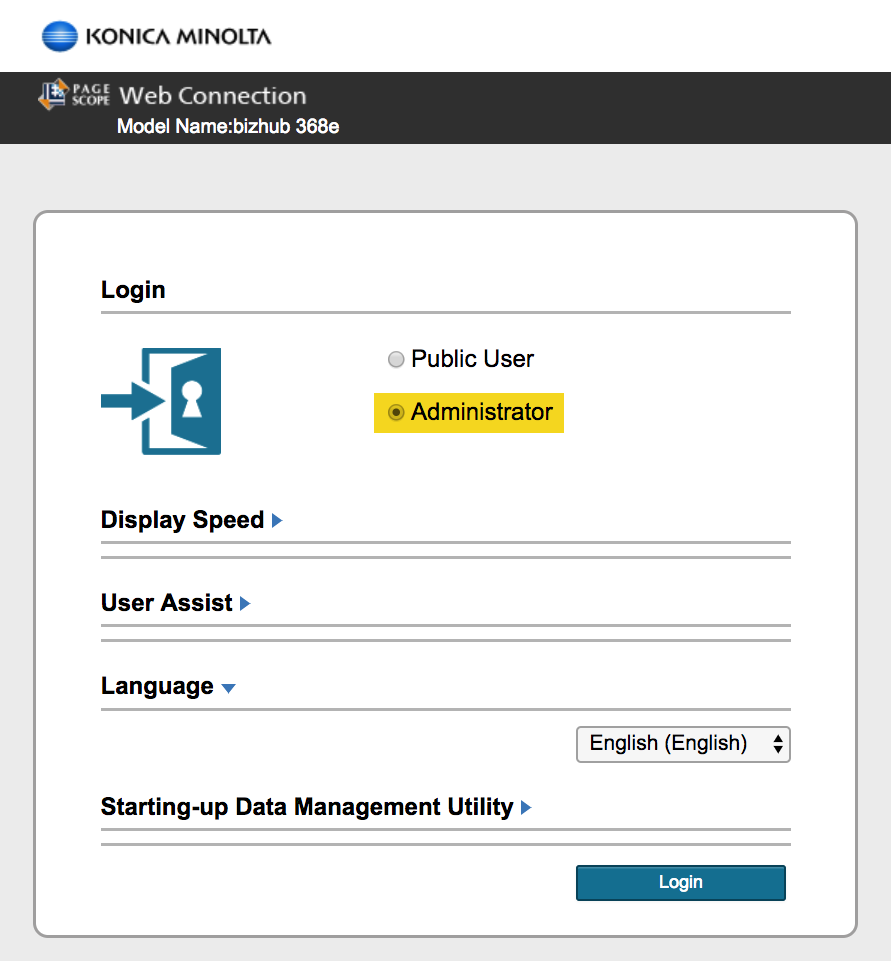
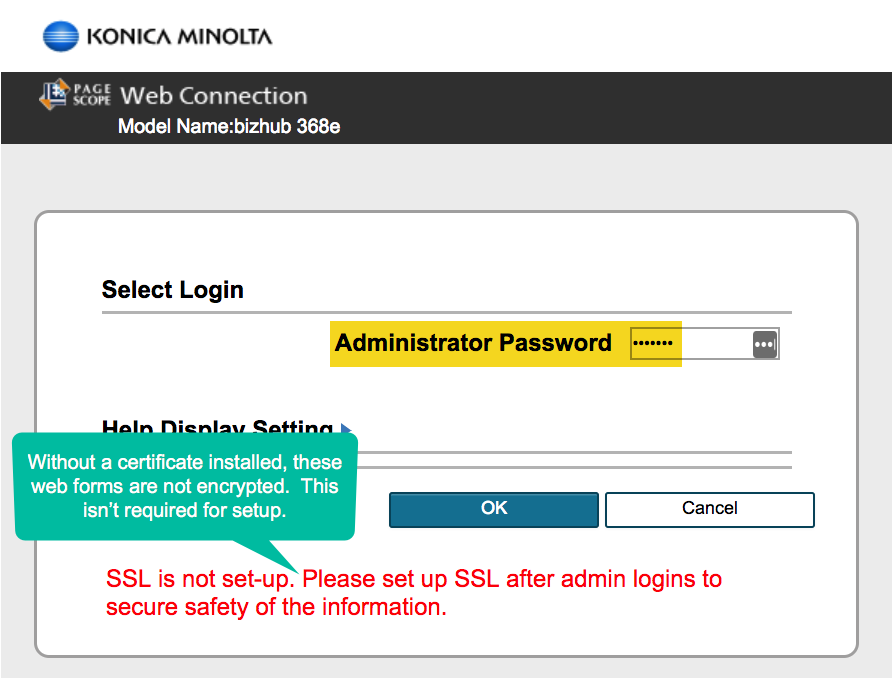
- Direct your web browser to the IP address of the copier and authenticate as the Administrator.
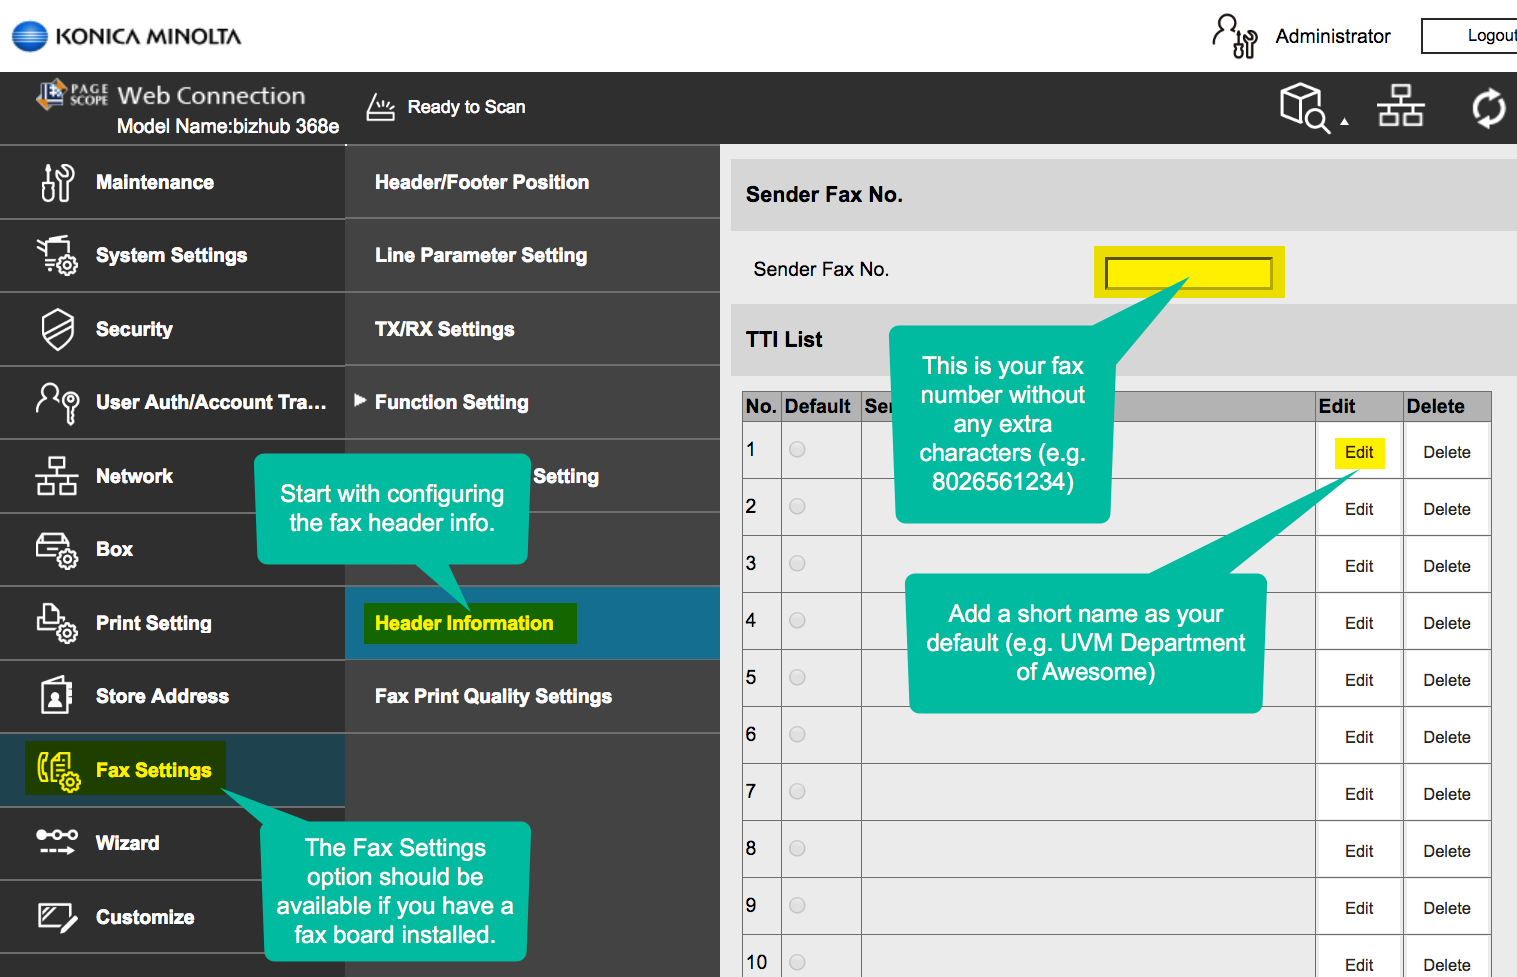
- First, we’ll configure the headers placed on outgoing faxes by adding your fax phone number and assigning a name indicate your group or department. The phone number should be all numbers, no spaces. You can create multiple names that may be selected from while sending.

- Now we select the receive data operations setting and choose Forward TX Setting, finishing with OK in the bottom right corner.
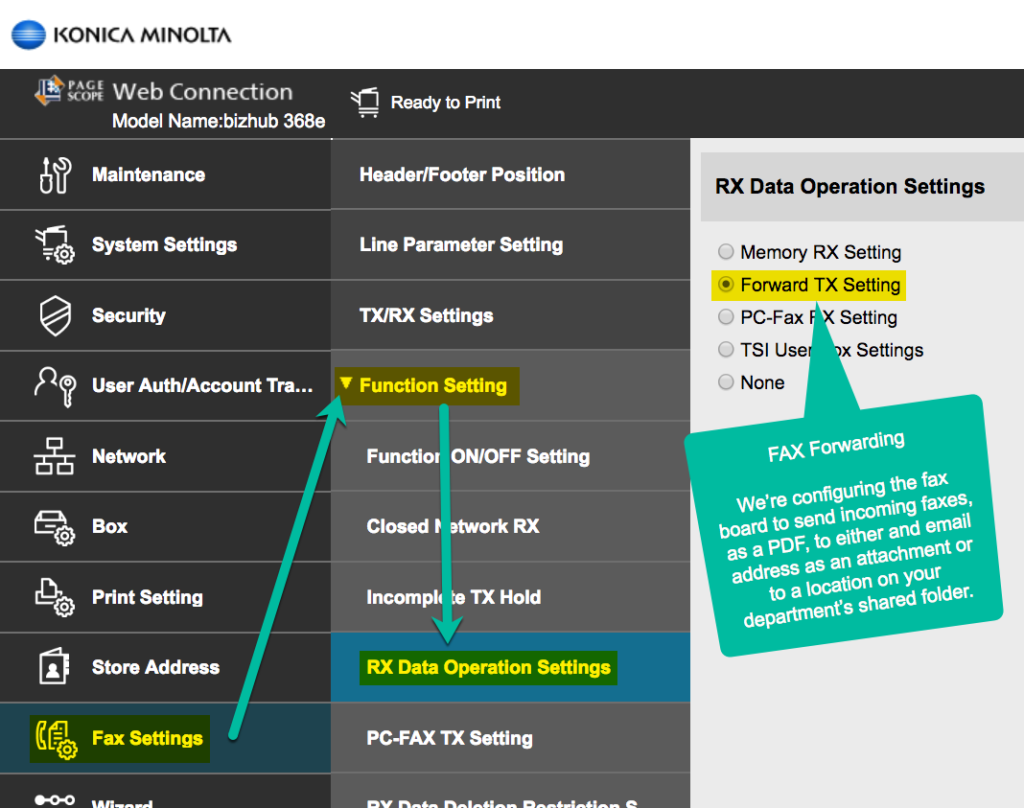
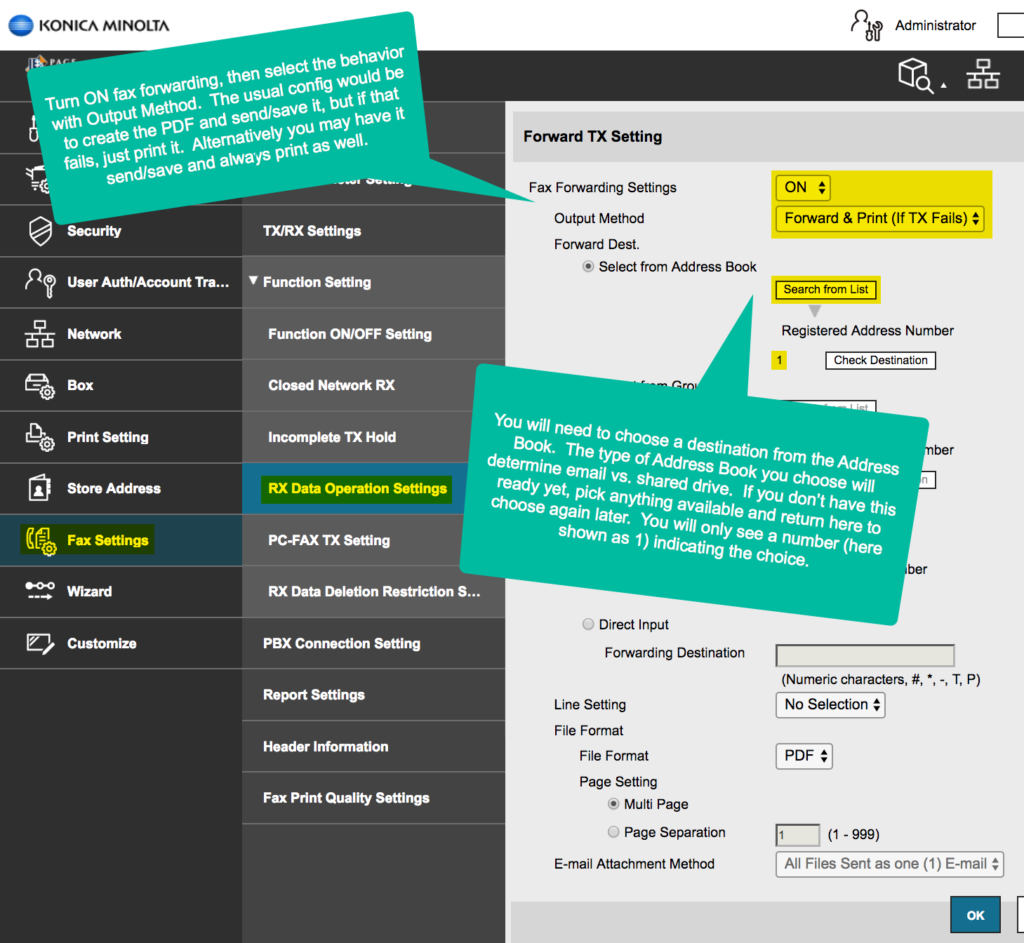
- Here we set the forwarding to ON and choose a name or group of names from the address book to forward to.


Account Tracking, Print Codes, Job Accounting
Account Tracking is a feature that limits who can print to a device to only those in possession of a valid PIN or print code.
Enabling and maintaining this feature adds complexity to machine and client setup, but may be worthwhile for those seeking extra control over their printer. Please contact the UVM Tech Team if you’re interested in setting this up.
User Boxes
User Boxes are a method of temporarily storing print jobs on a printer to be released and printed upon user arrival.
Typically, these are used to provide a level of privacy when printing sensitive materials, and to limit printing when someone is using the device for a larger job.
A box must be created on the copier. Take note of the box number when it is created, as this will be needed to configure the print queue locally.
There are a number of configuration options for user boxes, including the ability to auto delete print jobs left for prolonged periods.
When a server’s queue has been added to the copier, or the driver is installed to create a local queue, the queue must be configured to store the job instead of printing, and the box number must be supplied.
Printer Support at UVM
SymQuest Printers
While Faculty and Staff may call SymQuest directly, we recommend they first contact the UVM Tech Team.
The person who calls SymQuest will need to provide the device number found on the metal plate attached to all SymQuest printers.
SymQuest Phone: (802) 658-9890
UVM-Owned Printers
For printers not provided by SymQuest, contact the UVM Tech Team.
If available, please have your printer’s IP Address, MAC address, and physical location ready.