
How to use the Syllabus Link (Above the Table of Contents)
Single Syllabus File: Go to “Content & Activities” and click “Syllabus” at the top of the left-hand menu. This area allows you to upload a single syllabus file and add a description to it. If you have only one syllabus file, you can use this area for your syllabus.
If you had a link on the course menu in Blackboard labeled Syllabus, it will be displayed in your Brightspace course Table of Contents with a link called Syllabus. Note: If you choose to use the default syllabus link at the top of the menu, delete the duplicate syllabus link found in the Brightspace Table of Contents.
You cannot edit the name of this Syllabus link above the Table of Contents, however, if you do not upload a file in that area, this link will not display to students.
- Multiple Syllabus Files: If you have a multi-document syllabus, you don’t have to use the Syllabus link above the Table of Contents menu. Instead, create a Module titled Syllabus Files on the Table of Contents, Multiple files can be added to the Syllabus Files module.
Clean up the Table of Contents
Content that, in Blackboard, was found in the Course Menu will now be found in “Content & Activities” on the top Course Navigation Bar in Brightspace.
When migrated from Blackboard, Content Areas are now what Brightspace calls Modules and are listed in The Table of Contents.
Delete Excess Modules
To delete excess or outdated modules you no longer want or need in your course, click the module to open it. At the top of the module page, click the action button (to the right of the title text) and select “Delete Module.”
Note, you may see links to Blogs, Journals, or Wikis with a Hidden icon (An eye with a slash). Please see these articles about how to remove “phantom” tools that don’t exist in Brightspace, and tools that can be used as alternatives.
Remove Modules on the Table of Contents with Links to Assignments/Quizzes/Discussions
Blackboard did not have a way for students to view a list of all the assignments, quizzes, exams, etc. in a course in one place. This led many faculty to create Content Areas linked from the Blackboard Course Menu containing these course activities. If you organized your course in this way, you will now see Modules in the Table of Contents titled Assignments, Quizzes, or Discussions, etc. These can be deleted. Why?
Since in Brightspace students (and you) can access all Course Tools from the Course Navigation Bar, you do not need these Modules in your Table of Contents. Deleting the Module in the Table of Contents will not delete the Assignments, Quizzes, Discussions that are in your course, housed in Course Tools (located on the Course Navigation Bar). Remember, you should only delete these things from the Brightspace Table of Contents, in Content & Activities. DO NOT DELETE from Course Tools.
Additionally, we recommend that you create links to your Assignments, Quizzes, Discussions within Modules, so that students have more context to complete them.
Re-link or Delete Missing Images
If when clicking through the pages in your Table of Contents, if you see a missing image icon, chances are the file is still present somewhere in the course’s file storage area. Simply re-link it, re-upload it, or delete the missing image icon. To re-upload an image:
- Edit the item that should contain the missing image.
- In the HTML Editor, click on the frame where the missing image should be.
- Several buttons will appear above the missing image’s frame. Click the “Image Options” button (the button furthest to the right), browse to where the picture is on your computer, and select it.
- Click the “Add” button.
- Add functional alternative text for accessibility if the image conveys information visually.
- Click the “OK” button.
Flatten the Course Hierarchy as Much as Possible
By flatten, we mean move content to eliminate subfolders that require students to click several times to view the content. A flatter design of content means that most options can be viewed at the top level, rather than buried in folders.
Like Blackboard’s content folders, Brightspace allows you to place modules within other modules. However more than 2 levels has the potential to obscure important information from students, especially on a mobile device using the Brightspace app, Pulse.
Use submodules judiciously, for instance to contain several like things. An example would be a group of several journal articles. If you have a submodule which only contains one or two items, consider moving them up into the parent module and deleting the submodule. Here are some other guidelines to help you avoid confusion for you and your students.
Move Weekly/Sequential folders to the Top-Level/Root
It was common practice in Blackboard to have a single link in the course menu (such as Course Materials) which when clicked would reveal a sequential set of folders. In Brightspace, this results in a single top-level module containing many submodules. To move a module to the top level, click the image (dots cluster) to the left of the module and drag it out of the containing section. Brightspace refers to the top-level of modules as the “root” of the course.
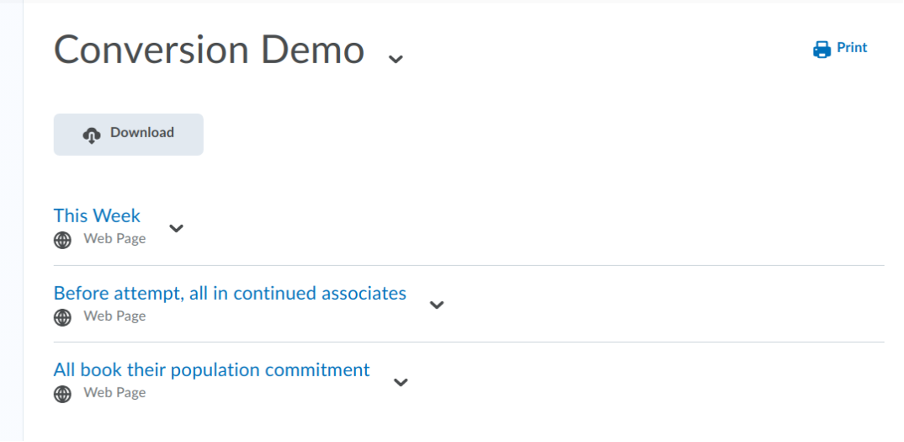
Consolidating Numerous “Web Pages”
In Blackboard, there were “Items” but in Brightspace they’re called “Web Pages.”
If, in Blackboard, you chunked your content as “items” it’s a good idea to consolidate them all into one Brightspace Web Page.
After migration, each former Blackboard Item displays as its own Brightspace Web Page. When a student enters a Brightspace module, they will see a list of Web Page titles and not the content contain on the pages. Students need to click on the first Web Page listed and then use navigation arrows to move from page to page. See the illustrations below for examples.
In Blackboard, a Content Folder with 3 Items (small amount of text):

In Brightspace, after migration it appears as a Module with 3 Web Pages (note only the Web Pages title display from this view)
Blackboard items come over with just their header showing, you must click on that header to read the text you could previously see in Blackboard.
If you don’t like how this displays, you can replicate how Blackboard displayed content by using the DESCRIPTION field of a Brightspace Web Page. Note, this fix works best only if your Blackboard Items only contained a small amount of text.