
![]() Qualtrics is a web-based survey tool that allows users to quickly create, distribute, and analyze surveys – from basic to very complex – with no previous experience and little time to learn.
Qualtrics is a web-based survey tool that allows users to quickly create, distribute, and analyze surveys – from basic to very complex – with no previous experience and little time to learn.
Getting Started
- Go to qualtrics.uvm.edu
- Log in with your UVM NetID and password, then Duo Multi-Factor Authentication.
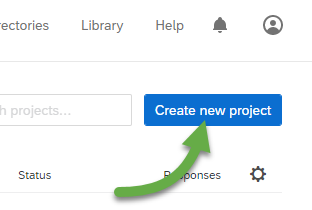
If you do not have MFA set up, see the Duo Multi-Factor Authentication guide to enroll a device. - Click Create a project (or + in the same location in smaller browser windows).
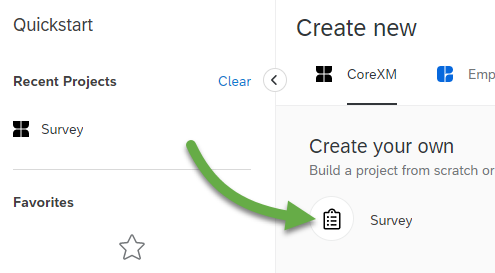
- Click Survey.
- Click Get Started.
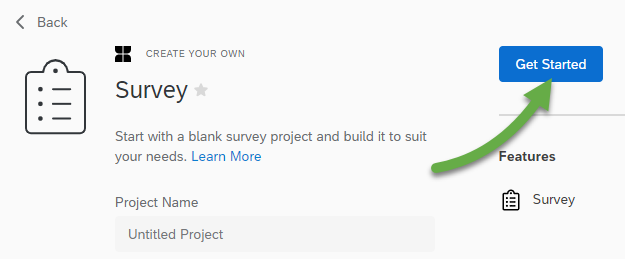
This will bring you to the Survey Editor for your first survey. For more information on creating surveys and Qualtrics in general, see the guides linked below.
Require UVM Authentication for Survey Takers
You may find it necessary to require UVM NetID authentication for survey takers, the steps below will guide you through the process of adding authentication as a requirement.
- Log in to https://qualtrics.uvm.edu and select an existing survey, or choose to create a new survey.
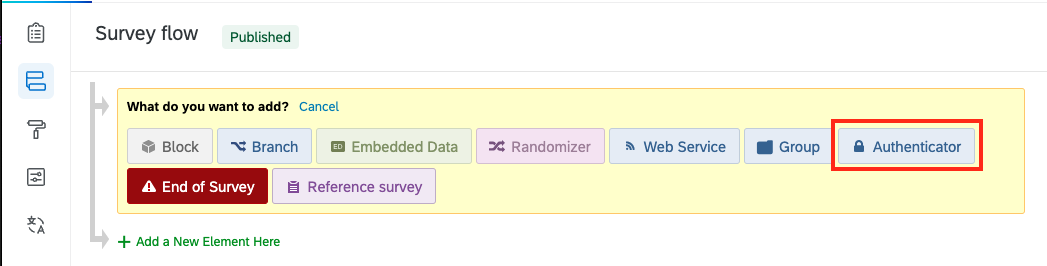
- Select the Survey Flow icon, then click the Add a New Element Here link.
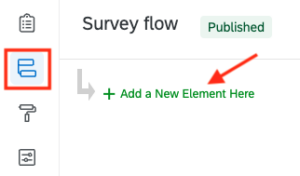
- Click the Authenticator button.
- Enter the following settings:
- Authentication Type: SSO
- SSO Type: Shibboleth
- Connection: UVM NetID without Duo Authentication or UVM NetID with Duo Authentication
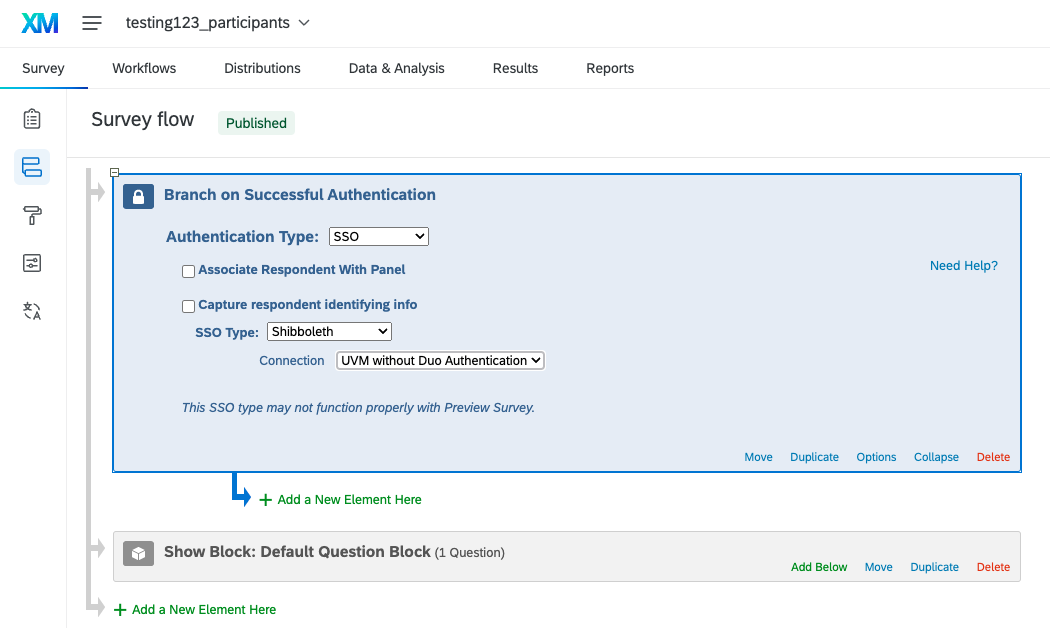
- Apply the changes, then re-publish your survey.
- The survey will now prompt participants for NetID authentication.

Use SMS Distribution for your Survey
Qualtrics SMS Distribution enables you to distribute your survey via text message. If you are interested in using this feature, please contact the UVM Tech Team so your request can be routed appropriately.
Qualtrics Groups
Qualtrics Groups allow multiple users to collaborate and share survey assets, libraries, and data within a defined team or department.
Benefits of Using Groups:
- Shared access to branded survey templates and question libraries
- Centralized contact lists for consistent distribution
- Easier collaboration on survey design and reporting
- Streamlined data governance and access control
Requesting a Qualtrics Group:
To request the creation of a new Qualtrics Group for your team or department:
- Submit a help request with the following information in your request:
- Request for a Qualtrics Group
- Desired group name
- Purpose of the group
- NetIDs or emails of initial group members.
Support
For Qualtrics questions and information, we highly recommend you take advantage of Qualtrics Support pages and/or the Basecamp video guides, and contact the Tech Team Help Line if you are unable to find an answer to your question.
Written Guides
Qualtrics Support site has a number of written guides on survey creation, distribution, analysis, etc. All guides can be accessed from qualtrics.com/support, but for links to the basic overviews of each section within the Survey Editor, see below:
Video Guides
Qualtrics provides video guides on their Experience Basecamp site. To access these guides, follow these steps to log in:
- Go to basecamp.qualtrics.com
- Navigate to a video you would like to watch.
- If you’re not sure where to start, click the box that says “New to CoreXM? Start Here.”
- Click Configuring Your CoreXM Project then BEGIN.
- Click Building a Survey to Capture X-Data then Creating a Project.
You will now be brought to the login page.
- Select Sign in with SSO at the login.
- Enter “uvermont” as the Organization ID, then click Continue.
- If not already logged in elsewhere, you will be asked to log in with your UVM NetID and password, then Duo Multi-Factor Authentication.
If you do not have MFA set up, see the Duo Multi-Factor Authentication guide to enroll a device. You will need this to log into the UVM Qualtrics site as well. - You should now be logged in and able to start the first video.
If neither of these are sufficient for your support needs, contact the Qualtrics support team.
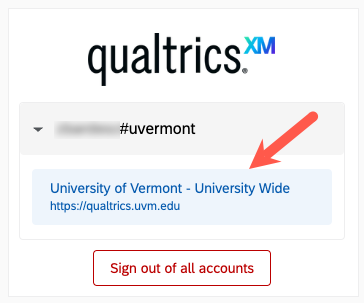
- Visit https://qualtrics.uvm.edu and sign in with your UVM NetID and password, if prompted.
- Click the question mark (?) in the top right corner, then click Contact Support.

- Under the section marked with your_netid#uvermont, click on the University of Vermont – University Wide link.
FAQ
I get an error that I've reached the maximum number of weekly emails. How do I get this raised?
By default, our entire Qualtrics brand is limited to 300,000 emails/week. Individual users are further restricted to 500 emails/week.
If you require the ability to send more than 500 emails/week, please contact the Tech Team, including an explanation for how many weekly emails you intend to send and why.