
Outlook offers significant configuration options for handling incoming messages. In this guide, you will find instructions on blocking senders, marking senders as safe, setting up forwarding, and creating or removing inbox rules.
In addition to configuring the way your mail client filters emails, you may also follow the steps detailed in the following guide to report an email as malicious, or to report a false positive or false negative: https://www.uvm.edu/it/kb/article/proofpoint.
Blocking a Sender
If spam messages appear in your inbox, you can block the sender or domain. This is a quick and straightforward process, but it has limited configuration options. If you require a more complex rule, please see Creating an Inbox Rule below.
Outlook Online and Outlook for Windows
Right-click an email from a sender you wish to block, then select Block > Block sender.
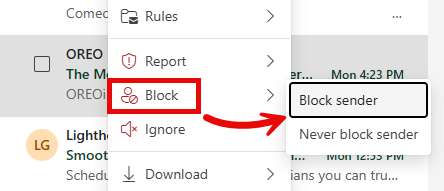 This will add the sender of the selected email to your Blocked Senders list. To undo this, see the Managing Blocked Senders section below.
Outlook (classic) for Windows
Right-click on an email from a sender you wish to block, and then select Block > Block Sender.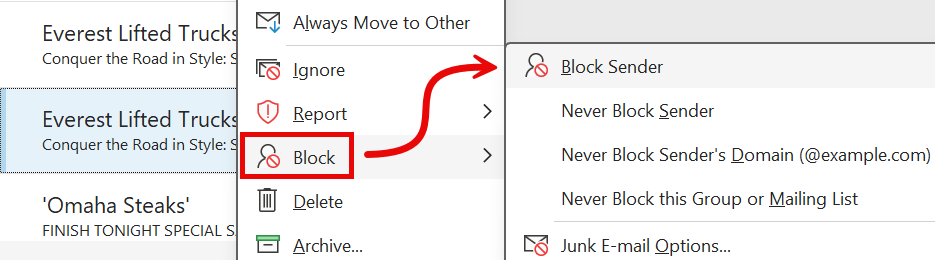 This will add the sender of the selected email to your Blocked Senders list. To undo this, see the Managing Blocked Senders section below.
Outlook for macOS
Right-click (or control-click) on an email from a sender you wish to block, and then select Block.
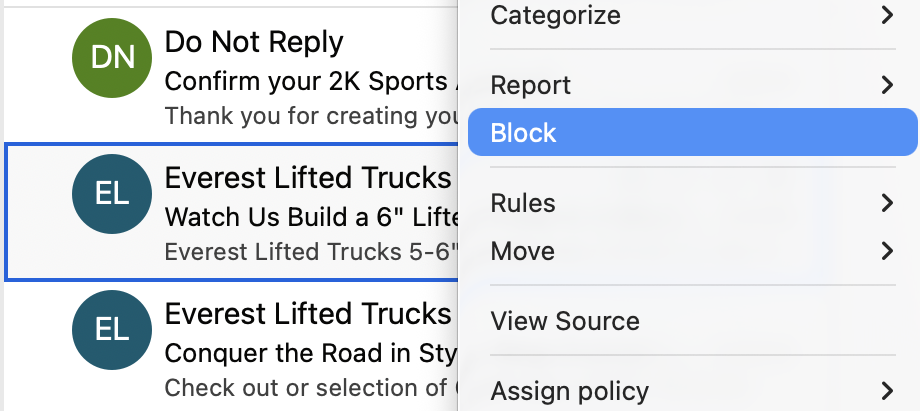
This will add the sender of the selected email to your Blocked Senders list. To undo this, see the Managing Blocked Senders section below.
Managing Blocked Senders
Outlook Online
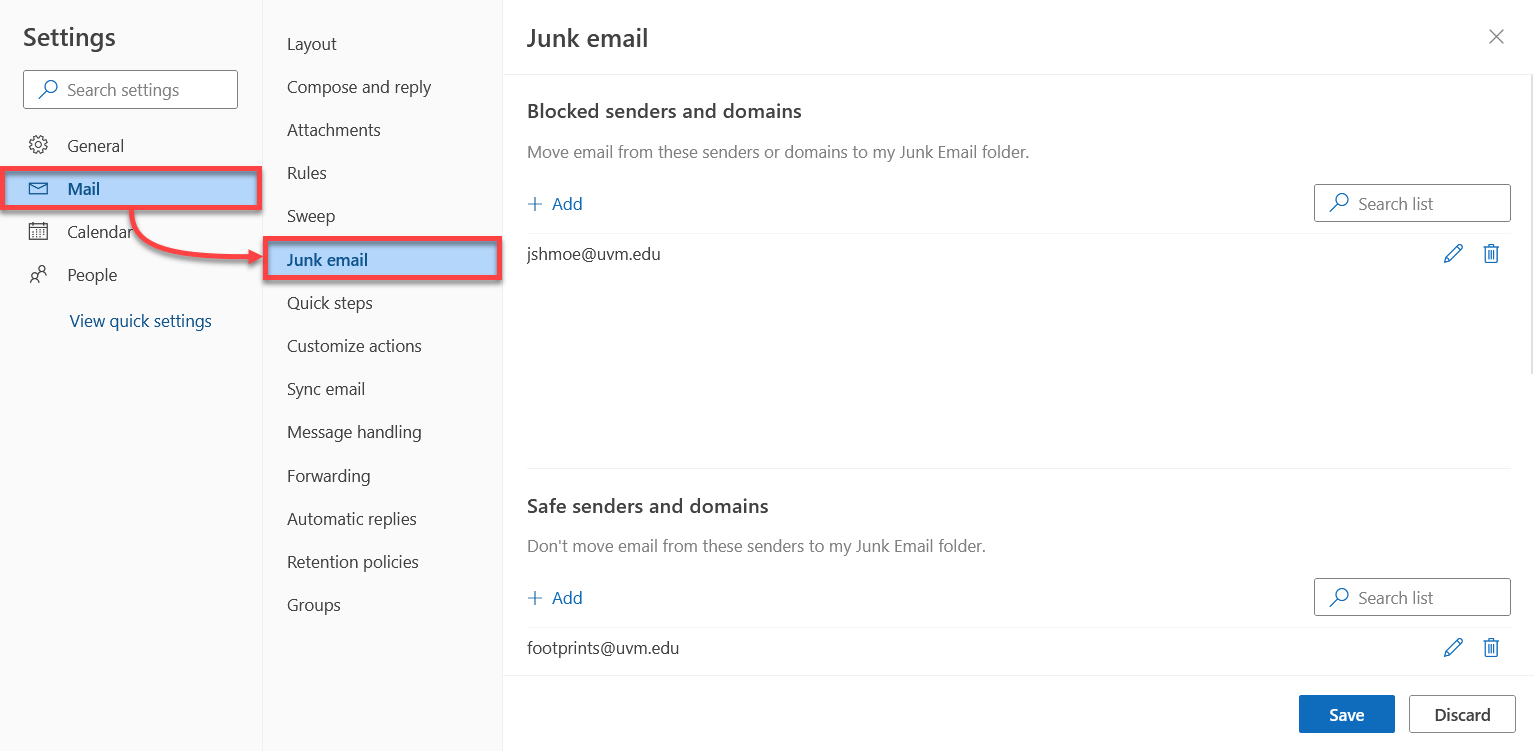
- Click the Gear icon near the upper-right corner to open the Settings menu.

- Within the Mail tab on the left side, select Junk email.

- To block a sender or domain, click + Add under Blocked senders and domains, type in the address or domain name you wish to block, and then press the Enter key.
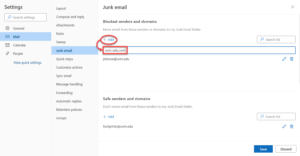
- Click Save at the bottom of the window to confirm your changes.

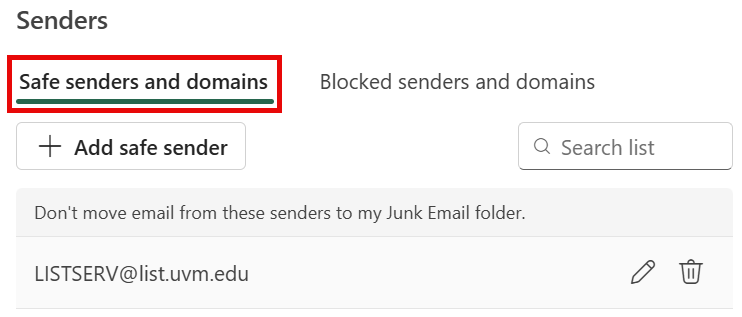
Outlook for Windows
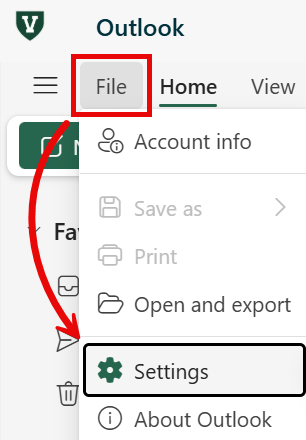
- Expand the File menu in the upper-left corner and select Settings.
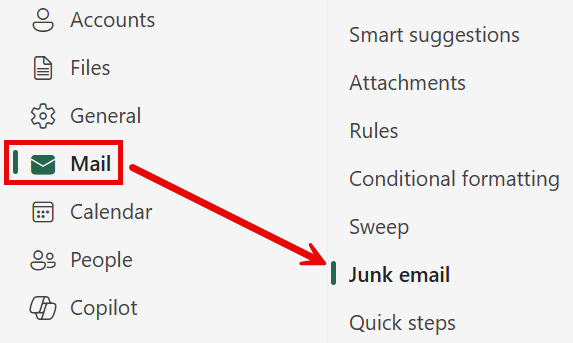
- Within the Mail tab on the left side, select Junk email.
- Scroll down to the Senders section and select the Blocked Senders and domains tab.
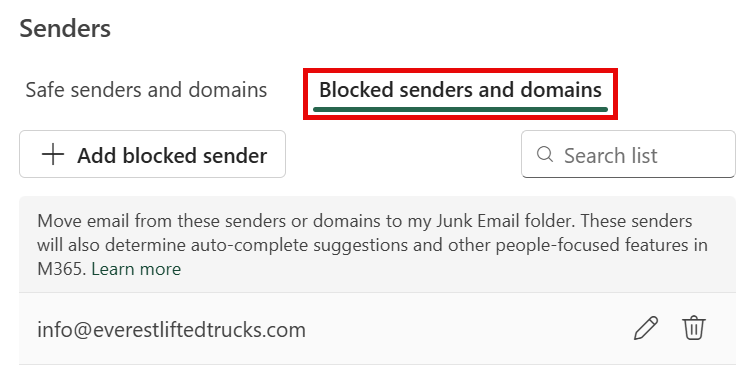
- From here, you can manually add an address or domain to the blocked senders list using the Add blocked sender button, or you can Edit () or Remove () entries from your blocked senders list.
Outlook (classic) for Windows
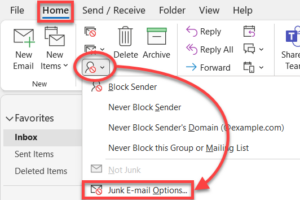
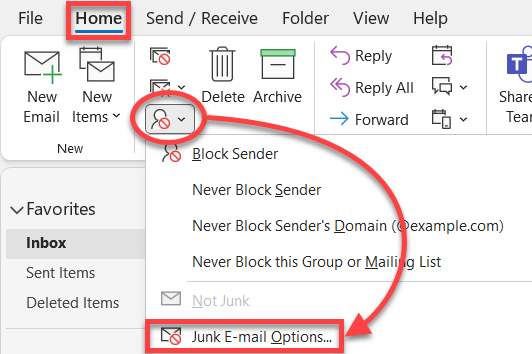
- Select the Home tab, and then expand the Junk drop-down and click Junk E-mail Options.
- Select the Blocked Senders tab.

- From here, you can manually add an address or domain to the Blocked Senders list using the Add… button, or you can Edit or Remove entries in your Blocked Senders list.

Outlook for macOS
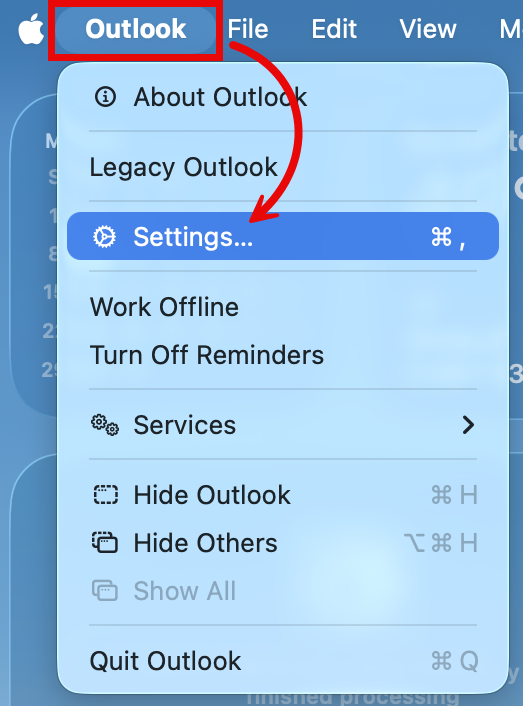
- Expand the Outlook menu in the upper-left corner and select Settings….
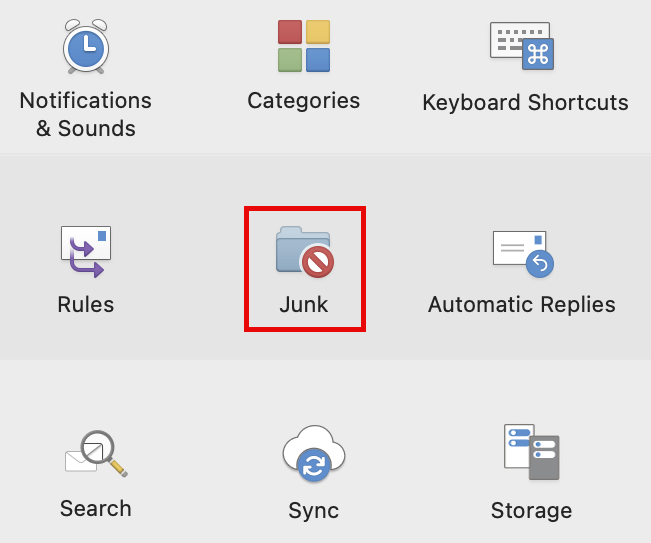
- Click Junk.
- Select Blocked Senders.
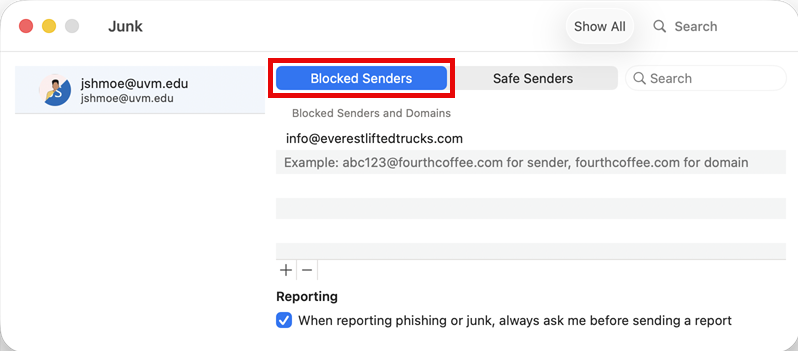
- From here, you can manually Add an address or domain to the blocked senders list using the plus icon () button, entering their email address, and hitting return on your keyboard, or Remove entries from your blocked senders list by selecting them and clicking the minus icon () button.
Marking a Sender as Safe
Conversely, if you notice legitimate emails ending up in your Junk Email folder in Outlook, you can mark the sender of these emails as safe.
Outlook Online
- Click the Gear icon near the upper-right corner to open the Settings menu.
- Within the Mail tab on the left side, select Junk email.
- To mark a sender or domain as safe, click + Add under Safe senders and domains, type in the address or domain name you wish to mark as safe, and then press the Enter key.

- Click Save at the bottom of the window to confirm your changes.
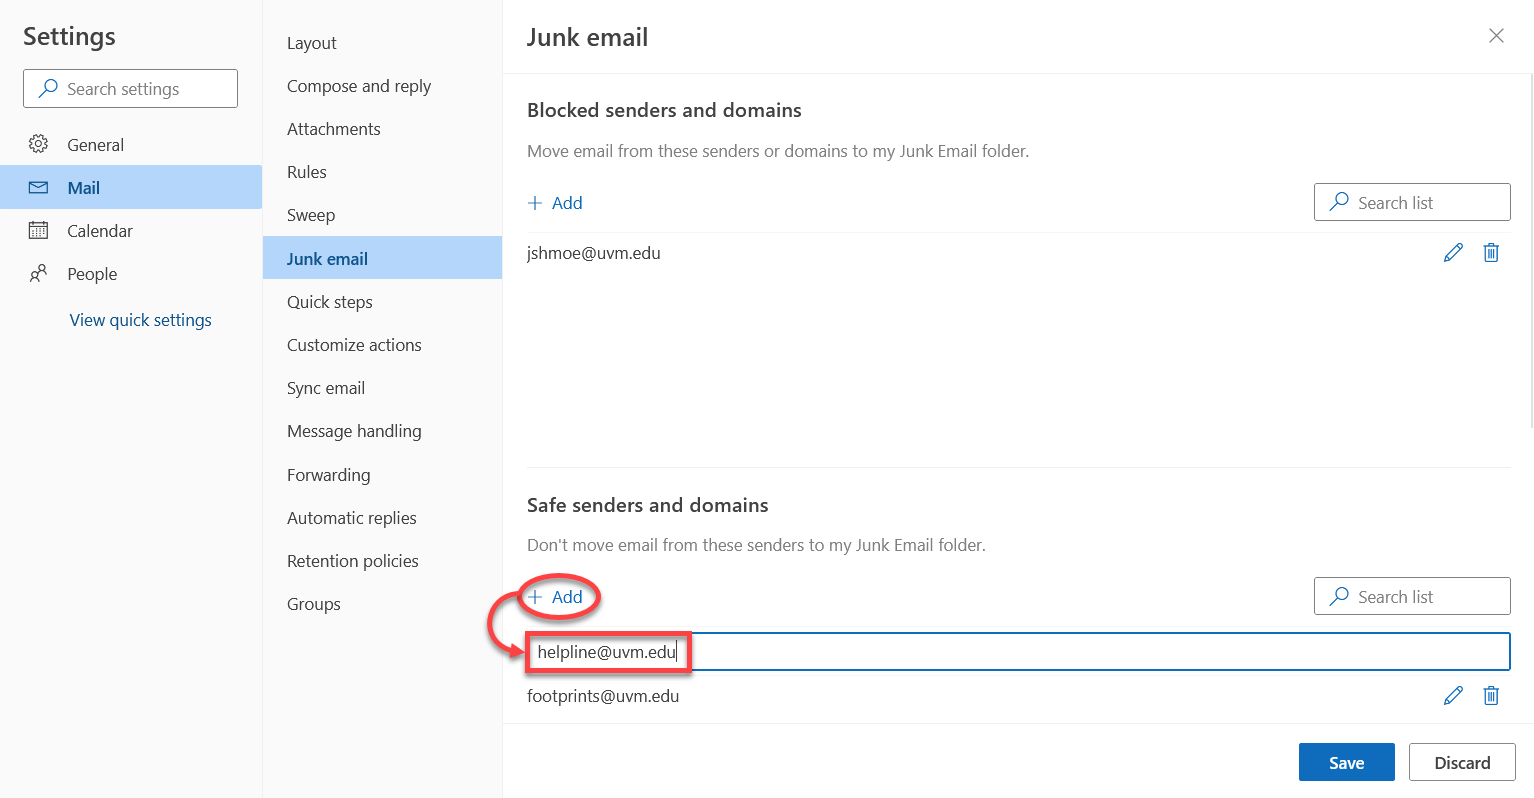
Outlook for Windows
- Expand the File menu in the upper-left corner and select Settings.
- Within the Mail tab on the left side, select Junk email.
- Scroll down to the Senders section and select the Safe Senders and domains tab.
- From here, you can manually add an address or domain to the safe senders list using the Add safe sender button, or you can Edit () or Remove () entries from your safe senders list.
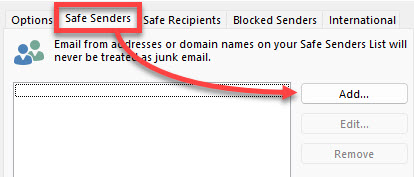
Outlook (classic) for Windows
- Select the Home tab, and then expand the Junk drop-down and click Junk E-mail Options.
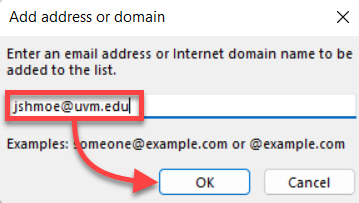
- Select the Safe Senders tab and click Add.

- Enter the address or domain name you wish to mark as safe and click OK.
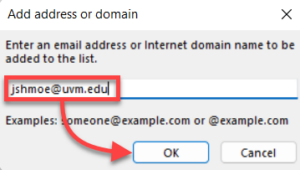
- Click OK at the bottom of the Junk Email Options window to confirm your changes.
Outlook for macOS
- Expand the Outlook menu in the upper-left corner and select Settings….
- Click Junk.
- Select Safe Senders.
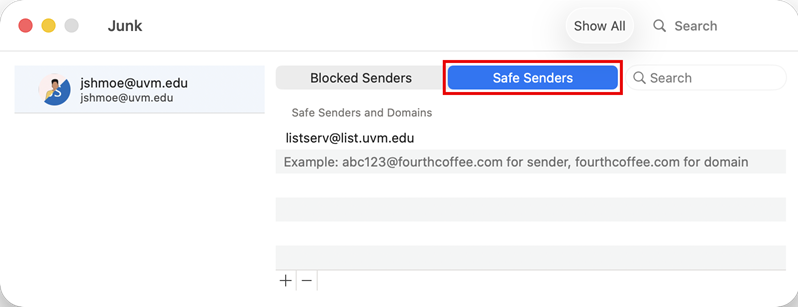
- From here, you can manually Add an address or domain to the safe senders list using the plus icon () button, entering their email address, and hitting return on your keyboard, or Remove entries from your safe senders list by selecting them and clicking the minus icon () button.
Forwarding
Outlook Online
- Log in to Outlook Online.
- Click the Gear icon near the upper-right corner to open the Settings menu.
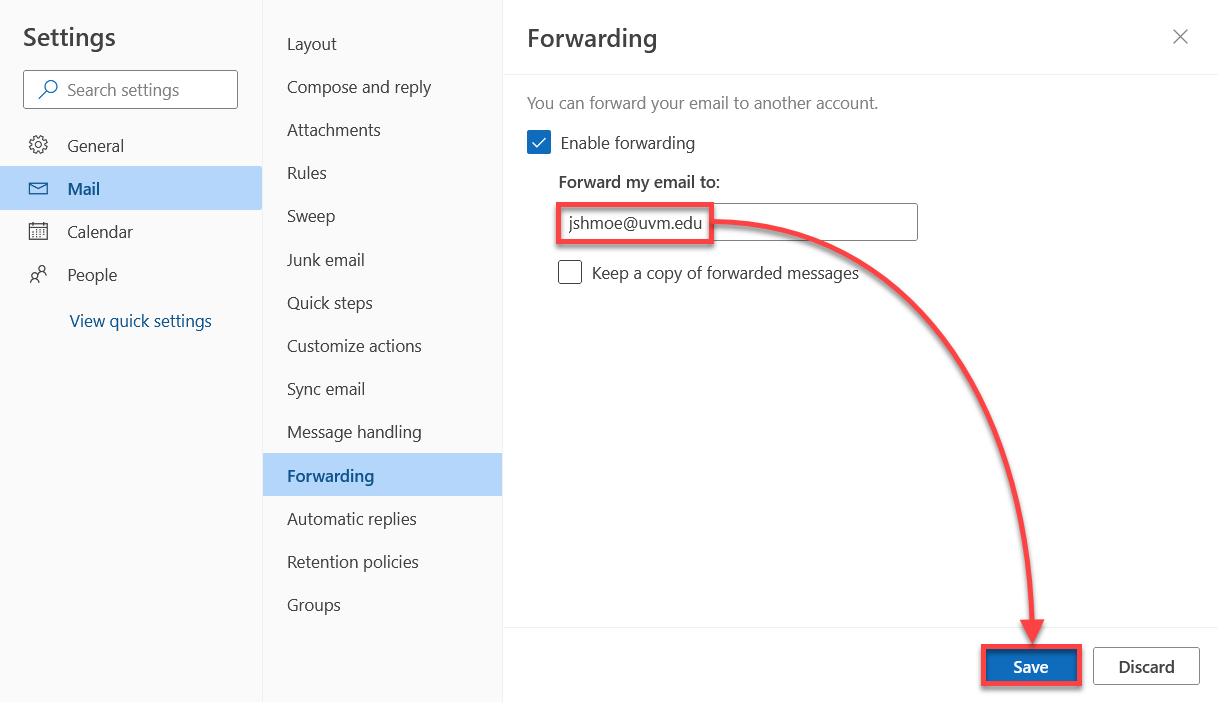
- Within the Mail tab on the left side, select Forwarding, and then check the box marked Enable forwarding.

- Enter the address you would like to forward your email to, and then click Save.

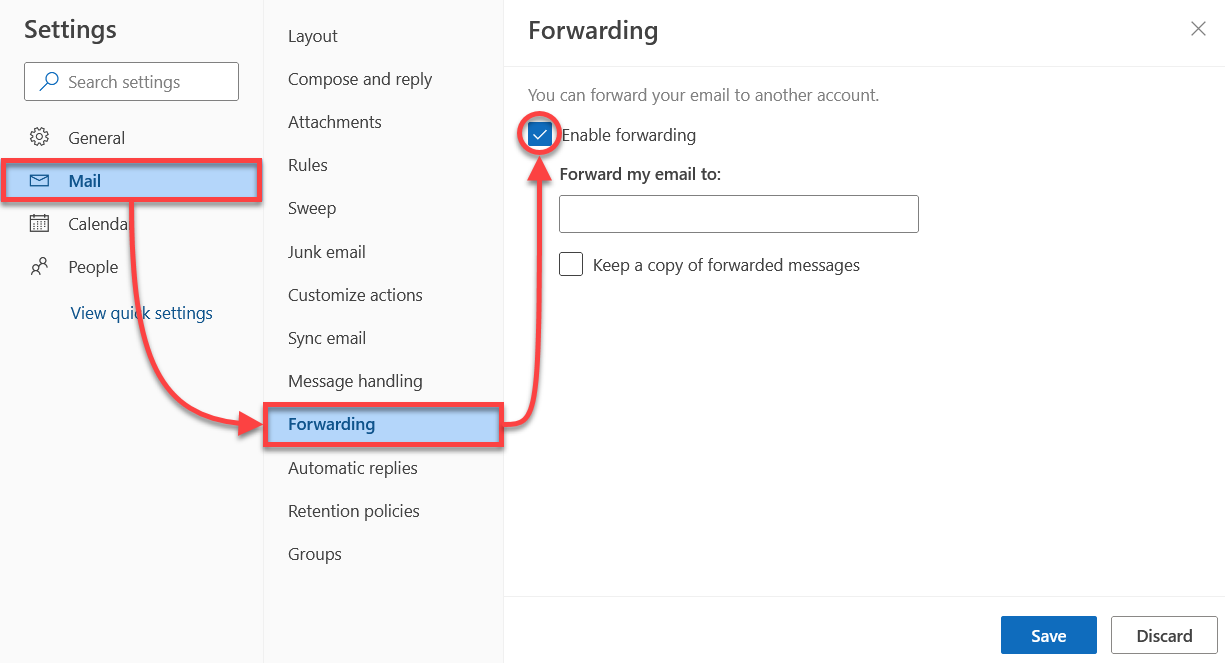
Outlook for Windows
- Expand the File menu in the upper-left corner and select Settings.
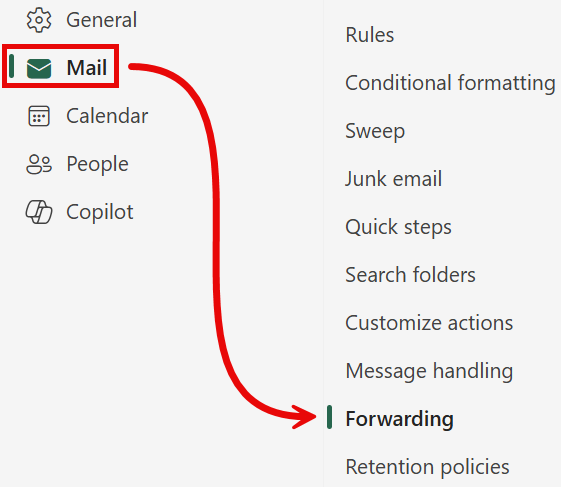
- Within the Mail tab on the left side, select Forwarding.
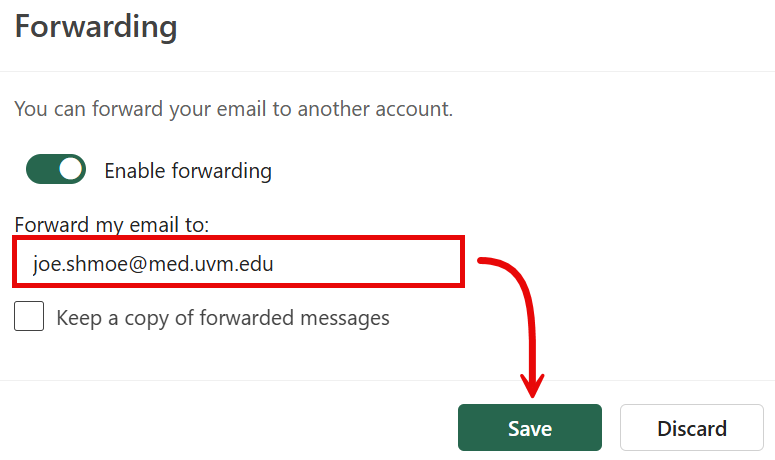
- Toggle the Enable forwarding switch on ().
- Enter the address to Forward my email to, and then click Save.
Creating an Inbox Rule
Inbox rules can automatically move mail from your inbox to a selected folder, categorize messages by custom criteria, and much more.
Outlook Online
- Click the Gear icon near the upper-right corner to open the Settings menu.
- Within the Mail tab on the left side, select Rules, and then click + Add new rule.
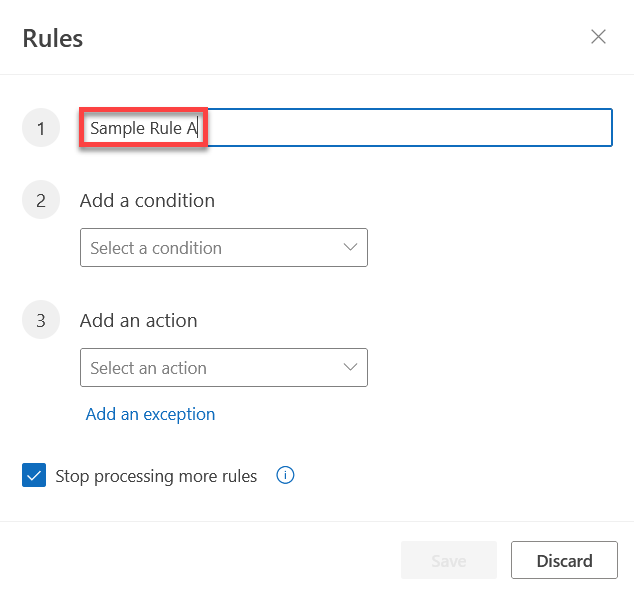
- Enter a name for your rule.

- Choose a trigger condition, and then choose an action that should take place when the condition is met.

- When you’re done, click Save.


Outlook for Windows
- Expand the File menu in the upper-left corner and select Settings.
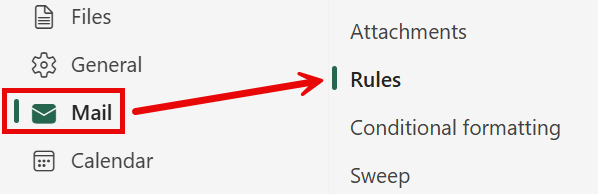
- Within the Mail tab on the left side, select Rules.
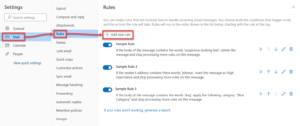
- Click Add new rule.
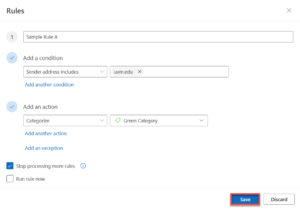
- Name your rule, Add a condition for which emails to filter, and Add an action to choose what to do with all those emails. Here is an example:
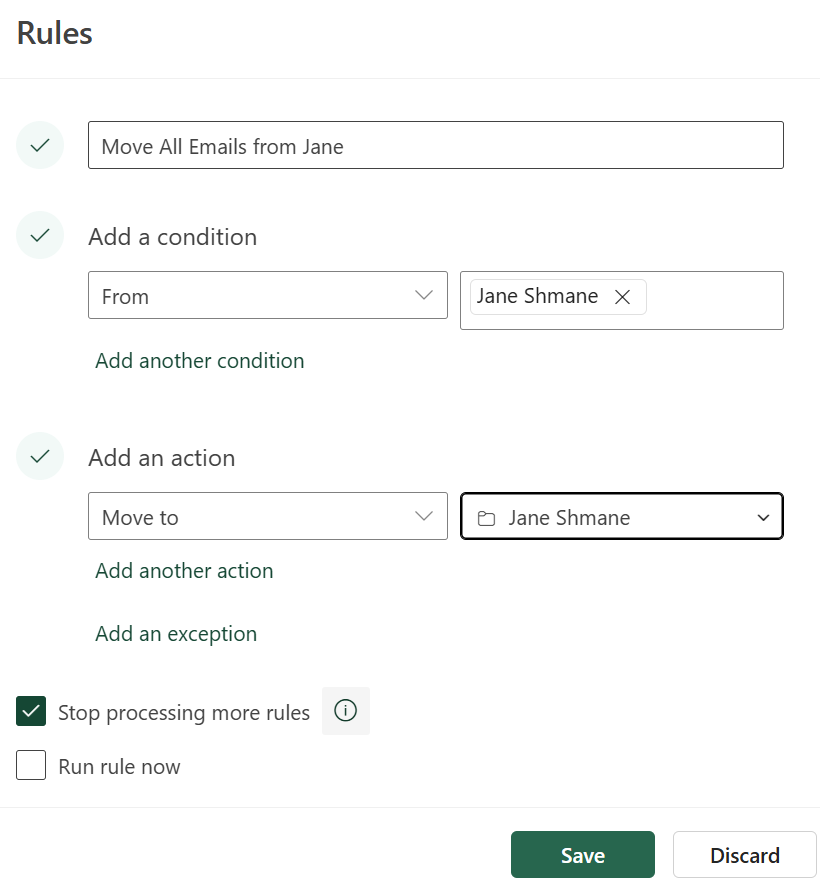
- Add as many conditions and actions and exceptions as you like using the Add another condition, Add another action, and Add an exception text buttons.
- Check the Run rule now checkbox to process all messages currently in your Inbox that meet the conditions you set.
- Click Save.
Outlook (classic) for Windows
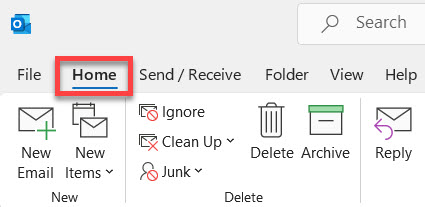
- Select the Home tab.

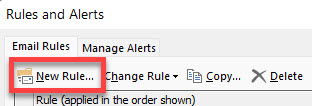
- Expand the Move and Rules drop-downs and select Manage Rules & Alerts.
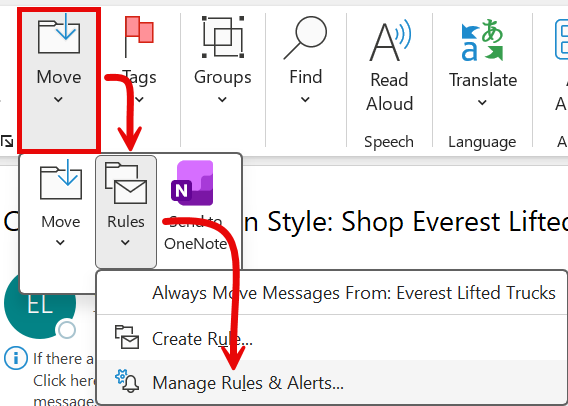
- In the Rules and Alerts window, click New Rule.
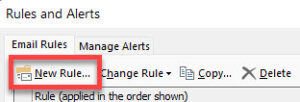
- Some popular rules have templates you can select; otherwise, select one of the blank rules at the bottom and click Next.
- On the first page of the Rules Wizard, select any conditions that you would like to trigger the rule, make any necessary edits, and then click Next.
- On the next page, select any actions that you would like to perform when the rule triggers, make any necessary edits, and then click Next.
- On the third page, select any exceptions to the rule that you would like to add (if any), make any necessary edits, and then click Next.
- On the final page, specify a descriptive name for the rule, ensure Turn on this rule is checked, and then click Finish.

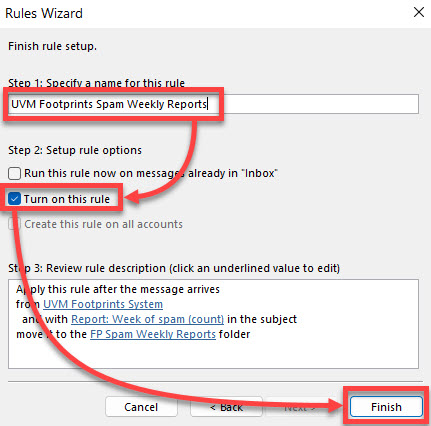
You should now see the rule with a check mark next to it in the list of Email Rules.
Outlook for macOS
- Expand the Outlook menu in the upper-left corner and select Settings….
- Click Rules.
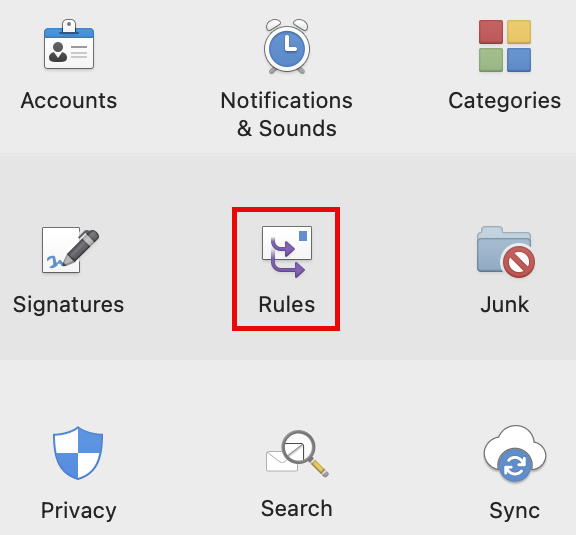
- Click Add new rule.
- Name your rule, Add a condition for which emails to filter, and Add an action to choose what to do with all those emails. Here is an example:
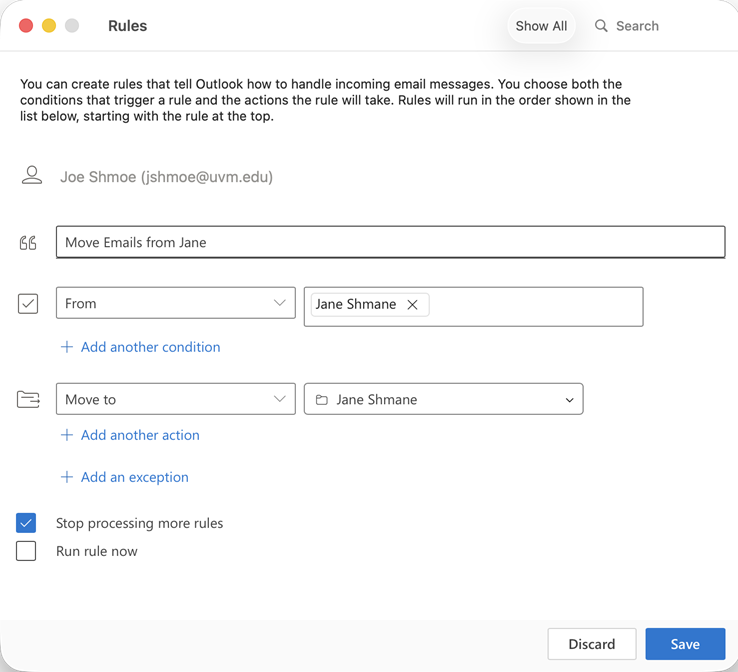
- Add as many conditions and actions and exceptions as you like using the Add another condition, Add another action, and Add an exception text buttons.
- Check the Run rule now checkbox to process all messages currently in your Inbox that meet the conditions you set.
- Click Save.
Removing Client-Side Rules
In classic Outlook (and other email clients), it’s possible to create rules that only take affect when the client on which they were configured is open. This typically happens if you try to create a rule that can’t be processed by Exchange, such as one that prints an email. If you try to create a rule like this, Outlook will warn you that the rule will be client-side only, and it will ask you to confirm.
Client-side rules will not carry over to a new computer, device, alternate email client, or Outlook Online, or even the new version of the Outlook desktop app. Additionally, it’s difficult to troubleshoot mailbox issues when client-side rules are enabled because IT does not have a complete view of the rules impacting your account. Thus, it’s highly recommended to use only server-side rules.
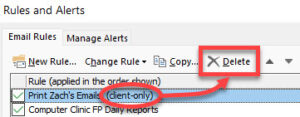
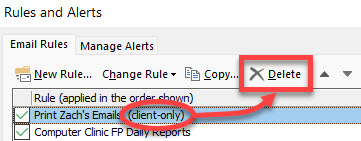
Outlook (classic) for Windows
- Select the Home tab.
- Expand the Move and Rules drop-downs and select Manage Rules & Alerts.
- Select any client-only rules, click Delete, and then click Yes to confirm.
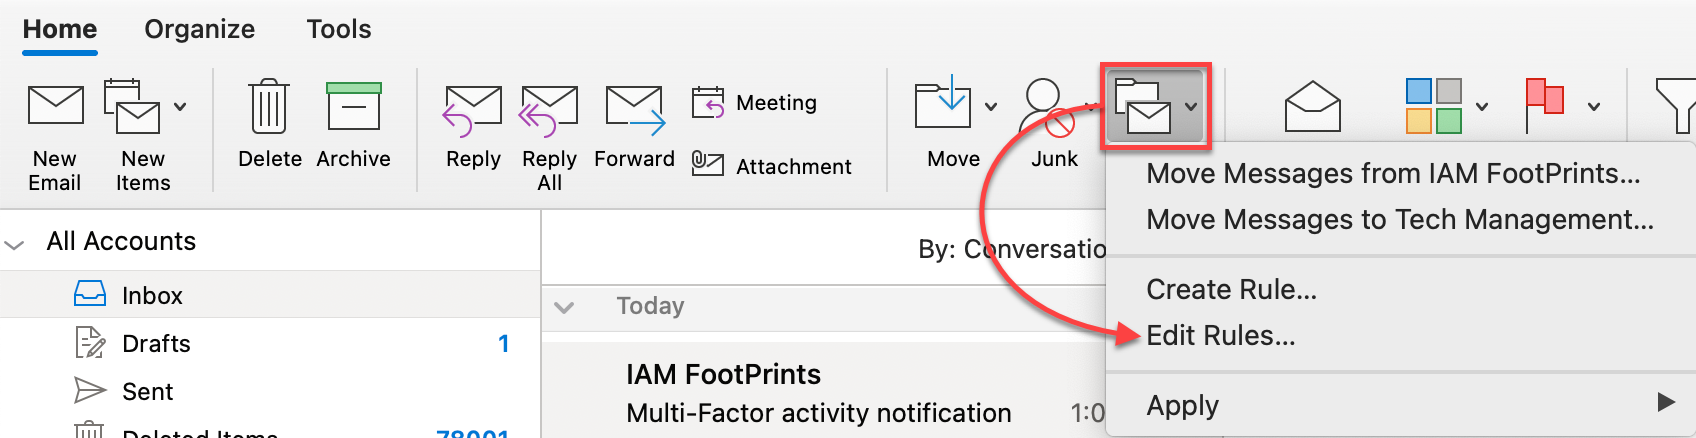
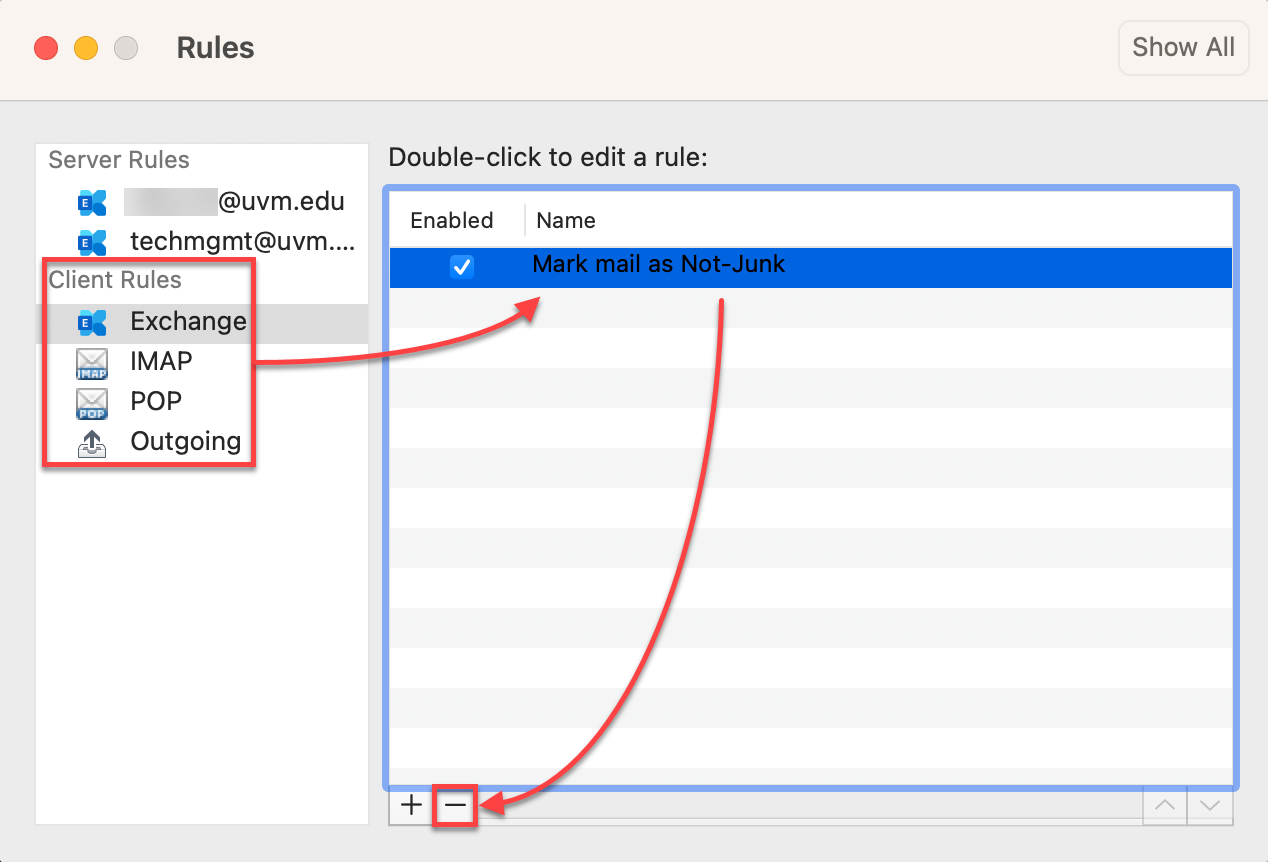
Legacy Outlook for macOS
- Select the Home tab, and then expand the Rules drop-down and click Edit Rules…
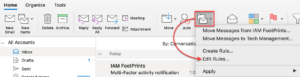
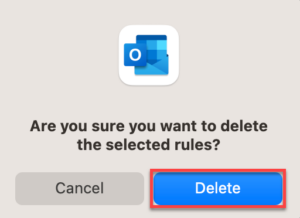
- Under the Client Rules section, look in each subsection for rules; remove rules by selecting them and then clicking the minus () sign.

- Click Delete to confirm.

Apple Mail
- Expand the Mail menu in the upper-left corner and select Settings….
- Click Rules.
- All of the rules listed here are client-only rules. Select the one you want to remove and click Remove.
- Click Remove to confirm.