
Rubrics provide a mechanism to explain to students how their work will be evaluated according to defined criteria. They can also contribute to the ease and consistency of the grading process itself. A rubric can be designed to provide pre-set feedback, but giving personalized feedback is still an option.
In Brightspace, the Rubrics tool can be associated with Assignments, Discussions, or Grade items (columns) in the Grade Book. Rubrics are not currently available for Quizzes.
Create a Rubric – First Steps
You will find the Rubric Tool by going to
- Grades & Feedback in your course’s navbar
- Choose Rubrics
- Click the “New Rubric” button
- Type in a name for your rubric.
- At the top right, select whether you want this to be Published, Archived, or Draft, (each explained below). This option can be changed at any point before you associate it with an assessment:
- Published: Ready and available to be associated with an assessment.
- Draft: Saved and can be modified but cannot be associated with an assessment as a draft. It must be published to do that.
- Archived: This option is meant for rubrics that you have associated with one or more assessments but no longer wish to be available for linking to another assessment. Setting a rubric to archived does not affect previous associations, i.e. it can still be used for evaluation and students can view the rubric and/or feedback if you’ve selected those options.
- Choose Analytic or Holistic rubric.
- Analytic rubrics allow for multiple assessment criteria, (i.e. specific expectations for student work) and the option to have points associated with each level of achievement. See details below.
- Holistic rubrics are simpler and have one assessment criterion with the option to set specific percentages for the achievement levels. See details below.
Once you’ve chosen the type of rubric, see the appropriate section below to learn how to set it up.
Create an Analytic Rubric
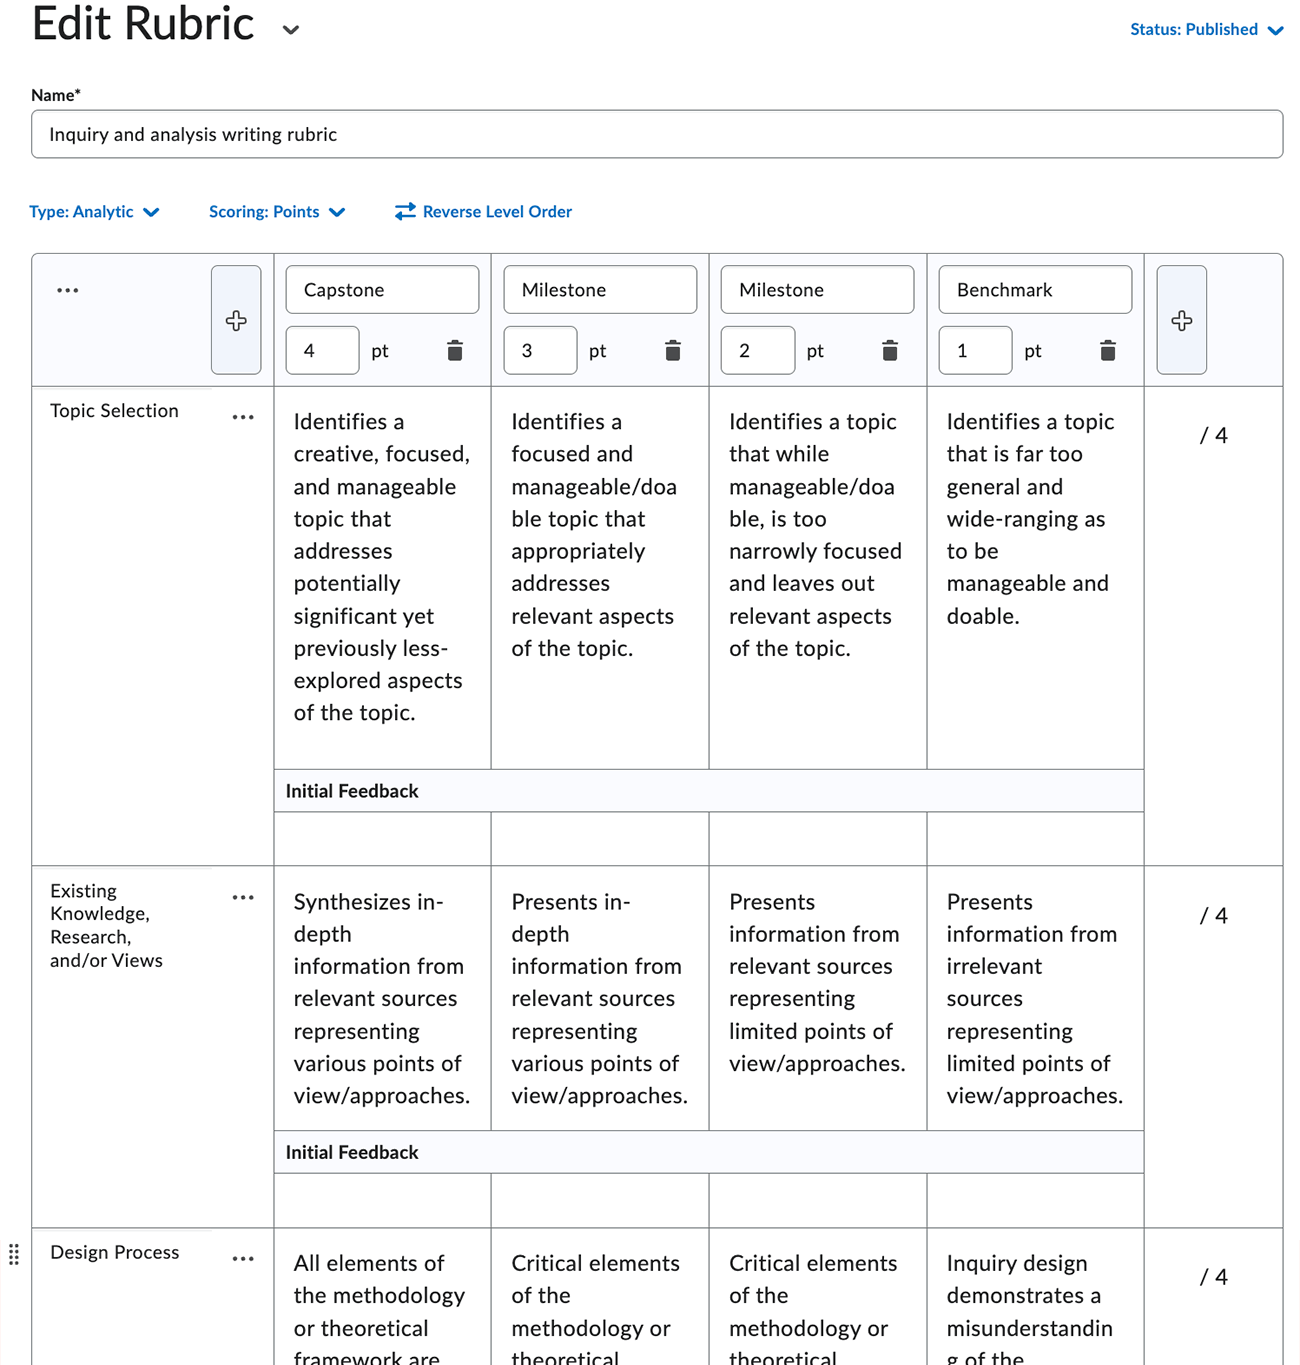
See example of analytic rubric.
- Choose your scoring method.
- No Score: Use this option if you want to give feedback on an assessment that has no points value, or you wish to enter the score independently of the rubric feedback.
- Points: Use this option if the point value for each achievement level is the same for all your criteria.
- Custom Points: Use this option to set points values for achievement levels independently for each criterion (e.g. the highest point value for Criterion 1 is 10 points and for Criterion 2 is 5 points).
- Enter your criteria and achievement levels.Criteria can be added by clicking on “+ Add Criterion” and deleted by clicking on the three dots at the left of the top row and selecting delete. (Add or remove achievement levels by clicking on the large plus signs or the trash can icon below the achievement level name, respectively.)
Criteria Groups
You also have the option to add one or more additional “Criteria Groups.” Groups are helpful when you wish to evaluate elements of a student’s work in detail and separately, e.g. clarity and cohesiveness, strength of arguments, etc. Click on “Add Criteria Group” to create a new group.- Click into the “Criterion name” field to enter your criterion names
- Replace the “Level” place holders with your own achievement levels, if you wish.
Achievement Level
Enter achievement level expectations in the top boxes for each criterion.You can enter preset feedback for each achievement level to be given automatically, and/or you can enter individualized feedback when grading students’ work. Your preset feedback can also be edited as you’re grading, so you can customize it for each student. If you prefer, you can leave the feedback field blank.
- Set the points values if you’re using points.
Enter points values for your achievement levels. A student’s total score will be calculated as the sum of the points earned for all criteria. The total rubric score as well as the criteria point values can be modified when grading. - The Overall Score section.
Please ignore this section. It’s linked to the competency tool in Brightspace that UVM hasn’t yet implemented. - Set Visibility Options Click on “Options” to view different ways you can adjust what students see. For example,
- Rubric is visible to students: Students see the whole rubric with the assessment, before they submit their work. Then, once the scores are published, they can view the rubric values you chose, by going to Grades or by viewing the feedback for an assignment or discussion topic.
- Rubric is hidden from students: Students never see the rubric. If you included feedback when creating the rubric that you want students to see or want to provide feedback for individual criterion when grading, select the box for that option. Anything you type in the Overall Feedback field when grading will be visible regardless of these settings.
- Rubric is hidden from students until feedback is published: Students can see the rubric along with feedback after you’ve graded the assessment and published the grades.
- Hide scores from students: This option is only applicable if you a) have points values in your rubric and b) have set it so the rubric is visible to students before and/or after publishing feedback. It ONLY hides the points values for the achievement levels in a rubric. It does NOT hide the overall grade for an assessment once it’s evaluated. For assessments linked to the grade book, published scores will also be visible there unless you’ve hidden the grade book item.
Create a Holistic Rubric
- Decide on your scoring method.
- No Score: Use this option if you want to give feedback on an assessment that has no points value, or you wish to enter the score independently of the rubric feedback.
- Percentage: Allows you to assign percentages to specific achievement levels.
- Enter your criteria and achievement levels. Add or remove achievement levels by clicking on the large plus signs (left or right) or the trash can icon below the achievement level name, respectively. Replace the level place holders with your achievement levels and enter your achievement level expectations in the box for each level.
- Set the percentages, if using. Edit the percentages as desired (i.e. if your percentage for Good is 80%, the percentage for Excellent must be more than 80%). By default, the lowest percentage is 0%.
- Set visibility options. Click on “Options” to view different ways you can adjust what students see.
- Rubric is visible to students: Students see the whole rubric with the assessment, before they submit work. Once the scores are published, they can view the rubric and your feedback in Grades or by going to view an assignment or discussion topic.
- Rubric is hidden from students: Students never see the rubric. If you included feedback when creating the rubric that you want students to see or want to provide feedback for individual criterion when grading, select the box for that option. Anything you type in the Overall Feedback field when grading will be visible regardless of these settings.
- Rubric is hidden from students until feedback is published: Students can see the rubric along with feedback after you’ve graded the assessment and published the grades.
- Hide scores from students: This option is only applicable if you a) have percentages in your rubric and b) have set it so the rubric is visible to students before and/or after publishing feedback. It ONLY hides the percentages for the achievement levels in a rubric. It does NOT hide the overall grade for an assessment once it’s evaluated. For assessments linked to the gradebook, published scores will also be visible there unless you’ve hidden the gradebook item.
Tips for Managing Your Rubrics
A list of existing rubrics is shown in the rubrics tool along with the type (analytic or holistic), scoring method, and status (published, draft, or archived).
A link symbol next to a rubric’s name indicates that it’s associated with an assessment, but it has not been used for evaluation.
A lock symbol next to any rubric shows that it’s been used for evaluation.
To manage a rubric, click on the chevron to the right of a rubric title to open the options menu.
- Edit (The edit option only appears if rubric has not been used for evaluation): Opens rubric and allows you to edit as desired including the visibility options.
- Edit Options (This only appears for rubrics that have been used for evaluation): Allows you to change the visibility options; other aspects of the rubric cannot be changed.
- Preview: View the rubric as it would appear to students.
- Set Status: Set to published, draft, or archived.
- View Statistics: The Competency Activities tab shows all assessments associated with the rubric.
- Copy: Generates a copy of the rubric. Note that copies are automatically set to Draft status.
- Delete: Only rubrics that are not linked to an assessment can be deleted. You can also delete multiple rubrics by selecting the desired rubrics using the check boxes on the right and clicking on the trashcan icon
Associate a Rubric with an Assessment
- Assignments and Discussion Topics: Under Evaluation & Feedback, click “Add Rubric” and select desired rubric. Click “Save and Close.”
- Grade Book Item: Go to Grades and Manage Grades. Create a new item or edit an existing item. Click “Add Rubric” and select desired rubric. Click “Save and Close.”
Grade with Rubrics

This section describes how to evaluate students’ work using a rubric that’s associated with an Assignment, Discussion Topic, or Grade Book item.
First, when you create the assignment, discussion, or grade book item, you’ll need to attach a rubric to it. (See “Associate a Rubric with an Assessment,” above) When you’re ready to grade, you can approach it in a variety of ways.
Grading Assignments and Discussion Topics
For these tools, we suggest using Quick Eval.
- Under Grades & Feedback, open Quick Eval
- Navigate to the Assignment or Discussion you want to grade
- Open a student’s submission to grade it
- Click on the rubric title to expand it and click on the achievement level earned for each criterion; the achievement level description will appear below. You can also provide specific feedback for each criterion and/or modify feedback you included in the rubric when you created it.For analytic rubrics that include points, you can edit the points for a criterion by clicking on the points value shown below it.
Percentages set for holistic rubrics are not displayed and cannot be modified, though you can change the overall grade as described below.
Depending on how you’ve set the visibility options for students, they can see the rubric, feedback, and points/percentages by going to the Assignment or Discussion Topic and clicking on
“Feedback: Read/Unread.”
Grading a Grade Book Item
 For assessments linked to a grade book item, students can also see all feedback with their score when they click on Grades, and there they can access the full rubric, as well.
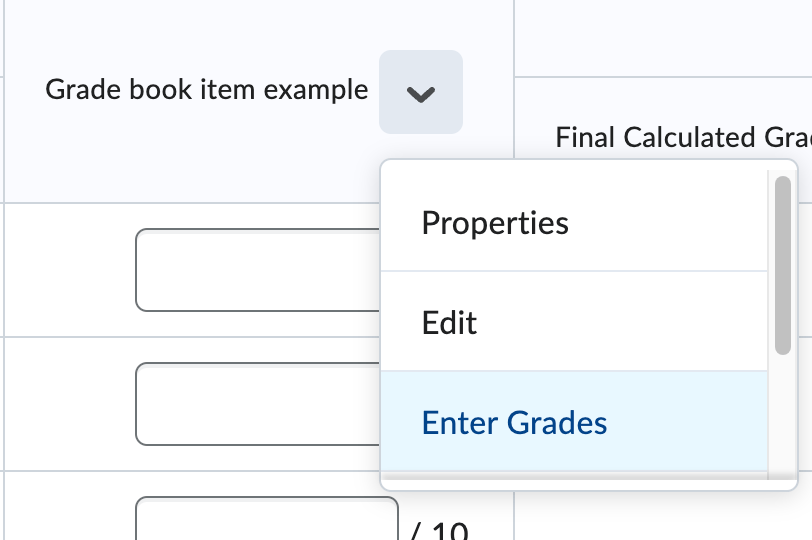
- Under Grades & Feedback, go to Grades, and in the “Enter Grades” tab view, click the drop-down arrow at the top of the grade column, and choose “Enter Grades.”
- Begin by clicking the small rubric icon to the far right of the top row.
- Click on the desired achievement levels. The score that appears in the Grade Book can be modified. Enter the grade manually for rubrics that lack points/percentages.
- Depending on how you’ve set the visibility options for students, they will see all feedback with their score in Grades and can view the rubric as well.