Research freezers and refrigerators are critical to supporting research at UVM. Any loss of temperature control can damage research materials, sometimes delaying or even ending a research project and jeopardizing your research funding.
Proper use and preventive maintenance is important to keep your unit functioning properly and to protect your research materials.
Maintenance and Outages
Preventive Maintenance: Freezers
Regular cleaning and preventive maintenance help ensure optimal freezer performance and extend equipment lifespan. Operators should complete routine upkeep, while a qualified service technician should periodically inspect and calibrate the unit for maximum efficiency.
The following is a condensed list of suggested preventive maintenance requirements. Refer to the manufacturer’s manual for specific details for each piece of equipment. Cleaning and calibration frequencies will vary based on usage, environmental conditions, and accuracy requirements, but we generally recommend defrosting your freezers annually.
Loading and Use
- Upright freezers:
Load from the top down. Add one shelf of racks at a time and allow the freezer to return to its set point before loading the next shelf. - Chest freezers:
Load from the left side near the probe. Be aware that room‑temperature racks significantly increase pull‑down time. - Optimize performance:
- Loading with frozen materials, such as frozen water jugs, improves overall temperature stability.
- Locate the freezer away from drafts and heating/cooling units.
- Keep the number of door openings to a minimum.
- Minimize the length of time door is open.
- Make sure the door latches securely after opening.
Placement and Power
- Airflow clearance:
Freezers require adequate space for ventilation. A general guideline is at least 6 inches (15 cm) of clearance, or as specified in the owner’s manual. - Electrical requirements:
The unit must be connected to a properly sized, dedicated circuit breaker.
Ports and Structural Integrity
- Probe ports:
Inspect regularly to ensure ports are sealed during and after use. - No drilling or mechanical alterations:
Do not drill into or fasten anything to the freezer casing without explicit approval from the manufacturer. - Vacuum relief port:
Ensure the port remains free of frost and ice to allow timely re-entry to the freezer after door openings.
| Action | Monthly | 6 months | Yearly |
|---|---|---|---|
| FOR SERVICE TECHNICIANS ONLY: | |||
| Verify that ambient temperature is < 90°F. | ✓ | ||
| Check and clean probe cover gaskets, hinges, and lid(s) of ice and snow. More frequent cleaning may be required, depending on use and environmental conditions. | ✓ | ||
| Check air filter. Clean or replace as needed. | ✓ 4X | ||
| Vacuum condenser coils as needed. (Use caution - SHARP) | ✓ | ||
| Clean unit with mild detergent, use baking soda and water to treat odors. | ✓ | ||
| Verify the unit alarms are active, and limits are properly set for the content. | ✓ | ||
| Check alarm back-up battery, replace* as necessary. | ✓ | ||
| Check chart recorder backup battery (9V), replace* as necessary. | ✓ | ||
| Inspect gaskets for tears and replace if compromised. Clean with mild detergent, check seal with dollar/paper test**. | ✓ | ||
| Vacuum condenser condensate pan. Use CAUTION as most pans have a heater for evaporation - may be HOT. | ✓ | ||
| Defrost freezer at 3/8" frost thickness. (Must be turned off for 24 hours before restarting) | ✓ (as required) | ||
| Adjust door handle for firm latching, as needed. | ✓ | ||
| Clean condenser compartment and wipe off condenser. | ✓ | ||
| Verify and document calibration, at a minimum annually. | ✓ | ||
*Dispose of batteries properly through Environmental Health and Safety
**Dollar/paper test: Close freezer door on dollar bill or piece of paper. If door seals properly, you should have difficulty removing the dollar or paper. If it is easy to remove paper, the gasket may need to be replaced.
Defrosting your Ultra Low Temperature (ULT) Freezer
Read your owner’s manual and follow the steps recommended by the freezer manufacturer.
The guidelines below provide general best practices for safe and effective defrosting.
Before You Begin
- Remove all contents and transfer them to an alternate ULT freezer.
- Following manufacturer instructions, turn off the unit and disconnect it from power.
- Switch off the back‑up battery (battery switch).
- Check the owner’s manual to determine whether the freezer is equipped with a drain.
- Whenever possible, move the freezer to a location with a floor drain. This prevents water from leaking into spaces below the lab.
If melting ice drains directly onto a lab floor without proper precautions, water damage may occur in areas below.
Chest Freezers
- Open the main lid and remove all sub‑lids. If sub‑lids have ice buildup, place them on towels.
- If there is no drain:
Place towels on the chamber floor and along the hinge to absorb meltwater. - If there is a drain:
Place a pan under the drain and open the drain port.
Upright Freezers
- Open the outer door and all inner doors.
- If there is no drain:
Place towels inside each compartment to collect meltwater. - If there is a drain:
Place a pan beneath the drain and open the drain port.
Ice Removal
- Allow ice to melt naturally until it becomes loose. Loose ice may be placed in a sink or pan to finish melting.
- Check the defrosting freezer periodically - at least every 2 hours while ice is present.
- Do NOT remove ice using sharp tools such as screwdrivers, ice picks, or similar devices.
(These can damage interior panels, refrigerant lines, and gaskets.) - If biological contamination is a concern, decontaminate according to biowaste management guidelines.
- For uprights, use a secondary bin to catch water as ice thaws.
- Safety staff can provide cotton rags to help absorb water inside the freezer.
Defrost Duration and Cleaning
- Allow the freezer to defrost for a full 48 hours to ensure both the interior and the refrigerant system warm completely to room temperature.
- Continue checking on the unit to ensure meltwater is contained and absorbed by towels or other absorbents.
- Once at room temperature, clean the interior with:
- A mild soap solution, or
- A solution of sodium bicarbonate (baking soda) and warm water.
Bleach is generally not recommended for freezers that will remain in service.
If bleach is used, follow it with a soap-and-water rinse, then clean water, and dry with towels.Note: For freezer disposal, bleach is acceptable for decontaminating biological materials.
Restarting the Freezer
- Close the door or lid and restart the ULT freezer.
- Allow the unit to return fully to set temperature before reloading contents.
(Some manufacturers recommend waiting up to 24 hours.)
Preparing for Unexpected Failures or Outages
If you have valuable and/or irreplaceable materials that rely on the mechanical equipment to maintain appropriate temperature, then you should install a monitor or alarm. There are two types of monitor/alarm systems in use at UVM that alert lab personnel to storage conditions that exceed lab-defined parameters. Either can be used for freezers, refrigerators, LN2 Dewars, warm rooms, and other equipment and space.
Sensaphone: Sensaphone monitors are installed by UVM Physical Plant. Submit a Planon Service Request for installation. This system uses UVM network connection, which labs may need to pay to be installed and/or activated. There is an initial purchase price as well as costs for PPD to install.
PPD does not respond to these monitors/alarms.
- Minus80: Minus80 monitoring is a system used in several institutions around the country. They provide monitoring and alert services that are customized to each lab's needs. These systems report temperature fluctuations over time as well as alerts for temperatures that exceed a given range. Minus80 personnel monitor alerts along with lab personnel. These systems communicate using Minus80 telecommunications equipment. Labs pay an initial purchase cost as well as monthly service charges. Contact Minus80 for more information or to set up this service.
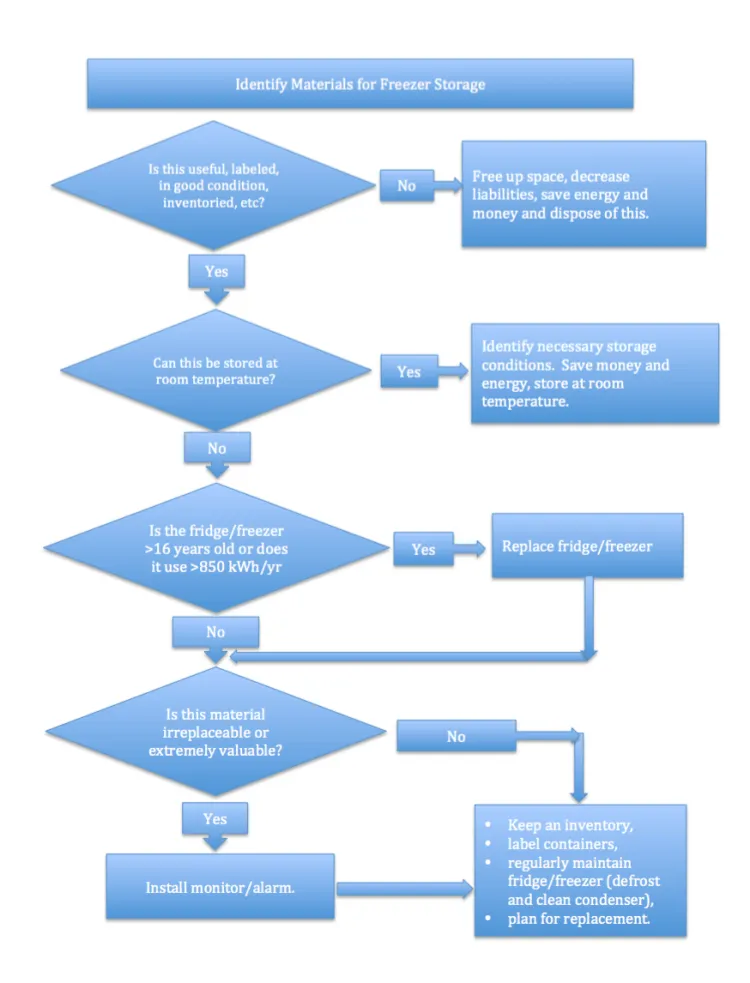
Consider the materials you are storing by following the flowchart in the dropdown below.
Storing Flammable Liquids
Storing Flammable Liquids Flow Chart
Flow Chart Description:
Identify Materials for Freezer Storage
Is this useful, labeled, in good condition, inventoried, etc.
If no: Free up space, decrease liabilities, save energy and money and dispose of this.
If yes:
Can this be stored at room temperature?
If yes: Identify necessary storage conditions. Save money and energy, store at room temperature.
If no:
Is the fridge/freezer >16 years old or does it use >850 kWh/yr
If yes: Replace fridge/freezer
If no:
Is this material irreplaceable or extremely valuable?
If no: Keep an inventory
- Keep an inventory
- Label containers
- Regularly maintain fridge/freezer (defrost and clean condenser)
- Plan for replacement
If yes:
Install monitor/alarm
- Keep an inventory
- Label containers
- Regularly maintain fridge/freezer (defrost and clean condenser)
- Plan for replacement
Refridgerated Flammable Liquids
Guidelines for Storing Flammable Liquids
Flammable liquids that require refrigeration must be stored in a refrigerator or freezer especially designed to prevent flammable vapors from igniting.
- Never store flammable liquids in domestic refrigerators or freezers. Explosions, injuries, and costly laboratory fires can result.
- Never store flammable materials in household appliances (Kenmore, GE, Amana, etc.)
- If a flammable material refrigerator or freezer is needed, purchase one that is U.L. listed, intrinsically safe, and specifically labeled for “flammable materials storage.” A flammable liquid is defined by the fire code as having a flash point of less than 100 degrees Fahrenheit/38 degrees Celsius.
- Ultra low freezers (less than -40 degrees Fahrenheit) generally cannot be approved for storing flammable materials.
- Do not purchase an “explosion proof” unit. These are unnecessary and costly.
Colchester Research Facility June 2000 Incidet
The staff of a biomedical laboratory in the Colchester Research Facility were given an unexpected demonstration of what can happen when flammable liquids are stored in household refrigerators. They came in one morning in June 2000 to find their laboratory in disarray.
Their first impulse was to call the UVM Police to say that their lab had been vandalized. However, as they examined the situation more closely, they observed that the doors to the laboratory were locked, and the damage was centered around the laboratory refrigerator.
Then, they remembered that they had stored about 100 mL of isopentane in the refrigerator the day before in an unsealed container.
Inside the refrigerator was also the thermostat that controlled its motor - a source of ignition if a flammable atmosphere developed inside the refrigerator.
Evidently, the fumes from the isopentane built up until the thermostat gave a spark and the whole refrigerator exploded.
The contents of the refrigerator were spewed across the lab.
The refrigerator itself bounced off the wall it was placed against and rebounded into the room.
The force of the explosion was strong enough to open the flammable storage cabinet across the lab.
Debris was found throughout the lab, although much of it did not break.
Fortunately, the materials in the refrigerator did not include acids and bases which could have done chemical as well as physical damage where they landed.
Some equipment, such as this incubator, was severely damaged by the shock wave of the explosion.
Even the ceiling tiles in neighboring rooms were affected.