
Microsoft Teams webinars provide the tools to schedule your webinar, register attendees, run an interactive presentation, and analyze attendee data for effective follow-up.
In contrast to standard Teams meetings, Webinars are more controlled, with the participants have clear roles: One or several experts (the presenters) share their ideas or provide training to an audience (the attendees).
See Microsoft’s documentation for more details about Webinars.
Organizing a Webinar
Scheduling a Webinar
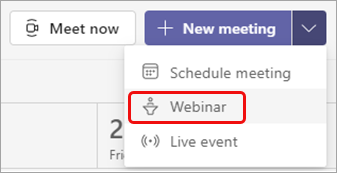
- In the Teams calendar, select the arrow to the right of New meeting and then select Webinar.
- Enter a Title, the Start and End times, and a message to attendees and an agenda in Description field.
- Scroll down to the Event group section to add any Co-organizers, Presenters from your org, and/or external presenters.
- By default, the webinar is open to everyone with the link. You can restrict it to UVM affiliates by scrolling down to the Event access section, and selecting Your organization.

- Make any additional required meeting option changes by expanding the Attendee experience section and then clicking Edit more options.
- Click Apply and/or Save.
- Expand Registration from the sidebar and select Configuration to customize the registration form before sending the invite to presenters or afterwards.
- Send the invite to your presenters and open the registration form to attendees by selecting Publish site in the upper-right corner of the page. You need to do this even if you are the only presenter.
- Click the copy icon () to copy the registration link to your clipboard. Paste to share that link with any potential attendees after Customizing the Registration Form as shown below.
- Meeting details and options can be modified later by selecting the event from your Teams Calendar, clicking the arrows () to expand the meeting details, making any desired changes, and then clicking Save and send updates.
Sharing Registration Link
To invite attendees, you can send them the registration link found in the event’s details screen.
- Select the event from your Teams Calendar.
- Click the arrows () to expand the meeting details.
- Select Copy event link near the top of the window.

- Paste to share the link with any potential attendees.
Viewing Registrants
After publicizing your webinar and sending the event link, track who registered and what they entered on the registration form.
- From your Teams Calendar, double-click the webinar.
- Select the Attendance tab.
- Click Download to download the Registration report.csv file.
- Click Open file from the Downloads list or navigate to your Downloads folder to open the file in Excel.
Customizing the Registration Form
Potential webinar attendees receive this form when they click the webinar registration link. They fill it out and submit it to receive the link to join the webinar. You can decrease the event capacity, add additional fields to the registration form, choose a theme, and more.
Edit the registration form
- If you have already sent the event invite, double-click the webinar from your Teams Calendar. If you still have the Event Setup Details open, skip to Step 2.
- Expand Registration from the sidebar and select Configuration.
- Decrease the Capacity to limit the number of attendees.
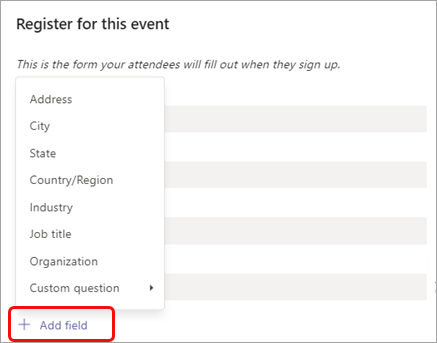
- Click Add field to add additional fields for the registrants to fill out.
- Click Save.
Choose a Theme
- If you have already sent the event invite, double-click the webinar from your Teams Calendar. If you still have the Event Setup Details open, skip to Step 2.
- Expand Setup from the sidebar and select Theming.
- Click Change image to change the Banner image.
- Select Choose another image, locate and select the image you want to use, click Open, and then Save.
- Do the same for Logo and Theme color.
- A Changes saved message should appear in the bottom-right corner of the window.
Choose additional fields
The form that attendees will complete includes three required fields: First name, Last name, and Email. You decide the rest.
- Under Registration > Configuration, select Add field to view a list of commonly requested fields.
- To add one of the listed fields, select it.
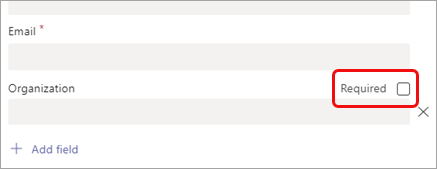
- When the field appears on the form, select the Required box if you want to oblige attendees to provide that info. (They won’t be able to register for your webinar if they leave the line blank.)
- Repeat steps 1-3 as needed. To delete a field, select the trash icon () to its right.
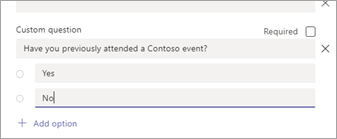
Create custom fields
You can request any amount of additional info, perhaps related to your webinar’s marketing goals or to help plan your training session.
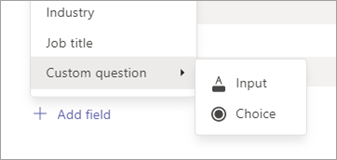
- Select Add field > Custom question and indicate whether the attendee will be entering info in the questionnaire (select Text input), choosing from options you supply (select Choices), or choosing between Yes and No (select Checkbox).
- If you chose Input, enter your question in the field under Custom question.

- If you chose Choice, enter your question under Custom question, select Add option until you have the number of choices you want to provide, and then enter the choices.
- To preview your registration form, select View published site from the top-right of the event details window.
- When you’re done, click Save.
- To close the form, select the X in the upper-right corner.
FAQ
Who can schedule a webinar?
Anyone who can schedule a Teams meeting can schedule a webinar.
Who can register for a webinar?
By default anyone can register. You can also choose to restrict registration to those with UVM accounts when you schedule the webinar.