
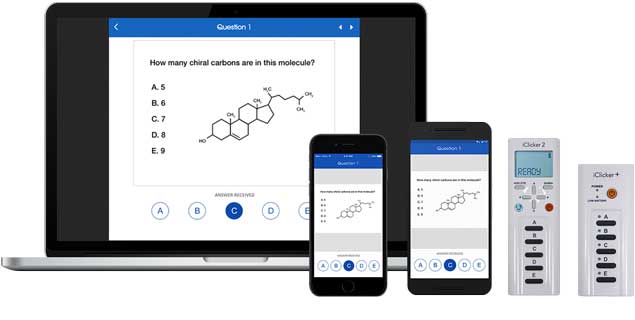
iClicker is an electronic polling technology that allows students to give instant feedback or answers to questions during class. Students respond to polls with either an app on their mobile devices (phone, tablet, or laptop) or on an iClicker+ handheld remote. Faculty can opt to display students’ collective responses to the class.
How are iClickers used for teaching?
Some of the ways they’re used at UVM are to:
- Take attendance
- Review/check understanding of course material
- Facilitate think-pair-share activities
- Spark discussion
- Dismantle common misconceptions
- Practice multiple-choice questions
- Get anonymous feedback on sensitive topics
- Administer multiple-choice quizzes
- Gage student reactions in real time with emojis
How students access iClicker polls
Students can respond using:
- The web portal, student.iclicker.com. Be sure to instruct them not to log in with their email, but rather to click below to find UVM on the institution list. They’ll then be prompted to log in as they would on any other UVM site.
- The free iClicker Student App on their laptops, tablets, or smartphones.
- iClicker+ or iClicker2 Remotes—that students will have to purchase—via radio waves sent to a receiving base station in the classroom that’s connected to the instruction computer.
If you are using iClicker Cloud in a fully remote or online course, students will not have the option of using a handheld clicker; they must use the iClicker web portal or the iClicker Student App on a laptop, tablet, or smartphone.
Option #1 - The (free) iClicker Student App
UVM has an institutional site-license, so the iClicker Student App is a no-cost option for students (for iOS, Android, and laptops via a web browser). For students to use this app, an adequate wireless signal is required in your classroom.
This article has instructions for students.
Should I ask my students to use the iClicker Student App?
We recommend that you only ask students to use the iClicker Student App if the classroom in which you are teaching has high-density wireless. The iClicker Student App will not be reliable in rooms without high-density wireless.
To determine whether your classroom has high-density wireless, go to the TechTeam’s Classroom Lookup Guide, and find the classroom you are teaching in. Scroll down to the “At a Glance” on the lower right-hand side of the page to see whether your room has high-density wifi capacity. If the room is not listed as “High-Density”, it does not have high-density wireless capabilities.
Where can students get the iClicker Student App?
Students acquire the iClicker Student App by downloading it through the app store on their phone or logging into the iClicker site on their laptop. When they enter their UVM email (i.e. netid@uvm.edu) while logging in, the system will recognize them as being associated with our institutional license.
Option #2 - The (purchased) iClicker Handheld Remote
How Students borrow iClickers for free
Students can borrow iClicker handheld remotes from the Media Services desk on the main level of the Howe Library for free, on a first-come-first-serve basis.
They are available first-come, first-served and should be returned at the end of the semester or when no longer required for the class. Have your students check for a loaner remote before purchasing one at the bookstore.
How students buy iClicker Handheld Remotes
Students can purchase iClickers handheld remotes through the UVM Bookstore, when ordered for a class.
Other vendors may also sell or rent iClicker handheld remotes online, including MacMillan Learning.
How students register their iClickers
Students must register their clicker handheld remotes in the Student App.
If students are using handheld clickers, what do I need to know?
If students will be using iClicker handheld remotes, you may need to limit your question types to multiple-choice in your polls. For example, many students have iClicker handheld remotes which do not support the same question types the iClicker2 or the student app supports.
Instructor’s steps to access and use iClicker Cloud
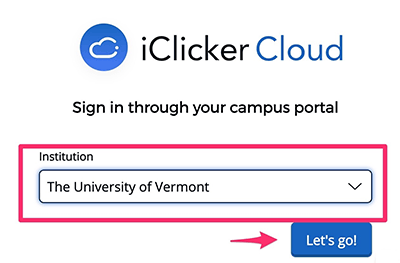
Step 1: Access iClicker Cloud
There are two ways to sign in to begin using iClicker Cloud:
- Use a browser (Chrome or Edge). The web interface allows you to set up assignments and quizzes, syncing the roster and grades to Brightspace. Note: to run polls in class, use the iClicker app. Web interface login: https://instructor.iclicker.com/ and click “Sign in through your campus portal.” To proceed, you’ll need to select: The University of Vermont.
- Download and use the iClicker Cloud app, version 8.0 or later. Open the iClicker Cloud app/program and click “Sign in through your campus portal.” To proceed, you’ll need to select: The University of Vermont.
All general-purpose classrooms have the iClicker Cloud software installed. However, if you are using your own computer, you have the option to download/install the iClicker Cloud application.
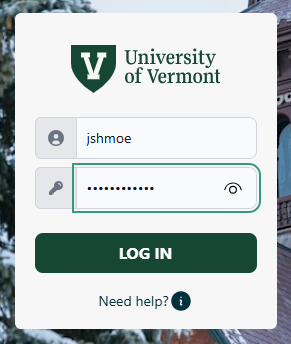
You will be prompted to log in with your UVM NetID and password on the next screen.
Step 2: Set up an iClicker Cloud Course
Courses can be created in either the instructor.iclicker.com portal or by using the iClicker Cloud app.
The following settings are important:
- Choose whether you’ll just take attendance or also run polls/quizzes.
- Recommended naming convention: Semester – Course Title. (Fall2026 – Course Title)
- Click on the course name.
- Click on “Settings…”
- Click on the “Devices” tab and choose the devices you prefer.
- If your class is online or remote, choose Mobile Devices Only. This allows students to participate with laptops, tablets, and smartphones, but not iClicker handheld remotes.
- If your class is in-person, choose Mobile Devices and iClicker Remotes or choose iClicker Remotes Only.
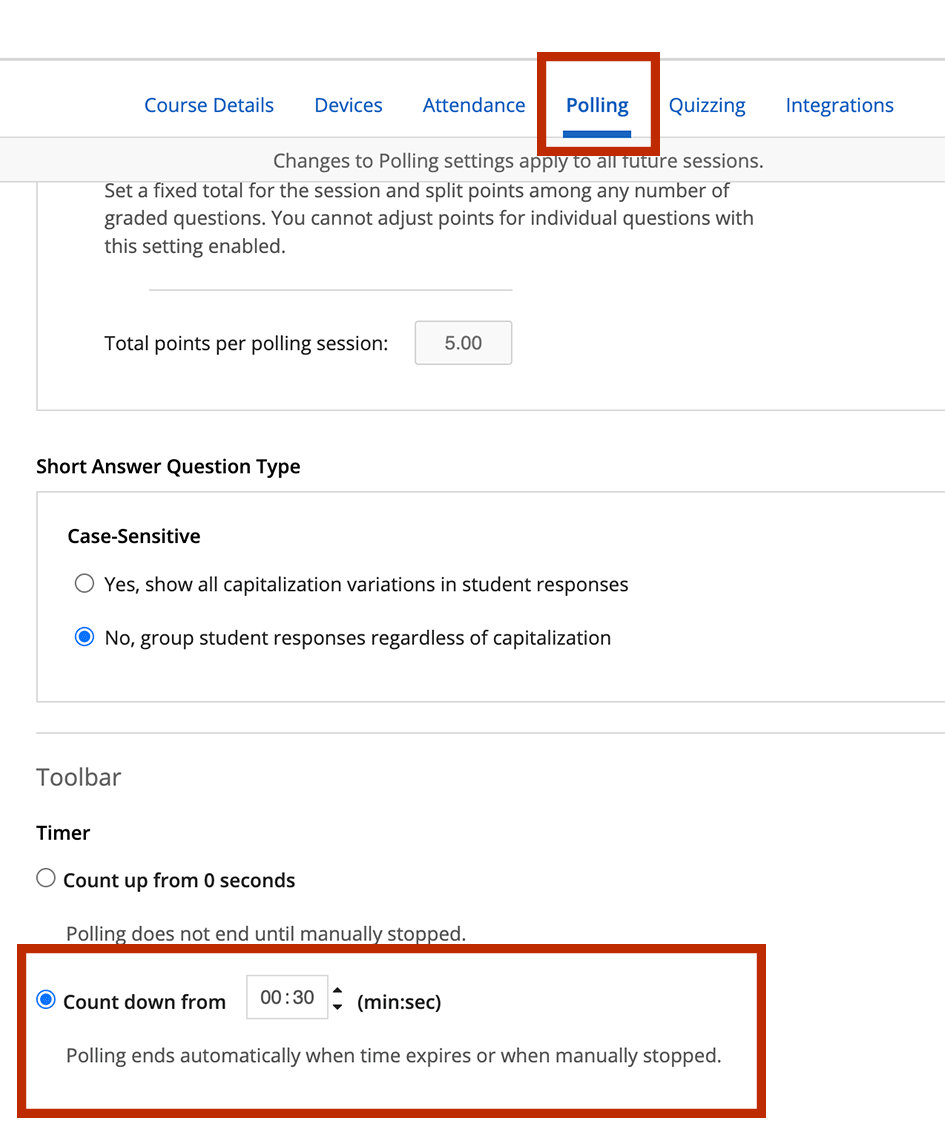
- Click on the “Polling” tab to determine what points students will earn for participation and/or performance as well as the values for those activities. Choose whether or not to send a picture of your screen to student devices when polling starts. This is recommended so that students can easily see the question. Additionally, set values for participation and performance points.
- If teaching a fully in-person class, choose whether or not to enable location for attendance. If you do enable location, you will have to choose your class building on a map and specify the number of feet students must be in proximity in order to be present. Enabling location for attendance should NOT be set for courses with students participating remotely.
- In settings, select the Attendance tab and choose whether or not to require location and click Save.
Step 3: Integrate iClicker Cloud course with Brightspace
- First, make sure that you are logged into Brightspace in your web browser. Then, click on the “Integrations” tab from the Instructor site (in your browser) rather than in the app you downloaded to your computer.
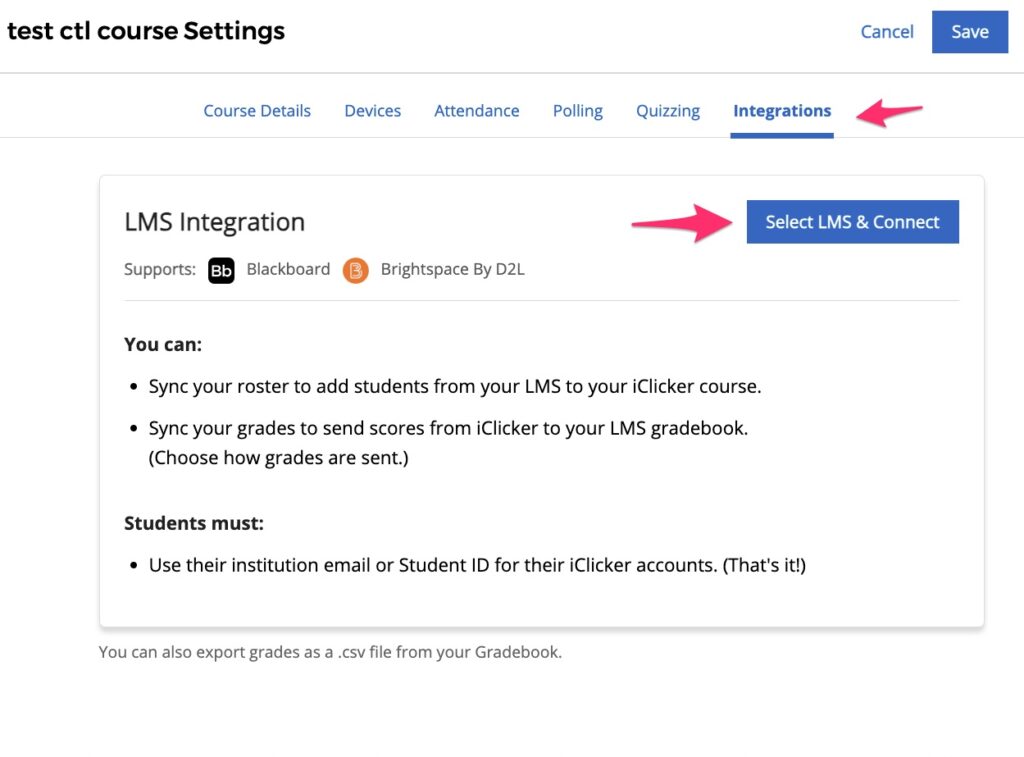
- Your course must be available to students (Active) to continue to fully integrate iClicker with Brightspace! Next, click Connect to Brightspace.
- See instructions to sync the roster, grades, or just attendance.
- You should see confirmation that the Sync was successful. This will transfer your Brightspace roster to iClicker Cloud. You will need to do this regularly during add/drop to ensure that your Brightspace and iClicker rosters match.
- Finally, make determinations about whether you wish to aggregate all iClicker data to a single column in the Brightspace Gradebook or whether you wish to create a new item (column) for each iClicker session. Additionally, choose whether students will receive a score of zero if they do not participate in a session. This is required if you plan to drop the lowest scores and count non-participated sessions as possible drops.
Step 4: Helping your students get started with the iClicker Student App
Students will need to follow these steps to log in and/or create an iClicker account. Important: If they’ve created an account prior to August 2021, they will need to follow the steps in that article to link their accounts with their UVM accounts.
Once logged in, they will need to add your course manually by following the steps in this article. Provide students with the specific name of your course so that they can easily find it.
If any of your students are using iClicker handheld remotes, they will need to follow the steps on this page to register their remotes in the iClicker Student App.
Step 5: Run an iClicker Cloud polling session
- Launch the iClicker Cloud application on the classroom computer or on your laptop.
- Login to iClicker Cloud using your previously created institutional login for UVM.
- Follow the steps for polling on this iClicker support page related to running polls and if you would like to use the new confidence feature, read this section.
There are additional actions you can take on the iClicker Cloud Instructor Website.
How to Use MS Teams with iClicker Cloud/Student App for remote classes
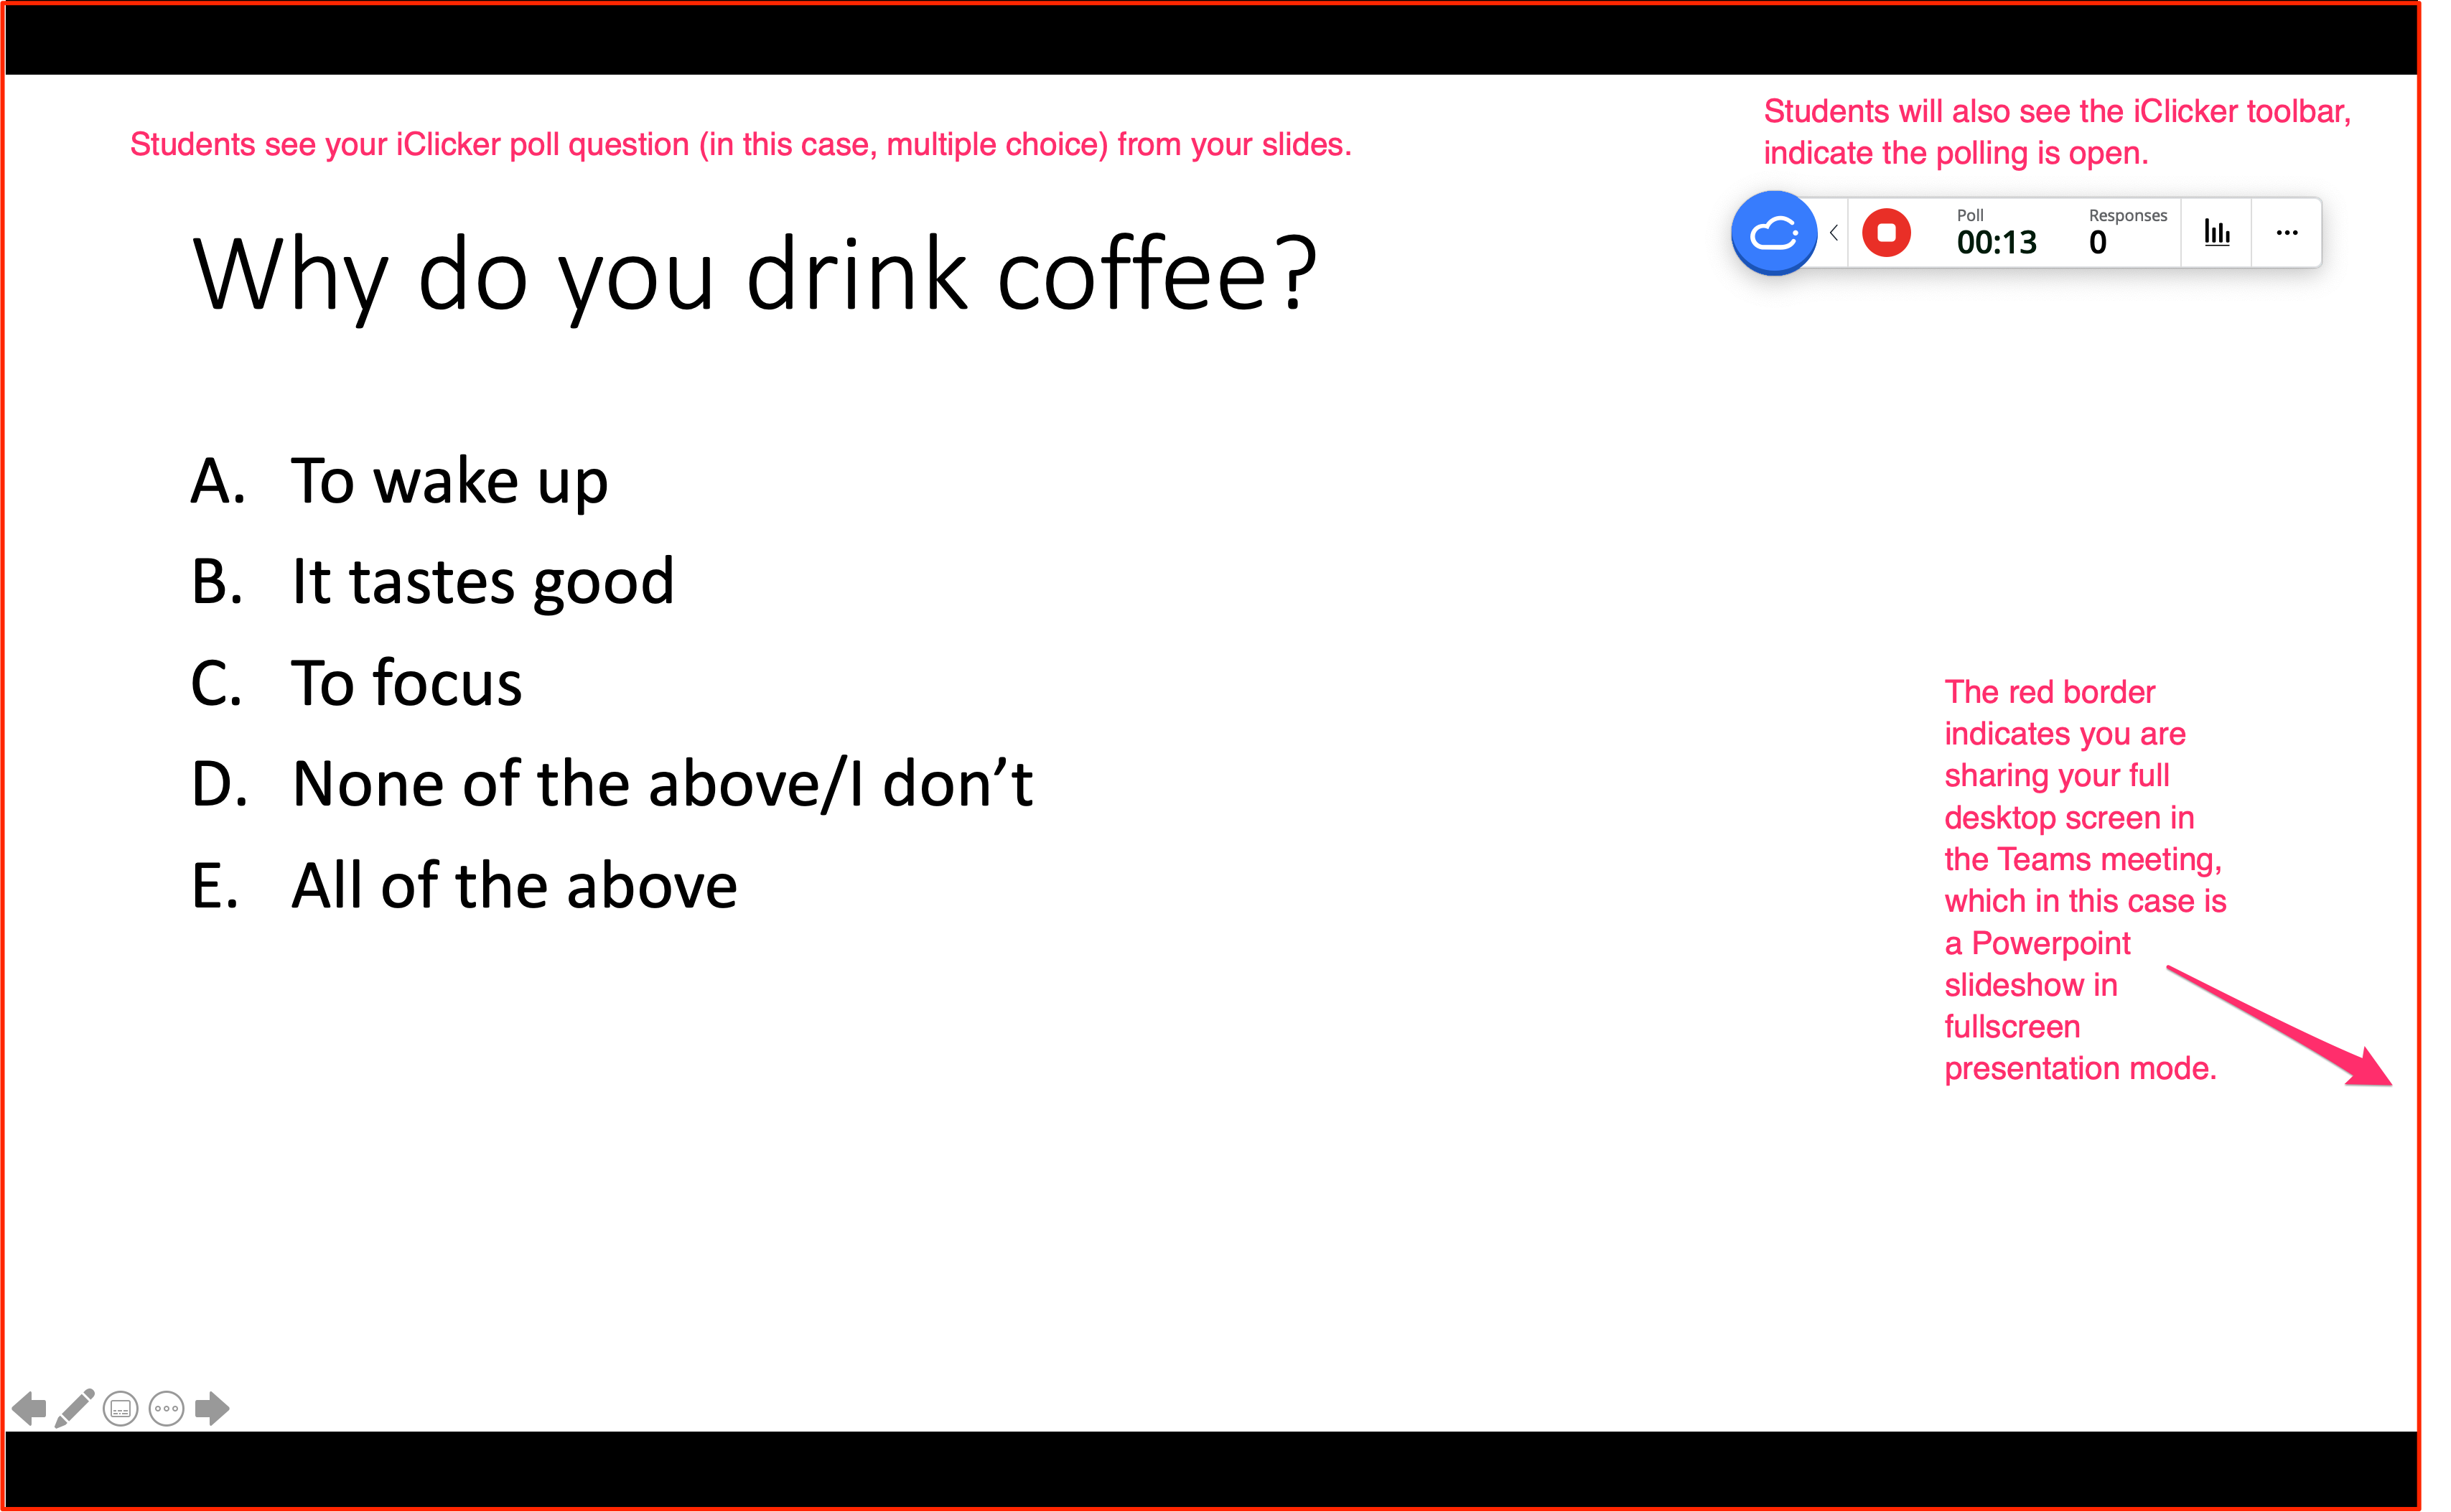
There are a variety of ways to share your screen during a Teams meeting. When using iClicker Cloud, you likely will want to share your Desktop so that you can toggle between your slides and your iClicker toolbar (which will allow you to share polling results with your students).
As noted above, in Step 2, you can choose whether or not to send results to students when polling ends. Only certain polling question types will display all results to students. For instance, students can see aggregate results for multiple choice polls but cannot see all the individual responses for short answer questions (they can only see their own response). Given the inconsistency of sharing results based on question type and the pedagogical reasons for not always revealing all responses to students right away, we recommend that you “do not send results” to student devices when polling ends.
The following steps will most seamlessly allow you to display questions and polls to students during Teams class meetings:
- Before your Teams class meeting, open the file with your questions (typically a Powerpoint, but could also be a website, a word document, a PDF, etc.). Additionally, close any unnecessary programs or programs that could pop-up notifications you wouldn’t want your students to see.
- Before your Teams class meeting, open the iClicker Cloud desktop application (that you’ve previously installed) and login to the program. Then click “Start Class” for the appropriate class, so students can join the iClicker session when they join the Teams class.
- Start your class meeting in Teams.
- When you are ready to start sharing questions and polls, be sure you have selected the option to share your Desktop. Students will see anything displayed on the screen that you are now sharing.
- Minimize any unneeded windows (this is often, minimally, the main Teams program window).
- Display your document containing questions. If you choose to display in full screen, you will no longer be able to see the Teams meeting window, unless you have a second screen or second device. You can also layer windows, with the Teams meeting window behind the document with your questions so that you can still keep an eye on the meeting chat. Or, you can view the Teams meeting on a second screen or device.
- The iClicker Cloud toolbar should float on top of any programs.
- When you are ready to begin polling, choose the question type and start polling.You and your students will see something similar to this (a Powerpoint slideshow in fullscreen presentation mode with the iClicker Cloud toolbar floating on top):
Or something like this (a Powerpoint slideshow presented to a resized Window layered on top of the Teams meeting window, with the iClicker Cloud toolbar floating on top):
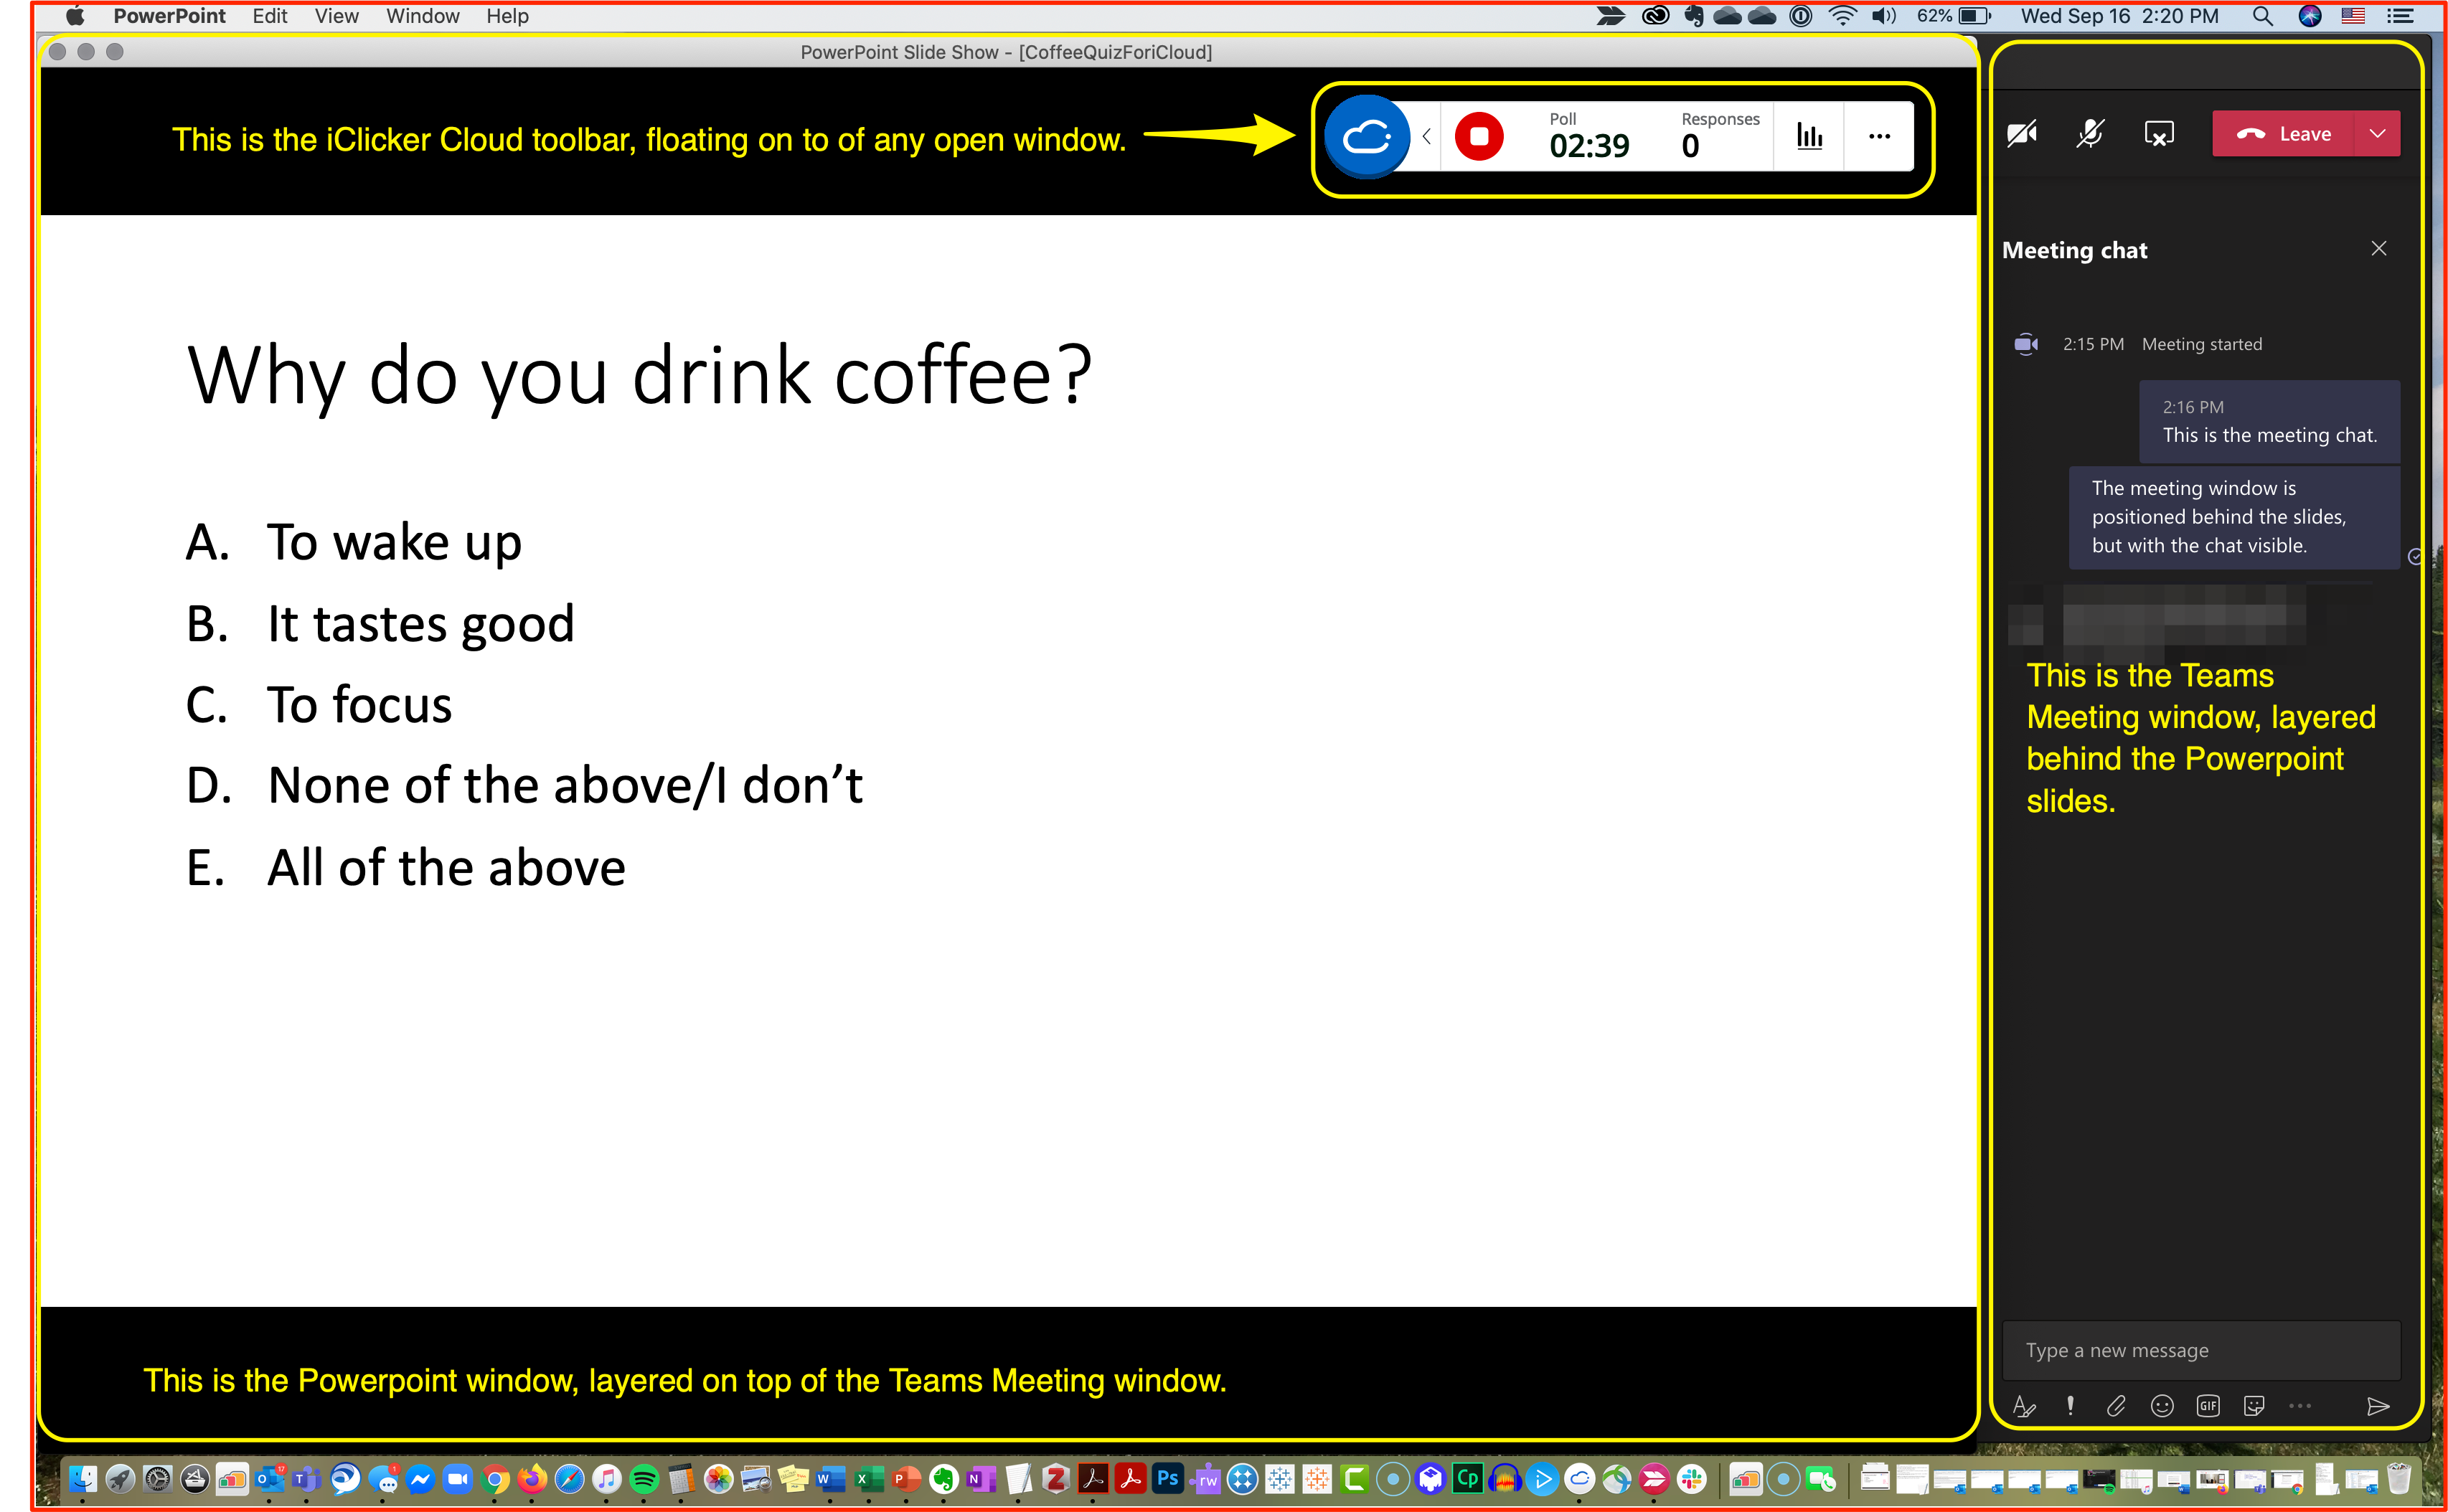
- From this screen, you will not be able to see the students’ responses; you can only track the number of responses recorded. (If you wish to see more details of the student’s responses, log in to the iClicker Cloud app on a mobile device simultaneously.)
- Stop polling when you have a sufficient number of responses or the time you’ve provided is complete.
- Choose whether or not to display the results to students from the iClicker Cloud toolbar.
- Repeat displaying questions and starting/stopping polling as many times as desired.
- If you are only using iClicker polling for a portion of class, you may choose to stop sharing your “Desktop” in the Teams meeting and choose a different sharing option so you can view the Teams meeting chat and participant list more easily.
Loan an iClicker remote
- Be sure that you’re connected to a base station
- Open iClicker and click the green Start New Session button
- Click the gear icon in the iClicker toolbar
- Choose Loan Clickers
- Now, on the clicker remote, hold the on/off button until the light flashes
- Then press A A
- The ID# for that remote will show up in the instructor’s “loan clicker” window
- Then choose the student from the list and select the time period (the term or the session)
- Click Save
Videos from Macmillan
iClicker: Student Understanding & Engagement
iClicker: Active Learning Simplified