The Brightspace Discussion tool allows instructors to set up forums and topics where students, TAs, and instructors can post threads and reply to each other as a class or in small groups. (Read about setting up groups here.)
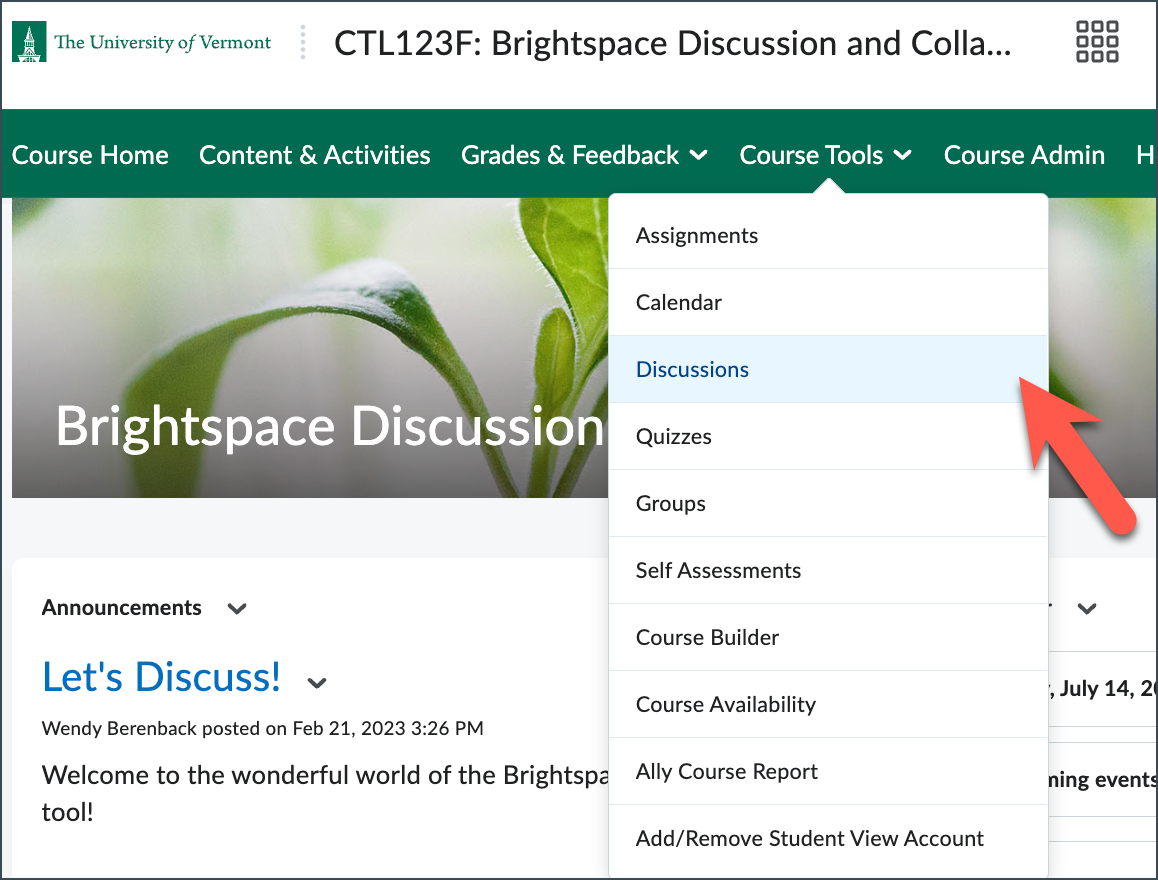
To start click “Course Tools” on the green Navbar menu and select Discussions.
Understanding the Structure
The hierarchy puts forums at the top:
- Forums are discussion categories set up by instructors.
- Topics are set up by instructors within Forums. Topics are where students can read assignments, post threads. Grading can be set up on Topics.
- Threads/Posts and replies to them can be made by students, instructors, and TAs.
- Topics are set up by instructors within Forums. Topics are where students can read assignments, post threads. Grading can be set up on Topics.
So, for example, a student might:
- Open the Forum titled – “Weekly Discussions”
- Click the Topic titled – “Chapter 2 due Sept 20”
- Create a Thread, e.g. “My thoughts on Chapter 2”
- Read/create responses or posts within a thread
Discussions Homepage Overview
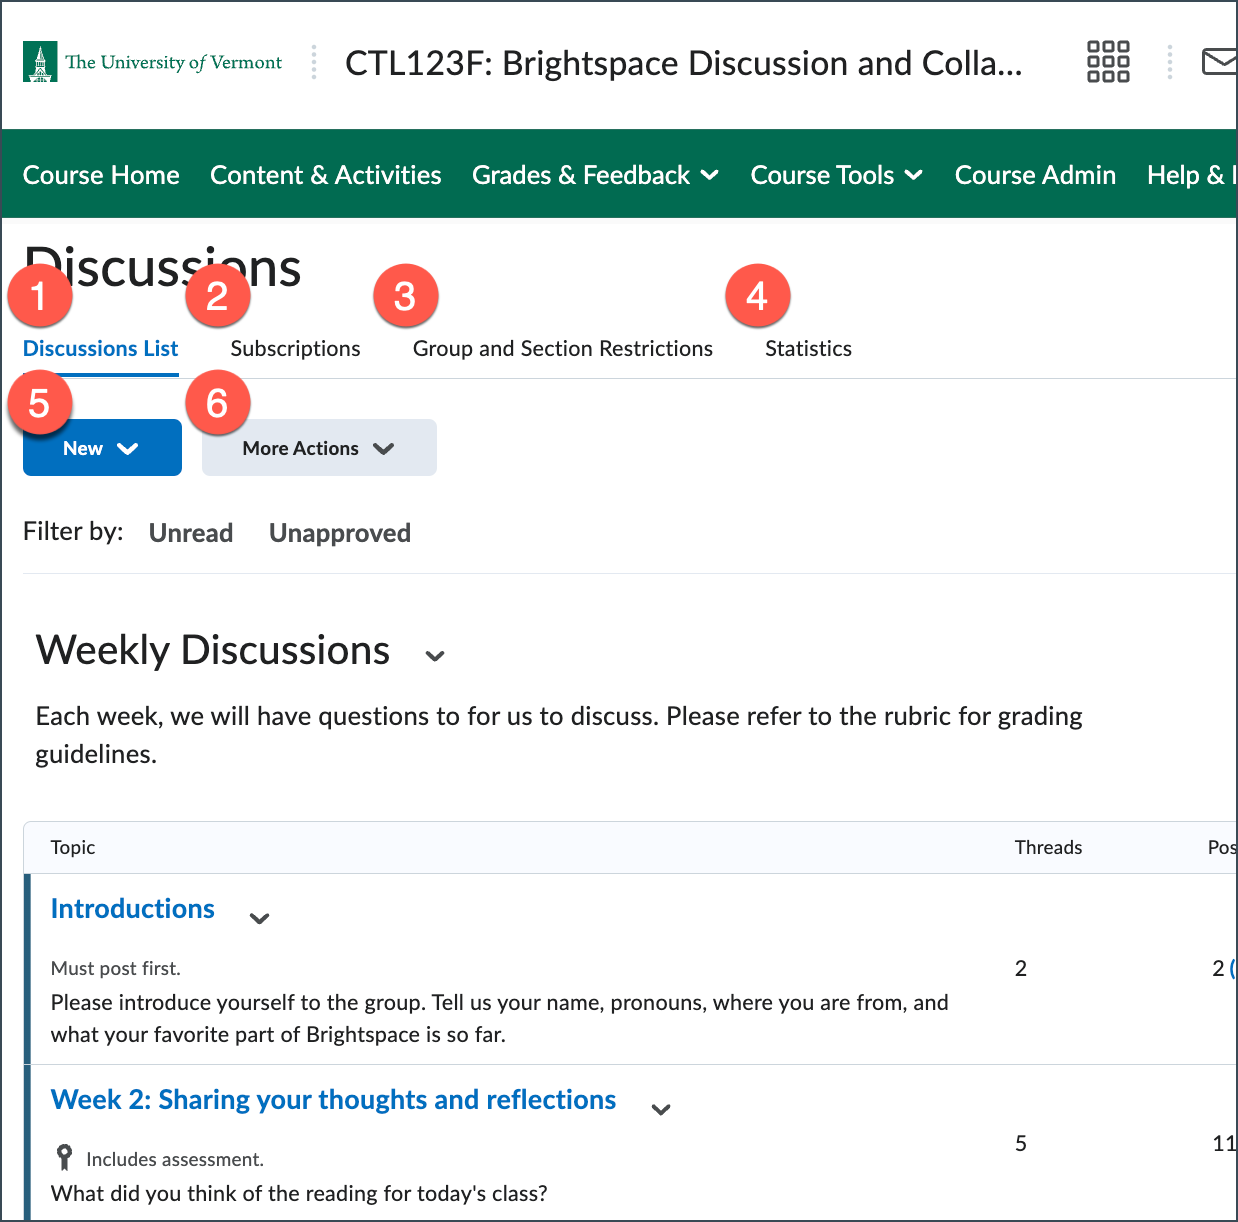
The Discussions homepage shows you an overview of all the forums and the accompanying topics that have been created for the specific course. This is the Discussions List.
The Subscriptions tab allows you to select how you want to receive notifications (in the form of an email) about discussion forums, topics, and threads to which you are subscribed.
The tab Group and Section Restrictions allows you to see which group of students you have granted access to which forum and/or topic and how the group interacts with discussion. (Reference this article for info on groups.)You can also change the access from here. Click on Save when you are done editing.
The Statistics tab allows you to generate statistics about the forums, topics, and/or their users. You can use this tool to see which students are participating in a discussion, which topic generates the most or least reactions, etc. You can export this data to Excel.
- When you add topics, you can click Evaluation and Feedback to attach a rubric or set the grade value.
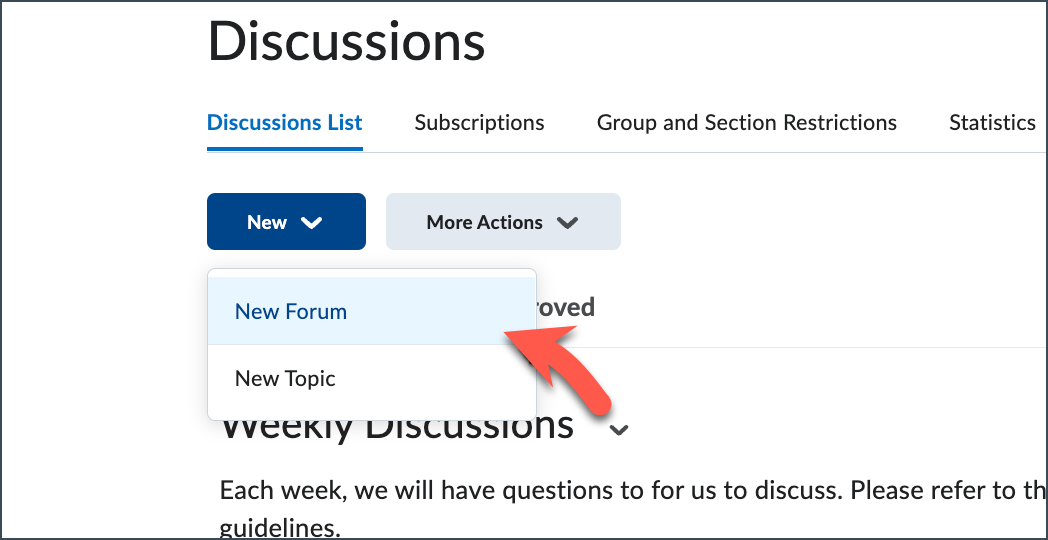
Create a Discussion Forum
You’ll need to start by creating a discussion forum so you have a place to create discussion topics. A forum can contain one or multiple topics.
From the Discussions homepage, Click New and choose New Forum.
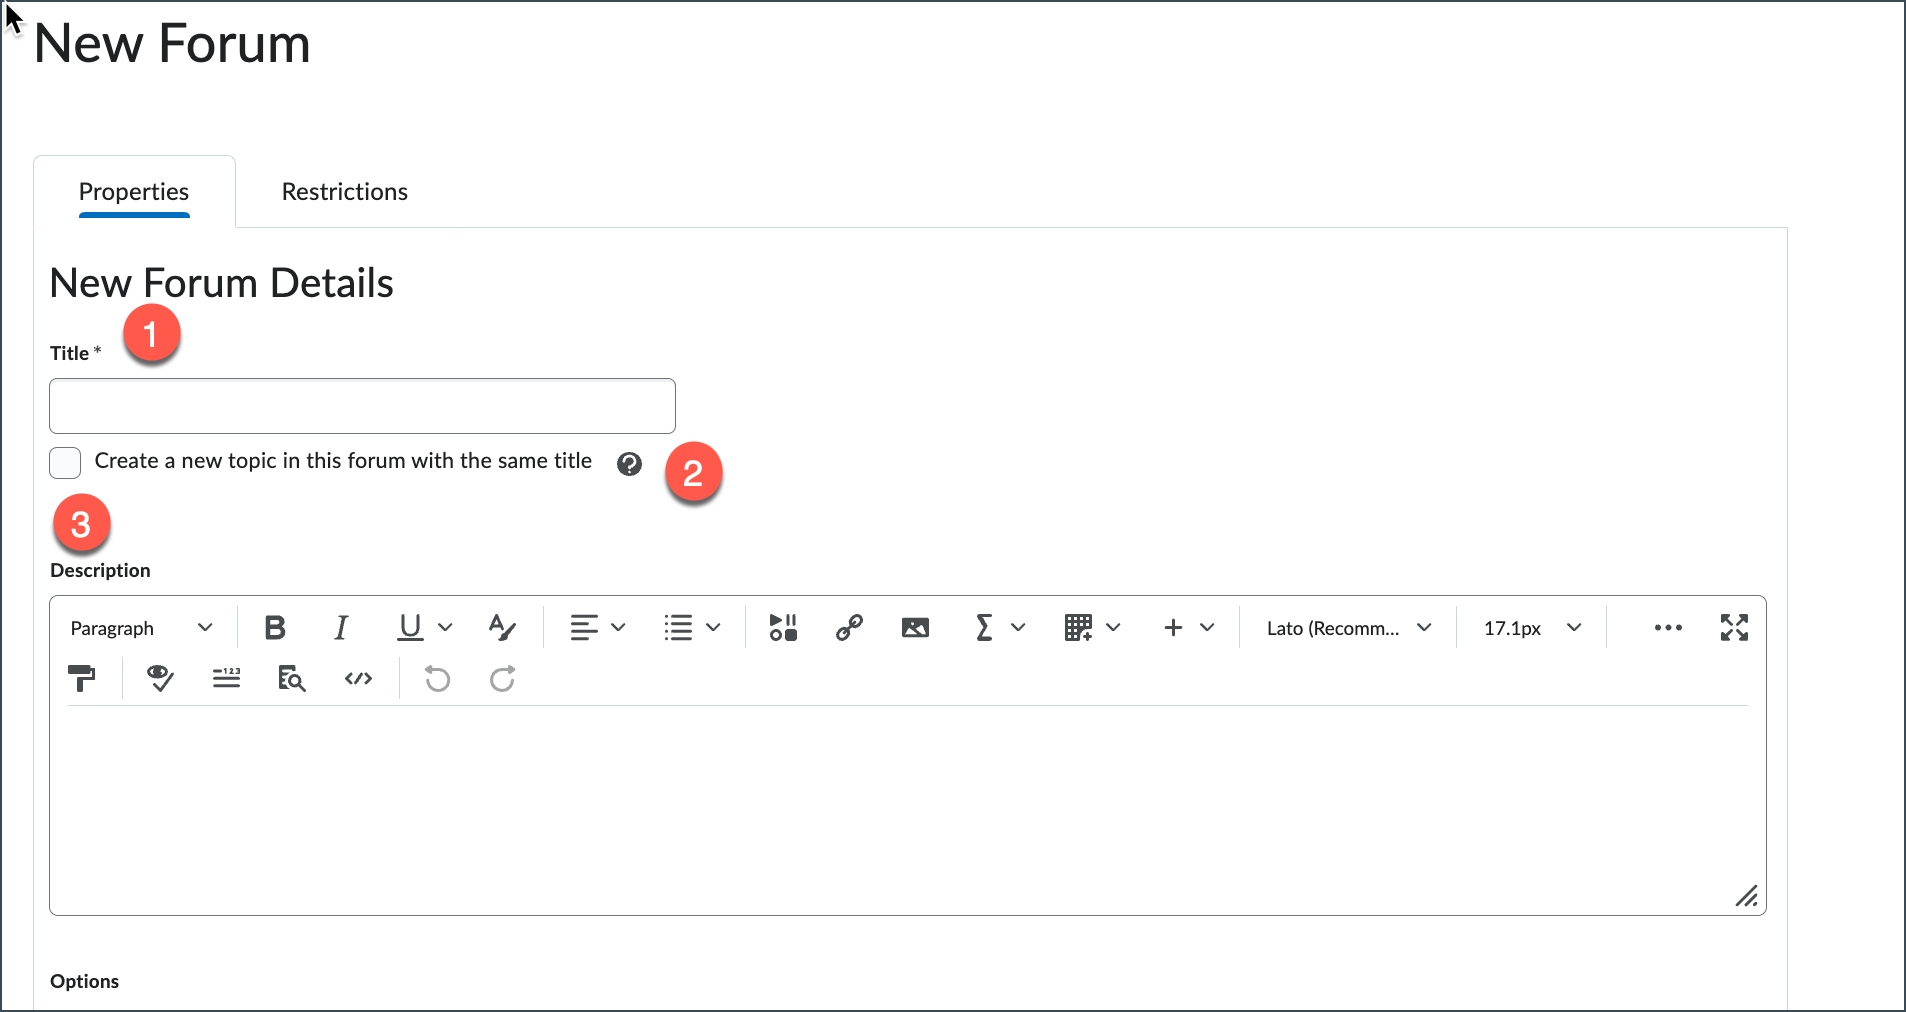
- Under Properties, enter the forum Title. (This is the only required field for a forum.)
- Optional: Create a new topic in this forum with the same title. This option is useful if you are creating a forum that will only contain one topic. For example, you might create a Class Introductions forum where the topic name is the same as the forum name. In this case, you would check “Create a new topic…” and it will automatically be created. Otherwise, leave the option unchecked and create multiple topics later.
- Optional: Add a description in the Description field.
The following options are available:
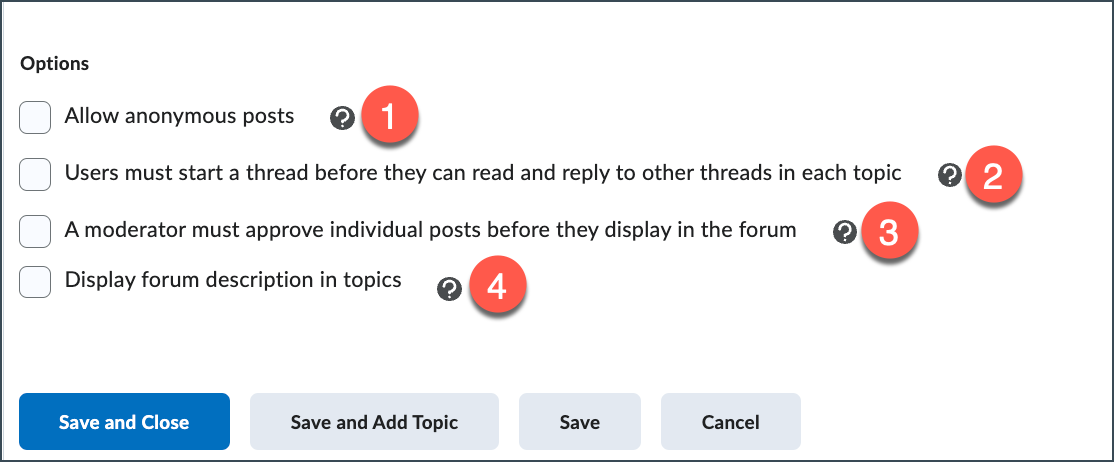
- Check “Allow anonymous posts” if you want to enable anonymous posting. Students will not see the names associated with a message. Messages will only be anonymous for students, but the moderator (you) can still see the names.
- Check “Users must start a thread before” if you want every student to first post a thread before they can read the other posts and/or post replies. (NOTE: You can set this at the Topic level, instead, if you choose.)
- Check “A moderator must approve” if you want to approve every message before it is posted.
- Check “Display forum description in topics” if you want the description of the forum to be visible in every topic. Topics can also have their own description.
When you have specified your preferences, click Save.
Restrictions Tab: Click this tab to manage forum availability and visibility, display in the calendar, add release conditions, and restrict forums to groups or sections in your course.
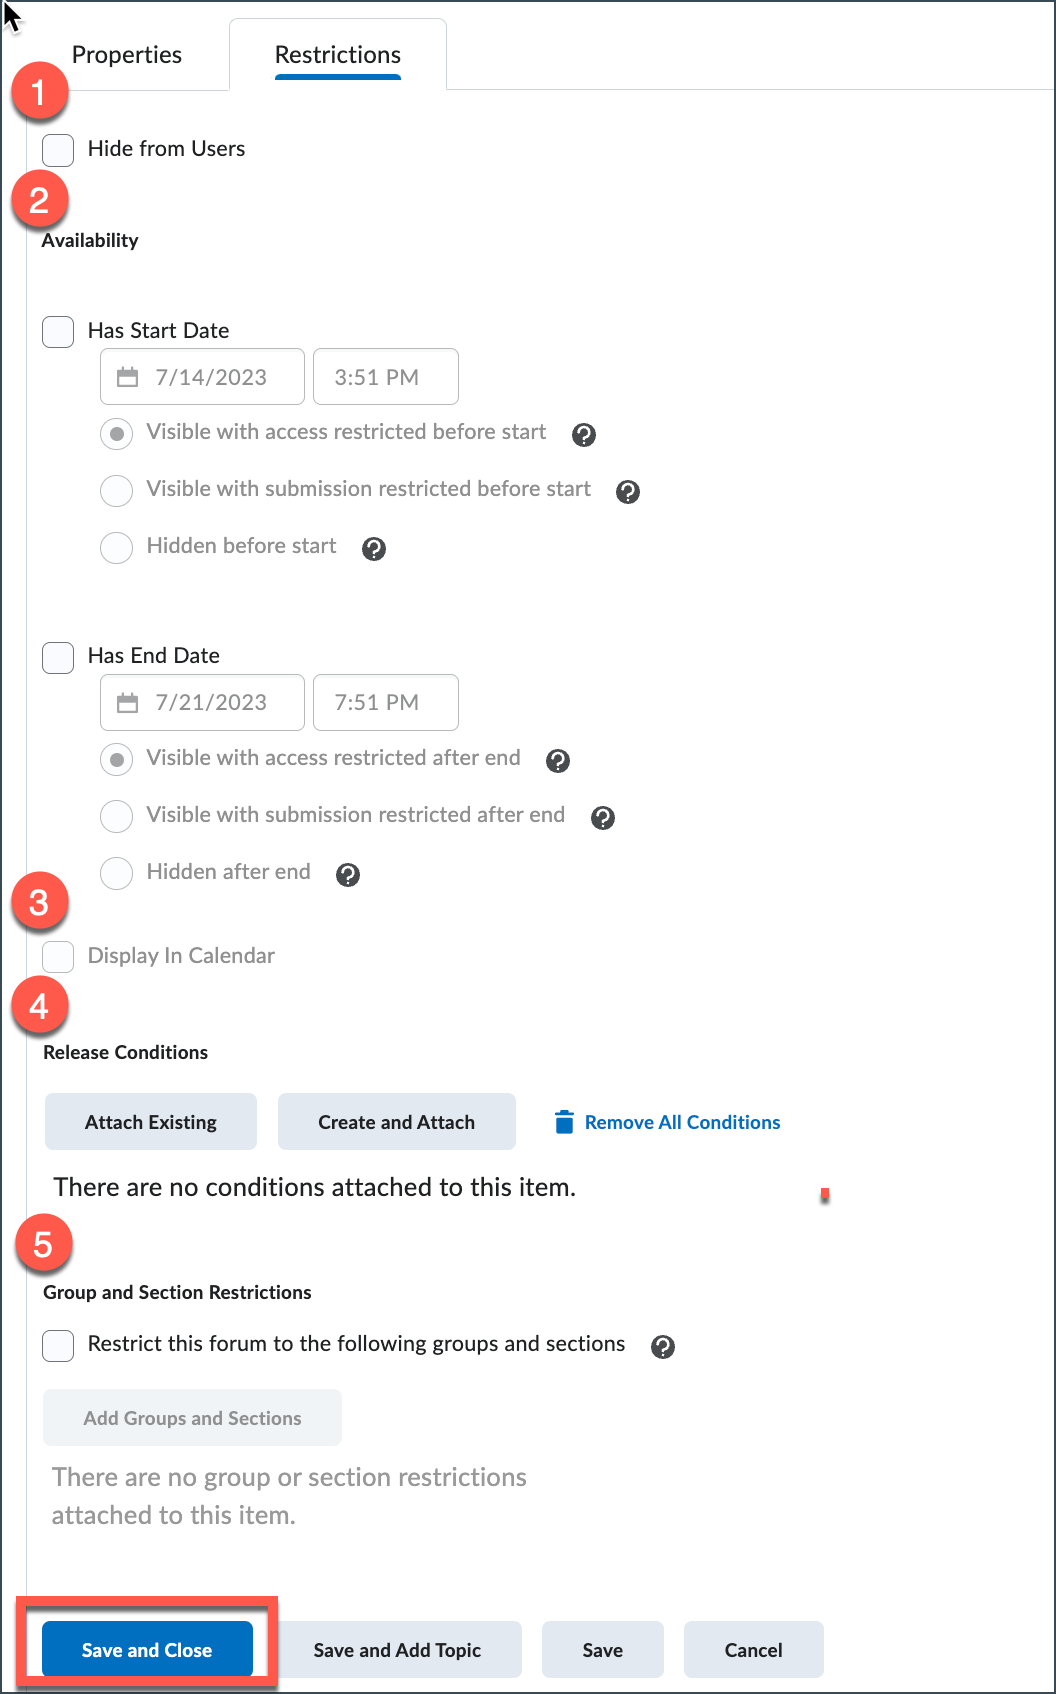
- Hide from Users: Note you have to manually uncheck this box to make the forum visible again.
- Availability Dates: Add a start and end date, if desired.
- Display in Calendar: Check this box to display forum availability dates in the Calendar.
- Release Conditions: Release conditions allow you to create a custom learning path through the materials in your course. When you attach a release condition to an item, users cannot see that item until they meet the associated condition.
- Group and Section Restriction: Restrict a forum to specific course groups or sections.
When you have specified your preferences Click Save and Close or Save and Add Topic if you are prepared to add a discussion topic to the forum.
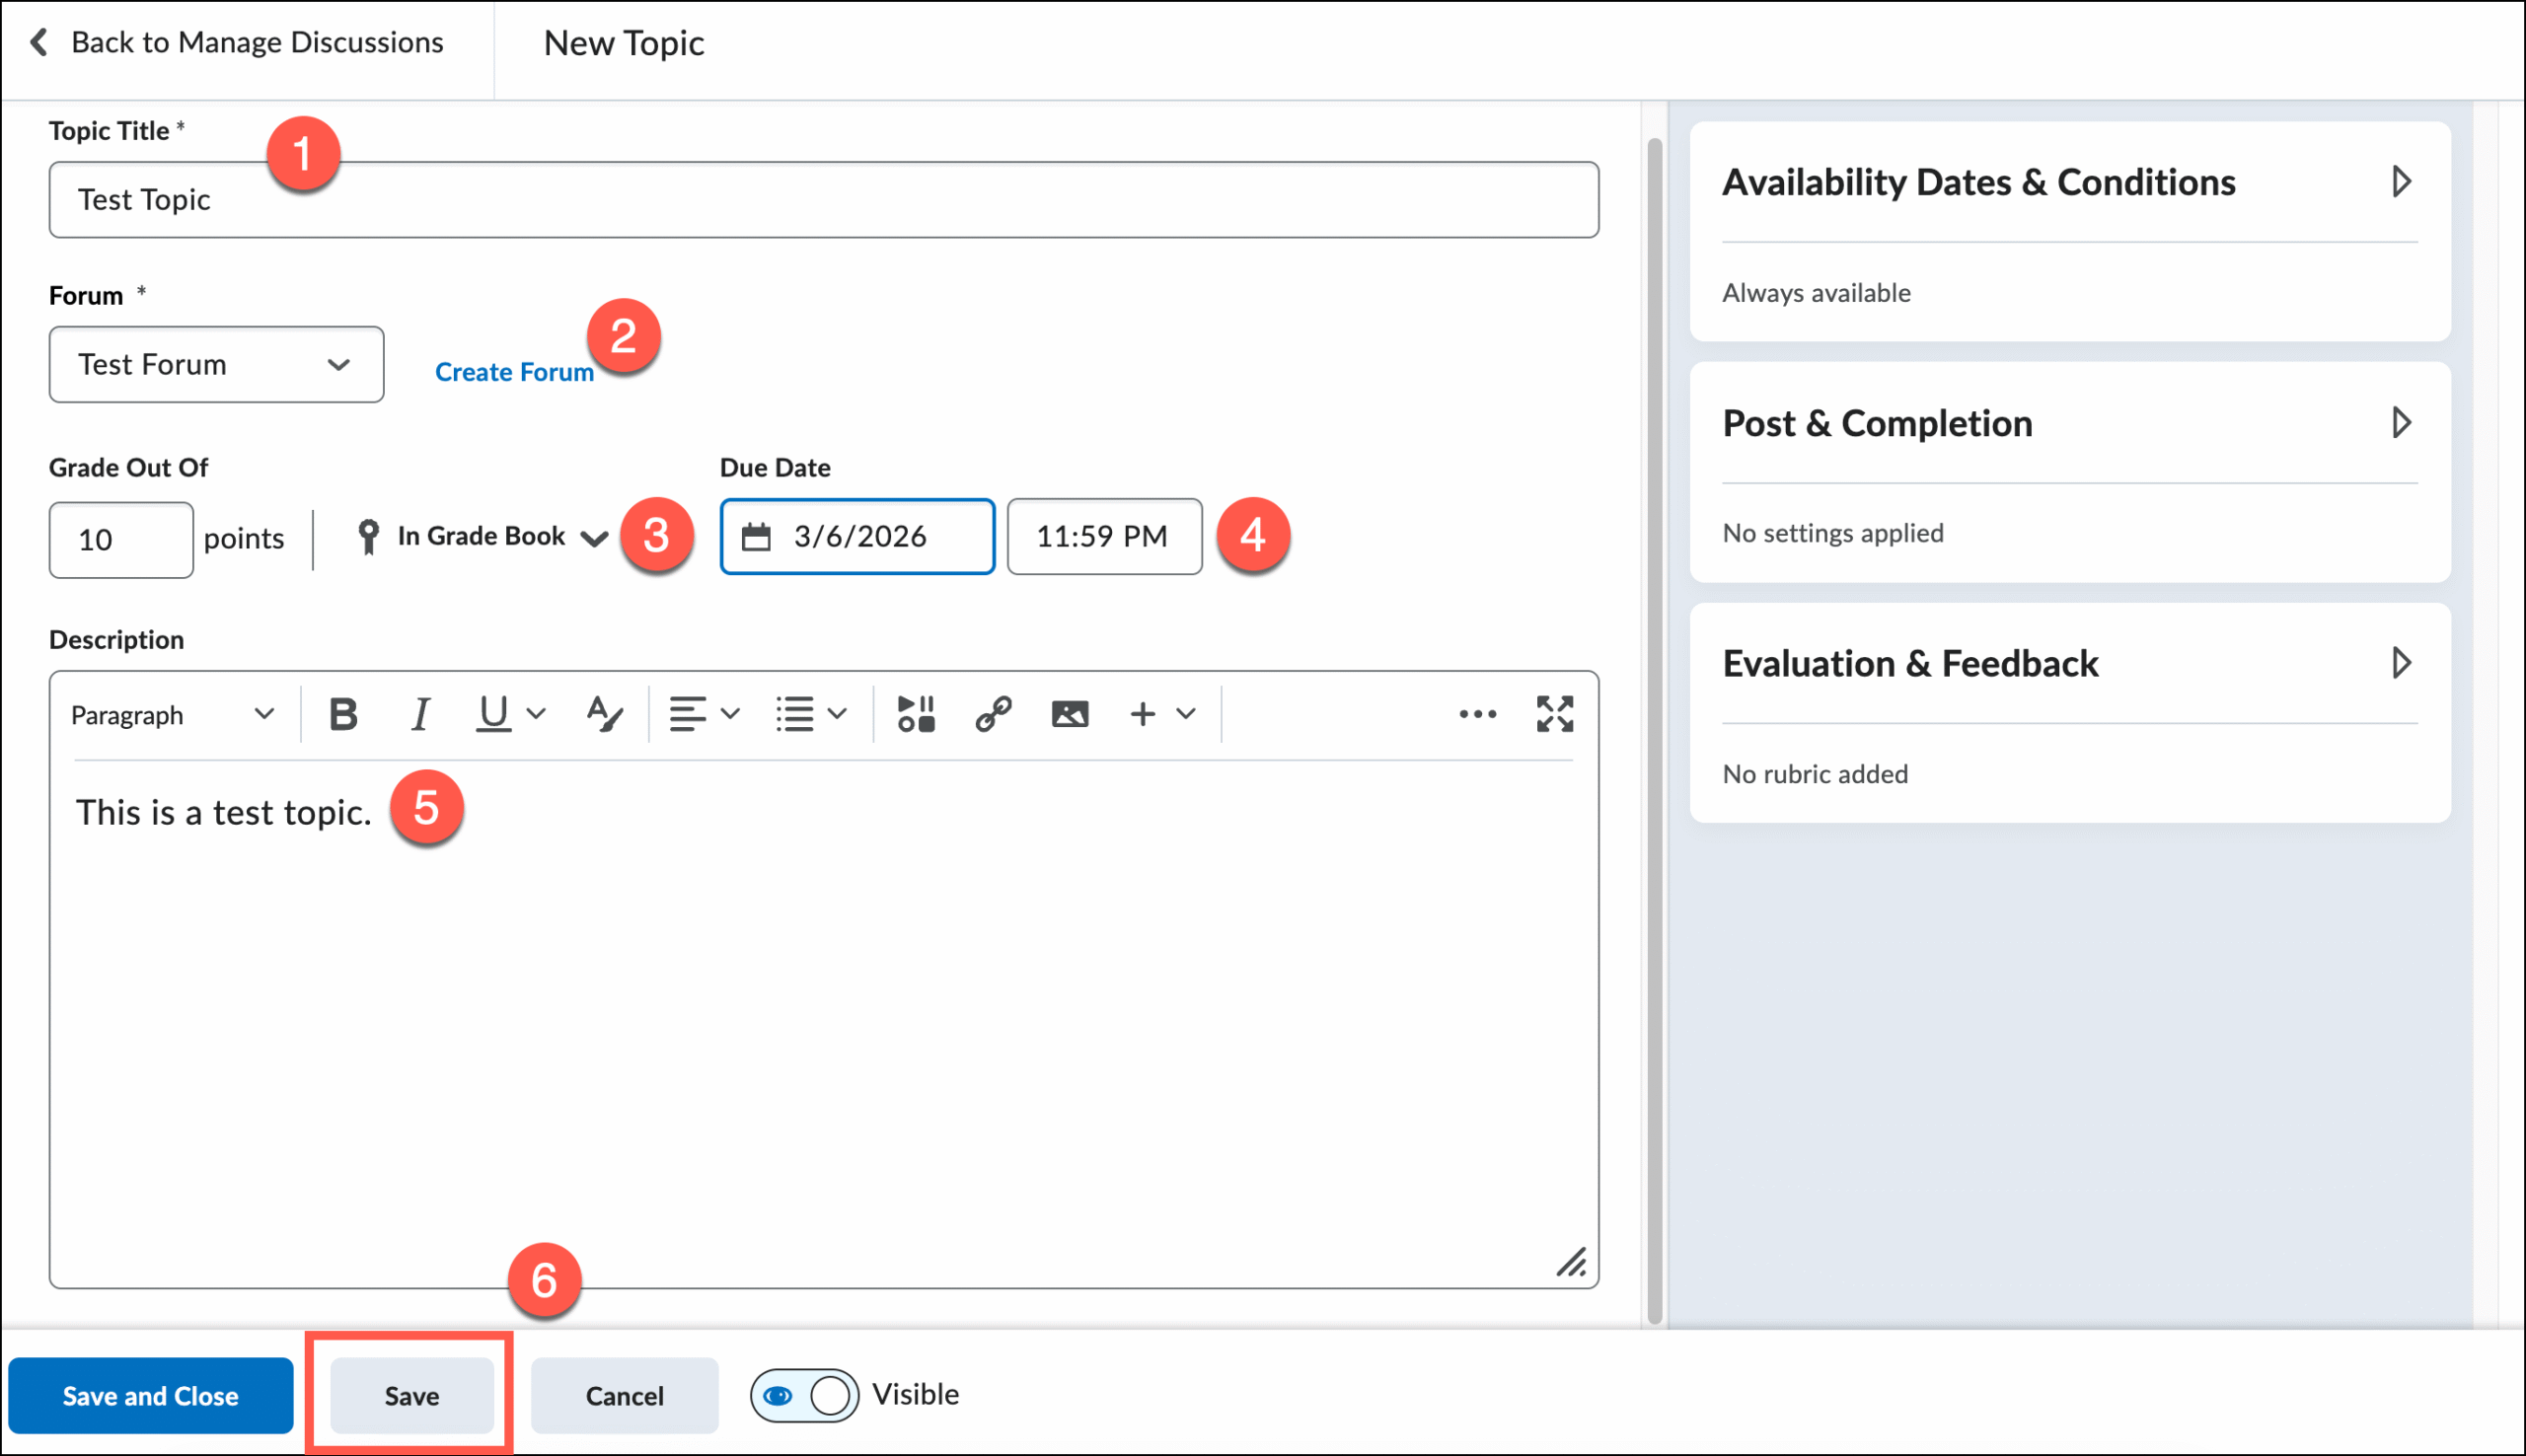
Create a Discussion Topic
A Topic is a place where students can post and read each other’s posts, or threads. They can create one or multiple threads within a topic. Threads are the main messages to which others can reply with a post. A student is able to both create a thread and post a reply.
To create a topic, click the drop-down arrow next to the Forum name and select Add Topic.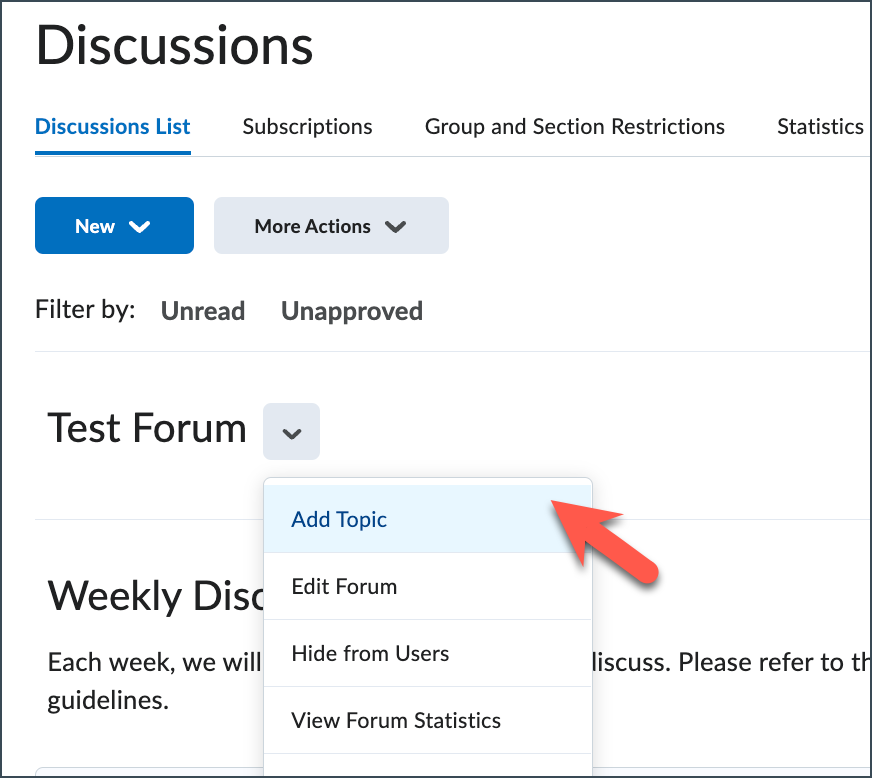
- Enter a name in the Topic Title field.
- You will see the forum in which your topic is located. Click Change Forum to move the topic to a different forum.
- To add the discussion topic to the gradebook, enter a point value in the Grade Out Of field.
- Specify a due date for the first post in a discussion.
- Enter the discussion prompt in the Description field.
- Click Save.
Additional Topic Settings
You can apply additional settings to the discussion topic under the following areas: 1) Availability Dates & Conditions; 2) Post & Completion; and 3) Evaluation & Feedback.
Availability & Conditions
To access these options, click the arrow next to Availability & Conditions to expand the area.
- If desired, you can set a Start Date and/or End Date.
- If you want to apply a release condition to the discussion topic, click Add Release Conditions. More information about release conditions can be found in this article, Brightspace – Release Conditions.
- If there are groups or sections in your course, click on Group and Section Restrictions to restrict a topic to certain groups or sections.

Post & Completion
To access these options, click the arrow next to Post & Completion to expand the area.
- Default participation is automatically selected. You can change this setting to either of two different options:
- Allow learners to hide their name from other learners: Instructors will still see student names for each post.
- Learners must start a thread before they can view or reply to other threads: This helps ensure that initial student posts are original.
- If you would like to review posts before they are visible to all students, check the Posts must be approved before they display in the topic box.

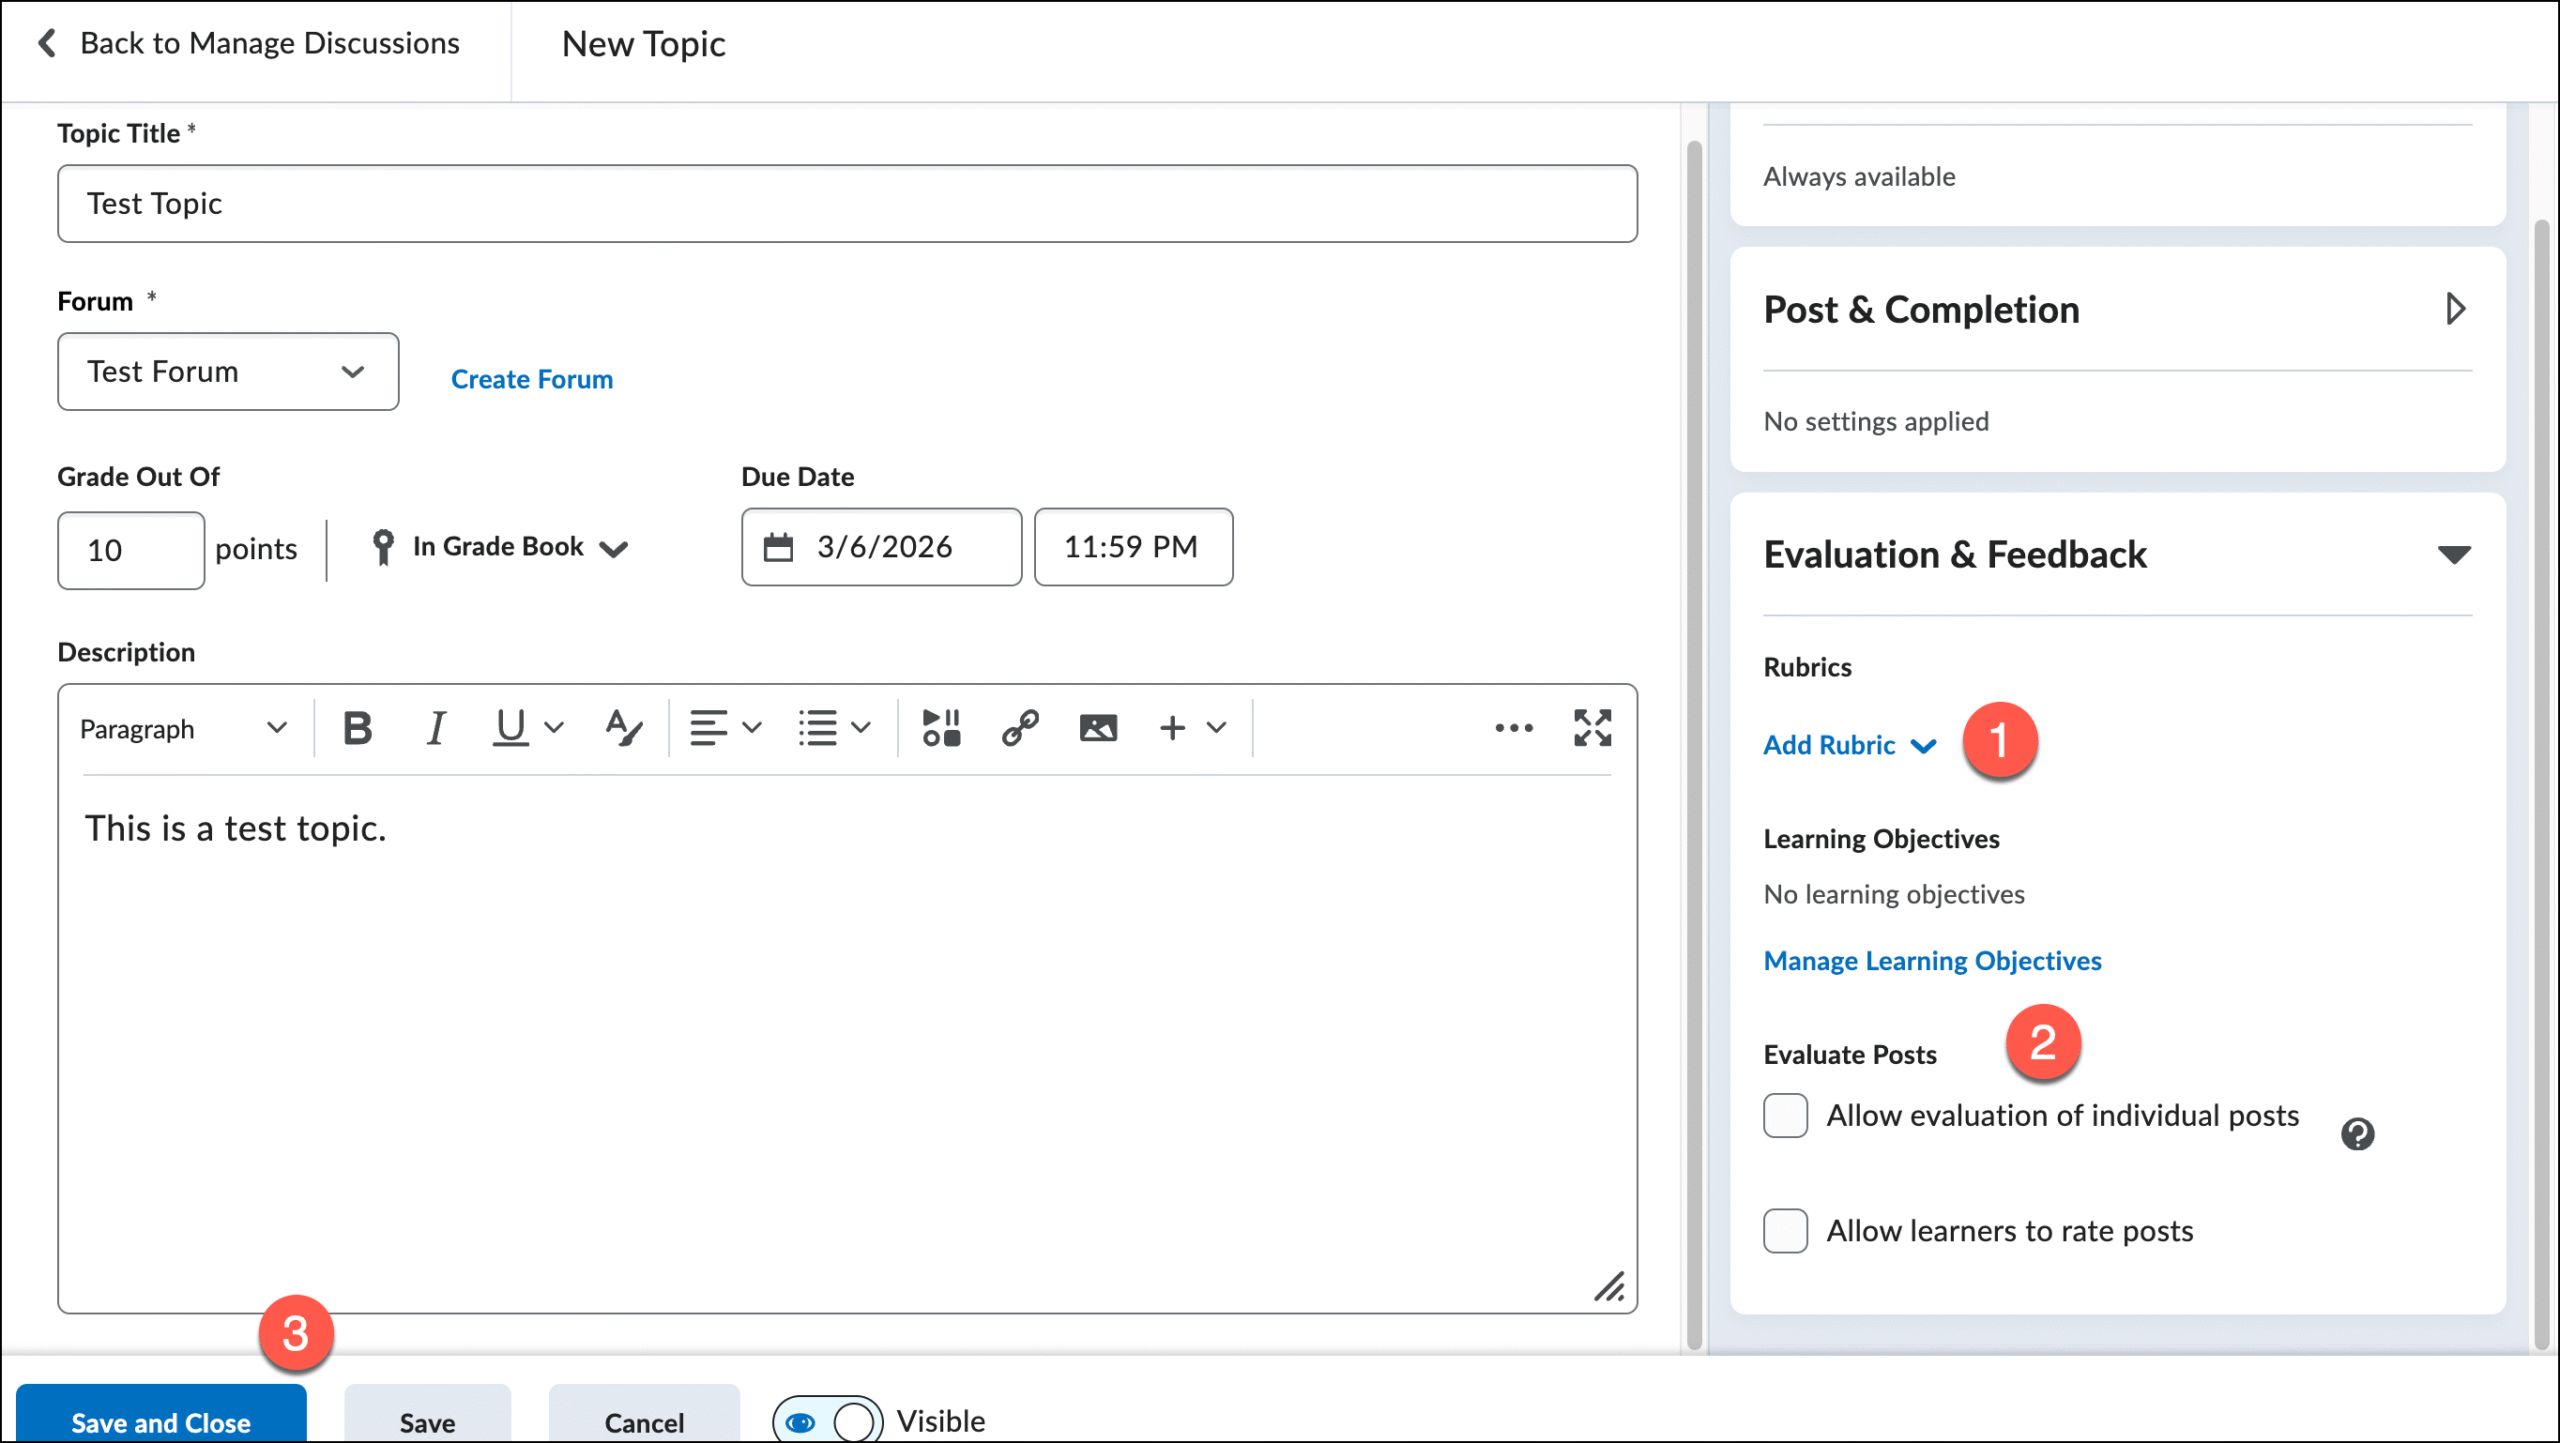
Evaluation & Feedback
To access these options, click the arrow next to Evaluation & Feedback to expand the area.
- If desired, click the Add Rubric link to add a rubric. More information about rubrics can be found in this article, Brightspace – Rubrics.
- Under Evaluate Posts, you can optionally select the following:
- Allow evaluation of individual posts: When selected, instructors can assign scores to each post on the topic. The option requires the topic to have assigned points.
- Allow learners to rate posts: The following options are available:
- Five-star Rating: When this scheme is selected, a scale with five stars appears below the post.
- Up Vote/Down Vote Rating and Up Vote Only Rating: When either Up Vote/Down Vote Rating Scale or Up Vote Only Rating is selected, a plus icon and a minus icon with a number in between will appear to the left of the post (for up vote, you will only see a plus icon). Click on the plus or minus icon to give the post a higher rating or lower rating.
- When are you done choosing options, click Save and Close.
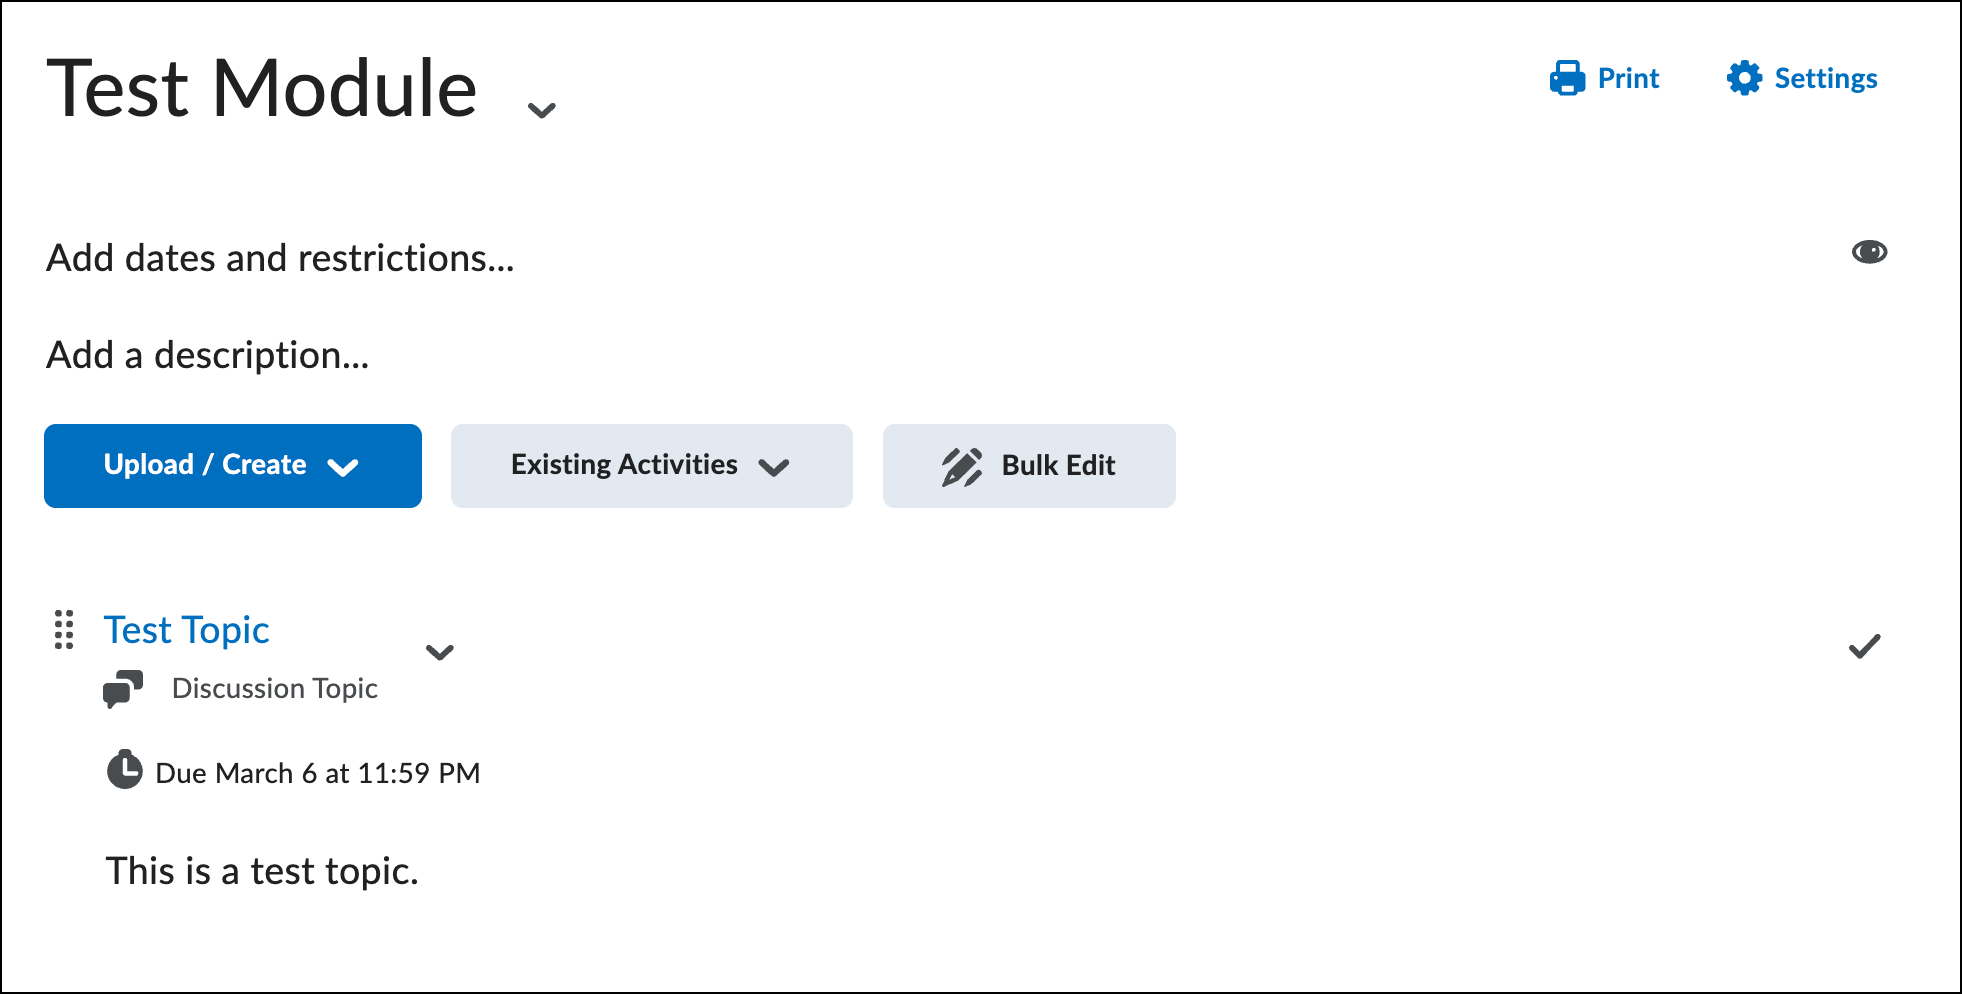
Link to Discussion in Content Module
- Click on Content & Activities. More information about content can be found in this article, Brightspace – Content.
- On the left menu under Table of Contents, either click on an existing module. (Or click Add a Module.)
- Once you’ve clicked on the module title on the left menu, click the Existing Activities button.
- Choose Discussions from the list.
- This pops open a window listing your discussion forums. Click on the correct forum, and then click the correct topic to link to.