Breakout Rooms enable Meeting Organizers to separate participants of a meeting into several meetings. Organizers may randomly or manually assign participants, and can move freely between these Breakout Rooms to check-in on ongoing subgroup discussions. Also, Organizers have the opportunity to pre-enroll participants into breakout rooms before a meeting begins.
This popular feature is effective for classes and teams of all sizes, enabling more rapid creation of small groups for dealing with specific tasks or having subgroup discussions.
Requirements for Joining or Hosting Breakout Rooms
For access to Breakout Rooms and some other Microsoft 365 and Teams features, please ensure your device meets the following requirements
- Updated and supported Operating System (OS)
- Apple only officially supports the three most recent versions of macOS. Please ensure you are running macOS 13 Ventura, 14 Sonoma, or 15 Sequoia. Click here for details and upgrade information.
- Windows users should ensure they are running Windows 10 or Windows 11 and are fully updated.
- Android and iOS users can be placed into Breakout Rooms but cannot create or manage Breakout Rooms. Please ensure your device is fully updated.
- Updated Teams App
Breakout Rooms for Participants
Participant Capabilities
Participants are not able to manage any Breakout Room settings or options – only the Meeting Organizer can change these settings.
When joined to a Breakout Room, participants will automatically be granted the Presenter role in that Breakout Room. The Presenter role has some additional capabilities over the default Attendee role.
Typically, this includes the following:
- Access to Meeting chat.
- When your Breakout Room is closed or you are unassigned, you will no longer be able to post in the room’s meeting chat. You can still view messages and content up until the point when you were removed or the room was closed.
- The ability to start a recording.
- The ability to view the participants list.
- You will not be able to invite others to the Breakout Room
- The ability to share content, such as your screen or a specific app.
Entering and Exiting a Breakout Room
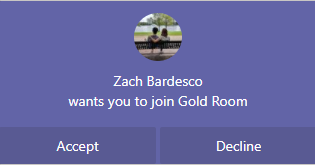
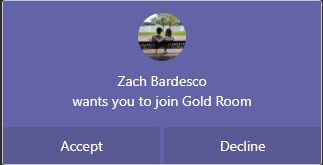
When you are automatically moved into or out of a Breakout Room, you will see the messages below before being automatically moved to the breakout room.
Breakout Rooms Opened
![]()
Breakout Room Closed
![]()
Join Breakout Room prompt
Depending on how the Meeting Organizer set up the meeting, you may not be automatically moved to your Breakout Room, and instead will see the following. 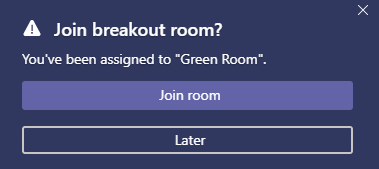
If you accidentally close this window, or you click Later, the Meeting Organizer can manually ask you to rejoin the meeting, or you can join the Breakout Room if you see it in your list of chats.
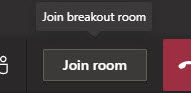
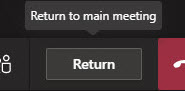
Swap Between the Breakout Room and Main Meeting
Meeting organizers can configure their Breakout Rooms to enable participants to freely swap between the Breakout Room and main meeting.
If this option has been enabled and the Breakout Rooms have been opened, you will see the option to Join the Breakout room or Return to the main meeting.
Join room
Return
Breakout Rooms for Meeting Organizers
Creating a Breakout Room
Requirements for Creating a Breakout Room:
- Only the Meeting Organizer or designated Presenters can create and manage Breakout Rooms.
- Classroom-style Breakout Rooms should plan ahead if they intend to have TAs manage their Breakout Rooms
- The Meeting Organizer must be using the Teams Desktop Client
- Participants can be on mobile or can use the Teams Web App.
- Click the Breakout rooms button (
 )from the top-right menu bar.

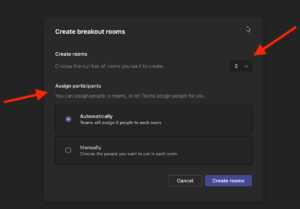
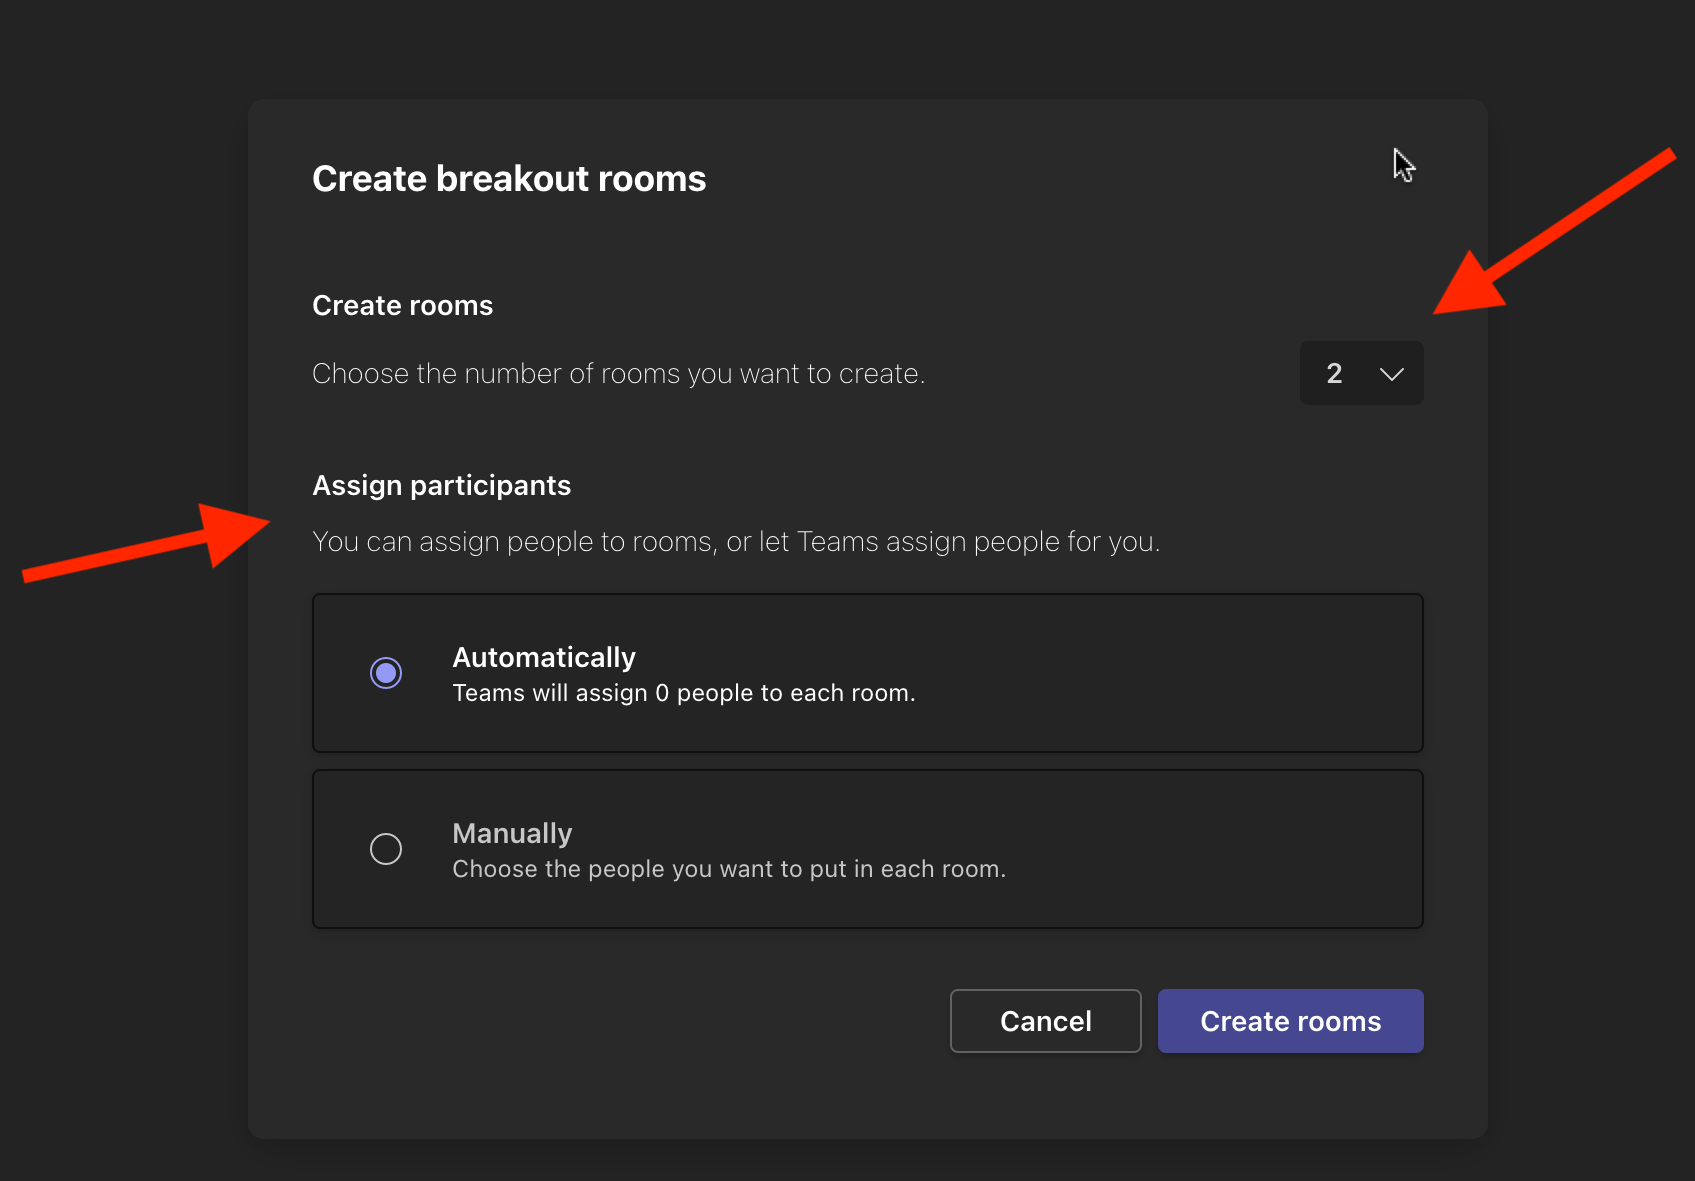
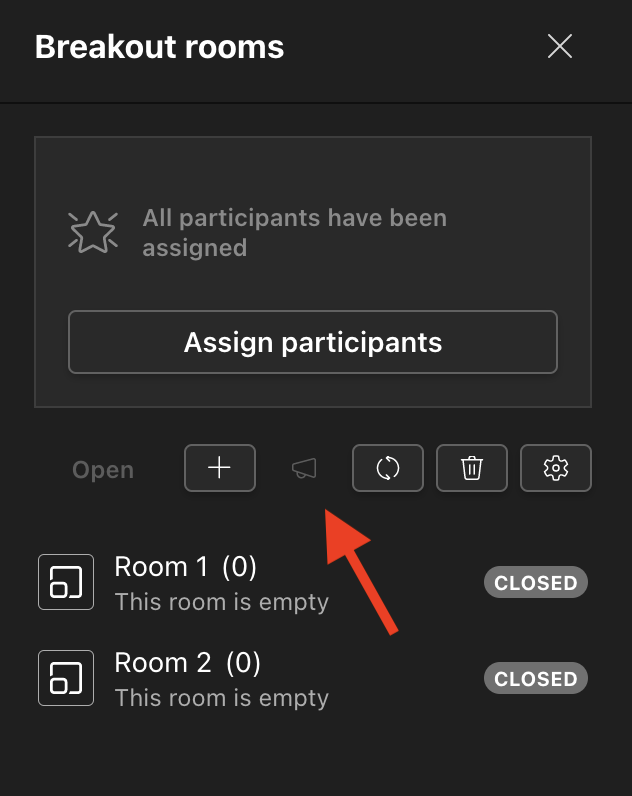
- Select how many rooms you need, choose whether to automatically or manually assign participants to rooms, then click Create Rooms. You can add more rooms and re-assign participants to rooms later.
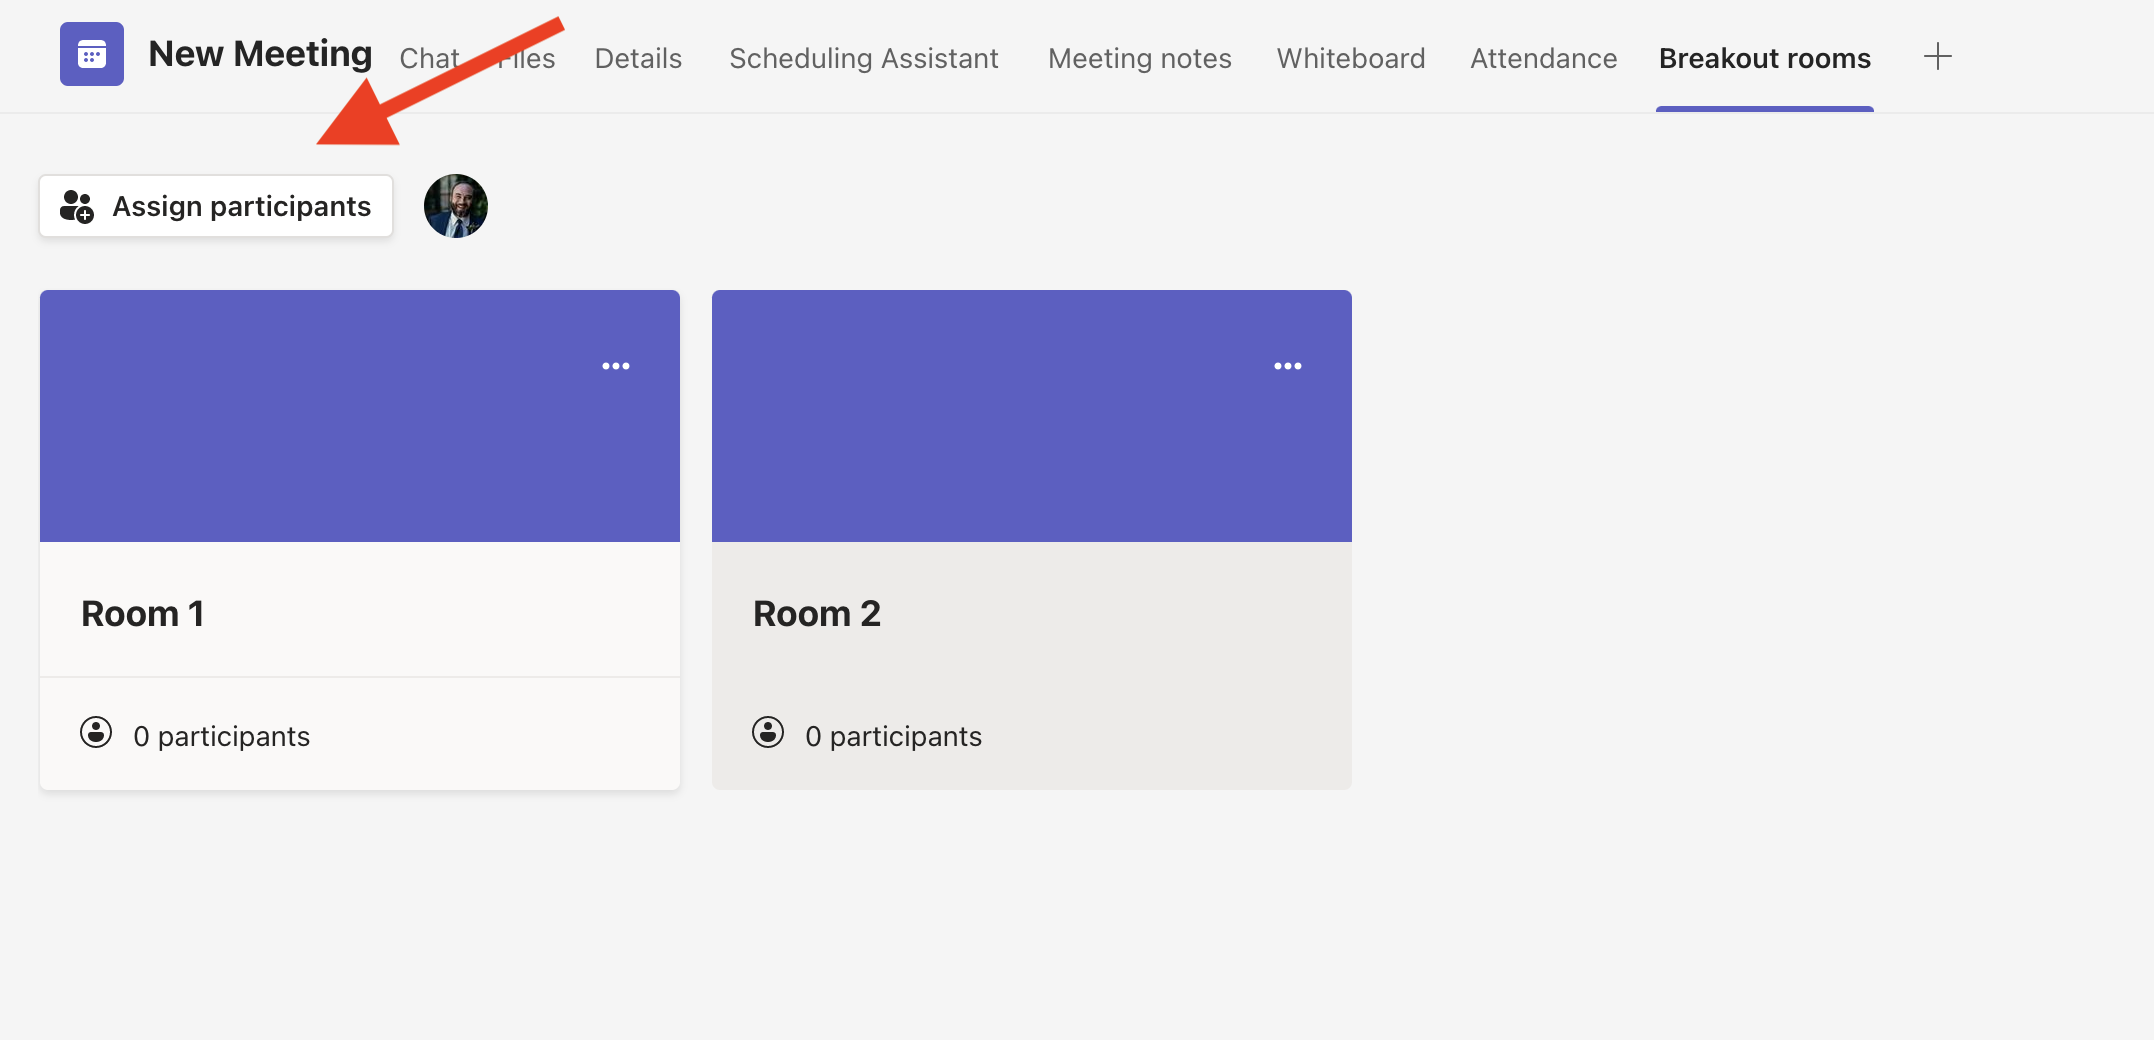
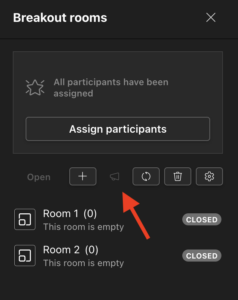
- At this point, you have successfully created your Breakout Rooms and should see them displayed in the sidebar.


Opening your Breakout Rooms
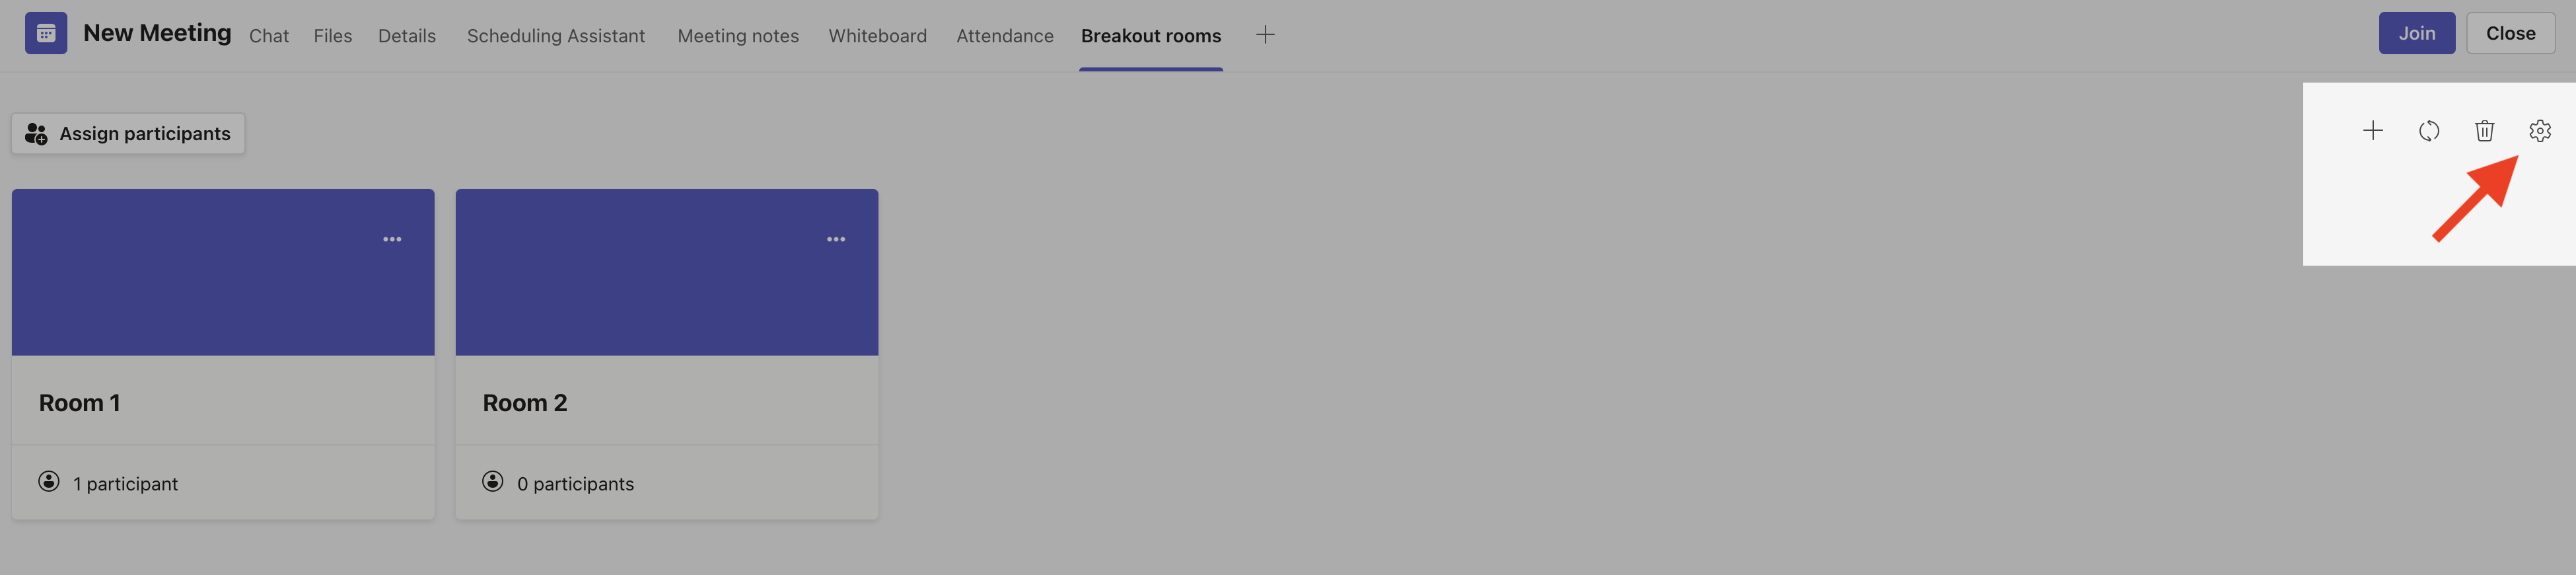
- Click the Breakout rooms button () from the top-right menu bar.
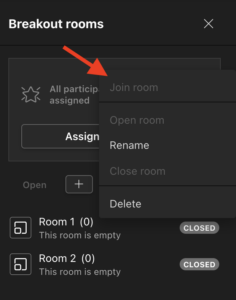
- You can open all rooms by clicking Open. Alternatively, open a specific room by hovering your mouse over the room you wish to open, clicking the 3-dot
 menu and selecting Open room.
Closing your Breakout Rooms
- Click the Breakout rooms button () from the top-right menu bar.
- You can close all rooms by clicking Close. Alternatively, close a specific room by hovering your mouse over the room you wish to close, clicking the 3-dot menu and selecting Close room.
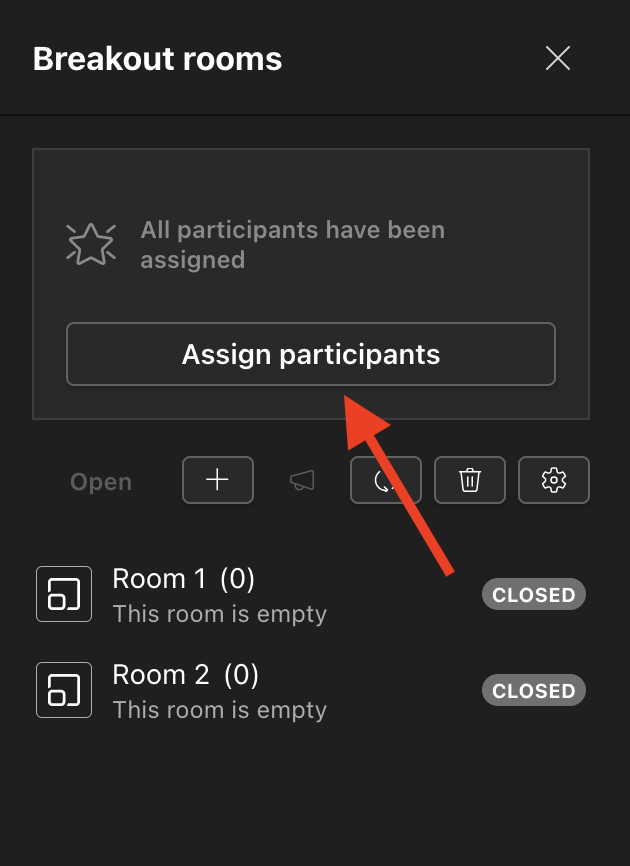
Managing Room Assignments
- Click the Breakout rooms button () from the top-right menu bar.
- Expand the Assign participants section (or, if re-assigning a participant, expand their current Breakout Room), check the box(es) next to the participant(s) you wish to reassign, then click Assign and make your selection.
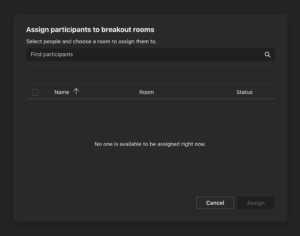

Note: Room assignments persist throughout recurring Teams meetings.
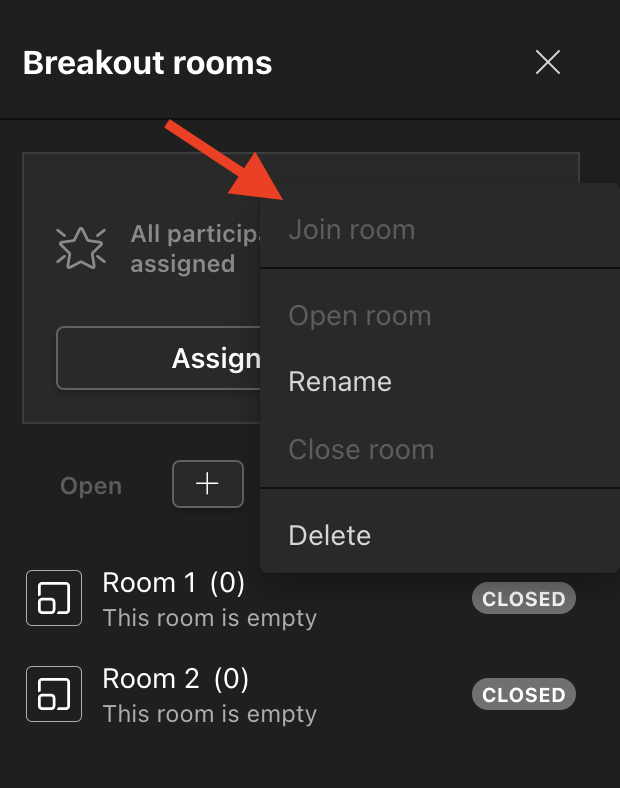
Renaming a Room
- Click the Breakout rooms button () from the top-right menu bar.
- Hover your mouse over the room you wish to rename, then click the 3-dot menu, and select Rename.
- Enter the new name, then click Rename room.
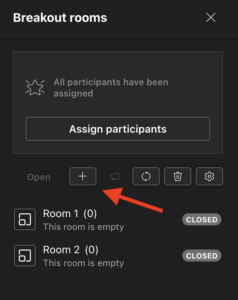
Adding an Additional Room
- Click the Breakout rooms button () from the top-right menu bar.
- Click +. This will create a new room with a default name. See these instructions for renaming the new room.

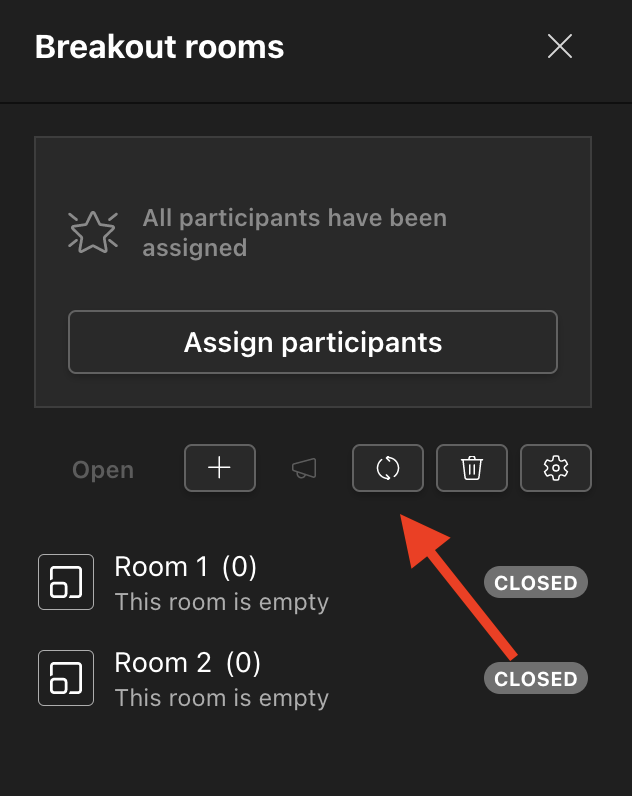
Recreating Rooms
If you want to start over with your Break Out room, you can use the Recreate Rooms feature. This can be useful if there was an issue automatically assigning a large number of participants to groups.
- Select the recreate rooms icon from the menu.

- Confirm you want to delete all of your existing Breakout Rooms.
- Use the instructions above on Creating a Breakout Room.
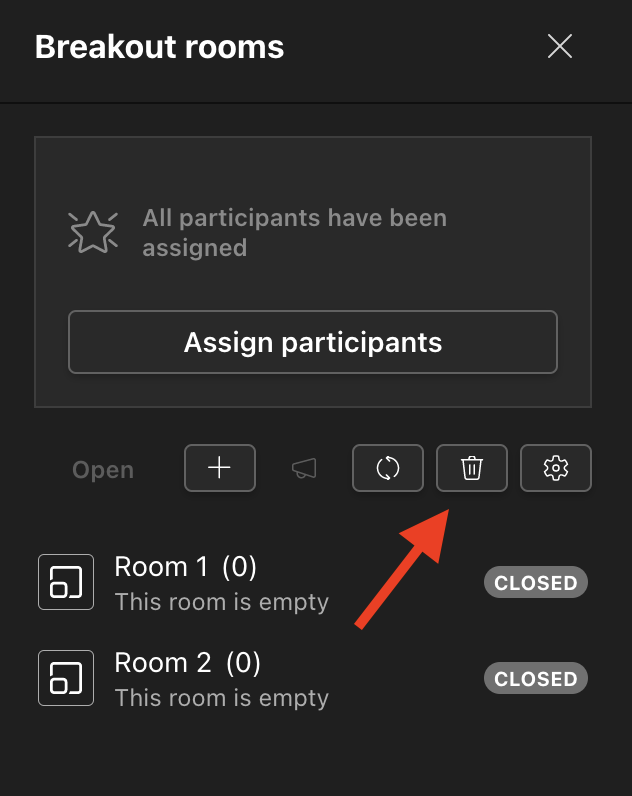
Deleting a Room
Deleting a Breakout Room removes the selected room from the rooms list, but does not delete the chat and any associated recordings or chat created in that chatroom. Deleted Breakout Rooms cannot be returned to the rooms list.
-
- Click the Breakout rooms button () from the top-right menu bar.
- Hover your mouse over the empty, to-be-deleted room, then click the 3-dot menu and select Delete.

- Click Delete to confirm deletion.
- Click the Breakout rooms button (

Advanced Options for Meeting Organizers
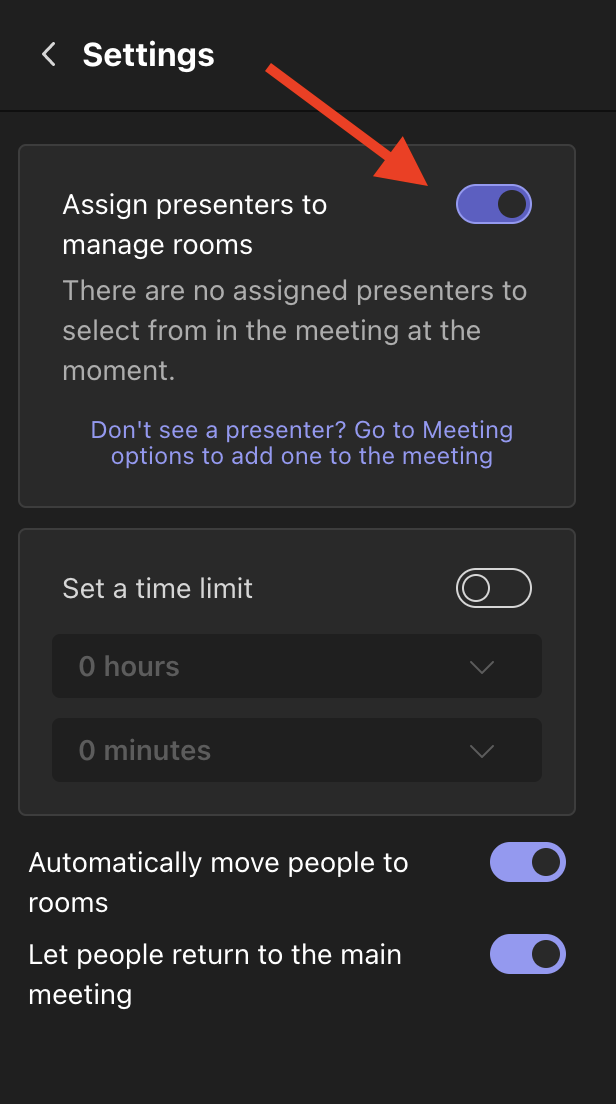
Assign Presenters to manage rooms
Meeting organizers can designate presenters to manage breakout rooms. This offers presenters the ability to take a more active role in managing the rooms.
- Click the Breakout rooms button () from the top-right menu bar.
- Under Assign participants, click the Gear icon.
- Click the toggle switch to Assign presenters to manage rooms.
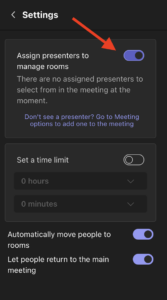
- Select the presenters you wish to have manage the rooms.
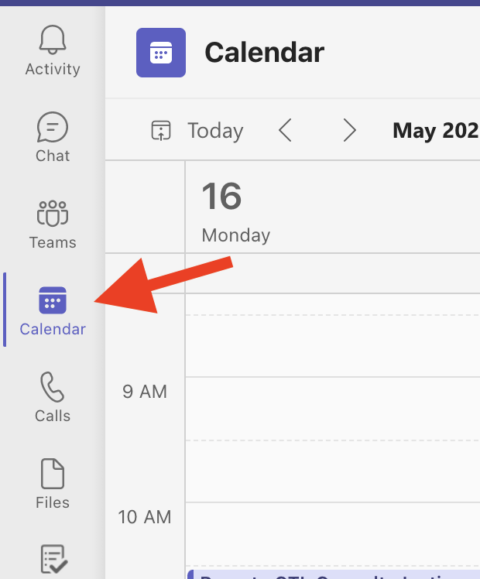
Create Breakout Rooms before a Meeting
Meeting Organizers can create Breakout Rooms prior to a meeting. This offers Organizers the convenience of having the rooms prepared in advance.
-
- Within the Teams desktop application, head over to the Calendar tab.
-
- Find your meeting and double click it.
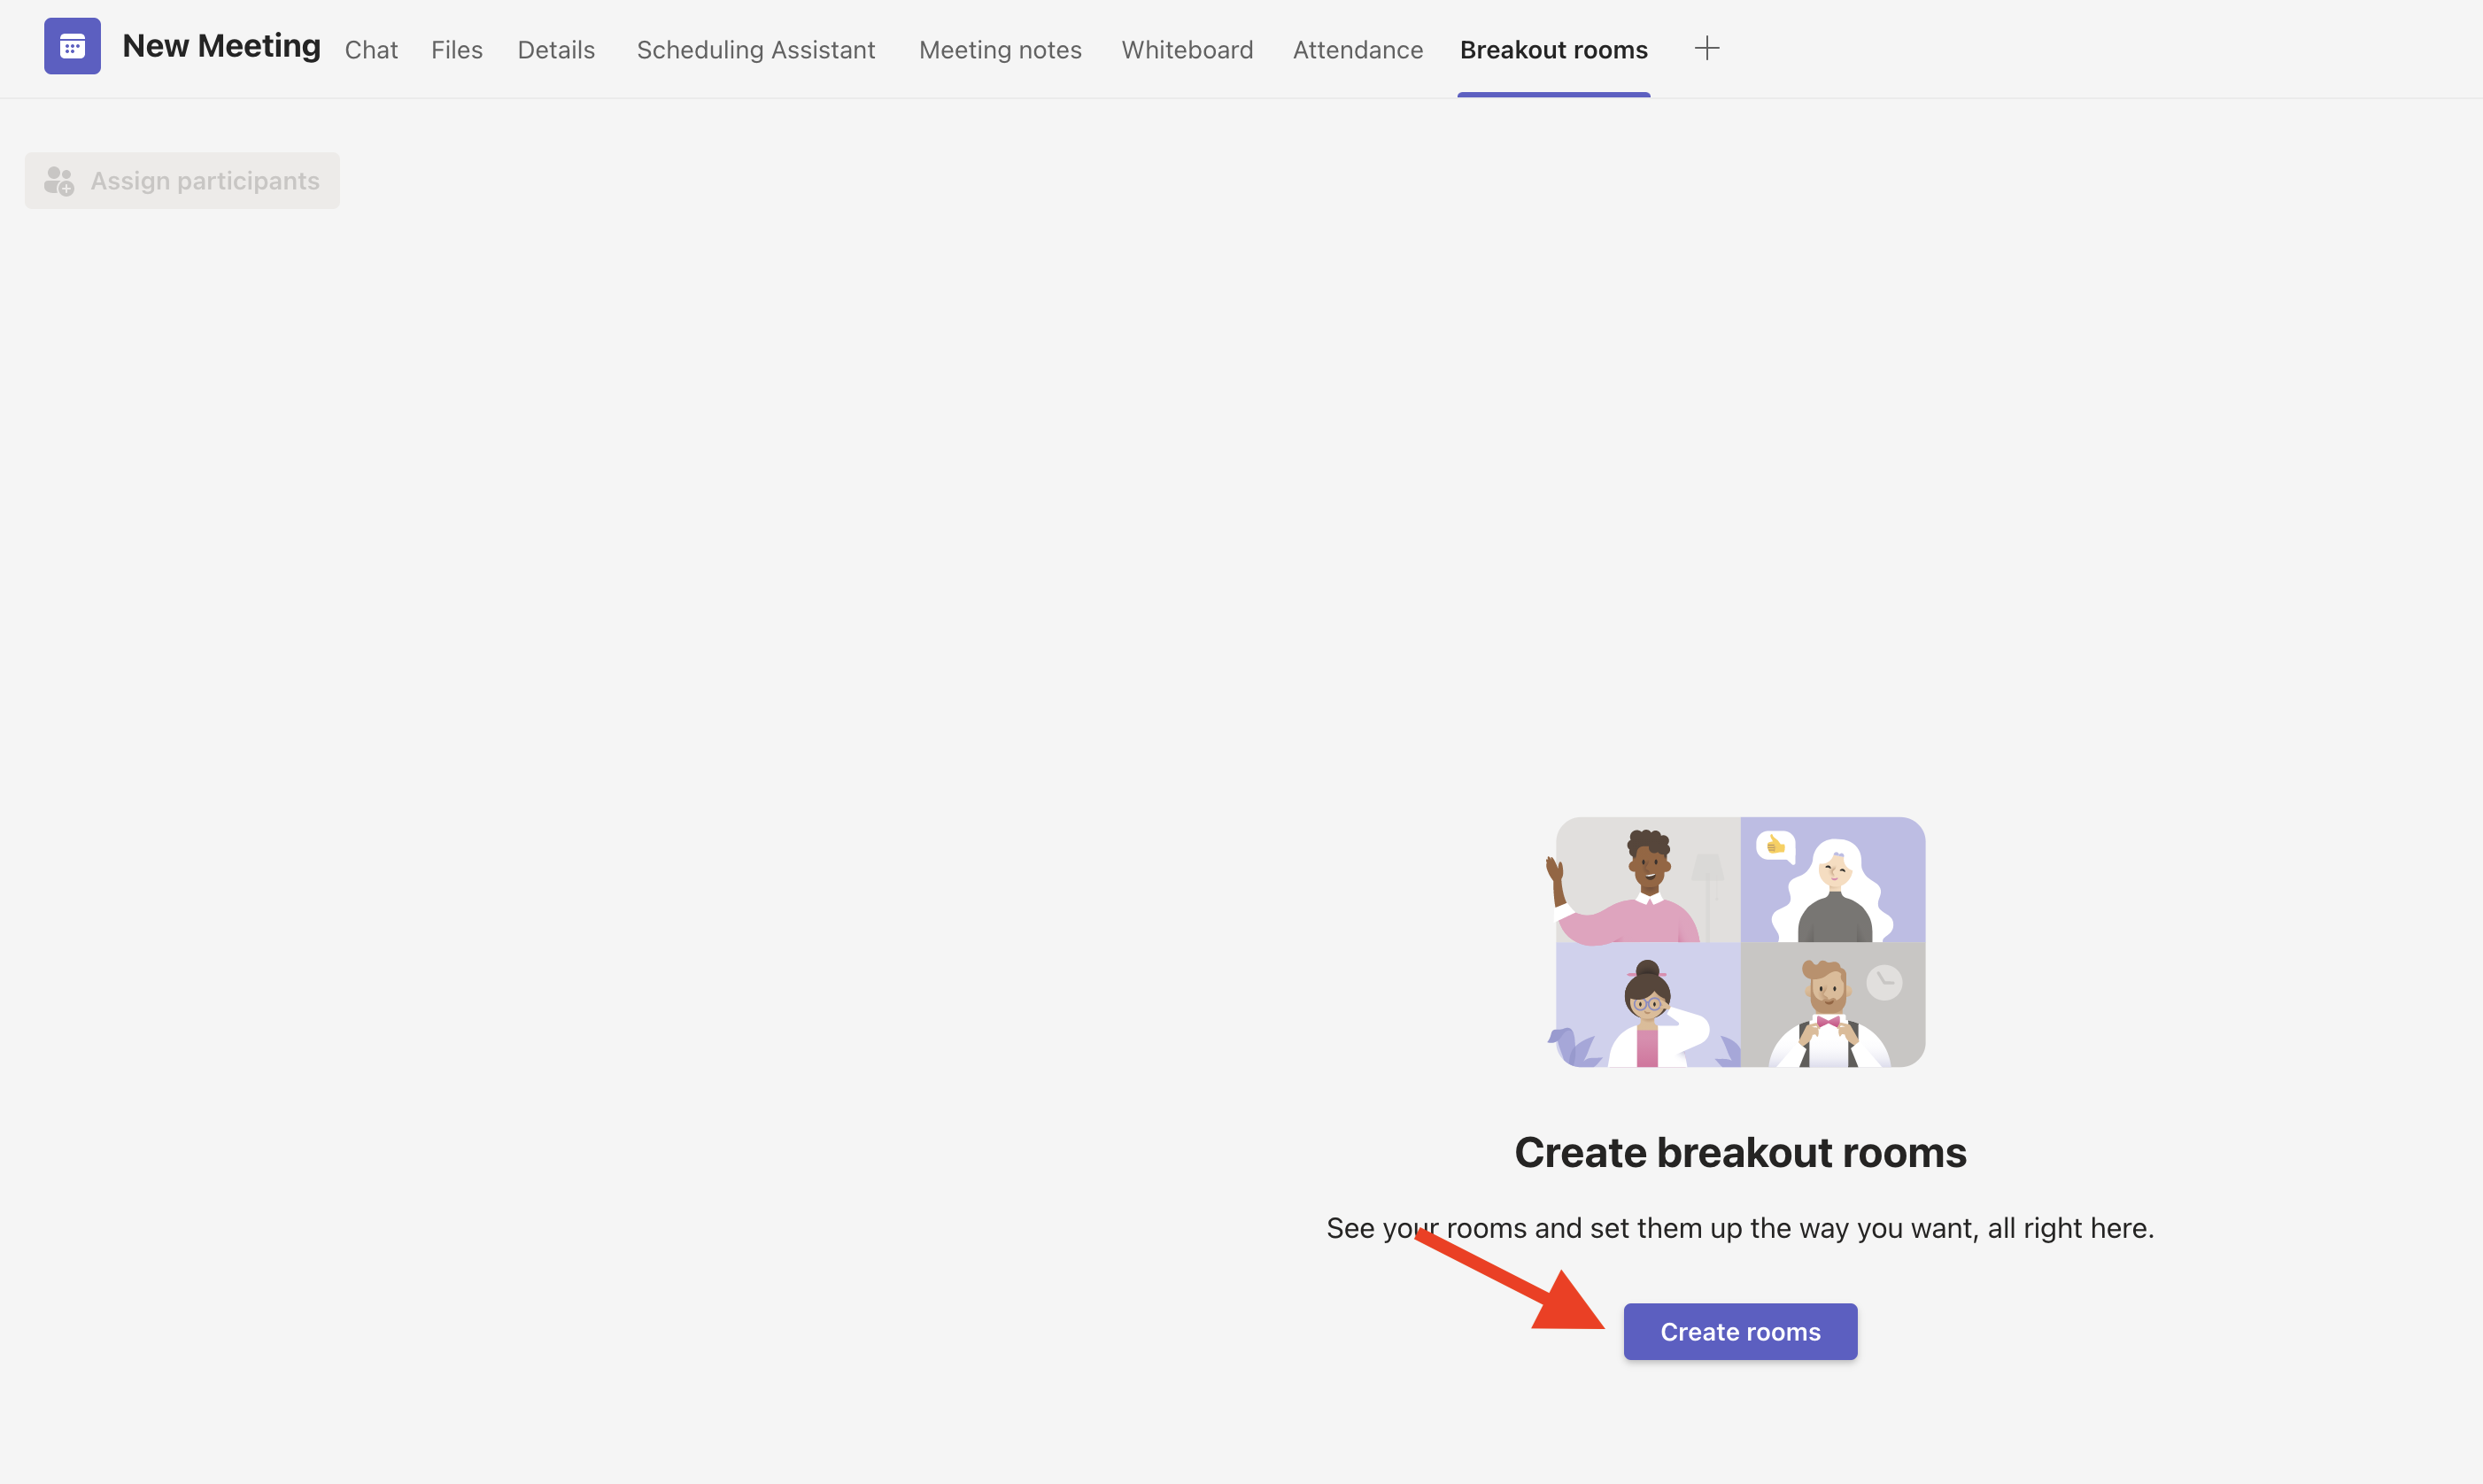
- From the top menu, select Breakout Rooms.

-
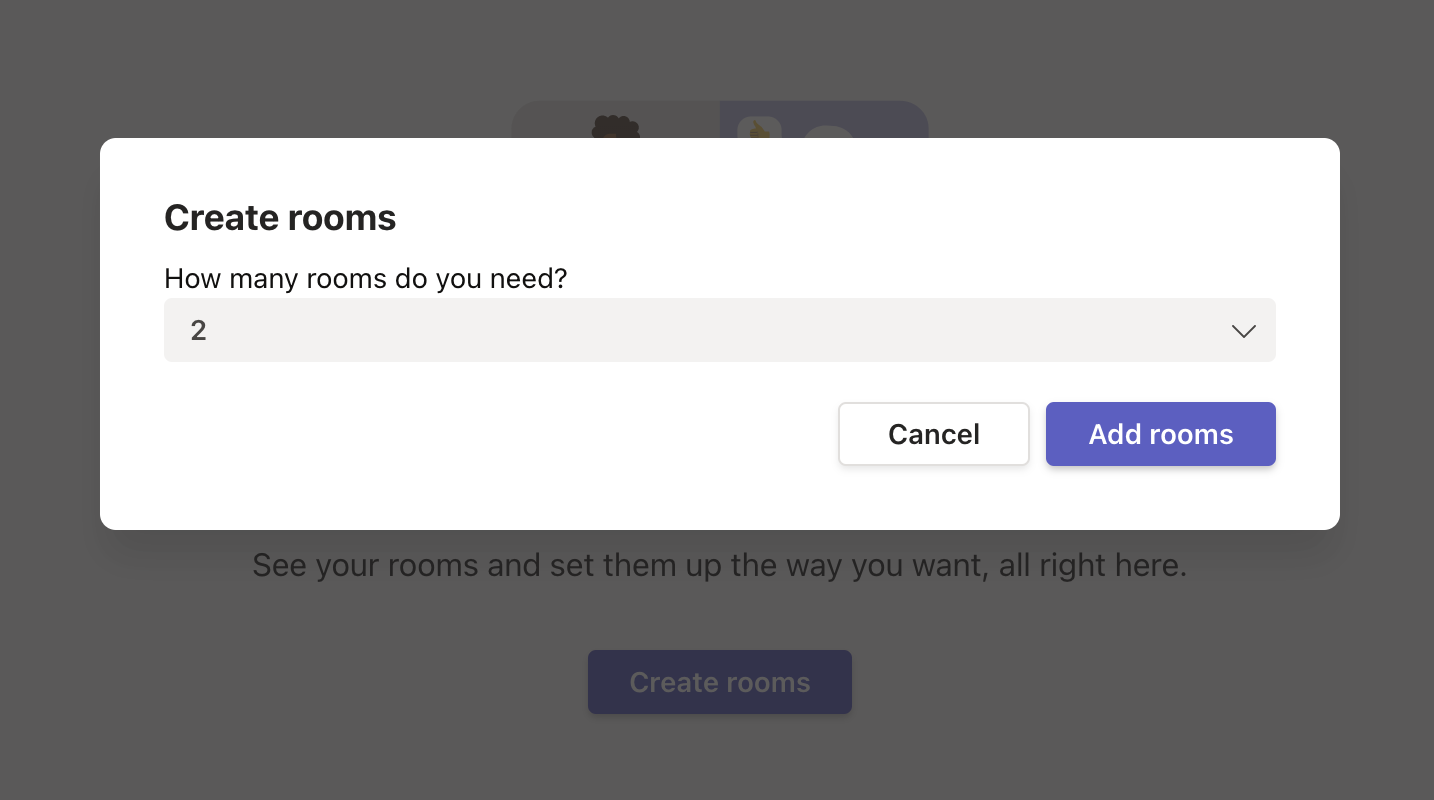
- From the Breakout Rooms tab, select Create rooms to begin the breakout rooms creation process.
-
- Select how many rooms you need and click Add rooms.
-
- After the rooms have been created, select Assign participants. Participants can be automatically or manually assigned to rooms.
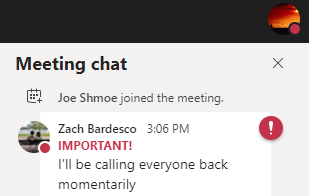
Making an Announcement
Announcements allow Meeting Organizers to broadcast a message to each Breakout Room. This has several uses, including posting a reminder of the discussion topic or informing participants that you will be closing the Breakout Rooms.
- Click the Breakout rooms button () from the top-right menu bar.
- Click the Announcement icon from the menu.
- Enter in your desired message, then click Send.

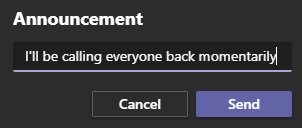
The announcement will be posted in the Meeting chat of each Breakout Room.
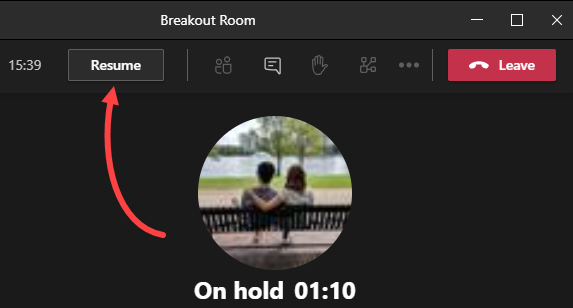
Joining Open Rooms
Meeting Organizers can join individual open Breakout Rooms on the fly as needed. It is not possible to join all meetings simultaneously, though you can access the individual Meeting Chats for each room.
Be aware that participants will not be notified that you have joined their room, so it may be helpful to post a chat when you join.
- Click the Breakout rooms button () from the menu bar.
- Hover your mouse over the room you wish to join, then click the 3-dot () menu and select Join room.
- To return to the main meeting, you can leave the Breakout Room and click Resume.
Enable timed Breakout Rooms
To enable participants to go into Breakout Rooms for a designated amount of time, select the Gear icon from the menu and check Set a time limit. Then select the time you want for the rooms. 

Allow Participants to go between their Breakout Room and the Main Meeting
While some meeting organizers may opt to mimic this behavior by simply Closing a Breakout Room, enabling your participants to freely move between their Breakout Room and the main meeting preserves their ongoing access to the meeting chats, files, and other content specific to that Breakout Room.
Normally, when a Breakout Room is closed, all participants are removed from the Breakout room, and will have read-only access to the content in that room available up until they were removed.
To enable participants to freely swap between their Breakout Room and the main meeting, select the Gear icon from the menu, and check Let people return to the main meeting.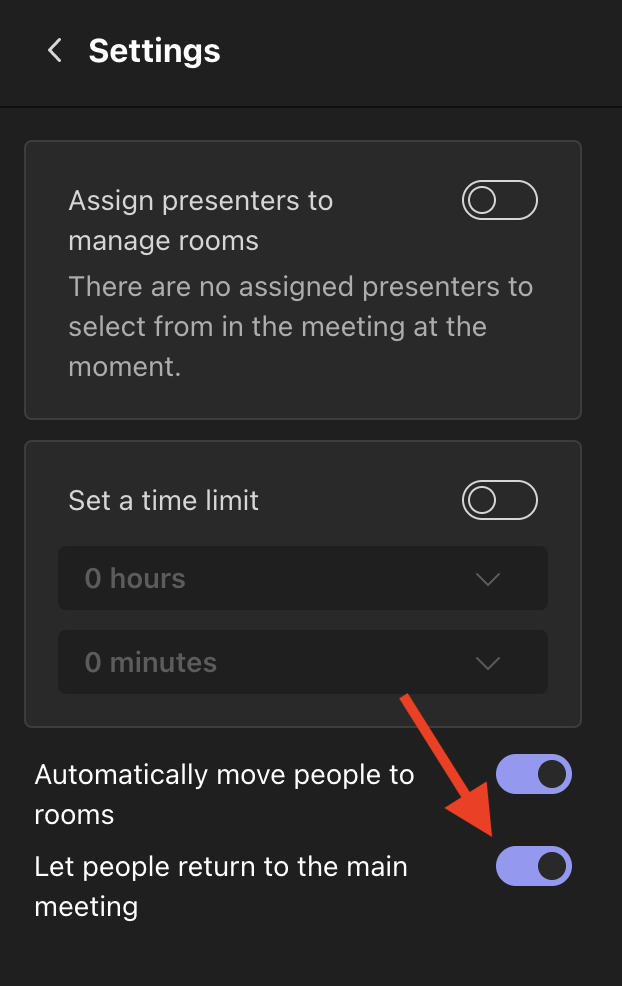
Recording in Breakout Rooms
Breakout Room recordings function similarly to normal meeting recordings. Breakout Room recordings are automatically uploaded to Microsoft OneDrive. You can find these recordings in their respective meeting chats.
A Breakout Room recording can be started by anyone assigned to that Breakout Room, as all participants are given the Presenter role when they are joined to a room.
The main meeting still follows normal restrictions – only the Meeting Organizer and Presenters may start a recording (participants have the normal Attendee role in the main meeting by default).
Manually Add Participants to a Breakout Room
If a participant isn’t automatically added to their assigned Breakout Room, you can manually prompt them to join. This may be necessary in cases where the Meeting Organizer chose not to automatically move people into open rooms, or if the participant joined the main meeting after the meeting organizer had already opened rooms.
- Click the Breakout rooms button () from the menu bar.
- Select Assign Participants and assign the participant to the desired breakout room.

- The selected participant will receive a message asking them to join their assigned Breakout Room.