| Home | |
| Step 1: Registration | |
| Step 2: Cat Card | |
| Step 3: Activate NetID Account | |
| Step 4: Configure NetID Account | |
| Step 5: Get the VPN Client | |
 | Step 6: Install the VPN Client |
| Step 7: Complete |
Knock Knock, Who's There?
Distance Access to UVM
Step 6: Installing the VPN Client
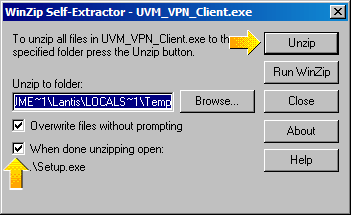
If you chose Desktop Step 5, a small icon named UVM_VPN_Client should appear on the Desktop. If you chose another folder for the destination, go there to get it. Wherever it is, double click it.

A small grey box should pop up. Make sure the checkbox When done unzipping open: has a check in it. The Installshield wizard will start; agree with all suggestions.
**If your computer is running Windows XP, you may run into problems somewhere in this process or after the install. If this happens you need to contact the CIT people for a fix: Call the Helpline at 656-2604 or e-mail helpline@uvm.edu*****
Once VPN is installed, you may choose whether to restart your computer or not. VPN will not work until you do restart.
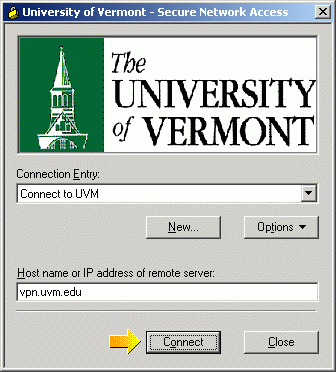
To run VPN, go to the Start button and choose Programs. Find University of Vermont VPN and choose the Secure Network Access with the little padlock icon.

This will open the VPN client. Click the Connect button.
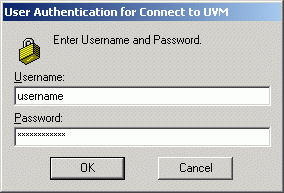
You will then be asked for your NetID and password. This is why you absolutely must have your NetID activated and configured. Enter them and click OK.
You may now go to your UVM sites and do your work exactly as if you were on campus. When you’re done, just exit the VPN.
**If you still have trouble getting in, especially if you are on a dial-up connection, or a cable/DSL connection with a router, contact CIT: Call the Helpline at 656-2604 or e-mail helpline@uvm.edu**
| < Previous Step | Next Step > |