
![]() SSH keys are an alternative method of authentication, using pre-generated key files in place of a password. This method also currently removes the requirement for Duo multifactor authentication. This article outlines how to generate a key pair, where to save them, and which services will accept SSH key pairs as an authentication method.
SSH keys are an alternative method of authentication, using pre-generated key files in place of a password. This method also currently removes the requirement for Duo multifactor authentication. This article outlines how to generate a key pair, where to save them, and which services will accept SSH key pairs as an authentication method.
Generate a key pair
Before authenticating with an SSH key pair, you must generate one. There are several methods you can use to accomplish this, and the process varies depending on the operating system of your device and the software you’re using to connect.
Windows
ssh-keygen (Windows Terminal)
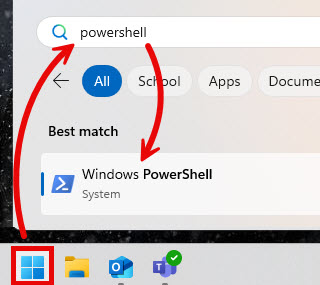
- Open a Windows PowerShell window. One way to do this is expand the Start Menu (), type “PowerShell“, and click the Best Match result that appears.
- Type “ssh-keygen” and hit Enter on your keyboard.
ssh-keygen
- Type in the path to a location and filename to save the private key, or just hit Enter to stick with the default (recommended).

- Choose a passphrase that you’ll have to enter each time you use this key pair and enter the same passphrase again to confirm, hitting Enter on your keyboard after each time. Or, just hit Enter twice without typing anything to bypass passphrase entry (recommended).
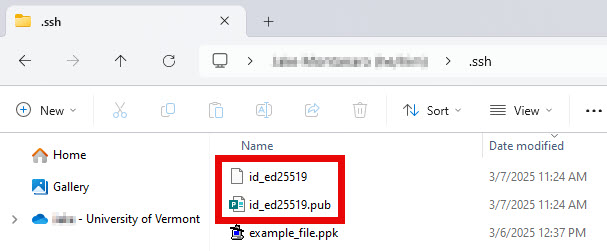
- The new key pair can be found in your local .ssh folder or whichever location you chose in Step 3 above. The .ssh folder is a hidden subfolder of your Windows User folder. See these instructions for more info about hidden folders in Windows.
WinSCP
WinSCP does not come preinstalled, but can be installed for free by visiting their website.
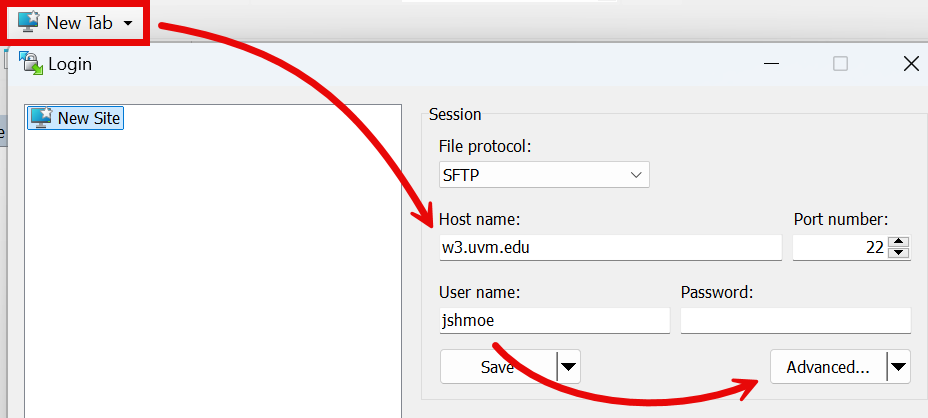
- Open the WinSCP app, click New Tab, enter the Host name of the remote server and your NetID, and then click Advanced.
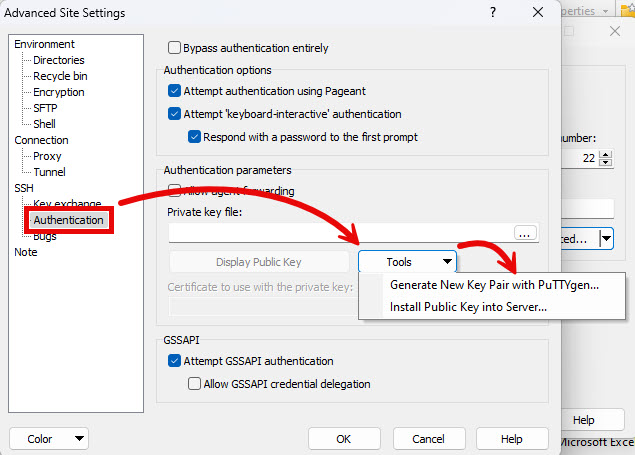
- From the SSH > Authentication tab, expand the Tools drop-down menu, and click Generate New Key Pair with PuTTYgen….
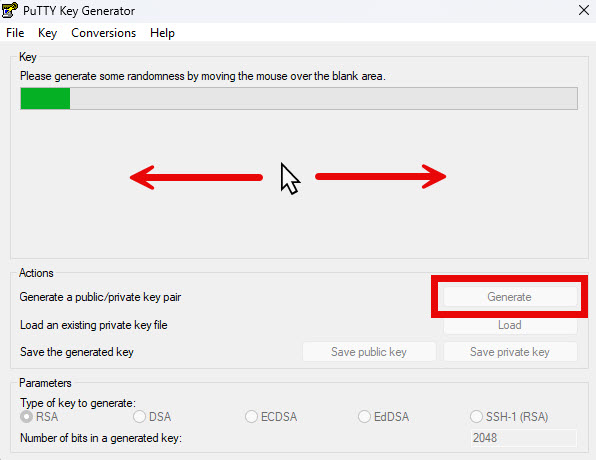
- Click Generate. Then, to fill the green progress bar and advance to the next step, move your mouse around the blank area.
- Click Save public key, choose a File name, and click Save. Do the same for private key. Names like “silk_key_pub” and “silk_key_priv”, accordingly, would work. In my testing, the default save location was my .ssh folder, which is the recommended location, but any location on your computer. Click Yes if warned about passphrase.
- Close the PuTTY Key Generator window.
- Expand the Tools drop-down menu once more and click Install Public Key into Server….
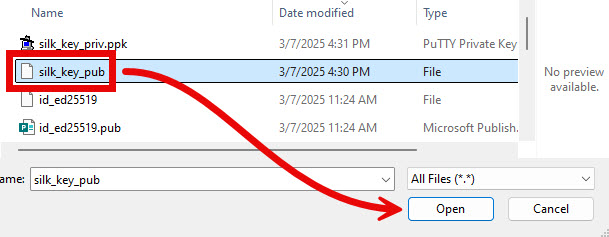
- The window that appears filters the visible files by Private Key, which doesn’t make sense because we are looking for a Public key right now. Expand the drop-down menu in the bottom-right corner of the window and select All Files (*.*).

- Select the public key you saved above (“silk_key_pub” in my example) and click Open.
- Enter your NetID password and hit Enter.
- You are now ready to connect to the specified server using your new key pair.
PuTTYgen
PuTTY Key Generator (PuTTYgen) does not come pre-installed on Windows, but comes bundled with PuTTY, which can be installed from the UVM Software Portal.
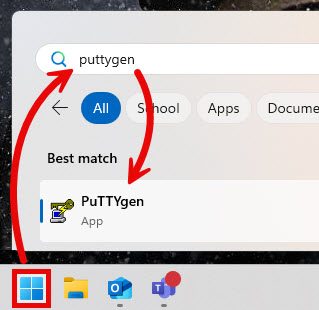
- Open the PuTTY Key Generator. One way to do this is expand the Start Menu (), type “PuTTYgen“, and click the Best match result that appears.
- Click Generate. Then, to fill the green progress bar and advance to the next step, move your mouse around the blank area.
- Click Save public key, choose a File name, and click Save. Names like “silk_key_pub” and “silk_key_priv”, accordingly, would work. In my testing, the default save location was my .ssh folder, which is the recommended location, but any location on your computer or OneDrive is fine. Click Yes if warned about passphrase. Do the same for private key.
macOS and Linux
ssh-keygen (Terminal/Shell)
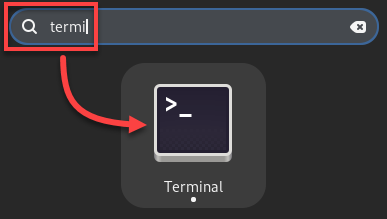
- Open the Terminal app. One way to do this is expand the Spotlight Search () or Launcher, type “Terminal“, and then hit Return or Enter on your keyboard.
- Type “ssh-keygen” and hit Return or Enter on your keyboard.
ssh-keygen
- Type in the path to a location and filename to save the private key, or just hit Return or Enter to stick with the default (recommended).

- Optionally, choose a passphrase that you’ll have to enter each time you use this key pair and enter the same passphrase again to confirm, hitting Enter on your keyboard after each time. Or, just hit Enter twice without typing anything to bypass passphrase entry (recommended).
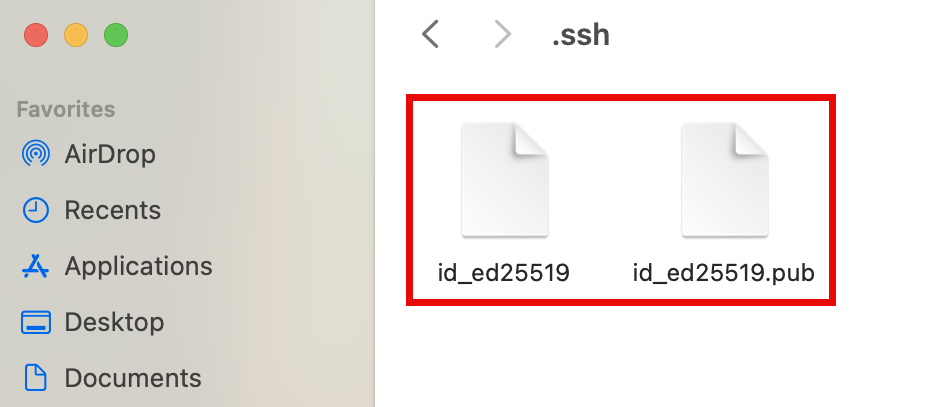
- The new key pair can be found in your local .ssh folder or whichever location you chose in Step 3 above. The public key has the .pub file extension and the private key has no file extension. The .ssh folder is a hidden subfolder of your macOS User folder. See these instructions for more info about hidden folders in macOS.
Add key pair to remote server or service
GitLab
- Copy the contents of your public key file to the clipboard. One way to do this is to navigate to your .ssh folder, open the file you saved above ending in .pub in a text editor, select all the contents, right-click the highlighted text, and click Copy.
- Sign in to UVM’s GitLab with your NetID and password.
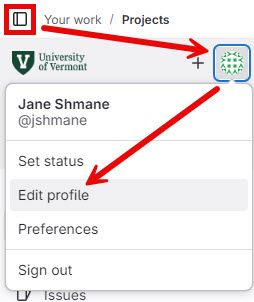
- Expand the sidebar, click your avatar, and select Edit profile.
- Expand the sidebar again and click SSH Keys.
- Click Add new key.
- Paste the contents of the public key file into the Key field.
- Choose a Title for this key that indicates which device this key is for, like the example shown, “MacBook key”.
- Optionally, remove or change the Expiration date.
- Click Add key.
- Once your public key has been safely saved remotely, it is a good idea to delete or move the local copy of the public key file. Your private key and public key should not be stored to the same location.
Silk, Zoo, VACC, and more
- Copy the contents of your public key file to the clipboard. One way to do this is to navigate to your .ssh folder, open the file you save above ending in .pub in a text editor, select all the contents, right-click the highlighted text, and click Copy.
- Connect to the server with your NetID and password. Here is a non-exhaustive list of servers this will work with:
- Navigate to your .ssh folder. If it doesn’t exist, create one. Folders with names beginning with periods are hidden by default. Click here for more info about hidden files.
- Open the authorized_keys file in a text editor. If it doesn’t exist, create one. The name should be exactly “authorized_keys” with no file extension at the end, and an underscore (“_“) in the middle.
- On a new line, paste the contents of the public key file, and save authorized_keys.
- Once your public key has been safely saved remotely, it is a good idea to delete or move the local copy of the public key file. Your private key and public key should not be stored to the same location.
Connect
SSH (Terminal commands)
Secure Shell (SSH) is a method of connecting to a remote Linux or Unix system via a command line interface like the Terminal app. While the origins of the terms are related, it should not be confused with “SSH Keys” (in this context).
The SSH command also happens to be the easiest way to verify if your SSH keys are set up correctly. More information about that can be found here.
- Open a Terminal window.
- Enter SSH followed by a space, your NetID, an @ symbol, and the hostname of the server you’re connecting to, like this:
ssh netid@host.uvm.edu
Replace “netid” with your own NetID, and “host” with the name of the server, like “zoo” for Zoofiles or “w3” for Silk.
- Hit Enter. If your SSH keys are set up properly you’ll be connected to the remote server via the command line interface without the need to enter a password.
Git
Git may not come pre-installed on your system, but can be installed for free using these instructions on git-scm.com. To check if git is installed, you can run the “git –version” command from a Terminal window.
To verify that your SSH key pair is set up correctly to connect to GitLab using Git, see these “Verify that you can connect” instructions from gitlab.com.
For more help using Git to connect to GitLab, see these general instructions from gitlab.com.
Windows Terminal Profile
If you use text-based commands from a Windows computer to connect to the same server all the time, you can save yourself some typing and set up a profile ahead of time. To get started, see the SSH in Windows Terminal tutorial on microsoft.com.
FileZilla
FileZilla is free software that can be installed by visiting their website directly. However, a link to FileZilla can be found on the UVM Software Portal as well.
- Open the Edit menu (on macOS, it’s the FileZilla menu instead) at the top of the main FileZilla menu and click Settings….
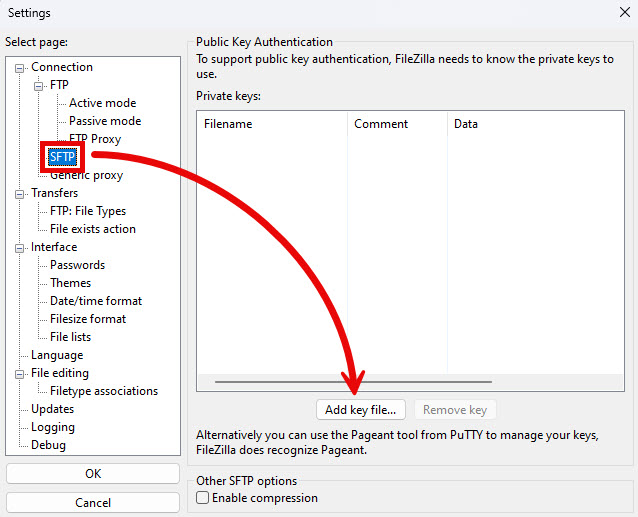
- Expand the Connection > SFTP tab and click Add key file….
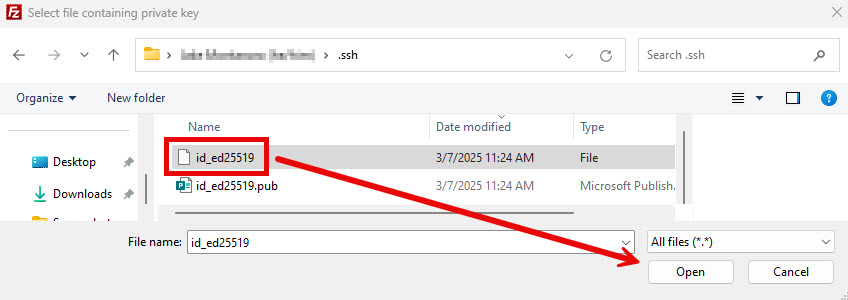
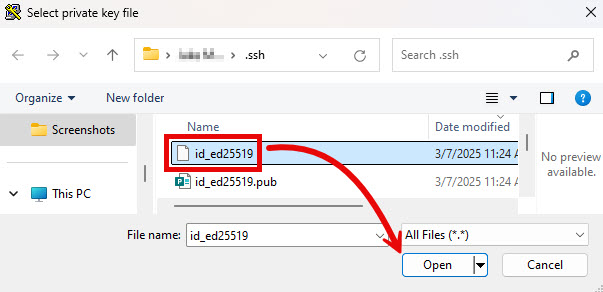
- Navigate to the folder containing your private key. It may not have the same name as the file in the example below, but it will be the one generated above with no file extension. Select the file and click Open.
- Click OK to close the settings window.
- Enter the Host (w3.uvm.edu for example), Username (your NetID), and Port (Likely “22”), but leave the Password field blank, and click Quickconnect.
WinSCP
WinSCP is free software that can be installed by visiting winscp.net. WinSCP has much of the same functionality as FileZilla, and is only available for Windows, but it is an option especially for users who are already comfortable with its interface.
One advantage of WinSCP is its built-in methods for generating a key pair and installing the public key on the server. If you followed those steps when you generated the key pair using the WinSCP method above, you can skip this section. However, it is still possible to add a key generated with a different method using these steps:
- Open the WinSCP app, click New Tab, enter the Host name of the remote server and your NetID, and then click Advanced.
- From the SSH > Authentication tab, click the ellipsis () button to the right of the Private key file field.
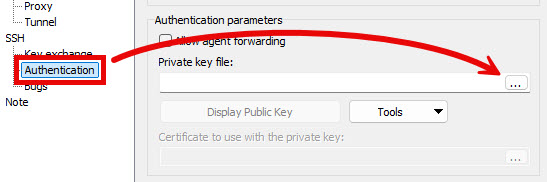
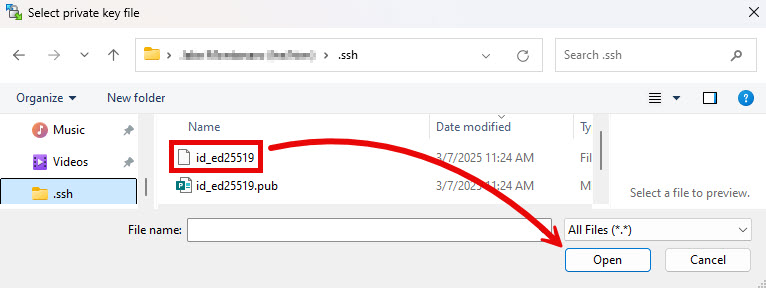
- The window that appears filters the visible files by the .ppk file extension, which may not work depending on the method used to generate the key. If you’re in the correct folder, but the file is not shown, expand the drop-down menu in the bottom-right corner of the window and select All Files (*.*).
- Navigate to the folder containing your private key. It may not have the same name as the file in the example below, but it will either have no file extension or the extension “.ppk“. Select the file and click Open.
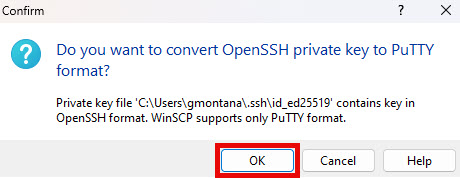
- If a Confirm window appears, click OK and then Save and then OK again.
- Click OK to close the Settings window.
- Click Login. If you receive an unknown server warning, see the end of this article for more information about fingerprints and verifying host keys, or just click Accept. You can tell it worked if you successfully connect to the remote server without entering your NetID password.
Fetch
PuTTY
PuTTY is free software for Windows PCs only that can be installed by visiting putty.org. A link to PuTTY can be found on the UVM Software Portal as well. PuTTY has much of the same functionality as the SSH Terminal Command method outlined above, but it is an option especially for users who are already more comfortable with its graphical Configuration interface.
- Open the PuTTY app. The PuTTY Configuration window will appear.
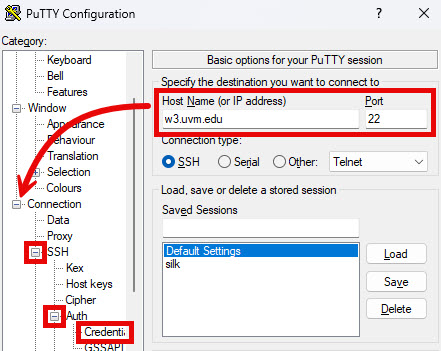
- If you haven’t previously saved a session, enter the Host Name of the server you’re connecting to (“w3.uvm.edu” for example) and the Port (likely “22”). Then, expand Connection, SSH, and Auth, and select Credentials.
- Click Browse… to the right of the Private key file for authentication field.
- The window that appears filters the visible files by the .ppk file extension, which may not work depending on the method used to generate the key. If you’re in the correct folder, but the file is not shown, expand the drop-down menu in the bottom-right corner of the window and select All Files (*.*).
- Navigate to the folder containing your private key. It may not have the same name as the file in the example below, but it will either have no file extension or the extension “.ppk“. Select the file and click Open.
- Click Open. If this is your first time connecting to this server from PuTTY, a PuTTY Security Alert window may appear. If it does, click Yes.
- If everything worked correctly, you’ll be connected to the remote host without typing in your NetID password.
FAQ
I received a warning message about connecting to an unknown server. What should I do?
When connecting to a remote server, you may receive a warning message along the lines of “Continue connecting to an unknown server and add its host key to a cache?” or “authenticity can’t be established”. If this is your first time connecting to this remote server from this computer using a new SSH key pair, you can safely ignore this warning by clicking Accept or OK.
However, if the warning appears for a second time on the same computer while attempting to connect to the same server with the same key pair, it is worth verifying the hostname and key fingerprints.
1. First, make sure you typed the hostname of the server correctly. The warning message will mention the server it’s trying to authenticate with. If the hostname shown is not the hostname of the server you were expecting, I would recommend clicking Cancel and attempting to connect again, making sure the host name is correct.
2. Next, if the warning message appears again with the correct hostname, select and copy the contents of the warning message, paste them into the Description field of a Help Request to the Tech Team, Submit your ticket, Cancel the connection to the server, and wait for a reply from the Systems Architecture and Administration team.