
Yellowdig is a conversation platform that can be linked from a Brightspace course to form a private class community. Yellowdig communities are designed to make it easy to post, comment, share media, and respond to each others’ posts following the conventions of social media apps that students are familiar with.
Brightspace Discussion Board vs Yellowdig
The Brightspace Discussion Board is typically used in this way: students are assigned to post about a topic by a due date and asked to reply to classmates’ posts by another due date. Grading is usually based on whether students’ posts meet certain criteria and are done on time.
Yellowdig, on the other hand, is considered a student engagement tool, and the characteristic that sets it apart from Brightspace is the gamification or social media aspect of participation: a point system that motivates students to earn points for a variety of activities. This Yellowdig article explains more about the differences: Gamification, not Gradification: Use Yellowdig to Motivate Rather than Assess Student Learning.
In summary, it should be stressed that Brightspace and Yellowdig approaches are both valid ways to reach different goals. If you have been using Brightspace’s Discussion Board successfully and feel it serves its purpose well, you might find that Yellowdig isn’t a good fit for you. For example, Yellowdig isn’t designed for instructor-driven discussions that are assessed using qualitative criteria; for that, Brightspace is more effective. But, if you’d prefer to have students drive their own discussion for which points are earned for frequency and word count, you may find that Yellowdig is the best choice.
Add Yellowdig to your Brightspace Course
Adding Yellowdig to Brightspace is a two-step process if you want to show the points collected in the community within the Brightspace Grades area. You will first connect to Yellowdig within your Brightspace course, and then set up an “Assignment” in the Yellowdig community where points will be collected and synced to the Brightspace Grades tool.
- Add a module on the Table of Contents to Brightspace called “Yellowdig“
- Click into the new module, and select Add Existing Activities → External Learning Tools.
- Scroll down to find Yellowdig at the bottom of the list.
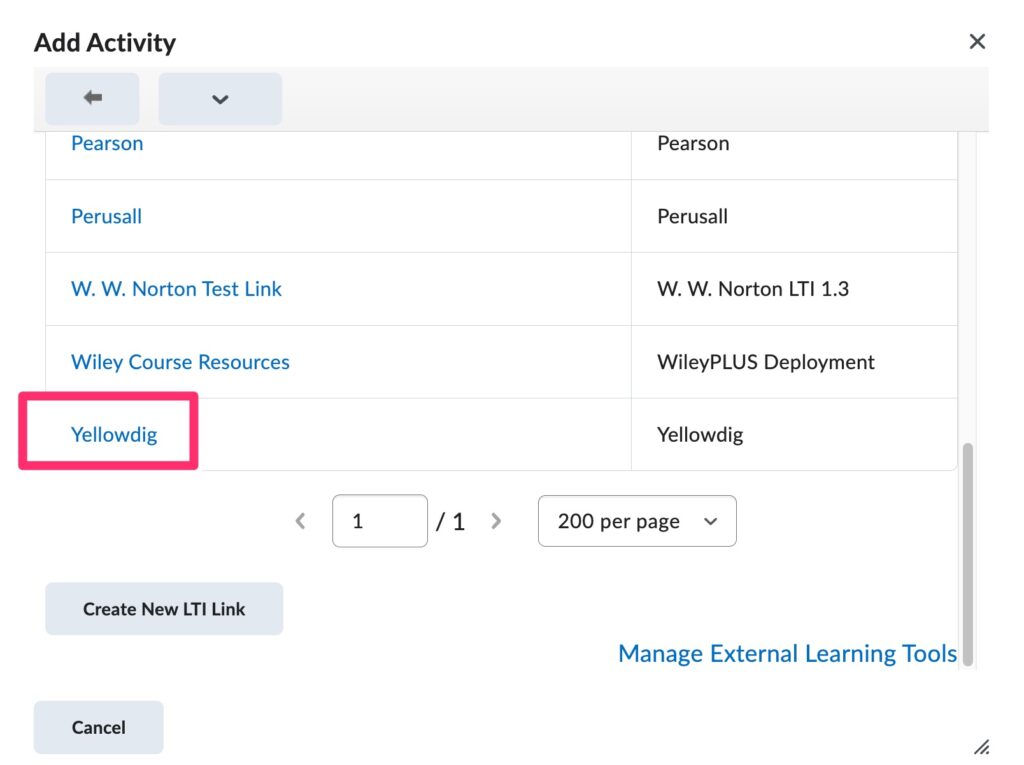
- Click on the Yellowdig link to insert the connection to the tool into the course.
- You will see a link appear in the Brightspace Yellowdig Module.
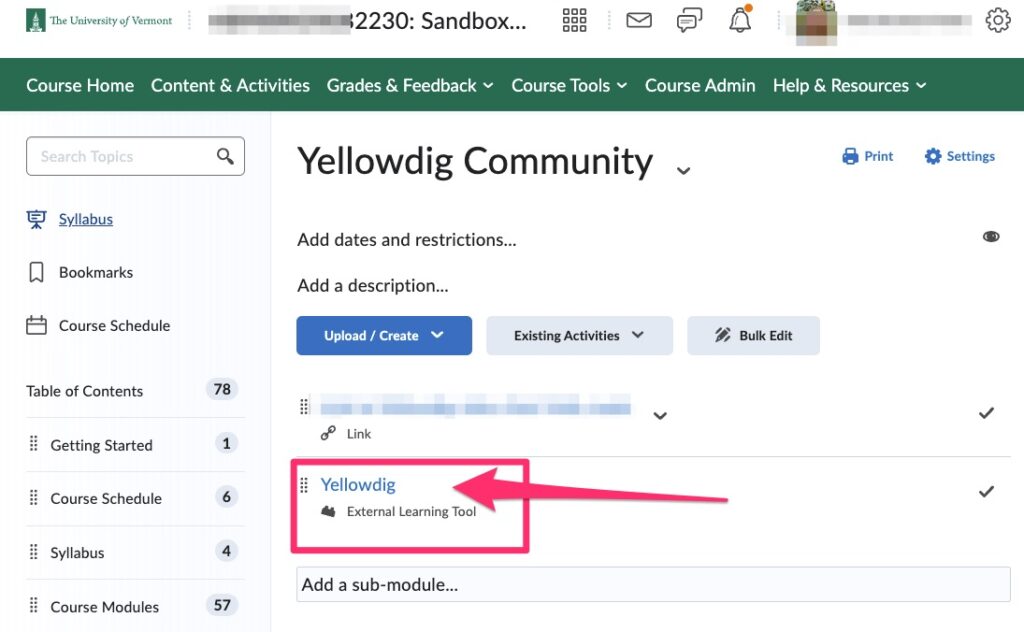


6. Click on the Yellowdig link to launch the Yellowdig Community space in a separate tab within your browser. Next: You will need to set up a Yellowdig Assignment to Connect to the Brightspace Grades tool.
Set up the Yellowdig assignment to connect to Brightspace Grades
The notification below will appear once the connection to the course in Brightspace is created. This alerts the instructor that another step is necessary to connect to “Grades” in Brightspace,

Click where it says “here” to create the assignment. Each Yellowdig community can have one assignment that connects to the Brightspace course. Here are the step-by-step directions for assignment creation.
Create Yellowdig Student Groups
- In Yellowdig, navigate to Settings → Groups.
- Set the “Groups Enabled” slider to ON.
- Under “Group Count”, specify how many groups you want in your community. Community members will be sorted evenly between these groups, though you can manually re-sort members after the initial sorting. Community Facilitators will not be partitioned into groups.
- For large classes, you may want to turn the Public Visibility slider to “OFF” to prevent confusion, but if you do want students to see and interact with other groups, set the Public Visibility slider to “ON.”
Points
How Points Work
When instructors (owners) set up Yellowdig for a course, they can assign point values for word count and frequency of posts and comments as well as other types of feedback.
When setting up points, you can decide how many points a student should earn in a week and what they need to do to earn those points. As the community owner, you get to choose these values. Here are two examples of point breakdowns:
Comments: 350 pts (higher than posts to encourage interaction)
Reactions (likes and emojis from other students): 20 pts
Accolades (instructor recognition): 50 pts
Comments: 35 pts (higher than posts to encourage interaction)
Reactions (likes and emojis from other students): 2 pts
Accolades (instructor recognition): 5 pts
Set up Points
To begin setting up points for your course, follow these instructions
Organizing and Elevating Posts
Topics
Topics are similar to hashtags and can be selected by anyone publishing posts. All community members have the option to click on a topic to read all posts that have been tagged with it. For organizations, therefore, it’s best practice to require students to select one or more topics for each post they publish. Topics are created (and edited) by the instructor only by clicking on Settings > Topics.
Accolades
Accolades are graphical “badges” that instructors can give to a post to award points to that student. Yellowdig provides a few default accolades (“Helpful!” “Interesting!” “Insightful!”) but you can edit what they say, how many points they’re worth, or create new ones that say what you like. Topics can be created and edited by clicking on Settings > Accolades.
Reactions
Reactions are emojis that both instructors and students can leave on an individual post which gives that some points. Posts with the most reactions will rise to the top of the page. This is the way that Yellowdig sorts the posts automatically but you can modify your own personal Yellowdig feed and so can students.
Pinned Posts
Pinning to top allows the instructor to fix a post to the top of the Yellowdig feed that stays there. “Pin to top” can be selected when writing or editing a post. Only one post can be pinned at a time. If a second post is pinned, the first one will return to its original position on the page. After a post is pinned, you can then choose to remove the pin (in edit mode).
Communicating with Students
Getting Students Started
At the start of the course, instructors often write an introductory post that explains how they’d like students to introduce themselves and gives brief instructions on how to make a post in Yellowdig. It’s a good idea to pin this to the top of the page for the first few days of the course, then unpin it when students are used to posting.
Your instructions might say:
To make a post, click the blue “Create” button. Type your message, be sure to select a topic, and click post. You can edit it afterward by clicking the 3 dots to the right of the post’s title.
What Do Students Need to Know?
Yellowdig has some sample wording you can use on this page: Telling Your Students About Yellowdig. And they provide resources for students on this page.
Note a few important things to communicate to students:
- Students should not set up a separate Yellowdig ID but should only log into Yellowdig through Brightspace. (A separate ID will cause confusion and won’t be integrated with Brightspace.)
- Yellowdig sends out notifications of activity by email and the volume can quickly become overwhelming. All users can control what notifications they want to receive by clicking on their personal Yellowdig graphic icon in the corner of the page, choosing Account Settings, and then Notifications.
- The Help button is found by clicking on the icon in the corner of the Yellowdig page.
Yellowdig Nomenclature and Glossary
Communities: Courses
Owners: Instructors
Members: Students
Comments (on posts):are the same as replies in Brightspace
Periods: weeks
Periodic targets: the point goals for set for each week. They can earn more than the goal, but they don’t get extra credit after reaching the target.
Accolades: quick ways faculty can recognize student work.
Reactions: emojis that students and instructors can leave on each other’s posts and comments.
Periodic Buffer: the amount of “wiggle room” a student has for one week. If they fall short one week they can make it up in subsequent weeks. (See Yellowdig article.)