UVM students have the ability to grant access to third party individuals to view account and billing and financial aid information.
What is Proxy Access?
By designating someone as a Proxy, a student is giving Student Financial Services permission to speak with that person about their financial aid and billing account. A student may set up multiple Proxies for their account.
Why Proxy Access?
In compliance with the Family Educational Rights and Privacy Act of 1974 (FERPA), student financial and academic records may not be shared with a third party without written consent.
The Proxy access system allows a student to grant this written consent to access financial records to another person, such as a parent or spouse.
FERPA
With several exceptions, schools must have a student’s consent prior to the disclosure of education records after that student is 18 years old or is enrolled in a higher education institution (UVM). The law applies only to educational agencies and institutions that receive funds under a program administered by the U.S. Department of Education.
UVM’s FERPA compliance policy is as follows:
FERPA affords Eligible Students (“Students”) certain rights with respect to their Student Education Record, including:
- The right to inspect and review one’s own Student Education Record within 45 days of the day the University receives a request for access.
- The right to request amendment to one’s own Student Education Record if the student believes such record to be inaccurate, misleading, or otherwise in violation of the Student’s privacy rights under FERPA.
- The right to provide written consent prior to disclosures of personally identifiable information contained in one’s own Student Education Record, except to the extent that FERPA authorizes disclosure without consent.
- The right to file a complaint with the U.S. Department of Education concerning alleged failures by the University of Vermont to comply with the requirements of FERPA. The name and address of the office that administers FERPA is:
Family Policy Compliance Office
U.S. Department of Education
400 Maryland Avenue, SW
Washington, DC 20202-5920
UVM’s full FERPA Rights Disclosure can be found here.
What can be accessed by a Proxy?
A student can grant two types of access to their proxies, each granting access to different information:
A Proxy with Account and Billing (Accounts Receivable) access can:
- View account activity and balance information
- View billing statements
- Make online payments
- Access Federal tax form 1098-T
- Receive billing related email notifications, including notifications when bills are available to view online, and reminders on applicable due dates
A Proxy with Financial Aid access can:
- View financial aid award
- View financial aid requirements
A Proxy does not have access to:
- Grades and Transcripts
- Schedules and Course Enrollment
Setting Up a New Proxy
Proxy access is granted by a student, but once access is granted there will be some additional set-up steps required from the new Proxy.
Adding a Proxy - Instructions for Students
- Click here to sign into myUVM and access Proxy Management.
- Begin the process of adding a new Proxy by clicking on Add Proxy

- Complete the following form and then click on Add Proxy again to create their account. A notification email will be sent to your proxy. Please note that all fields are required.

- Now that you have created your Proxy, you must complete their profile and grant their authorizations. To do this, expand the Proxy by clicking on their name or email address.
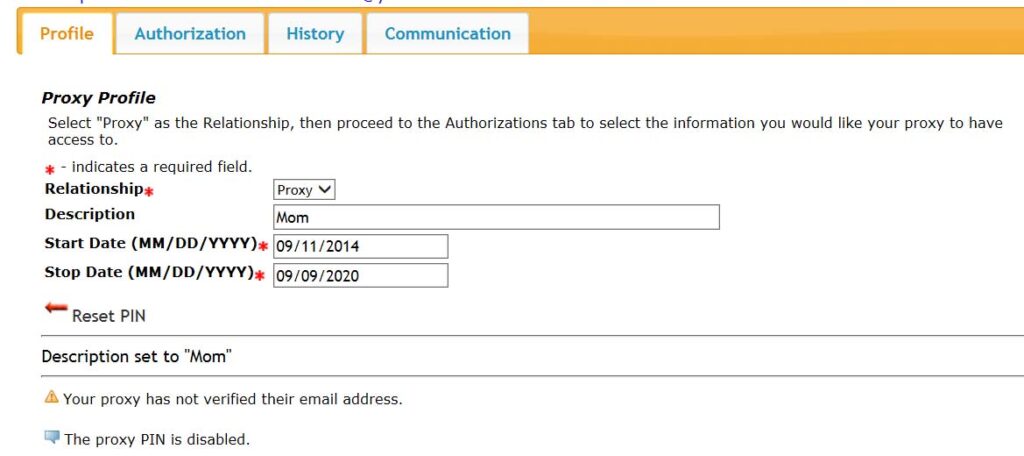
- Select Proxy as the relationship. The start and end dates will default to today and 6 years in the future automatically.
- Continue to the Authorization tab and select the information you would like your Proxy to be able to view. You may authorize your Proxy to view Accounts Receivable information, Financial Aid information, or both.
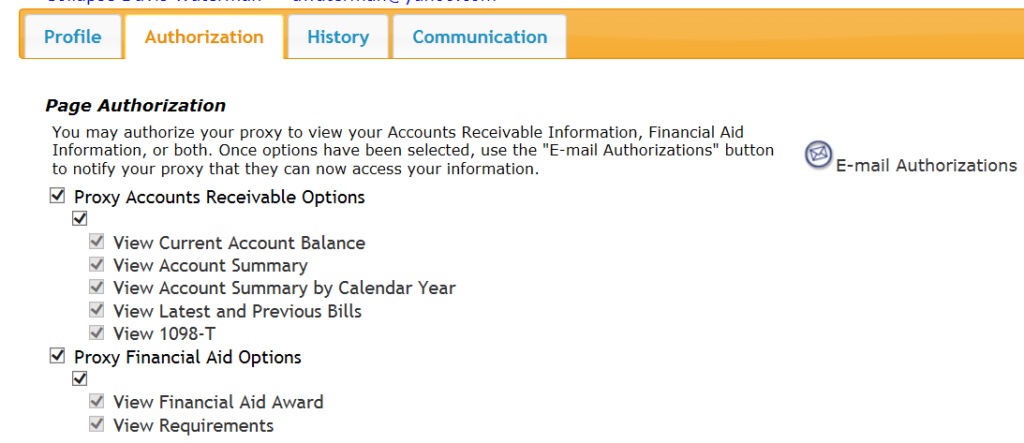
Changes are automatically saved as they’re made. You’ve now completed the set up process.
Instructions for new Proxy
When your student creates your Proxy Access account, you will receive two emails.
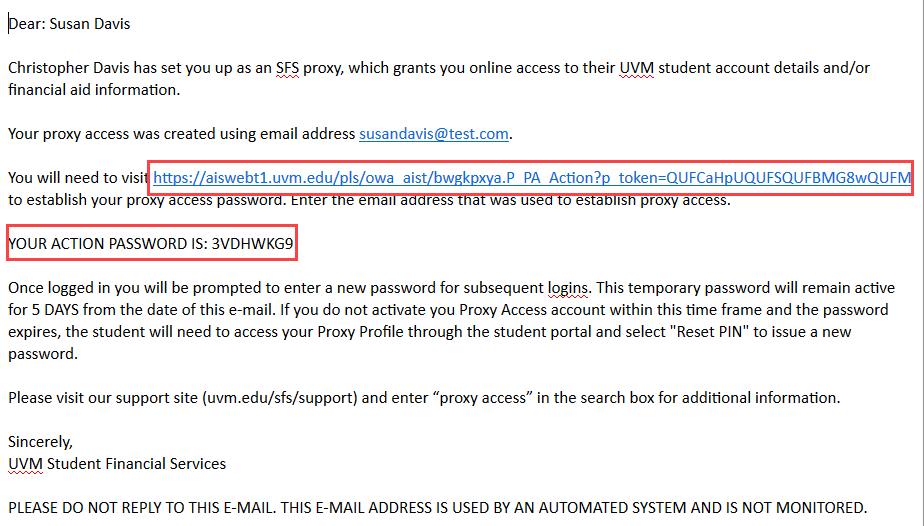
The first email (shown below), with subject READ FIRST: Action Required To Activate UVM Proxy Access contains a single-use URL as well as an Action Password that you will need in order to complete the set-up of your Proxy Access account.
The second email, with the subject New UVM SFS Proxy Relationship contains the web address for subsequent logins. As outlined in this email, the student must authorize screens for your use before you will have online access to their information.
- Click on the URL in the first email to access this login page and enter the Action Password provided.

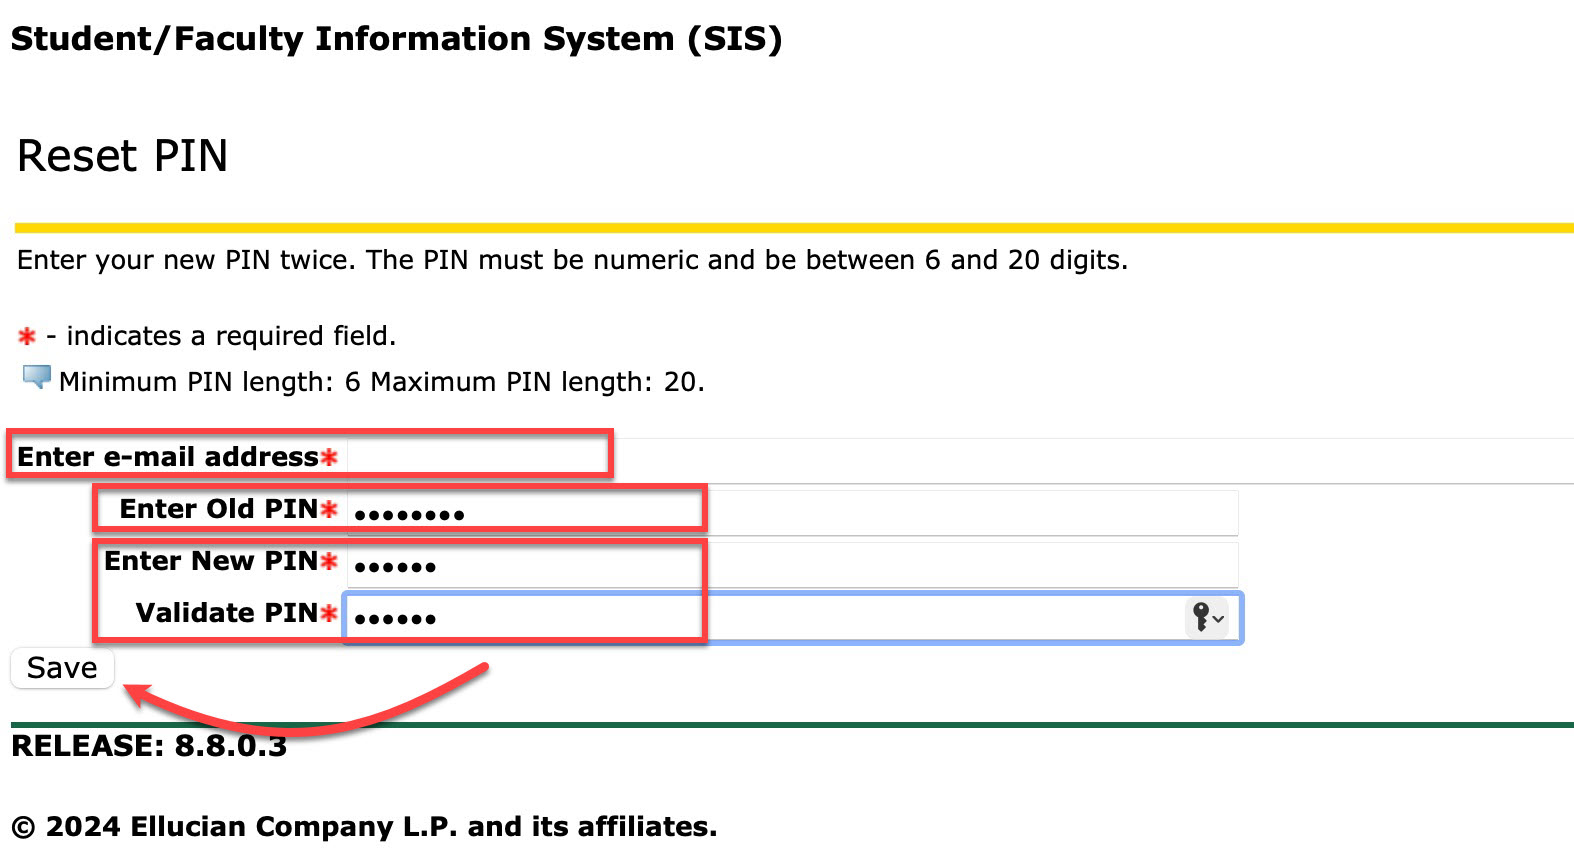
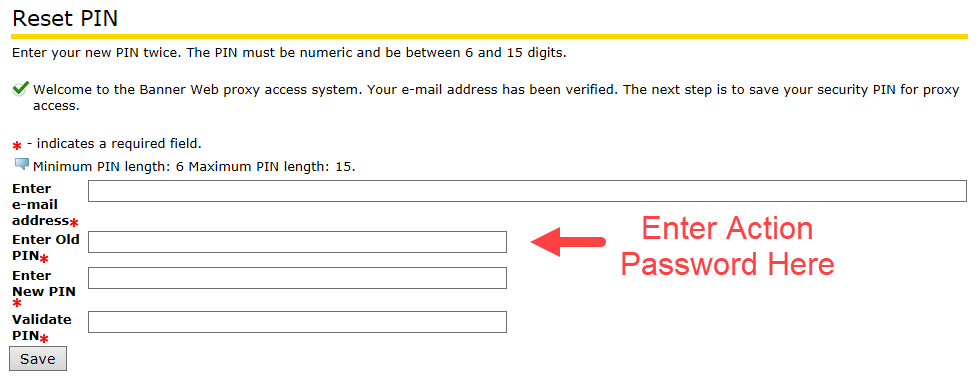
- Next, you’ll need to create your PIN. When prompted for an Old PIN, enter your Action Password. Your new PIN must consist of only numbers (0-9) and must be between 6 and 15 digits long.
You are now logged into your Proxy account. On the profile tab you can update your email address or request to change your PIN.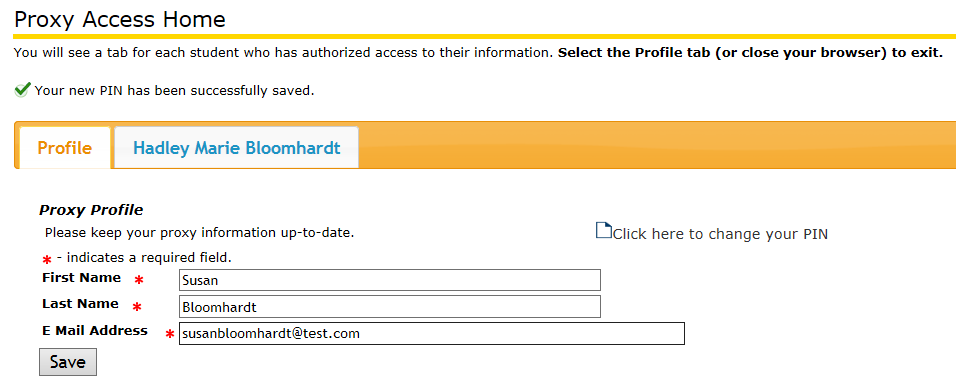
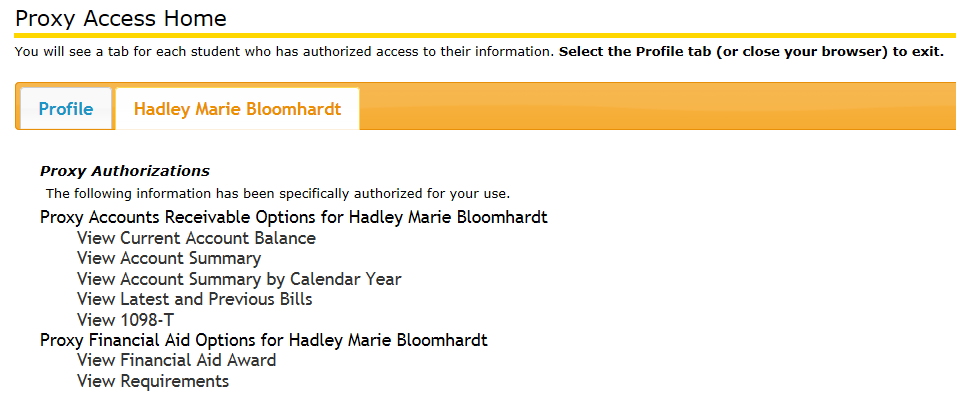
Click on the tab with your Student’s name to access the authorized screens. If you have more than one student who has authorized you to view their information, you will see a tab for each student.
When you click on the link to an authorized screen, such as View Current Account Balance, it will launch in a new browser window.
For subsequent logins, please go to https://www.uvm.edu/sfs/proxy.
Troubleshooting
Change Email Address
Student Financial Services uses the Proxy email address to send notifications when billing statements are available (if given authorization for account and billing access by the student) and to notify you of other account related information for your student.
To update your email address:
- Log into the Proxy Access System.
- Update the email address in the Profile tab.
- Click Save

Student: Resetting a Proxy Payer PIN
Your student can initiate a reset your Proxy Payer PIN in myUVM.
- Click here to sign into myUVM and access Proxy Management.
- Expand the proxy you wish to edit.
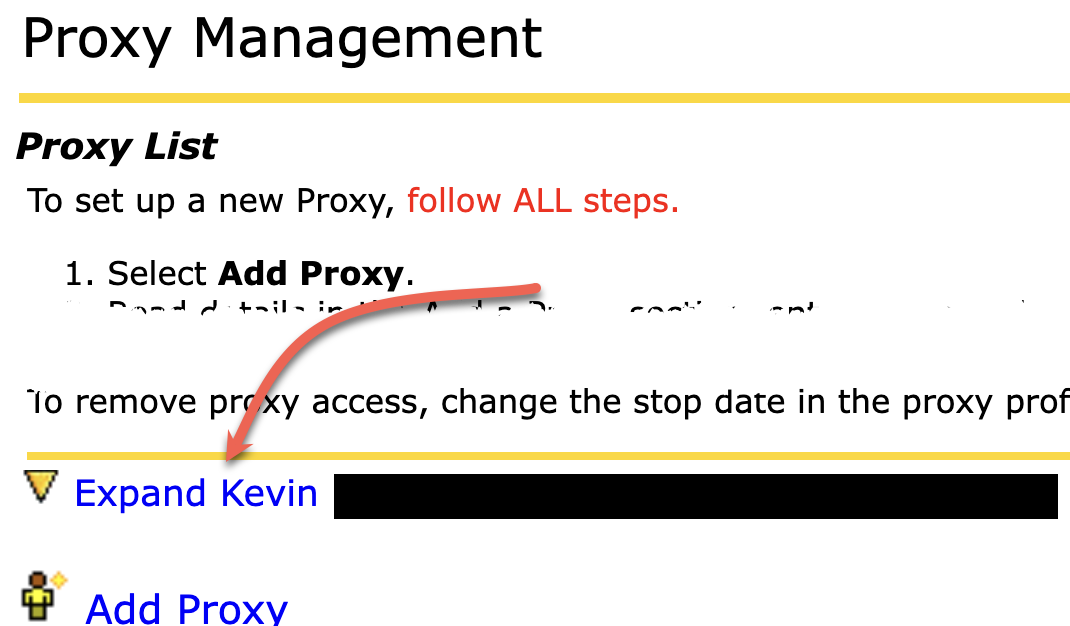
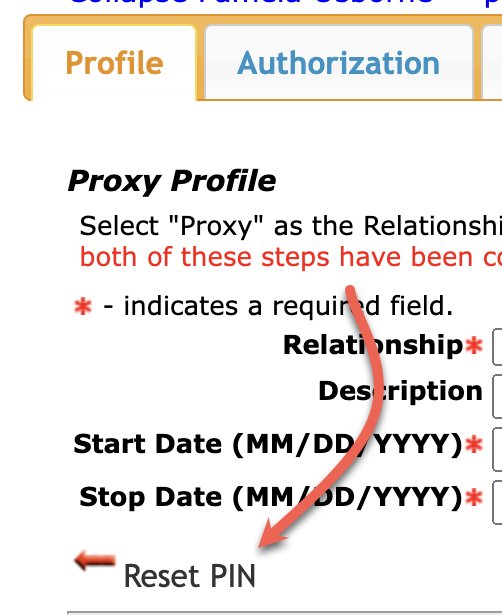
- In the Profile tab, click Reset PIN
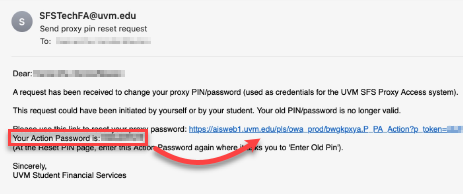
- Your proxy will receive an email from SFSTechFA@uvm.edu that contains a link and an Action Password. They should copy the Action Password, then click the link.
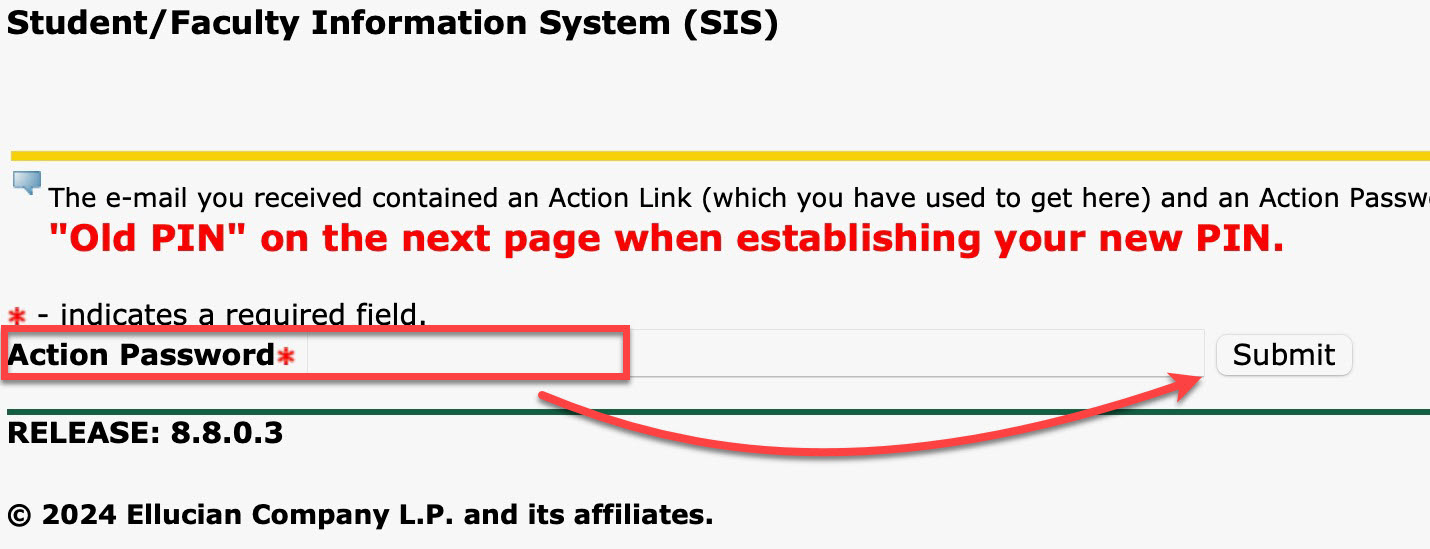
- Your proxy can enter their action password, then click Submit.
- Your proxy should enter their email address, the Action password into the Old PIN field, then enter a new pin twice and click Save.
- Their Proxy PIN should now be successfully reset.
Proxy: Resetting a Proxy Payer PIN
If you have forgotten your Proxy Payer PIN or have been locked out of your Proxy Payer account, you can reset your pin manually.
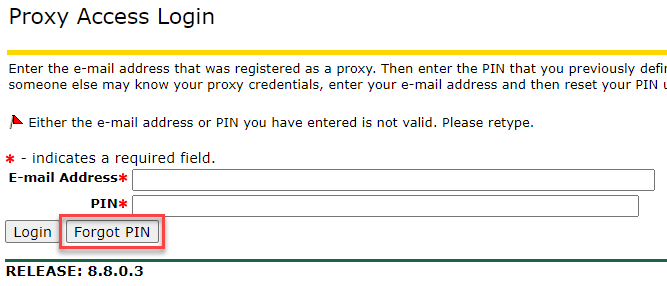
- Visit the Proxy Access login page, enter the email address associated with your Proxy access account, and then click the Forgot PIN button.
- You will receive an email from SFSTechFA@uvm.edu that contains a link and an Action Password. Copy the Action Password, then click the link.

- Enter your action password, then click Submit.

- Enter your email address, the Action password into the Old PIN field, then enter your new pin twice and click Save.
- With your PIN successfully reset, you’ll be logged in and able to access the pages your student authorized you to see.
Error: No Pages have been Authorized
In addition to creating a Proxy Payer account, your student must also grant the ability to view Accounts Receivable Information, Financial Aid Information, or both in the Authorization tab.
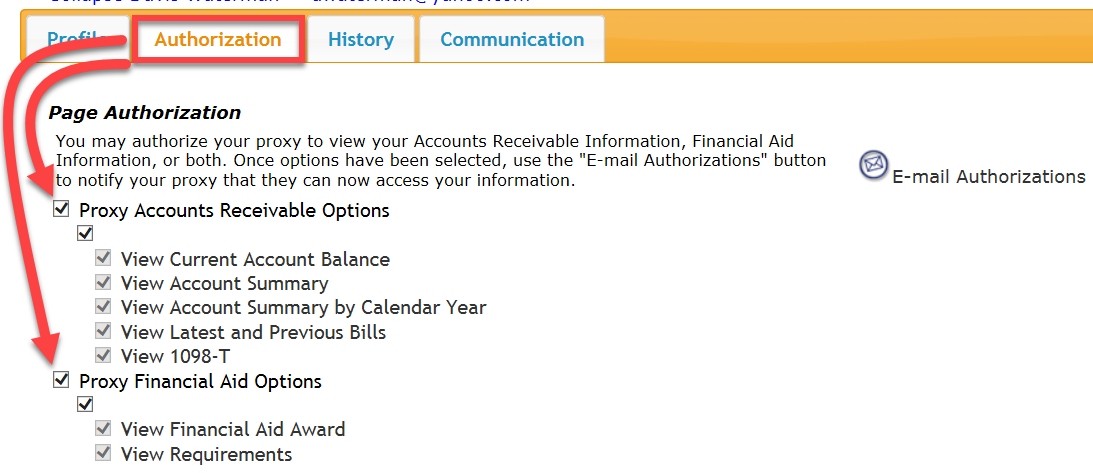
To grant this access, your student may follow the instructions below:
- Click here to sign into myUVM and access Proxy Management.
- Expand the proxy you wish to edit.

- Select the Authorization tab, then check the boxes as appropriate.

Removing a Proxy
To remove a Proxy’s access, set their access end date to some time in the past. To do this, simply navigate to your list of Proxies, find the Proxy you want to remove and click on their name. This will open their settings and allow you to edit their end date.
This form will auto-save while you edit.
If you use Comcast as an email provider:
Proxies who use @comcast.net email addresses during the setup and PIN reset processes are sometimes unable to receive the above emails. This has been looked into, and it appears to be an issue on Comcast’s end preventing the delivery.
If you normally use an @comcast.net email address, please consider using an alternative address with the Proxy Access system.

