
This classroom is intended to support both in-person and mixed modality courses.
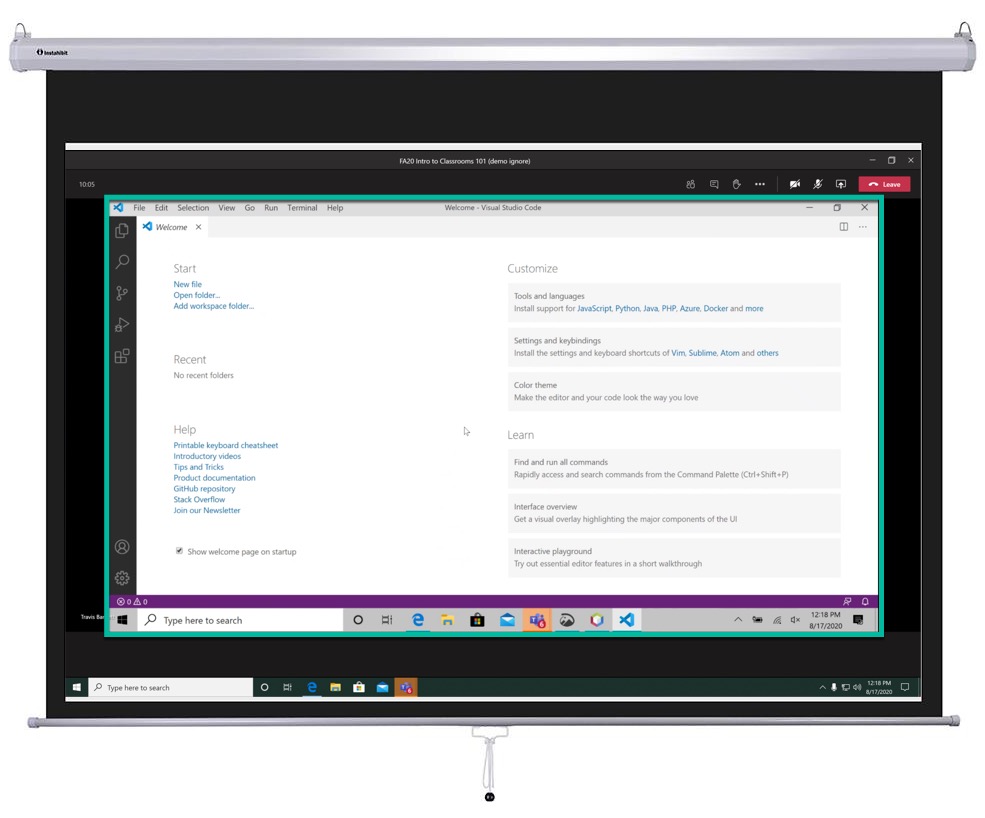
The presentation computer is equipped with a webcam, microphone, speakers, document camera, pen display (for use as a virtual whiteboard) and a projector. The computer uses the Windows 10 operating system and has Microsoft Teams, Office and several other applications.
Get Started
These guides will help you use the room system, log in to the computer, sign into Teams, and arrange your monitors. Generally you'll use these steps every time you login to a classroom computer.
Step 1: Using the Room System
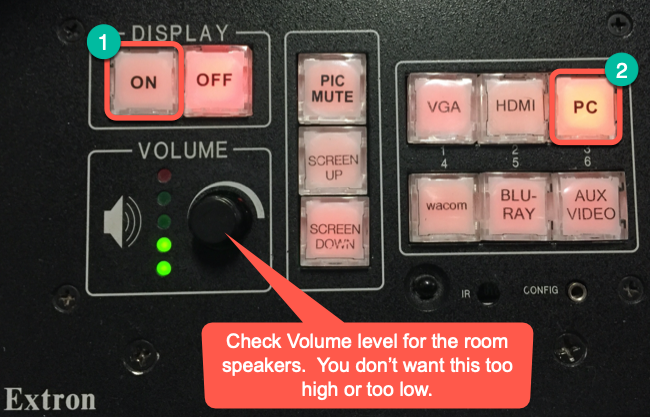
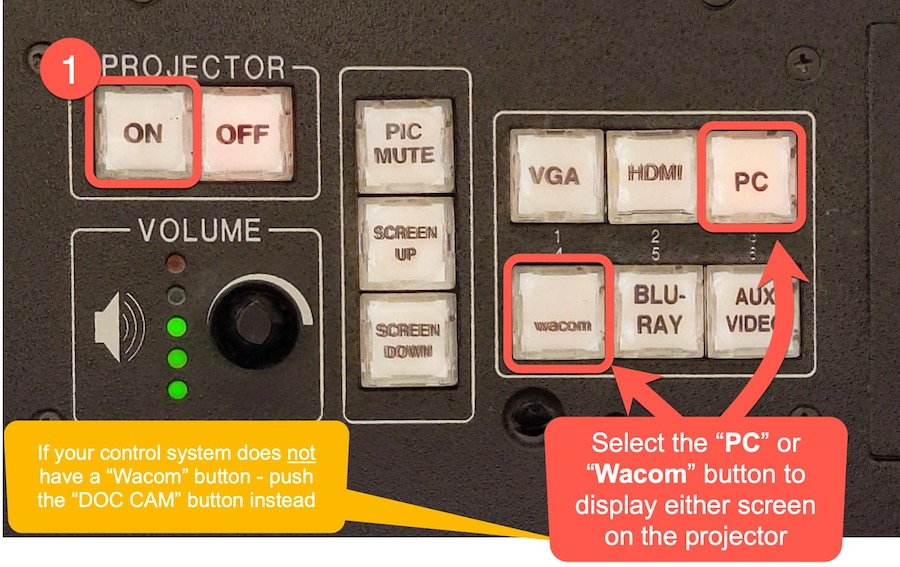
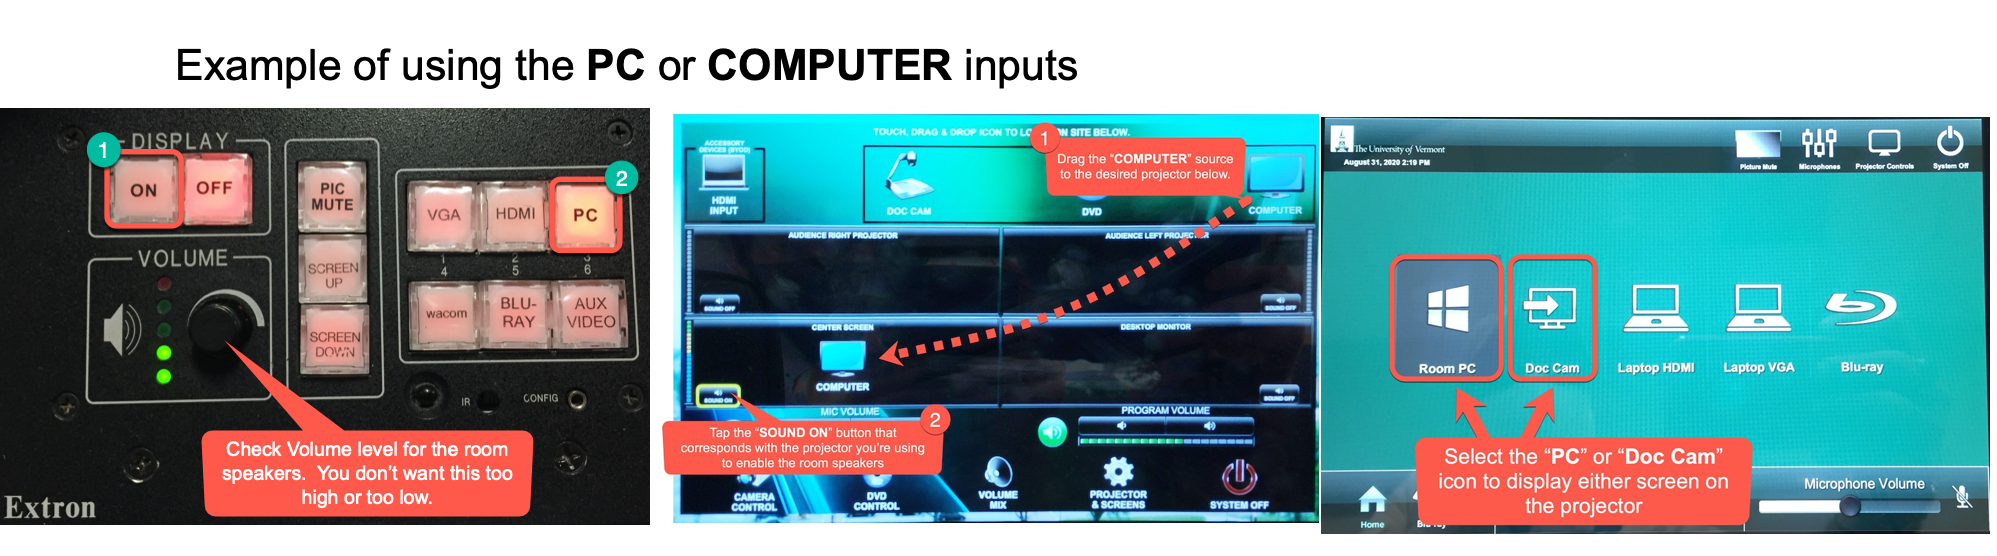
This classroom is equipped with an Extron push button control system. To start using this classroom, press the Projector ON button, then make sure that the PC input is selected to display the desktop monitor on the room projector. You may also want to adjust the volume knob to a more appropriate level.
Step 2: Logging into the Presenter Computer
General Purpose classrooms require NetID login.
To login to the classroom computers:
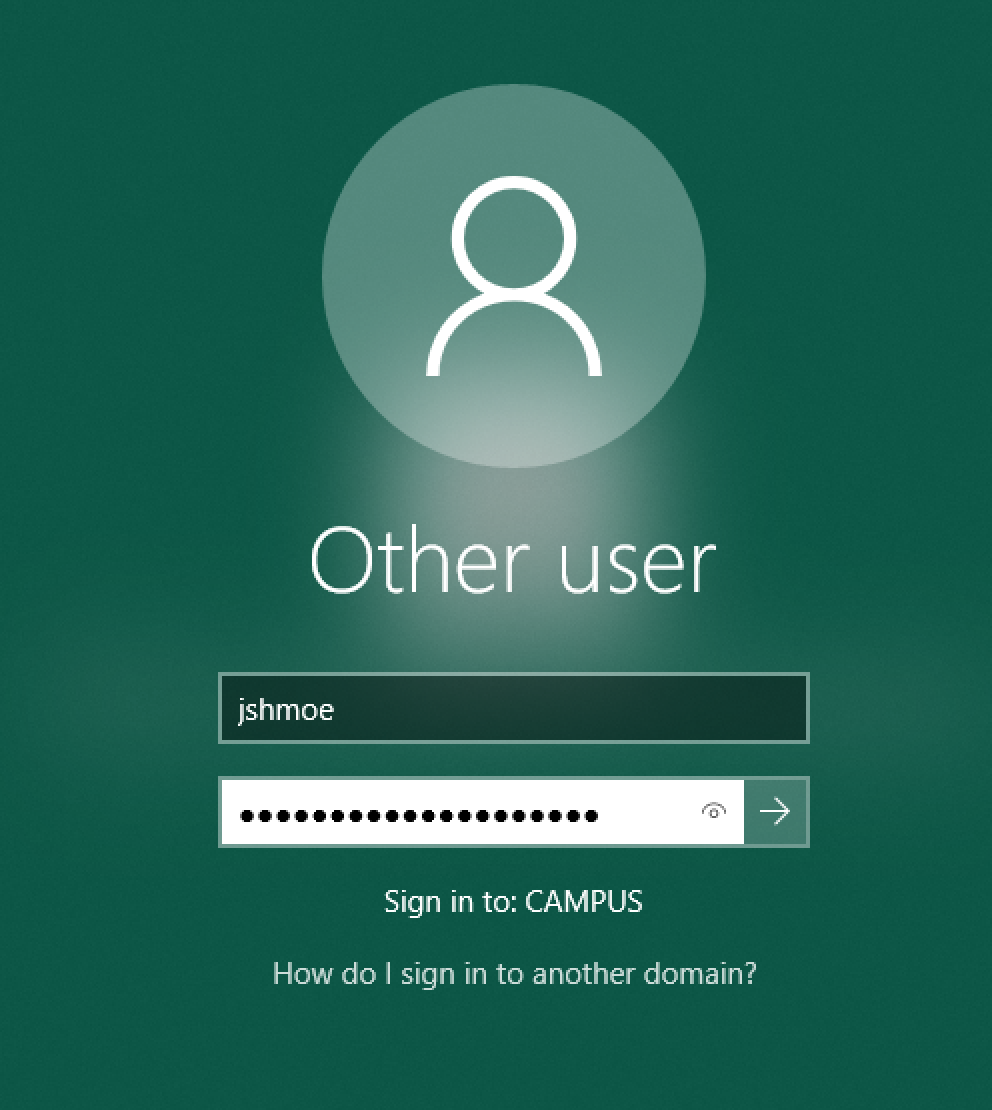
- If you don't see a login prompt, click anywhere on the screen to display the username and password fields. Enter your NetID and password to login.
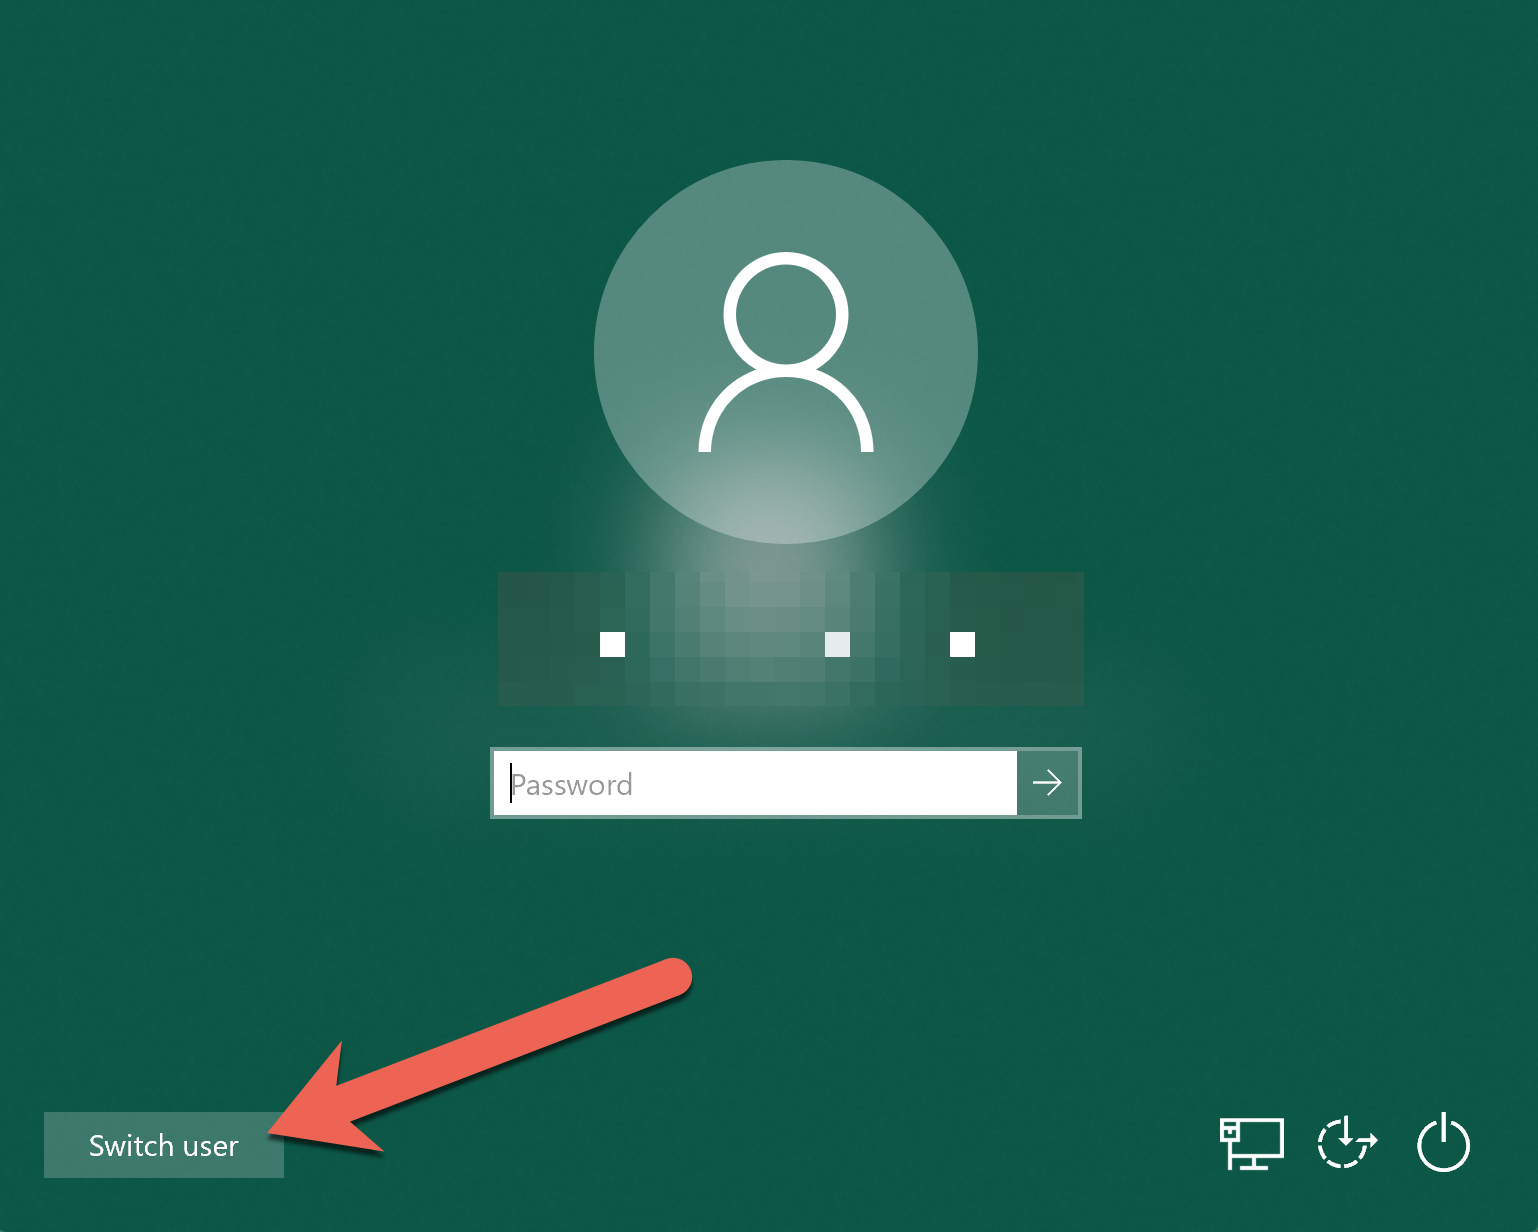
- If the username field is populated with someone else's account, click Switch User in the lower left corner to login.
- If the username field is populated with someone else's account, click Switch User in the lower left corner to login.
- After successfully loging in you will be brought the Windows desktop. If this is the first time you have used this computer, it may take some additional time to create your personal profile.
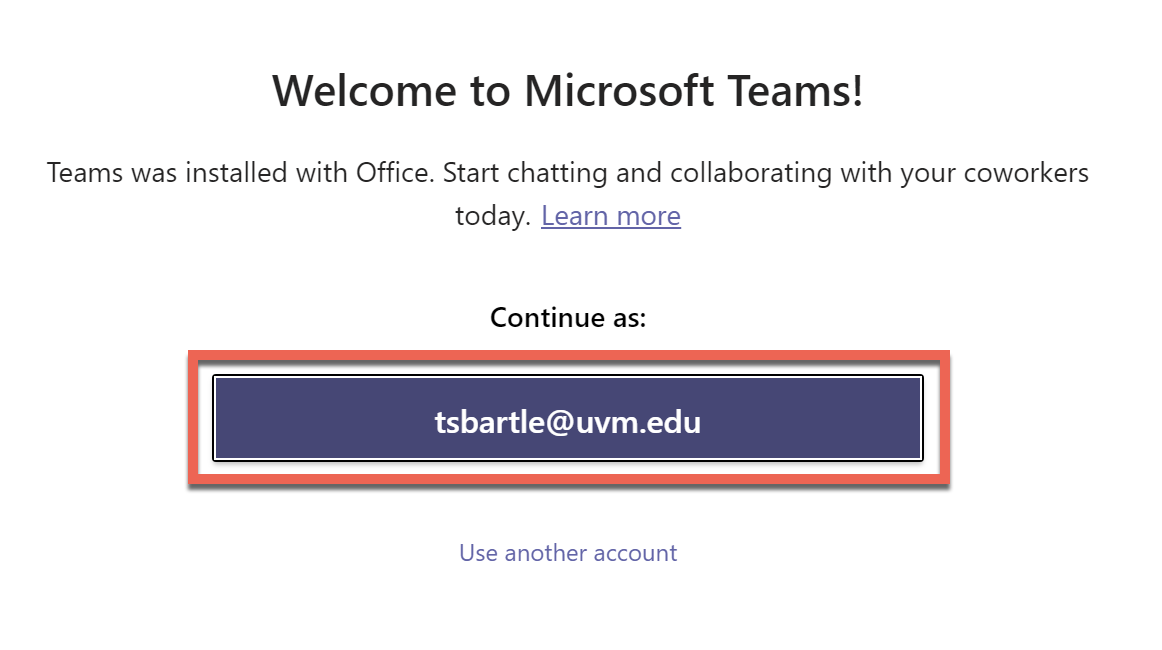
Step 3: Signing into Teams
The first time you login to a presentation computer in a particular classroom you'll need to sign into Microsoft Teams.
Thereafter, when you visit this classroom and login to the computer, Teams will automatically launch and sign you in.
- Click the Continue as: netid@uvm.edu button.
- If prompted, select Work or School account
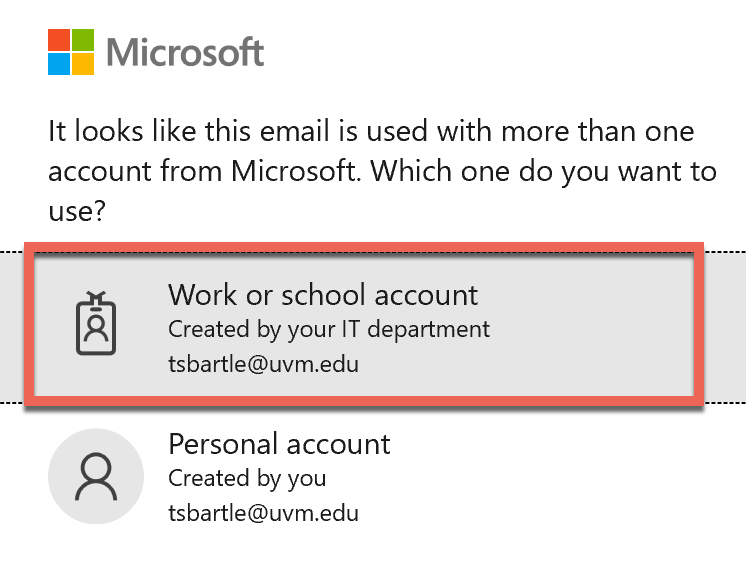
- If prompted, select Work or School account
- Sign in with your UVM NetID and password.

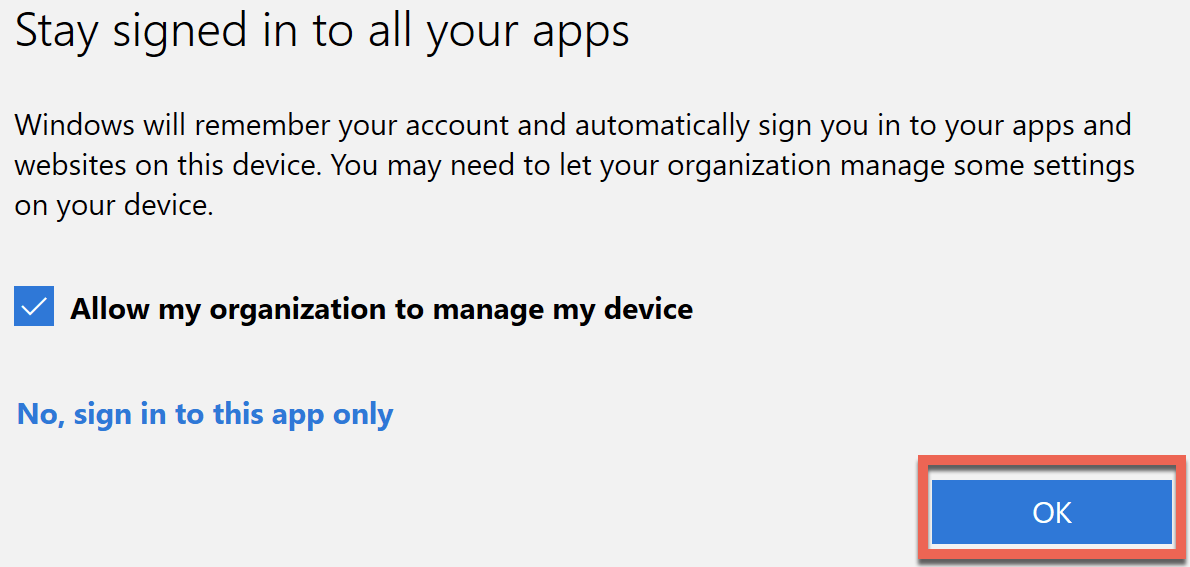
- Leave the box checked, and click OK. This step is important - leaving the box checked and choosing OK ensures the other Office applications on this computer will activate correctly.
- Click Done.
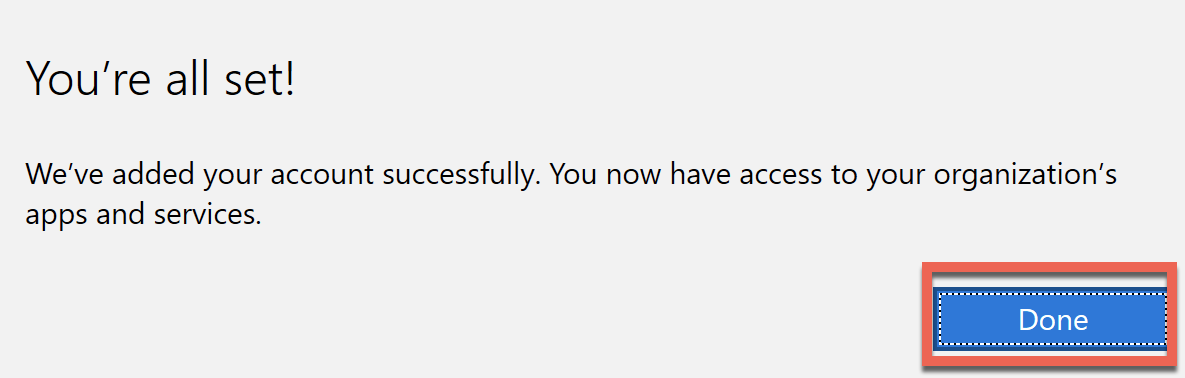
- That's it, you've successfully logged into Teams. The Teams application will launch automatically shortly.
Step 4: Join and record a Teams Meeting from the Classroom PC
This guide will show you how you join and record your Teams meeting from the calendar.
This guide assumes that you:
- Are already logged into the presentation computer
- Are already signed into Teams
- Have created teams enabled meetings for at least one of your classes
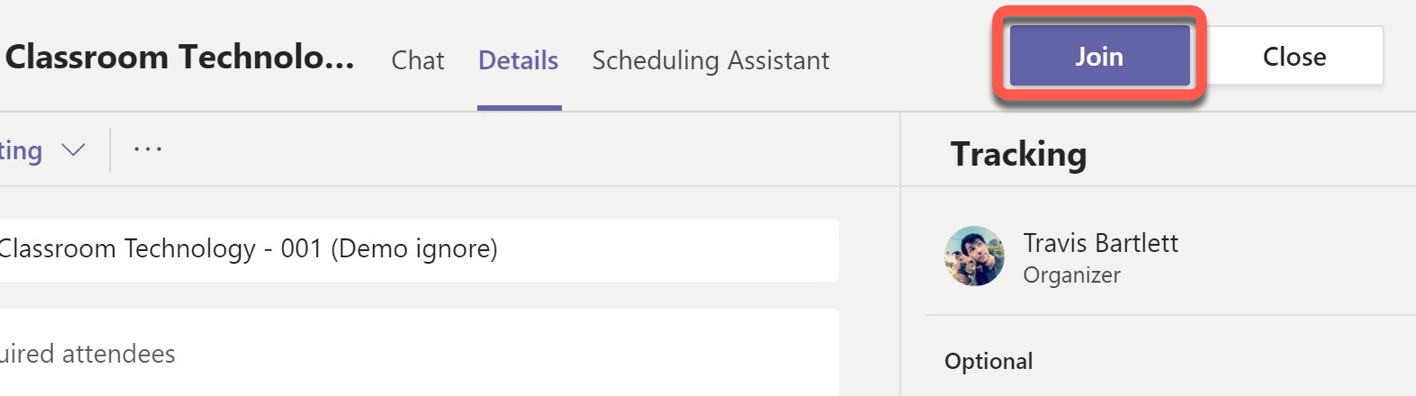
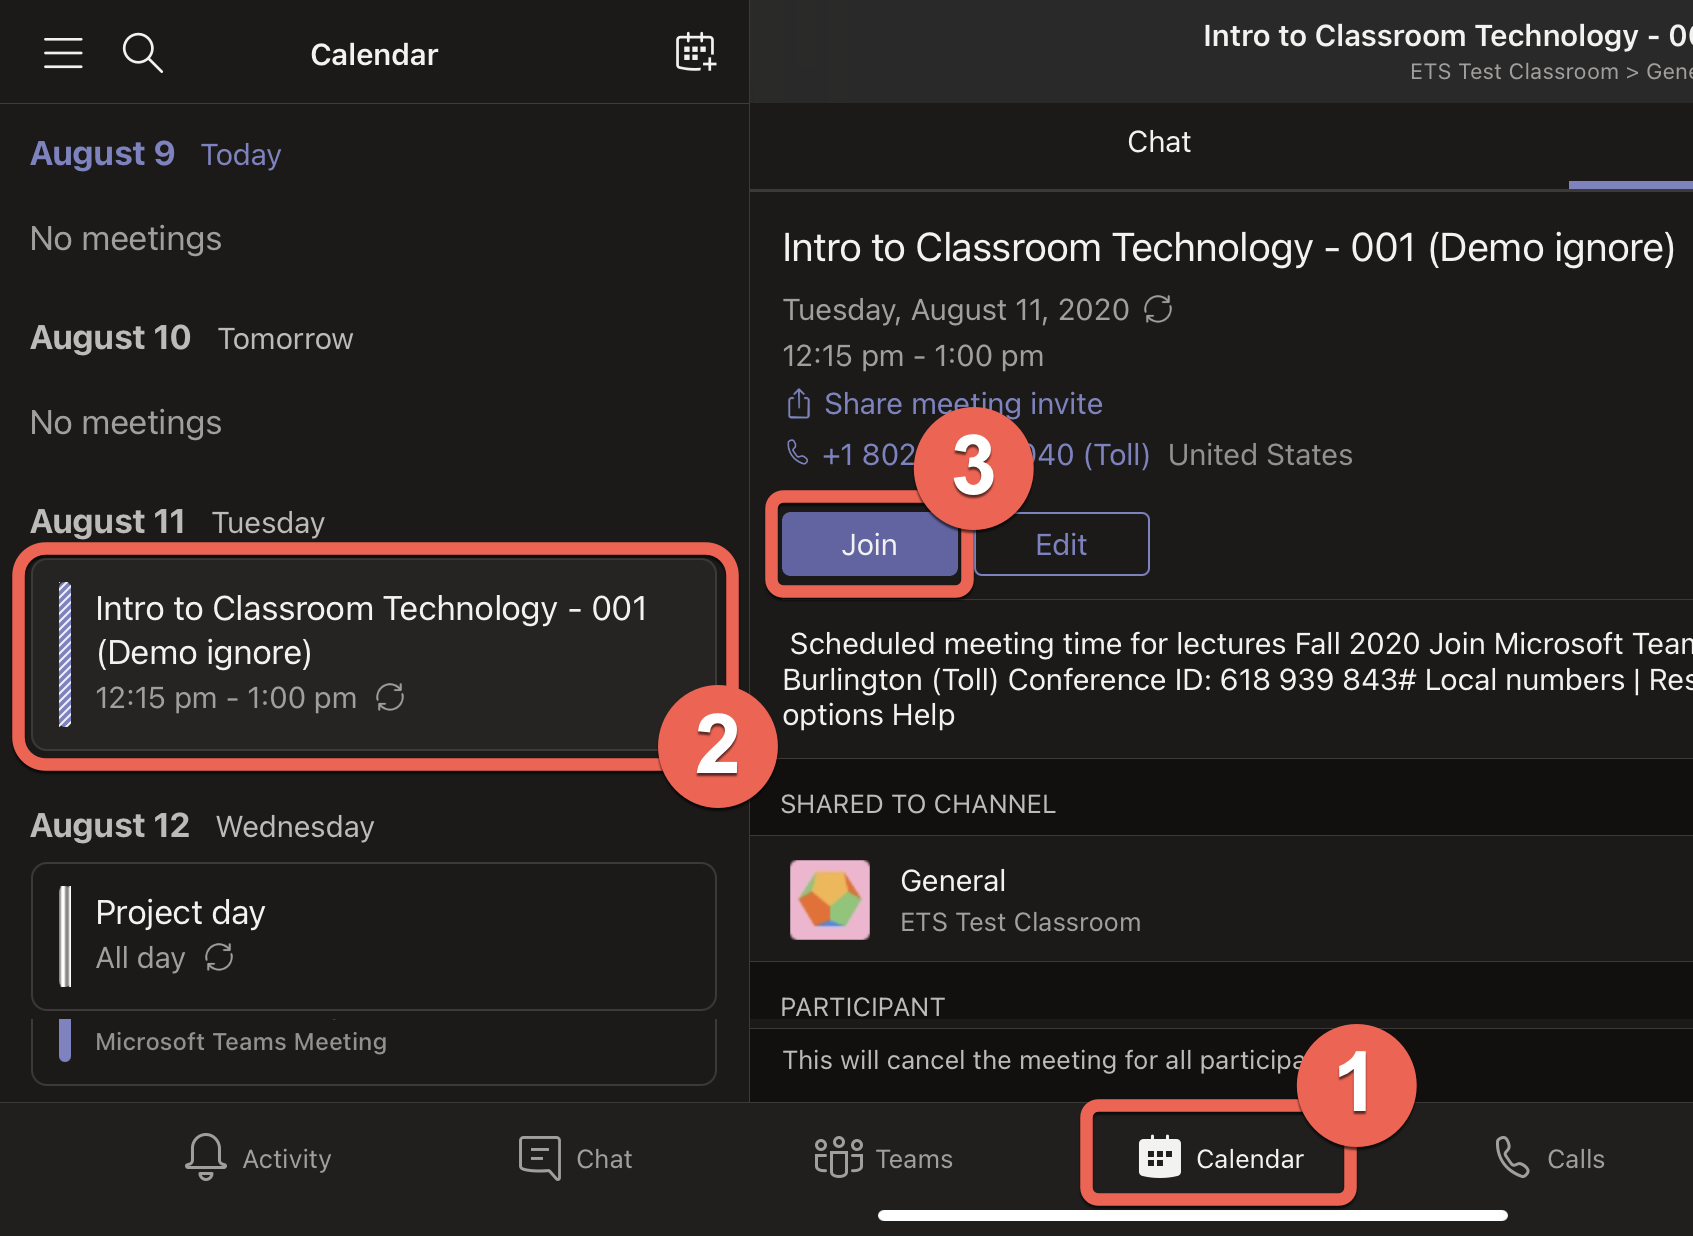
- Select Calendar, then locate and click the meeting associated with your lecture.

- Click the Join button in the upper-right corner.
- Before joining the meeting, make sure that the webcam and microphone are toggled ON. It is best practice to check the Device Settings before joining the meeting. Click the Gear icon to verify your device settings.
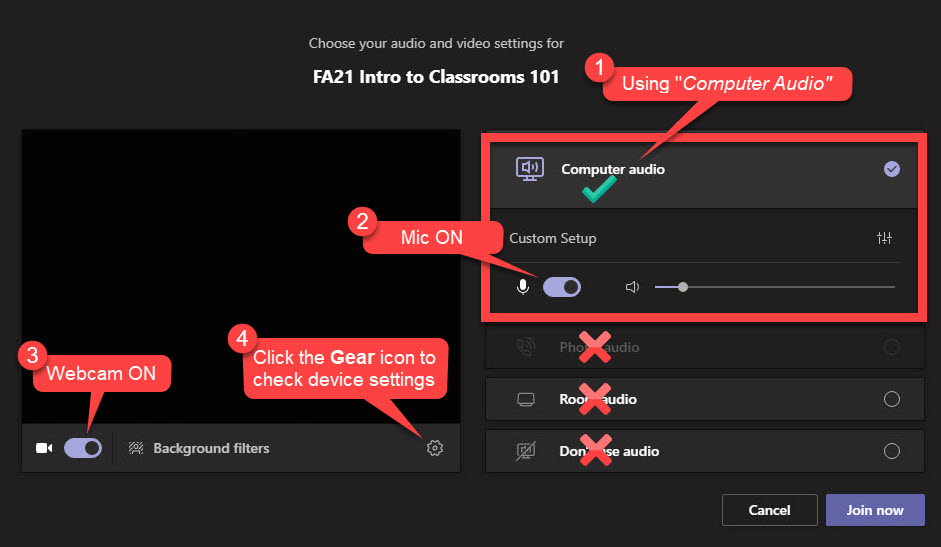
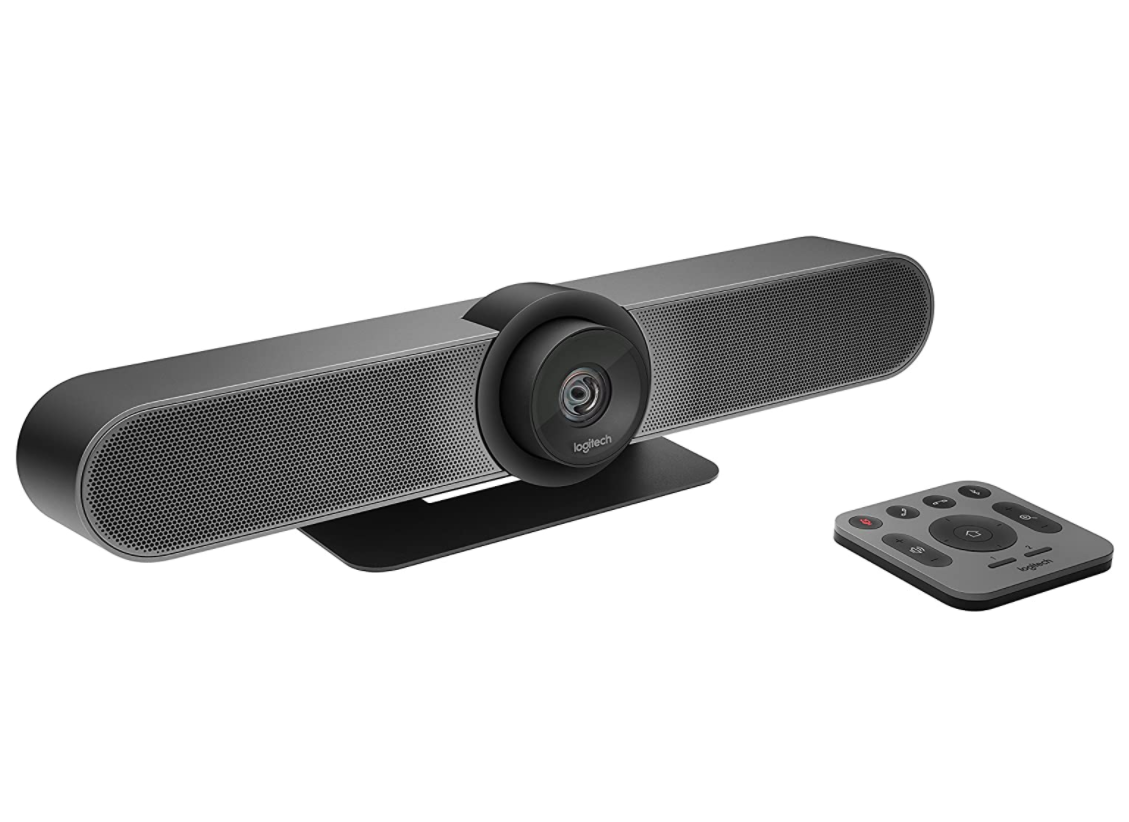
- There are a couple of options when choosing your Device settings in Teams. You can choose to use the Logitech MeetUp as the webcam, mic, and speaker for the Teams meeting -- OR -- you can choose to use the classrooms sound system as the speaker device.
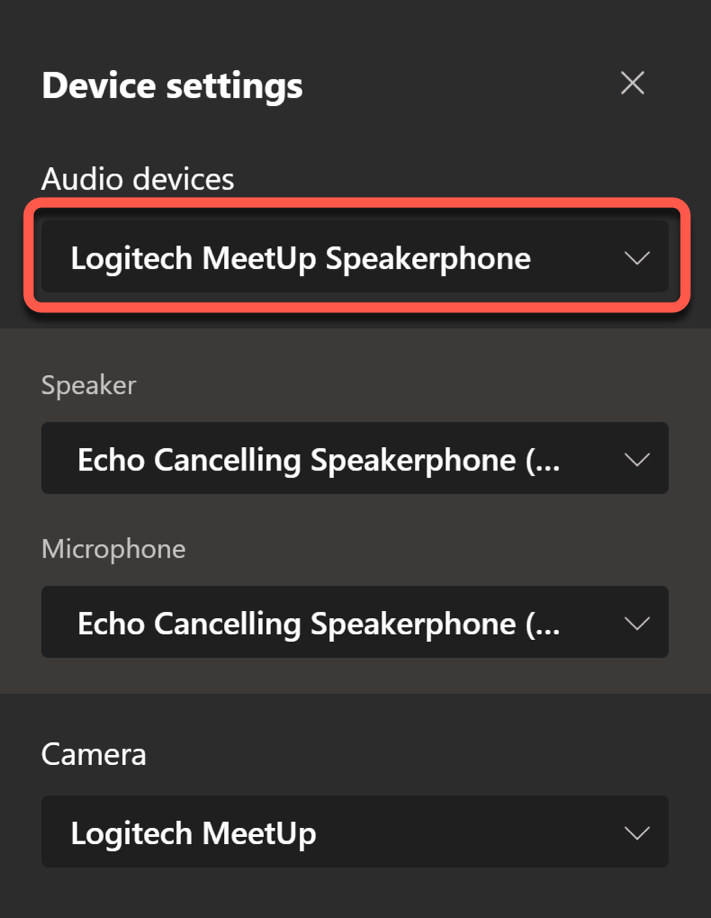
- To use the Logitech MeetUp as the speaker, microphone, and webcam for your Teams meeting, select the Logitech MeetUp Speakerphone from the Audio devices menu.
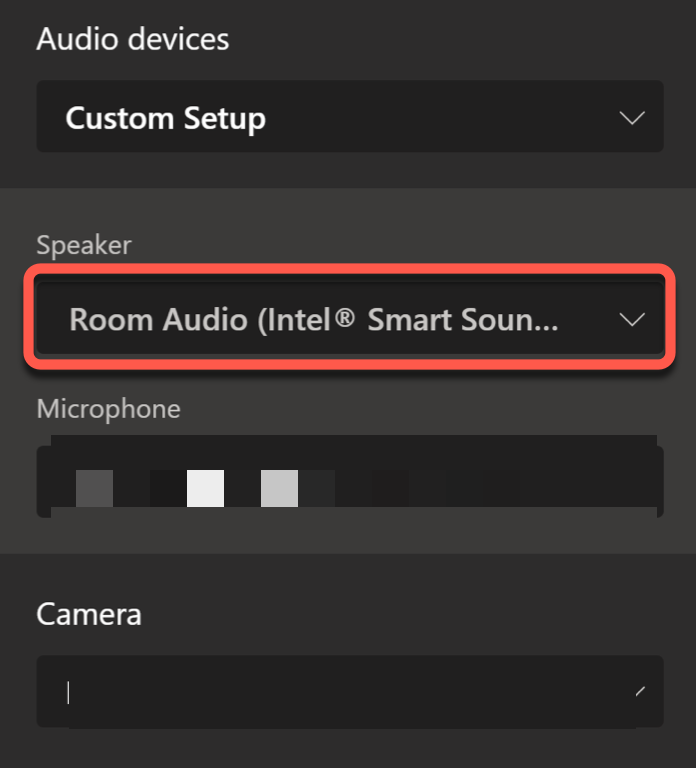
- If you prefer to use the classroom's sound system as the speaker device, select "Room Audio" from the Speaker dropdown menu:
- NOTE: Some rooms may have options of ExtronScalerID, Crestron, or EA244WMi instead of Room Audio
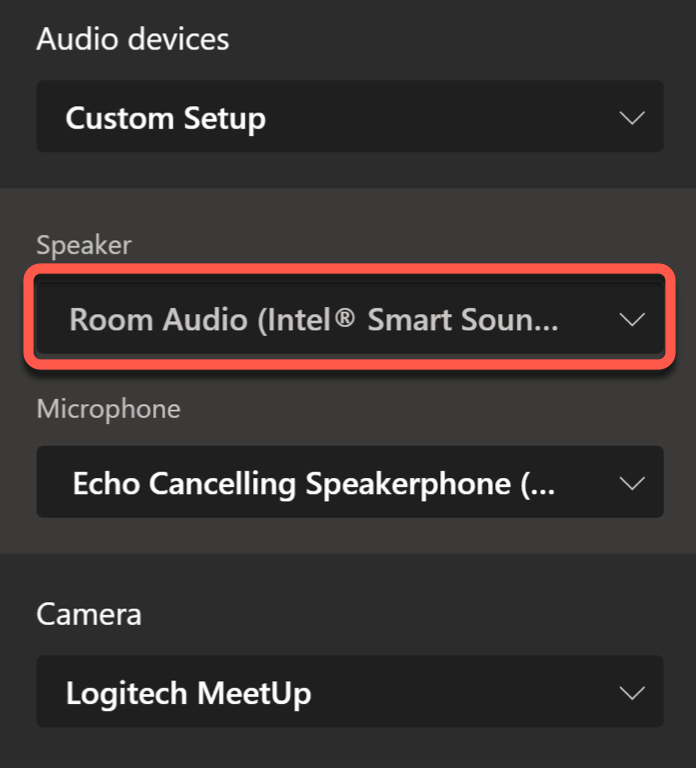
- NOTE: Some rooms may have options of ExtronScalerID, Crestron, or EA244WMi instead of Room Audio
- To use the Logitech MeetUp as the speaker, microphone, and webcam for your Teams meeting, select the Logitech MeetUp Speakerphone from the Audio devices menu.
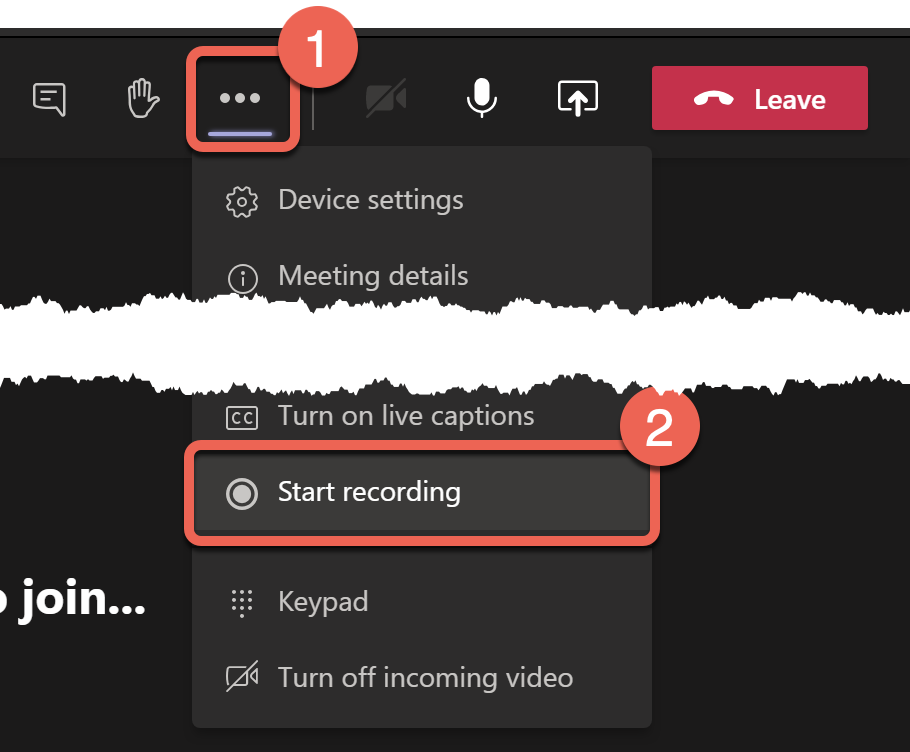
- Once you have joined the meeting, don't forget to Record your lectures if you wish to do so. Recording you meetings makes your class more flexible and available to students that may no be able to attend physically or are having connection issues. Start your recording by selecting the More Options (tripple dot) menu, then click Start Recording.
Step 5: Monitor Arrangement Options
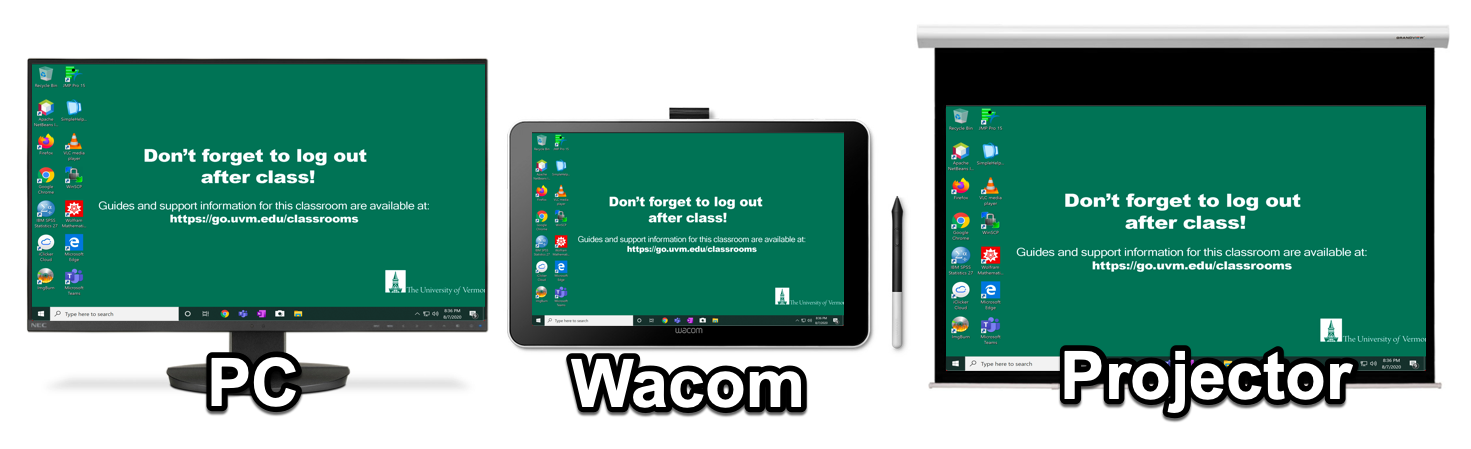
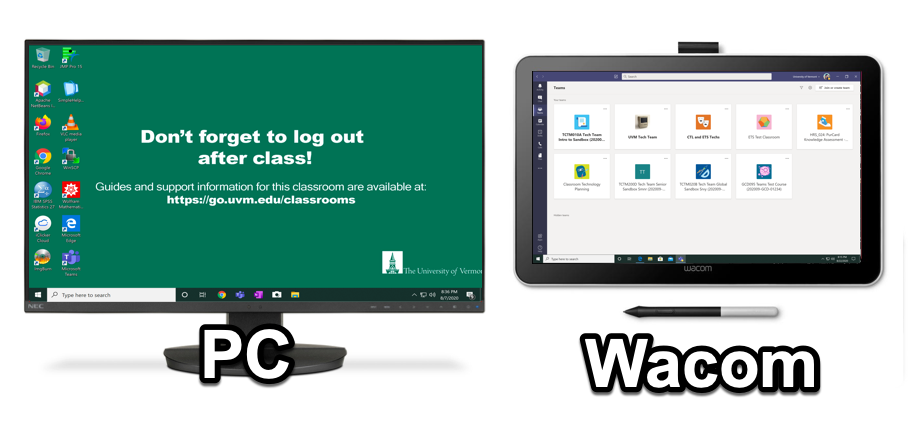
The computer is essentially a PC with dual screens -- one standard desktop PC monitor and one Wacom pen display. The screens can be duplicates of each other for simplicity, or they can be used as separate screens for extra real estate -- dual monitors will allow you to display one monitor on the projector and use the second monitor to view your remote students through the Teams meeting window.
DEFAULT: Duplicate Displays
Default monitor arrangement after logging into a classroom computer is to display the same image on the PC monitor, Wacom display, and Projector.
Extended Displays
If you prefer to use the desktop monitor and wacom display as two separate screens:
- Press the Windows key + P keys on the keyboard. From the menu that appears, select "Extend".
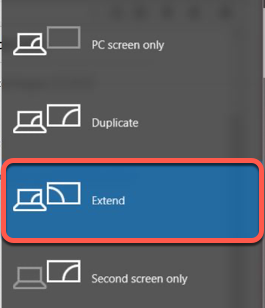
- The PC monitor and Wacom display will now behave as separate screens. You can drag applications to either screen, and choose which screen is displayed on the projector (see step 3).
- To select which monitor displays on the projector, press the PROJECT/DISPLAY ON button, then tap either the PC or WACOM buttons to select which display is show on the projector.
- If your control system does not have a "Wacom" button, try pushing the "DOC CAM" button instead.
- If your control system does not have a "Wacom" button, try pushing the "DOC CAM" button instead.
Sharing content with Teams
These guides are intended to show you how to share various content through Teams using the available technology in the classroom.
PowerPoint Presentations
This guide assumes that you've already logged into the presentation computer and that you've signed into and joined your Microsoft Teams meeting associated with your lecture.
There is a built-in PowerPoint sharing option in Teams, however, using this method is not ideal for MIXED teaching modalities with in-person and remote students. The best option for sharing a PowerPoint presentation is to share a desktop and to open the PowerPoint application on the desktop that is being shared.
- From the Teams meeting, click the Share button located in upper-right corner of the meeting window.

- From the Share menu, select Desktop Screen #1 (if you're using the 'extended' display mode, you may want to choose screen #2 instead).

- A red border will appear around the desktop as an indication that it is being shared.
- Click the Start button, select the PowerPoint application.
- Open the slideshow you'd like to present, then start the presentation as you normally would. The slideshow will be visible to your in-person and remote students.

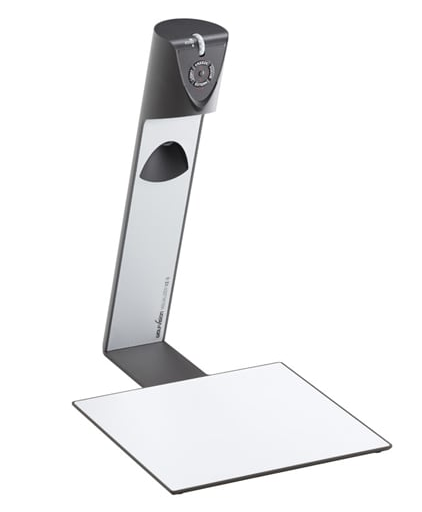
Document Camera
This guide assumes that you've already logged into the presentation computer and that you've signed into and joined your Microsoft Teams meeting associated with your lecture.
- Turn on the Document Camera by lifting up the camera arm (it will turn on automatically).
- From the Teams meeting, click the Share button located in upper-right corner of the window.
- From the Share menu, select Desktop Screen #1 (if you're using 'extended' mode, you may want to choose screen #2 instead)
- A red border will appear around the desktop as an indication that it is being shared.
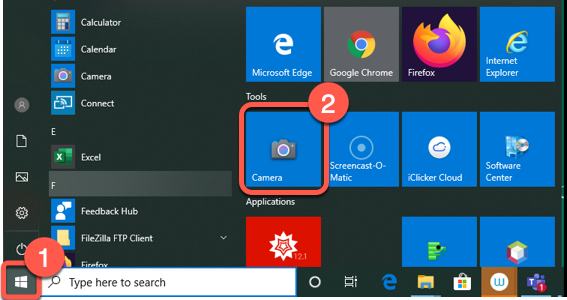
- Click the "Start" button in the lower-left corner, then select the "Camera" app.
- The camera app will open and the Document Camera video feed should be visible.You can maximize the window to make the image bigger.

- If the webcam video is being displayed (only possible if the camera is set to off in Teams) in the camera app instead of the document camera, click the "switch camera" button to toggle back to the Document Camera.

- If the webcam video is being displayed (only possible if the camera is set to off in Teams) in the camera app instead of the document camera, click the "switch camera" button to toggle back to the Document Camera.
OneNote Class Notebook
This guide assumes that you've already logged into the presentation computer and that you've signed into and joined the Microsoft Teams meeting associated with your lecutre.
- From the Teams meeting, click the Share button located in upper-right corner of the meeting window.
- From the Share menu, select Desktop Screen #1 (if you're using the 'extended' display mode, you may want to choose screen #2 instead)
- A red border will appear around the desktop as an indication that it is being shared.
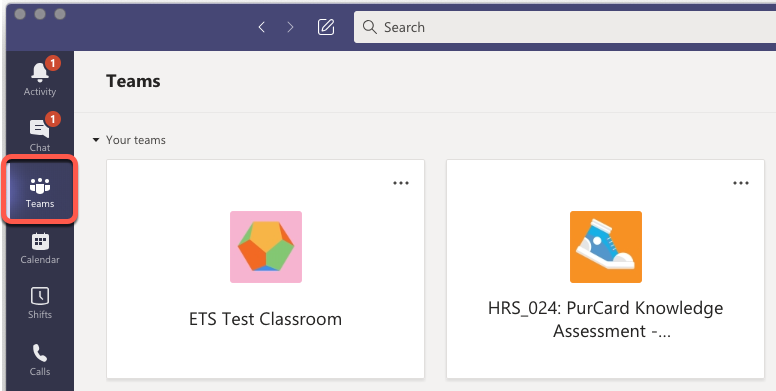
- Navigate back to the Teams application and select Teams from the sidebar. Select the class team associated with this lecture to open it.
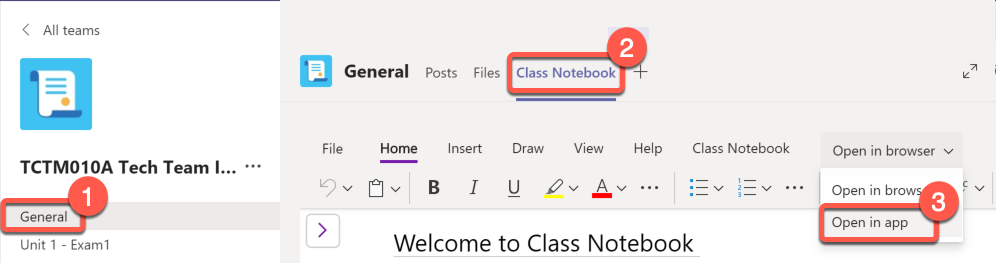
- Select the General channel of your class team, choose the Class Notebook tab, then choose the option to Open in app. While you can edit the OneNote document in Teams, the OneNote Windows 10 generally makes for a better experience when writing notes.
- If prompted to choose which version of OneNote you'd like to use, choose the top one, then click OK. We're currently looking into setting this as the default, but for now this may be something you need to do manually the first time you open your class notebook on this computer.
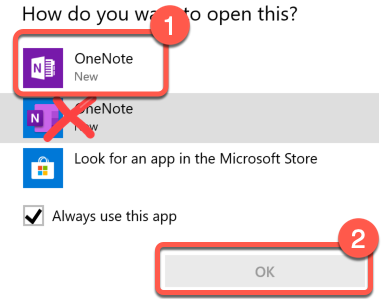
- If prompted to choose which version of OneNote you'd like to use, choose the top one, then click OK. We're currently looking into setting this as the default, but for now this may be something you need to do manually the first time you open your class notebook on this computer.
- There will be a brief syncing period the first time you load a OneNote class notebook this way in a classroom. When the notebook loads:
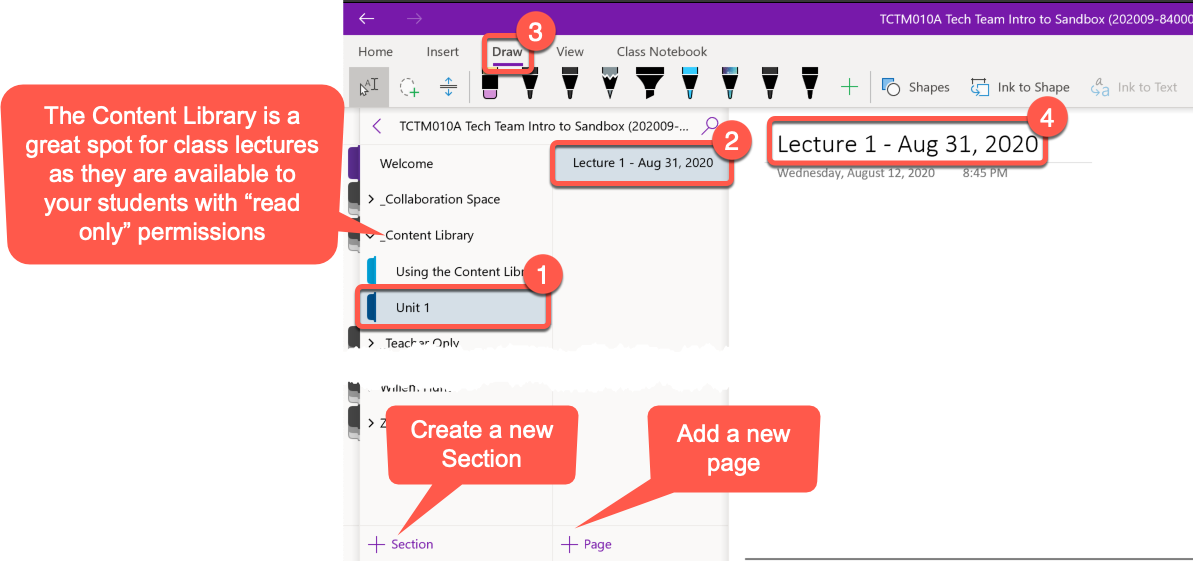
- Expand the Content Library
- Add a new section (if necessary) by clicking the + Section button.
- Add a new page to the section you just created (if applicable).
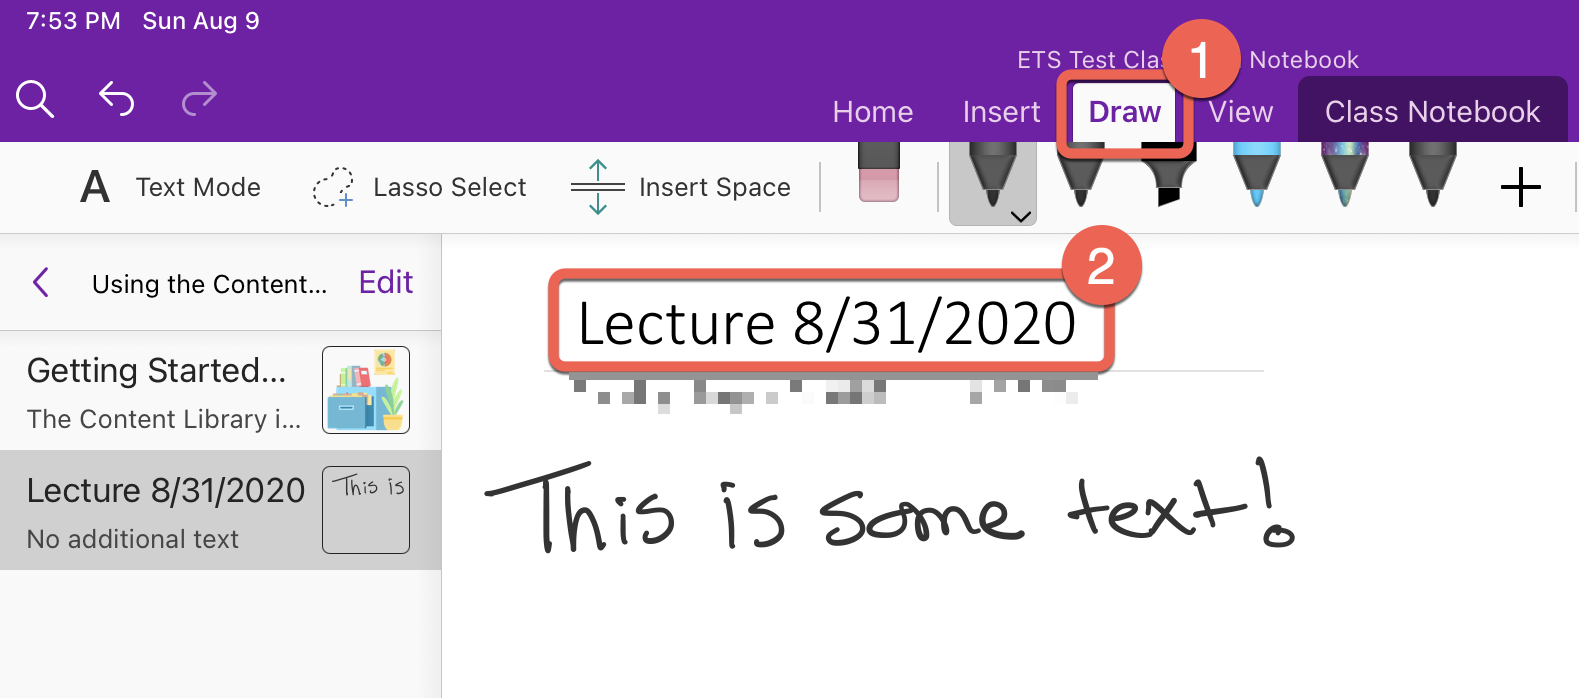
- Select the Draw tab from the ribbon.
- Give the page you just created a title relevant to today's lecture.
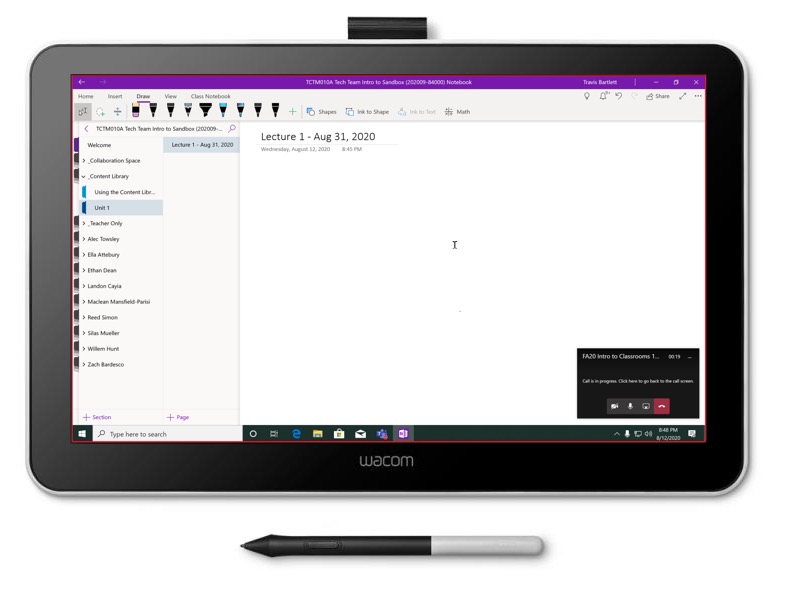
- Move the OneNote window to the Wacom Pen Disply and begin writing with the stylus.
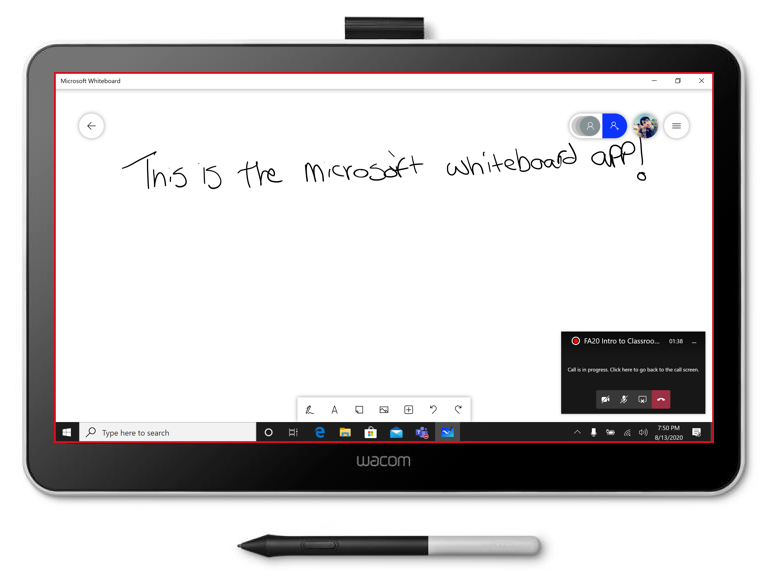
Microsoft Whiteboard app
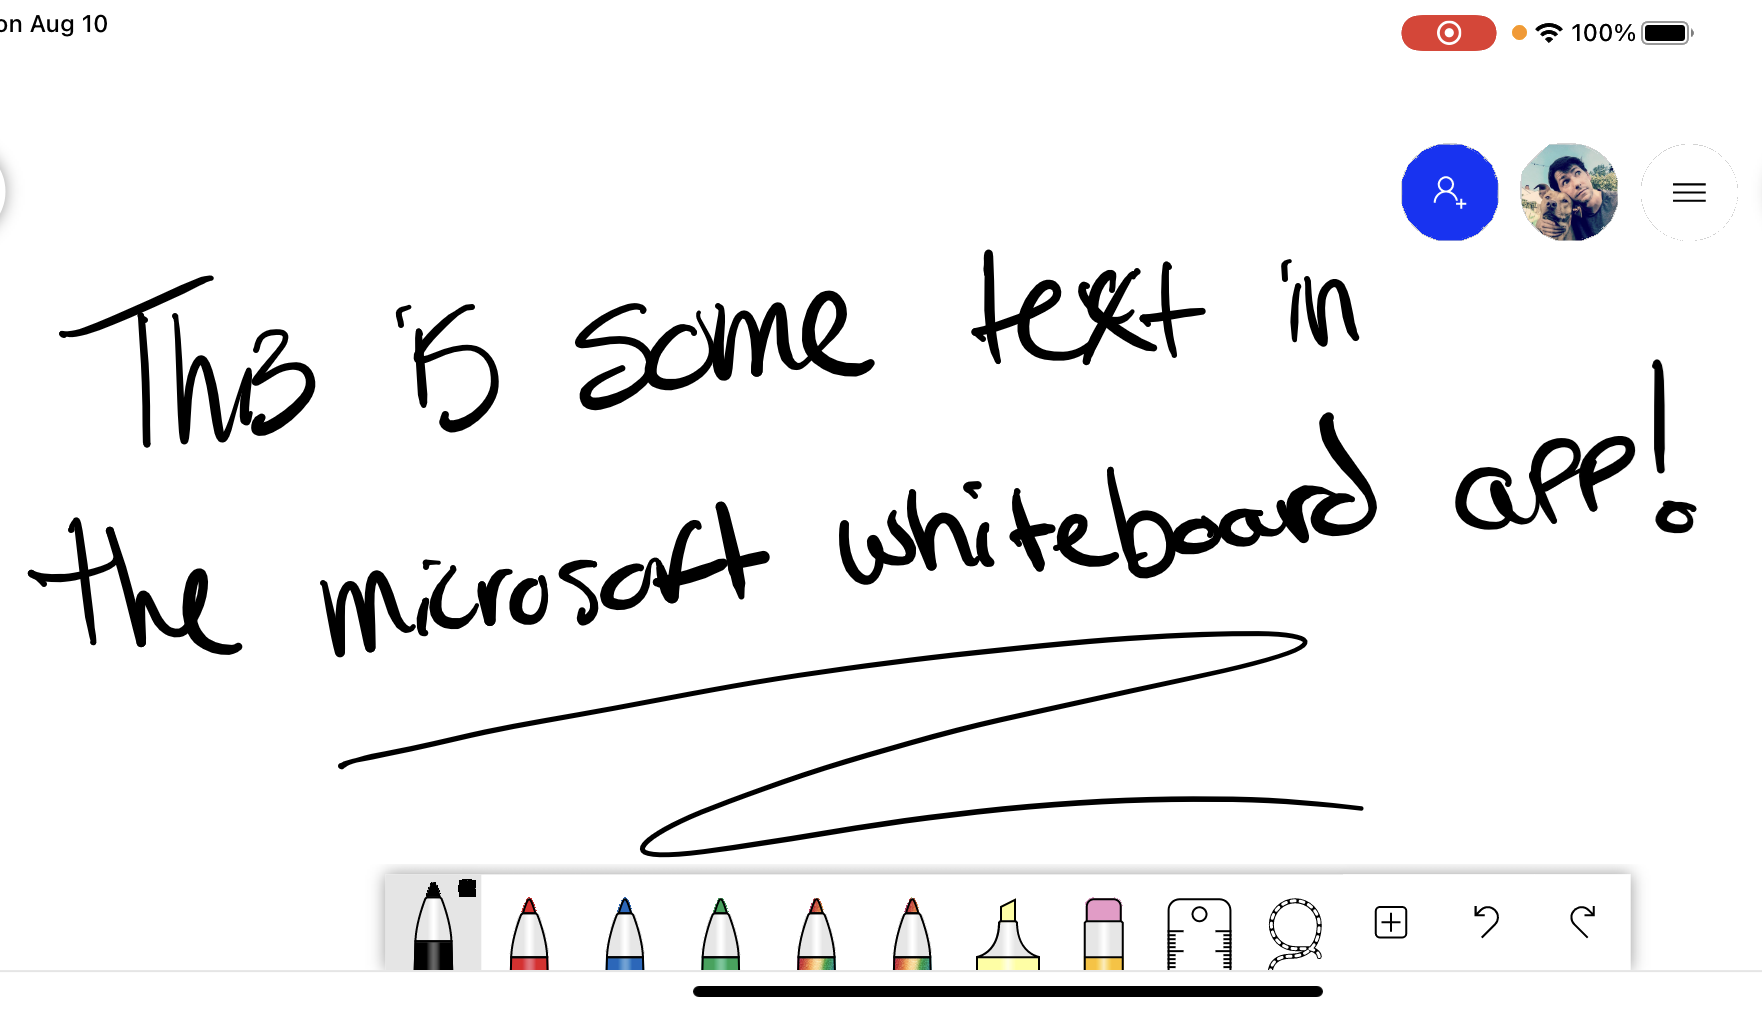
This guide will show you how use the Microsoft Whiteboard app, which can be used as a standalone whiteboard for lecture notes, or as a collaborative space where students can interact with the whiteboard simultaneously. Sharing the whiteboard as described below will also allow it to be captured as part of the lecture recording.
This guide assumes that you've already logged into the presentation computer and that you've signed into and joined the Microsoft Teams meeting associated with your lecutre.
- From the Teams meeting, click the Share button located in upper-right corner of the window.
- From the Share menu, select Desktop Screen #1 (if you're using 'extended' display mode, you may want to choose screen #2 instead)

- A red border will appear around the desktop as an indication that it is being shared.

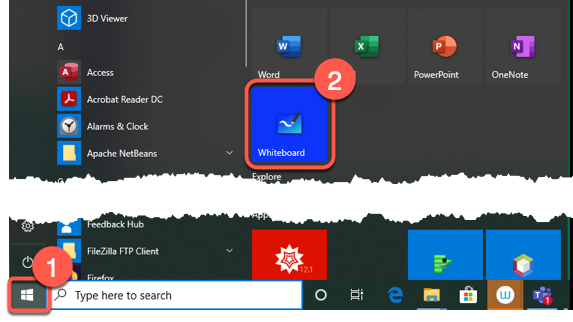
- Click the Start menu. Click the Whiteboard app.
- The Microsoft Whiteboard app will launch. If needed, move the whiteboard app window to the Wacom Pen Display.
- Your students will be able to see the whiteboard through the Teams meeting, it will also be visible in the recording of the lecture.
Collaborative Whiteboarding with the MS Whiteboard app
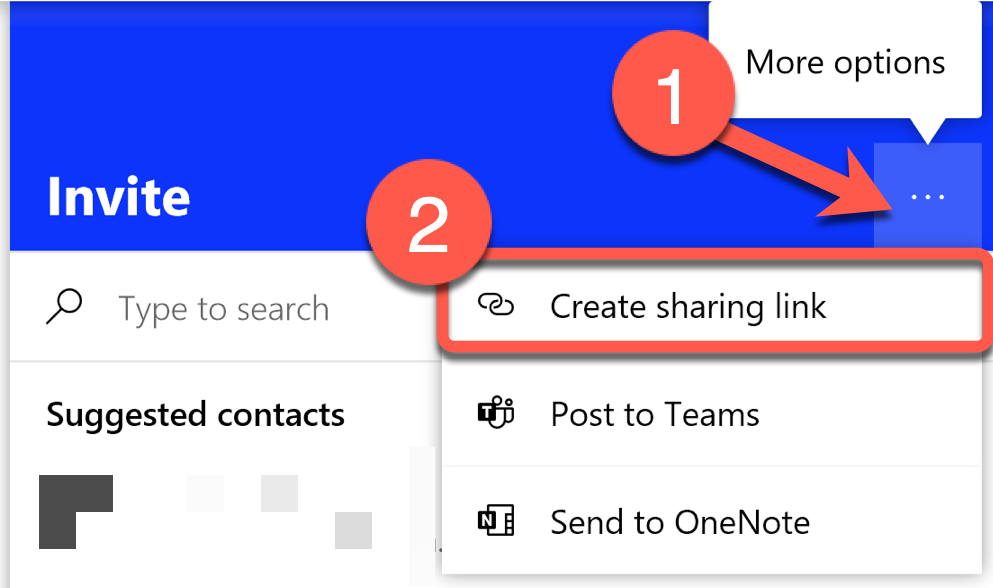
This guide assumes that you've completed the steps above of sharing your desktop with the teams meeting, and that you've already opened the MS Whiteboard app. These steps will outline how to create a sharable link to your Whiteboard that you can be posted in the chat of your teams meeting.
- Click the "Invite Someone" button in the upper-right corner of the Whiteboard app.

- Click the More Options menu, then select Create Sharing Link
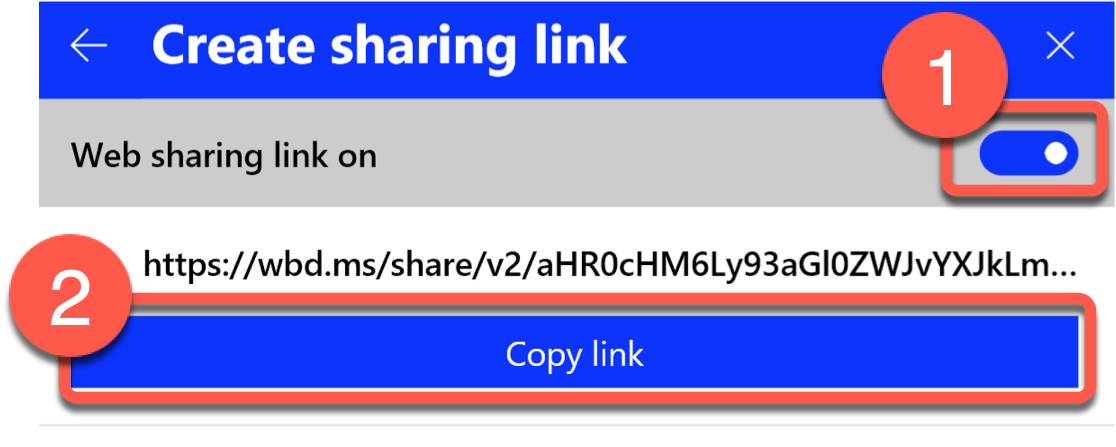
- Toggle Web sharing link to ON, then click the Copy button to copy the link to your clipboard.
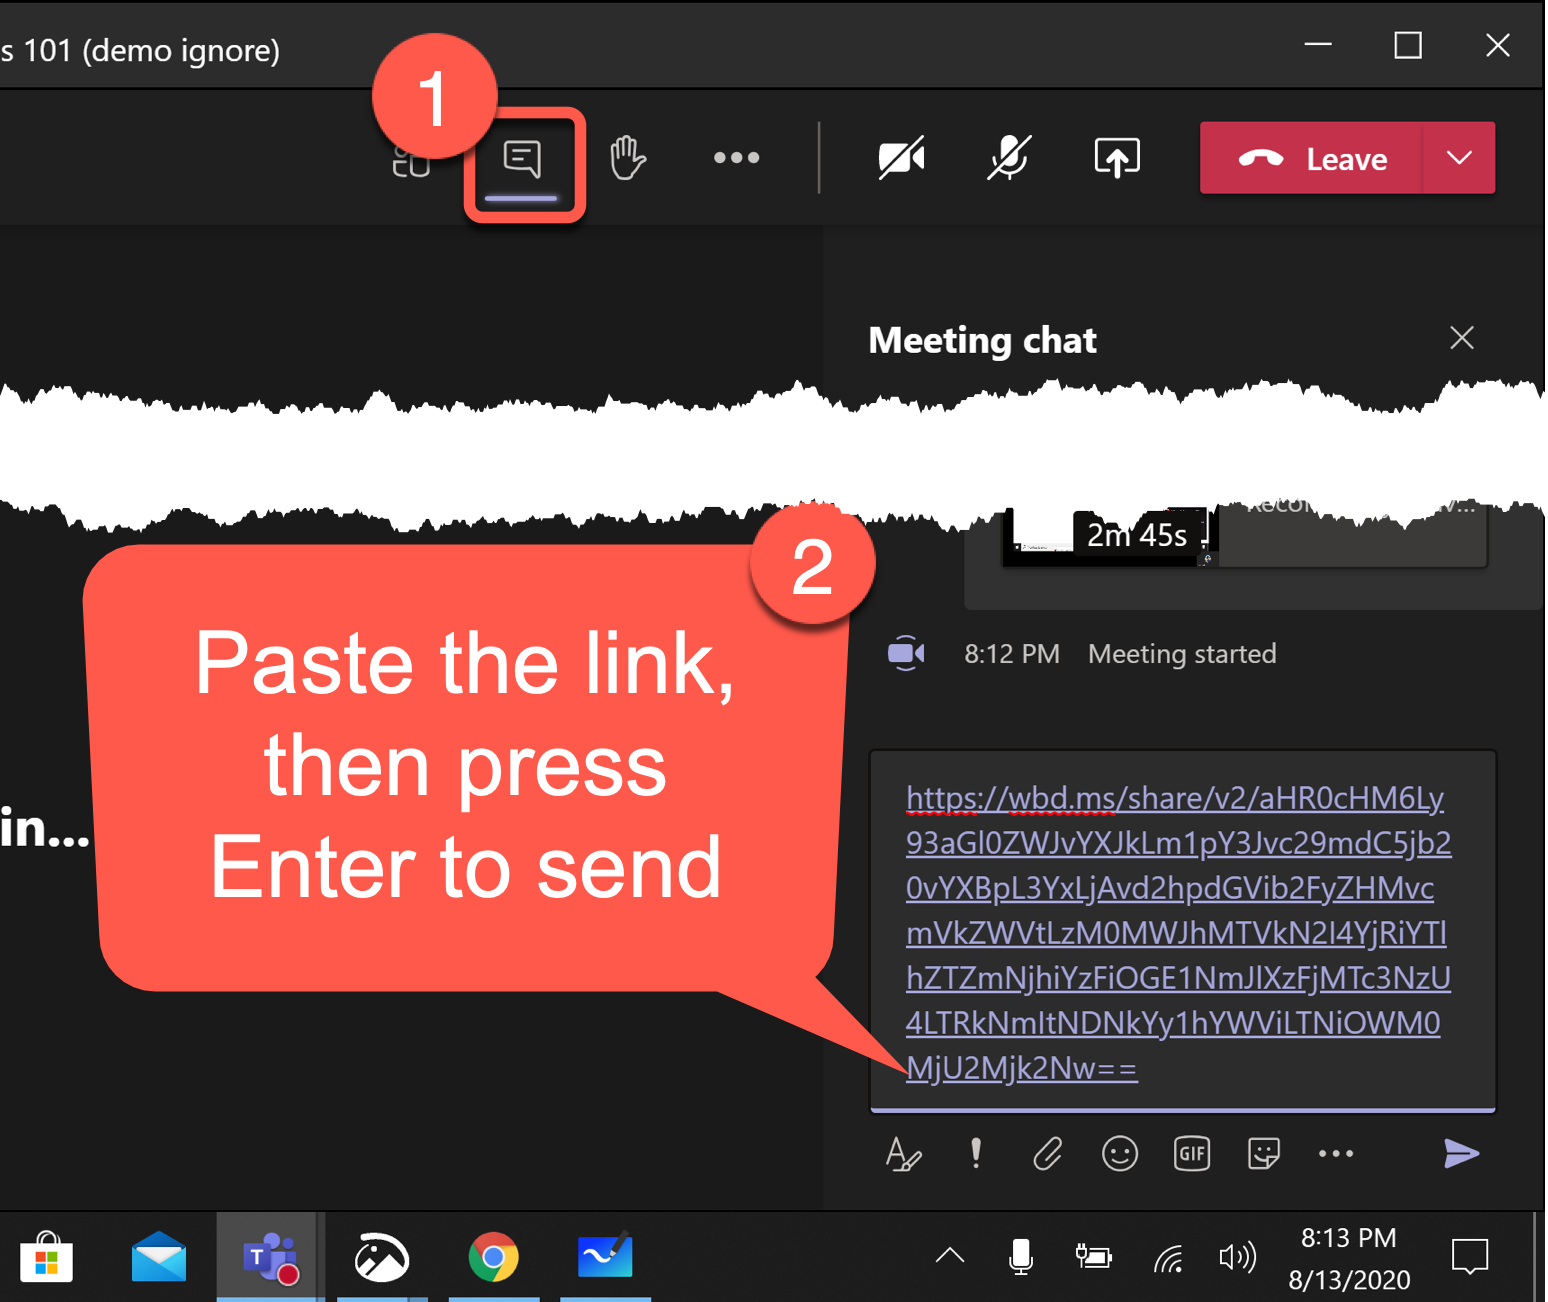
- Open the Teams meeting window, select the chat, then paste the link and send it.
- You're can click the link to access the Whiteboard.
Sharing other Applications
This guide assumes that you've already logged into the presentation computer and that you've signed into and joined your Microsoft Teams meeting associated with your lecture.
- From the Teams meeting, click the Share button located in upper-right corner of the meeting window.
- From the Share menu, select Desktop Screen #1 (if you're using the 'extended' display mode, you may want to choose screen #2 instead).
- A red border will appear around the desktop as an indication that it is being shared.
- Open the application that you'd like to share with your students. If needed, move the application window to the desktop that is being shared (the one with the red border).
Sharing Video and Audio with Teams
- Verify that the PC or COMPUTER input on the control system in your classroom. This will display the PC Desktop monitor to on the Projector.
- You'll need to ensure that you are using the "Room Audio" device as a speaker in Teams. This is required to share audio from the PC through Teams to remote participants.
- NOTE: Some rooms may have options of ExtronScalerID, Crestron, DMP128 Plus USB, or EA244WMi instead of Room Audio
- NOTE: Some rooms may have options of ExtronScalerID, Crestron, DMP128 Plus USB, or EA244WMi instead of Room Audio
- From the Teams meeting, click the Share button located in upper-right corner of the meeting window.
- From the Share menu, select Desktop Screen #1 (if Desktop 2 is displaying on the projector, use that instead).
- You MUST select the Include computer sound option in order to have the sound from any video you play made available to students who are attending the lecture through Teams.
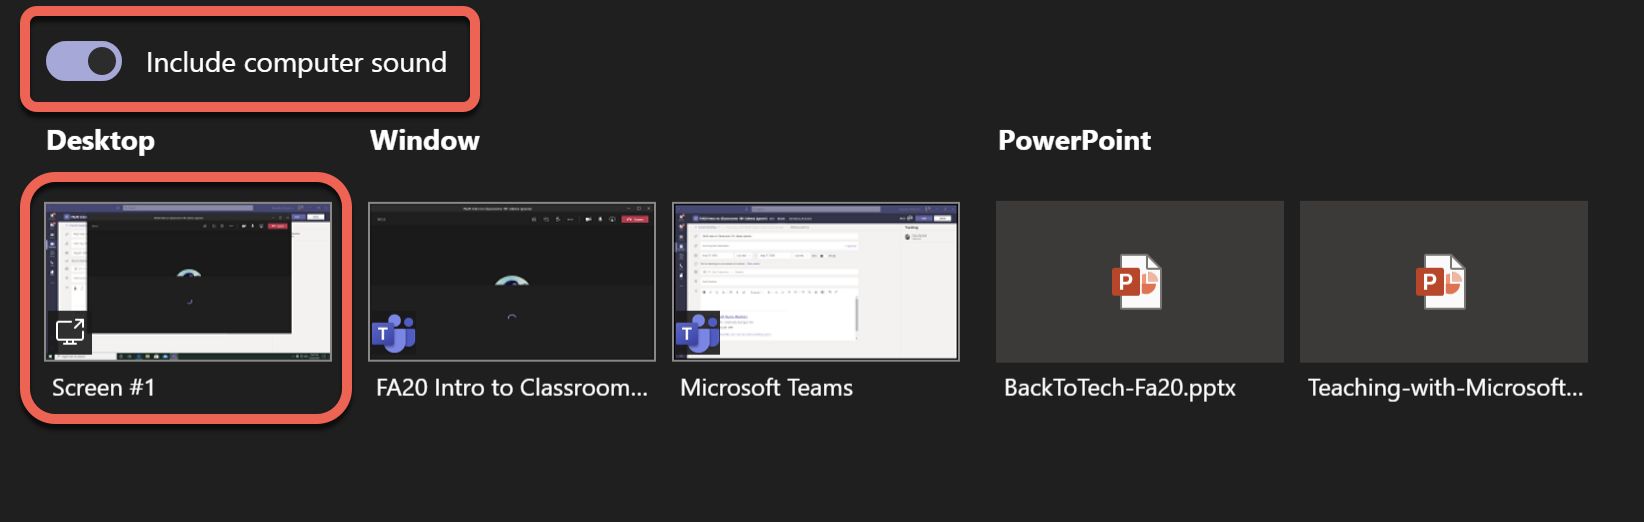
- You MUST select the Include computer sound option in order to have the sound from any video you play made available to students who are attending the lecture through Teams.
- A red border will appear around the desktop as an indication that it is being shared.
- You can now open and share your video, such as a YouTube clip.

Connecting from Laptops and iPads
If you'd like to use your laptop or iPad, you must first join the Teams meeting from the presenter computer. Joining your meeting from the presenter computer is required to use the webcam, microphone, document camera, pen display, and any other room equipment.
Once you've joined the meeting from the presenter computer, you will be able to join the meeting from your laptop.
Laptop - Join Teams Meeting
The instructions below will work for joining a Teams meeting from a Windows or macOS laptop
We recommend only using your laptop for specific use cases, such as needing to work with a piece of software or operating system that isn't available on the presenter computer. The presenter computer is equipped with a webcam, mic, pen display, and document camera -- this is what will be used to capture your lecture for remote students. If you don't use the presenter computer you will not have access to those pieces of equipment.
This guide assumes that you've already logged into and joined the meeting from the presenter computer.
- Open the Teams application from your Windows laptop.
- Select Calendar, then locate and click the meeting associated with your lecture.

- Click the Join button in the upper-right corner.

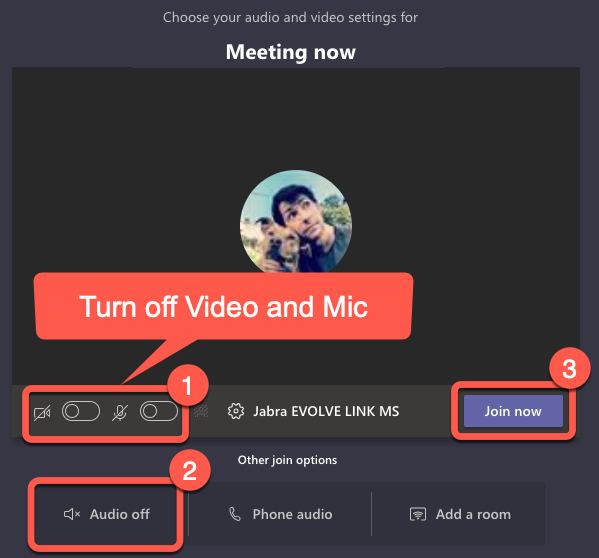
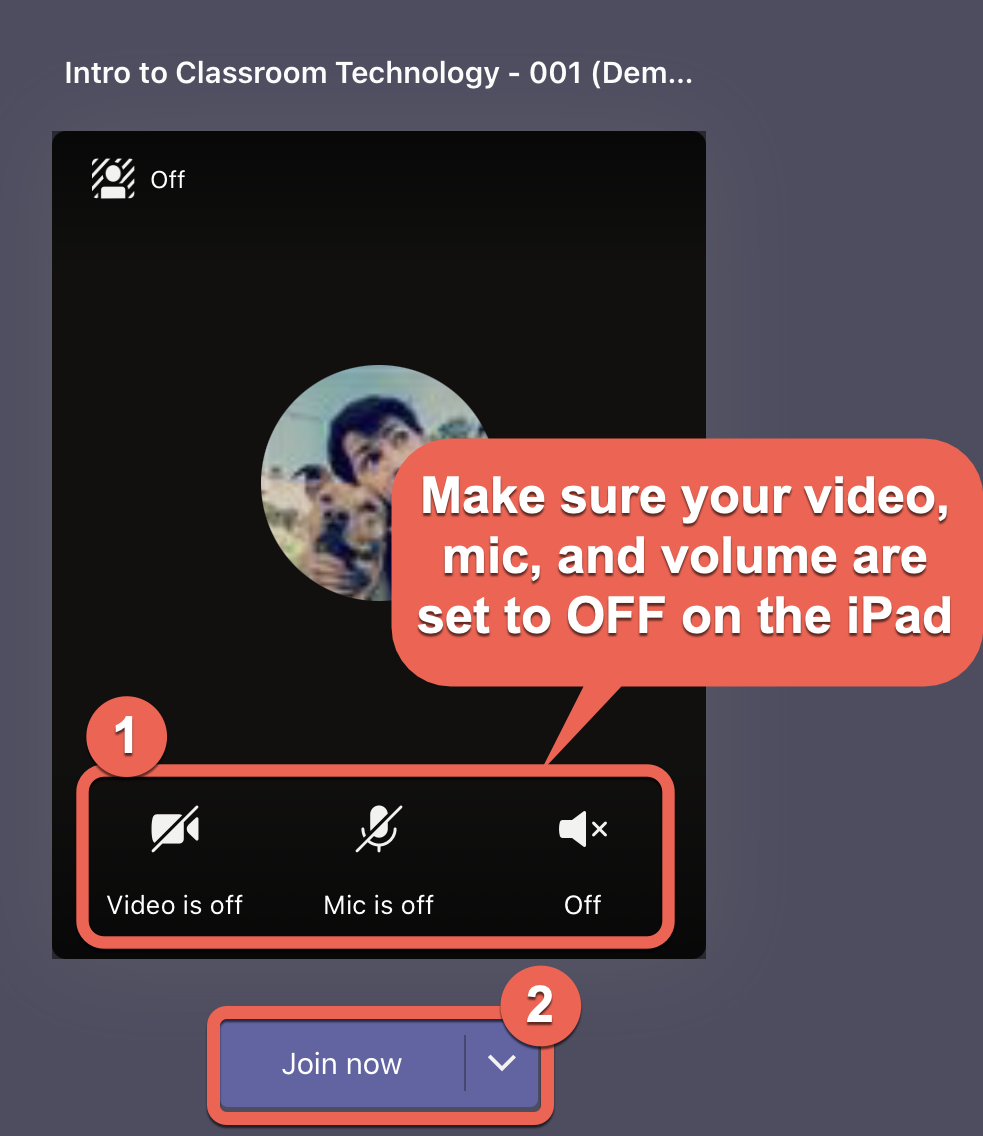
- When joining the meeting from your laptop, turn off your webcam, and microphone, then click the Audio Off button. These settings are required to prevent feedback. When you're ready, click the Join button to enter the meeting from your laptop.
- From the Teams meeting, click the Share button located in upper-right corner of the window.
- From the Share menu, select Desktop Screen #1 (if you're using different display settings, you may want to choose screen #2 instead)
- The desktop of your laptop will have a red border around it to signify that Teams is sharing your screen. Open whatever application is needed from your laptop so it can be seen by your students.

- GO BACK TO THE PRESENTER COMPUTER and maximize the Teams meeting window so your in person students can see the what you're sharing from your laptop on the classroom projector. Below is an example of what this might look like on the projector:
iPad - OneNote Class notebook
The steps below will show you how you join a Teams meeting from your iPad and share the OneNote app with all meeting participants.
This guide assumes that you've already done the following:
- Joined the Teams meeting from the presenter computer.
- Installed and have signed into Teams and OneNote on your iPad
- Open the Teams app on your iPad and select the Calendar. Locate the meeting for your desired lecture, tap it, and then tap the Join button.
- When joining the meeting, make sure that the video, mic, and sound have been turned Off. (tap each option to turn on/off). You will still be heard and seen through the presenter computer - turning these options off on your ipad will prevent feedback. When you're ready, click the Join button to enter the meeting from your iPad.
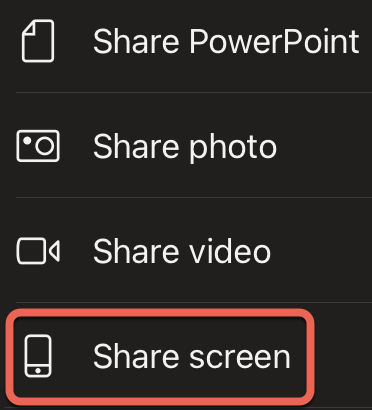
- Tap the More Options menu (three dots), the select Share.
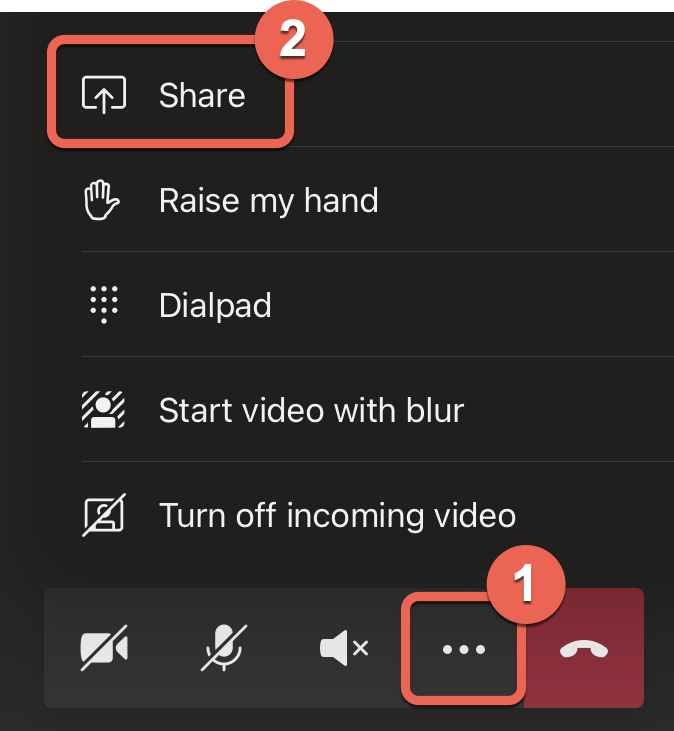
- From the sharing options menu, select Share Screen
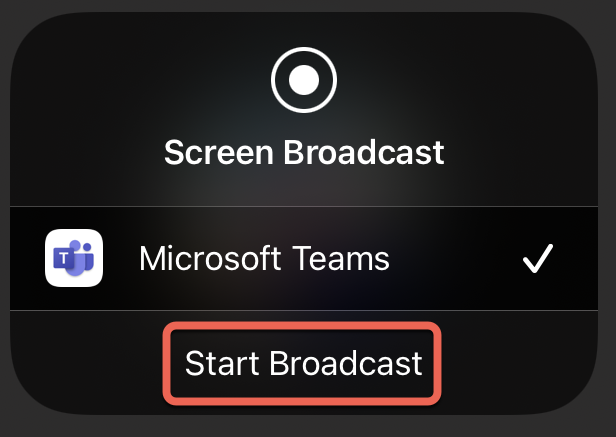
- Confirm screen sharing by tapping Start Broadcast - after a 3 second countdown your iPad screen will be shared with the meeting.
- Navigate back to the iPad's home screen, then open the OneNote app.
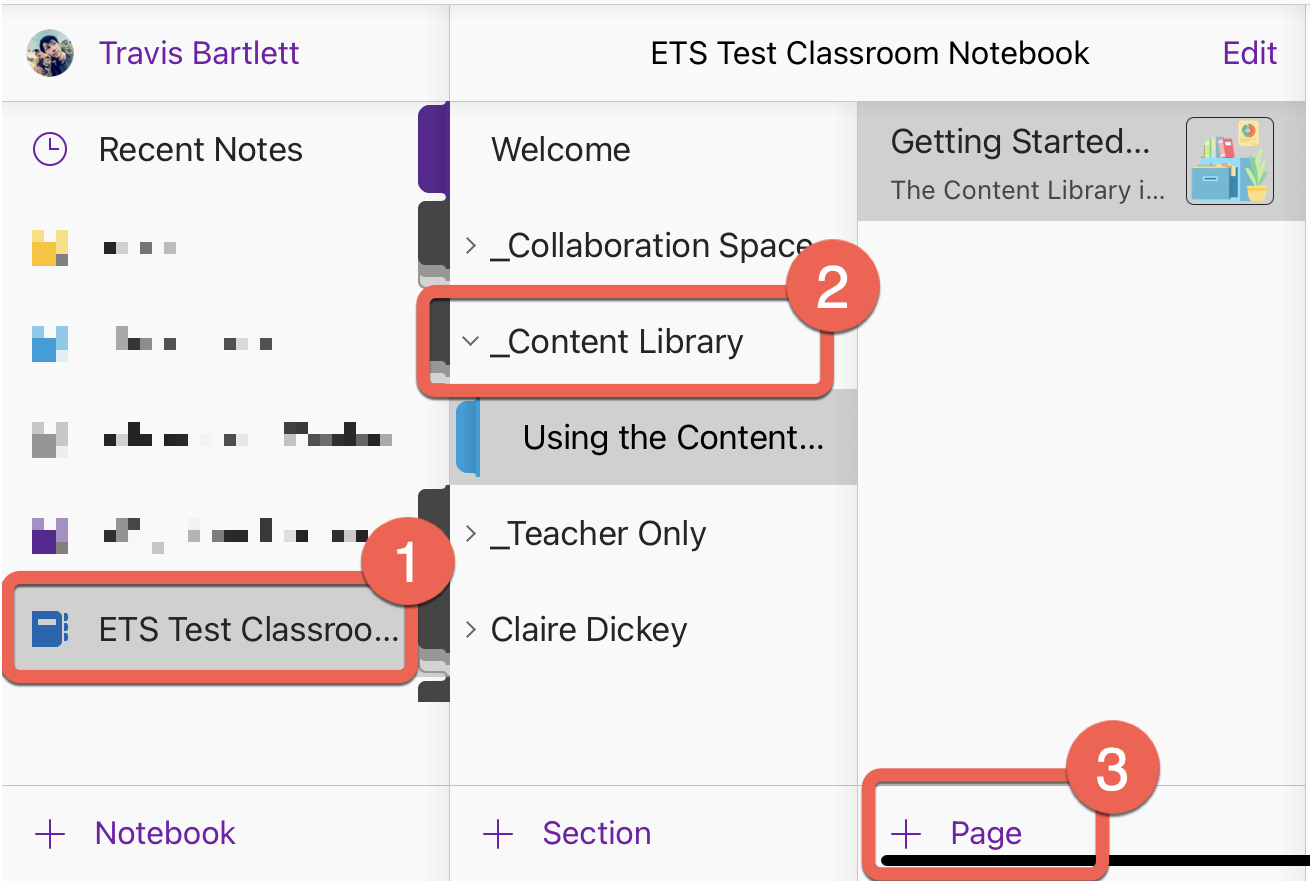
- Class OneNote notebooks will automatically appear for all of your class teams. Find the notebook for your lecture, tap it, then enter the Content Library (notes in the content librarby are set to read only and will be available to your students after lecture). Add a new Page for todays lecture, or continue where you left off last time.
- Select the Draw tab in order to use you Apple pencil. If needed, enter a title for the page, then begin writing your notes.
- When you're ready to stop sharing your iPad's screen, swap back to the Teams app, then tap Stop Presenting.

iPad - Microsoft Whiteboard app
The steps below will show you how you join a Teams meeting from your iPad and share the Microsoft Whiteboard app with all meeting participants.
This guide assumes that you've already done the following:
- Joined the Teams meeting from the presenter computer.
- Installed and have signed into Teams and Whiteboard app on your iPad
- Open the Teams app on your iPad and select the Calendar. Locate the meeting for your desired lecture, tap it, and then tap the Join button.
- When joining the meeting, make sure that the video, mic, and sound have been turned Off. (tap each option to turn on/off). You will still be heard and seen through the presenter computer - turning these options off on your ipad will prevent feedback. When you're ready, click the Join button to enter the meeting from your iPad.
- Tap the More Options menu (three dots), the select Share.
- From the sharing options menu, select Share Screen
- Confirm screen sharing by tapping Start Broadcast - after a 3 second countdown your iPad screen will be shared with the meeting.
- Navigate back to the iPad's home screen, then open the Microsoft Whiteboard app.
- The whiteboard app will open, create a new board, or use an existing one.
- When you're ready to stop sharing your iPad's screen, swap back to the Teams app, then tap Stop Presenting.
- If you'd like to Export your whiteboard to your class team so your students can access the board later, please see this guide.
Other Resources
Signing into Screencast-O-Matic
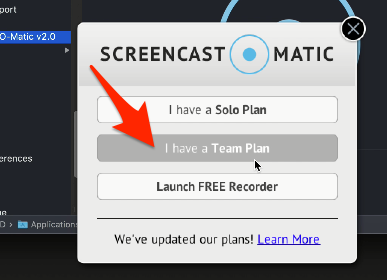
The first time you use Screencast-O-Matic in this classroom you'll need to sign in to activate it. The steps below will guide you through the process of activating Screencast-O-Matic. Please be aware that SOM is only licensed for use by faculty. For a quick start guide for how to use SOM, please look here.
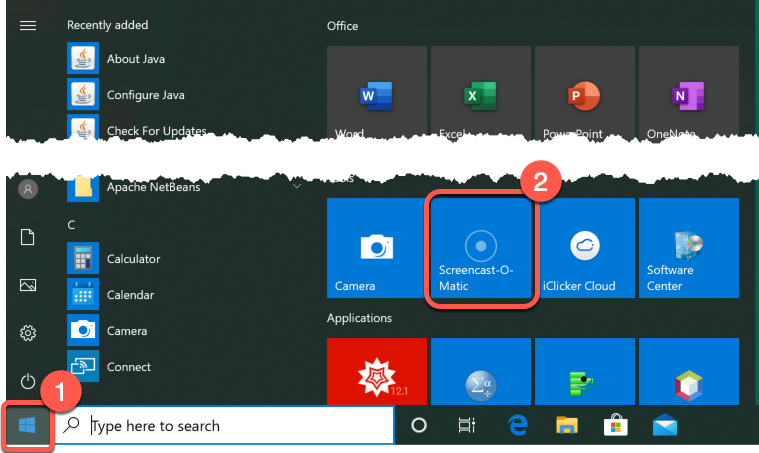
- Click the Start button, then select the Screencast-O-Matic app.
- Select the "I have a Team Plan" option.
- Enter the URL code uvermont then click the "Submit" button.
- You'll be brought a UVM single-sign-on page. Enter your NetID and password.

- Screencast-O-Matic will activate and launch the application.
iClicker Cloud
The Center for Teaching and Learning has created this guide for how to use iClicker cloud.
Troubleshooting
The guides below are intended to help you resolve issues that may crop up when using the technology in the classroom.
Computer will not turn on or display image
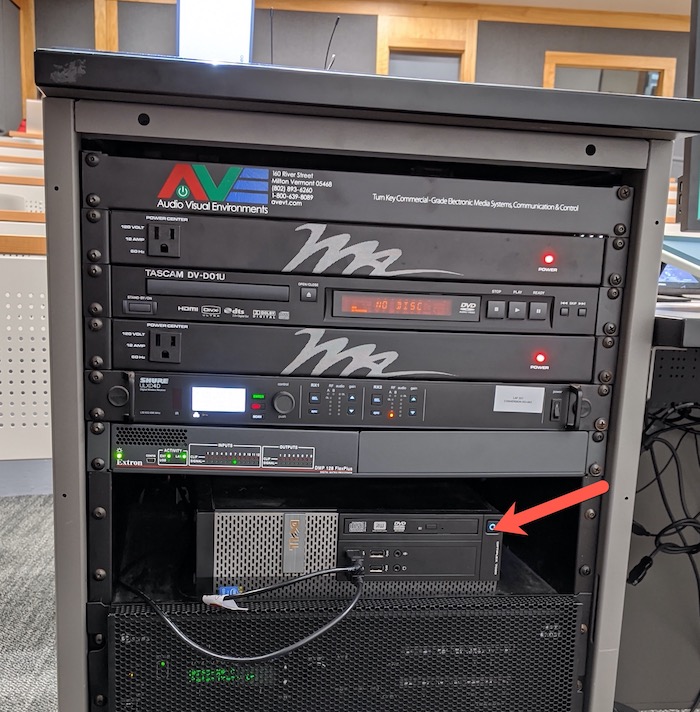
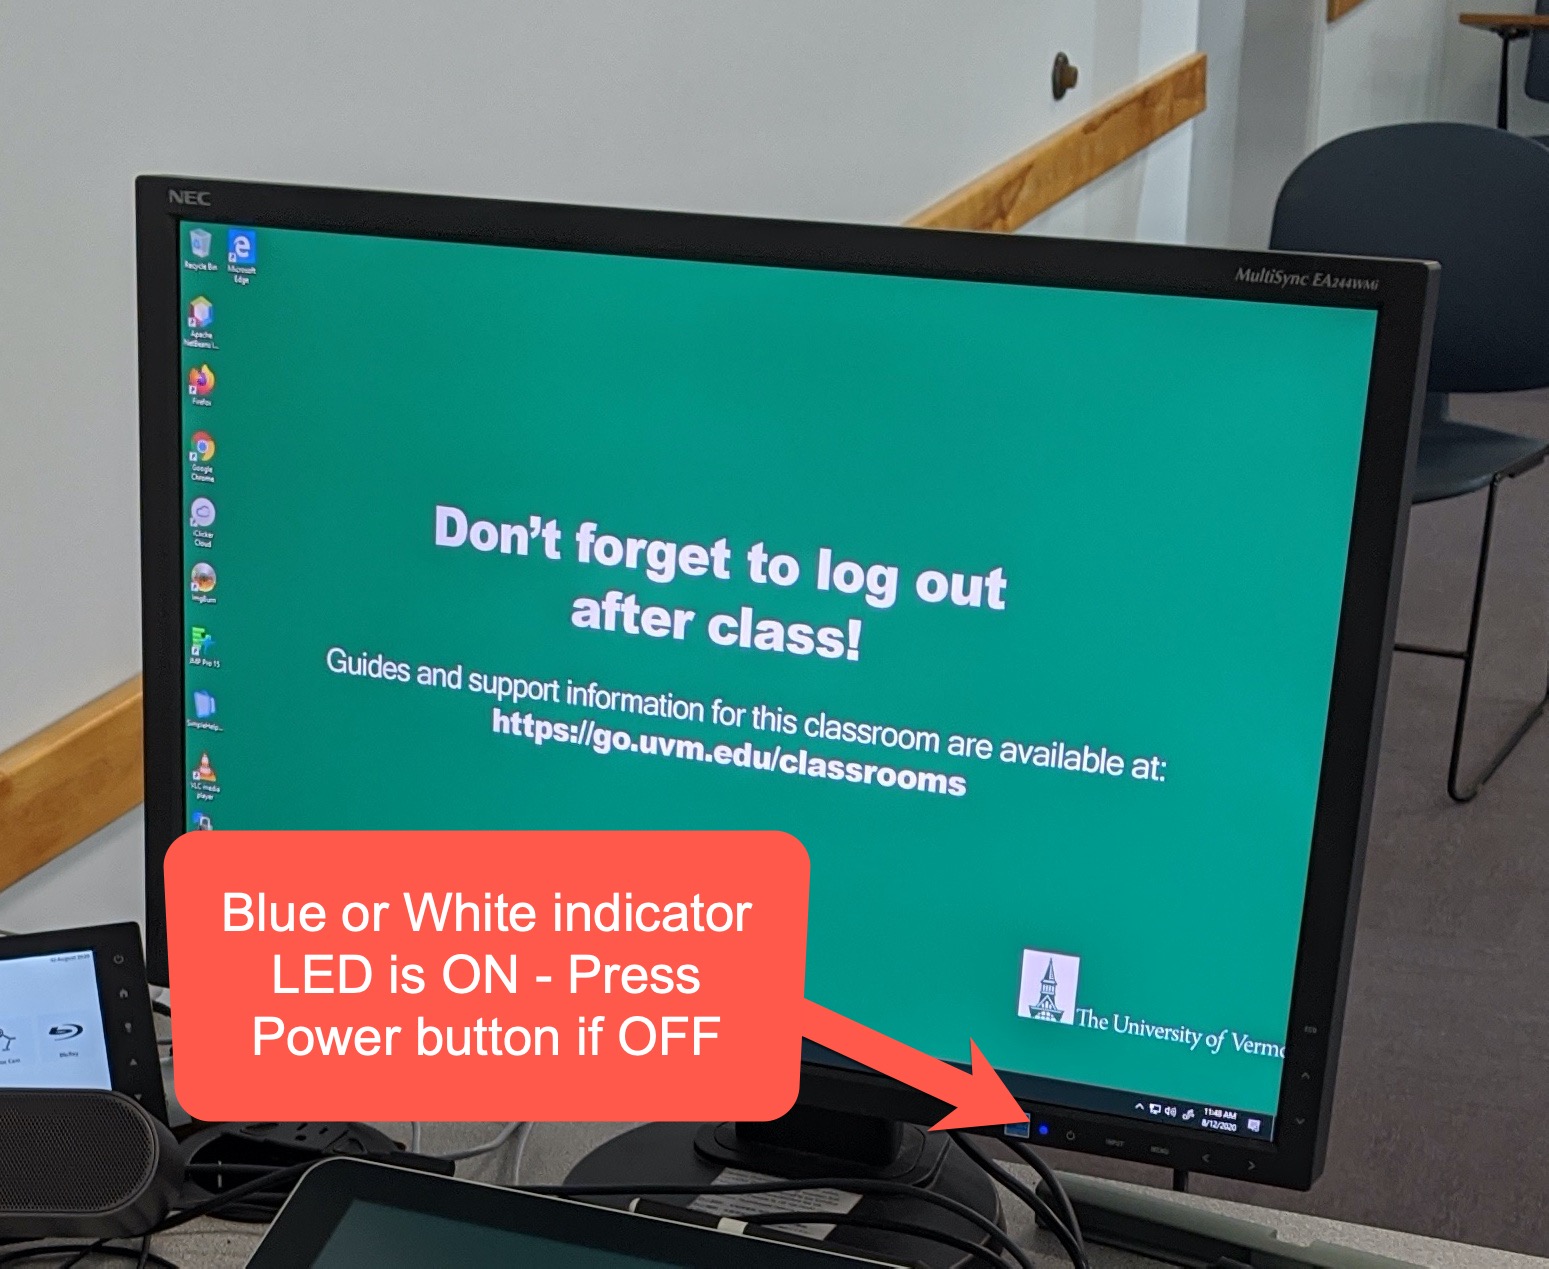
- Check that the computer is powered on in the rack. You'll see a power indicator light if it is ON. If you don't see a light, press the Power button
- If you're still not seeing an image on the Desktop monitors, check to make sure that the Monitors have been powered on as well.
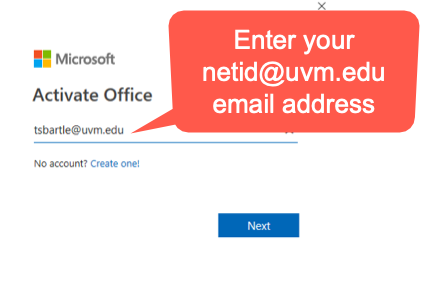
Office apps (PowerPoint, Word, Excel, Onenote) ask me to Login
Office application should activate automatically after signing into Microsoft Teams. However, if you're receiving a prompt to "Sign In" when opening other Office applications you can do the following:
- Click the Sign In button.
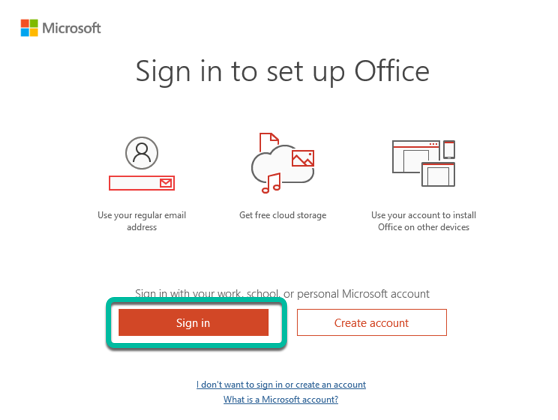
- Enter your netid@uvm.edu email address.
- If prompted, select Work or School account.
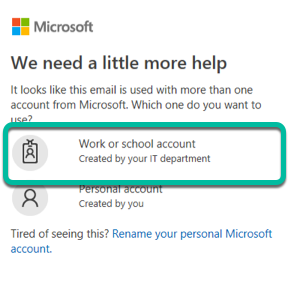
- If prompted, select Work or School account.
- You'll be brought to a familar UVM single-sign-on page, enter your NetID and password to login.

- Keep the defaults, click OK.
- Click the Done button.
Your office application should open and activate!
Wacom Pen Calibration
If you're experiencing an issue with the Pen on the Wacom display not lining up with the cursor properly, you will need to recalibrate the screen.
- Search for the Wacom Tablet Properties app using the Windows search bar.
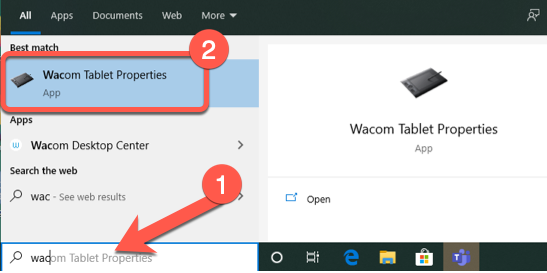
- Select the Calibrate tab (1). From the dropdown menu, make sure the Wacom One monitor is selected (2). Then click the Calibrate button (3).

- Touch the pen to the + that appear on the screen.

- When you're finished, click the OK button.
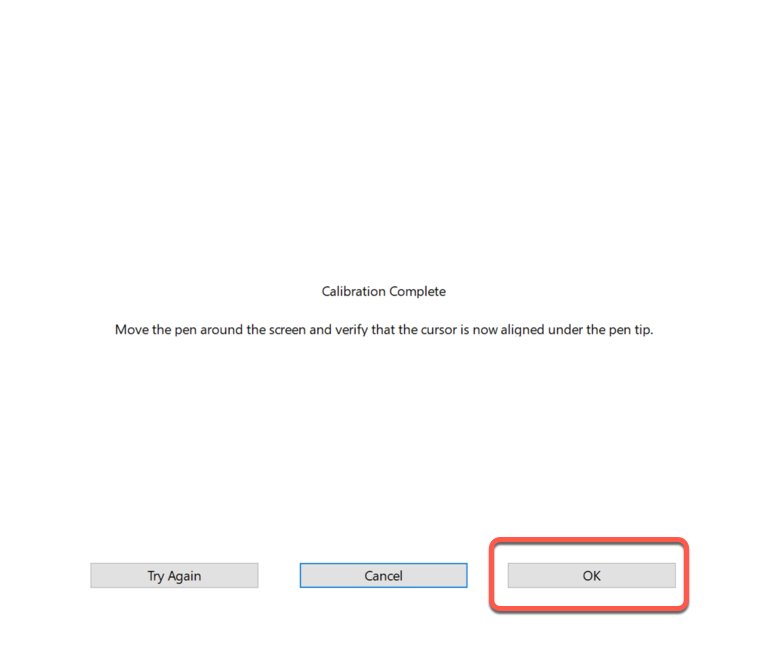
The Wacom display is now calibrated and should allow you to write accurately with the pen.
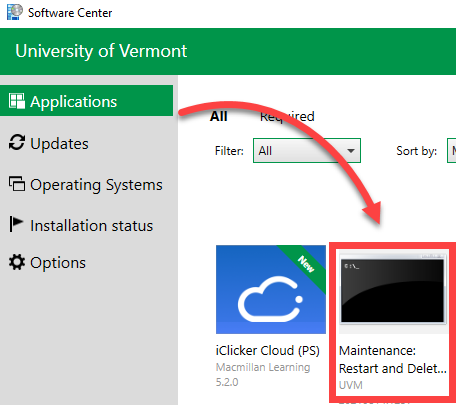
Resetting the Windows User Profile (80090030)
In some cases, it may be necessary to completely reset your User Profile on the Presenter Computer.
This process clears out any files and folders that are stored locally on this computer - please consider using Microsoft OneDrive, MyDocs, or some other approved cloud or network storage solution when using classroom computers.
- Open Software Center
- In the Applications section, open the Maintenance: Restart and Delete Profile
- Click Install
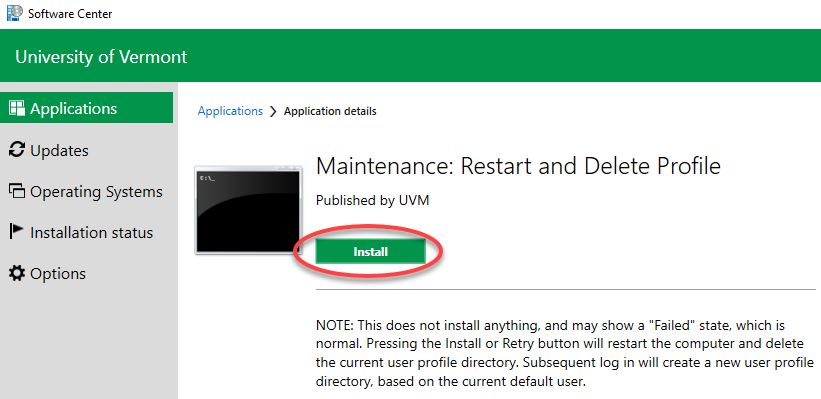
- When prompted to restart the computer and reset the user profile, click Yes
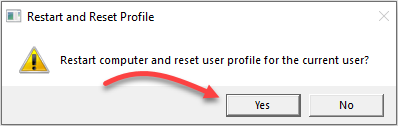
After the computer restarts, you can log back in, as described in the Get Started section above.
Teams quits shortly after launching
If you experience issues with Microsoft Teams on a classroom computer, such as automatically quitting after launch, issues with recognizing or signing out of your account, or other major issues, you may need to run the UVM Program to fully reset the local installation and configuration files for Microsoft Teams.
- Open Windows Explorer and go to C:\local\
- Double-click teamsfix.exe to reset your local Teams files.
- Microsoft Teams will relaunch automatically after a few minutes and sign you in with your UVM NetID and password
If you are still experiencing issues with Microsoft Teams, please try restarting the computer. Contact the UVM Tech Team for assistance with further issues.
Teams - Microphone not working
If your microphone doesn't seem to be working, please ensure that the correct device has been is selected as the active microphone. See step 4 in the Get Started section.
- Click the three dots in the upper right corner of the meeting window, then select Device settings.
- From the Device settings sidebar, click the dropdown in the Microphone section, and ensure the proper microphone is selected.
If you do not see the any available microphones, please restart the computer. If you still do not see a microphone, contact the UVM Tech Team for further assistance.
Teams - No audio output
If you are unable to hear other people in your Teams meeting, please ensure that the proper device is selected as the active speaker. See step 4 in the Get Started section.
- Click the three dots in the upper right corner of the meeting window, then select Device settings.
- From the Device settings sidebar, click the dropdown in the Speaker section, and ensure the correct speaker is selected.
If you do not see any available speakers, please restart the computer. If you still do not see any speakers, call the UVM Tech Team for further assistance.
Teams - Webcam not displaying
If you are trying to join a meeting, but do not see any video output, please ensure that the proper device is selected as the active webcam. See step 4 in the Get Started section.
- Click the gear icon at the bottom center of the image, expanding the Device settings sidebar.
- Click the dropdown in the Camera section, and ensure the proper device is selected is selected.
If you do not see any available cameras, please restart the computer and try again.