PDF Accessibility Requirements
At UVM, all .pdf documents must be fully accessible. Each .pdf must meet the WCAG2ICT guidelines for accessibility. To meet those guidelines, .pdfs must have:
- Tags
- Headings
- Logical reading order
- Document title showing in the title bar (instead of the file name)
- Adequate color contrast (as defined by WCAG 2.1 AA)
- Any tables must have either header rows or columns
- Any lists must be well-constructed
- Bookmarks if the document is seven pages or longer
- Meaningful alternate text for all images, and non-meaningful images marked as "decorative"
- Security settings set to "No Security".
- Metadata and document properties, including "Title" and "Author", and "Language" set appropriately
- Forms, if included, must be fully accessible.
The PDF Pipeline
Here's how to navigate The PDF Pipeline:
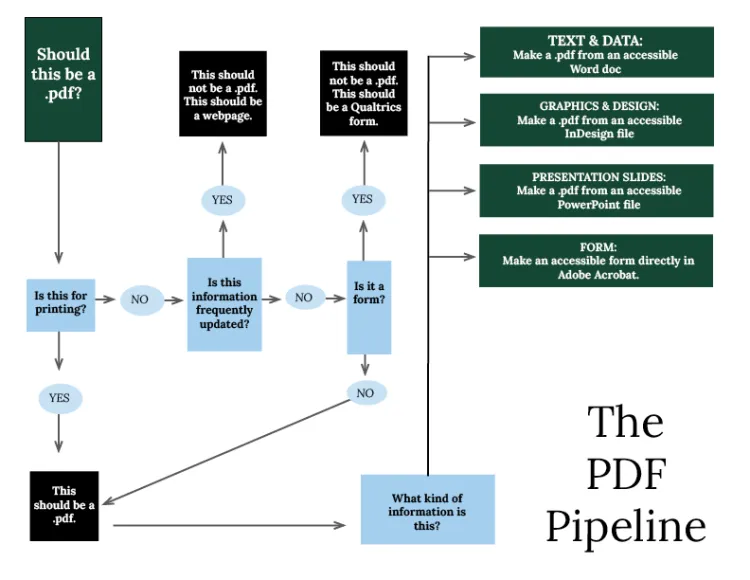
The PDF Pipeline asks creators to consider the end function of the information they wish to share, and to work backwards through a logic tree from there.
Specifically:
- Is this information primarily for printing?
- If yes, then this should be a .pdf.
- If no, then:
- Is this information frequently updated?
- If yes, then this information should be a webpage.
- If no, then:
- Is this information a form that gets filled out?
- If yes, then this information should be a Qualtrics form.
- If no, then this information should be a .pdf.
- What kind of information is it?
- If it’s text and/or data, make your .pdf from an accessible Word document.
- If it’s fancy graphics and design, make your .pdf from an accessible InDesign document.
- If it’s presentation slides, make your .pdf from an accessible PowerPoint document.
- If it’s a form (again, primarily for printing), make an accessible form natively inside an Adobe Acrobat document.
- What kind of information is it?
- Is this information a form that gets filled out?
- Is this information frequently updated?
Creating Accessible PDFs
The easiest way to create an accessible .pdf document is to focus on the software used to create the .pdf. Most .pdfs are created from either Microsoft Word, Microsoft PowerPoint, or Adobe InDesign.
Here's how to create accessible .pdfs from each type of software.
The PDF Pipeline in Action
Do you really need a .pdf?
.Pdfs are convenient ways to share documents across different platforms and software packages, but they take time to make accessible, and they take extra effort to update.
Before you make a .pdf, decide whether your content would be best served by being a .pdf, or whether it makes more sense as a webpage. Most people with disabilities have their web browsers set up to serve them up content in the way that most makes sense for their disability or disabilities. Web browsers are more flexible than other types of software.
In general, the Office of Accessibility Services recommends that .pdfs only be used for information that has reached a final form, and is unlikely to need updating. Information that is likely to change, or receives frequent updates, should more likely be a webpage or website. If possible, design for the web first, and .pdfs second.
| Type of Information | Recommended Format |
|---|---|
| Annual Report | HTML (and .pdf as necessary) |
| Instructions for a process | HTML |
| Facts and figures | HTML |
| Maps | HTML |
Accessible .PDFs from Microsoft Word
Follow these steps to create accessible content, then an accessible Word document, and finally an accessible .pdf.
Creating Accessible Word Content
As you enter content into a Word document, make sure that your content is accessible. This includes:
- Adding a title. Your title should use the Heading 1 style from Word's Styles pane. It should be the only Heading 1 in the document.
- Adding nested headings. Separate sections of text in your document should each start with a heading. Divide up your content into large sections, and start those with headings that have the Heading 2 style from Word's Styles pane. Divide large sections into smaller bits, and start those smaller bits with headings that have the Heading 3 style from Word's Styles pane. If you have multiple parts to a Heading 3 bit, use Heading 4 to start each of those parts.
- Adding alternate-text to meaningful images, and marking decorative images as decorative. A meaningful image is one that illustrates a point you're making in the text. A decorative image is one that's simply in the document for decoration. Alternate text should be 1-3 short, active sentences that focus on the main action in the image.
- Check that colors have adequate contrast. WCAG 2.1 AA-level requires that foreground and background colors have enough contrast that most people can make out the difference. For text that's 12-14 points, that's a 4.5:1 contrast. For text larger than 14 points and any graphics, it's a 3:1 contrast. But how do you measure? Use the WAVE WebAim Color Contrast tool.
- Show your links some love: make sure links are long enough, and accurately describe their destinations. Links should be 2-4 words in length, and should show their destination. For example, if you're linking to a registration page, instead of "click here", use "register online". If you're linking to anything other than a web page, such as a .pdf, video, audio, or another Word document, identify the destination in parentheses. For example, if you link to a video about creating great links, instead of using "go here for more information" as your link, use "Watch this video on creating accessible links", or "James Jacobs has more information on how to create accessible links (video)."
- Make sure your tables are data-only, and that they have a header row or column. Tables should showcase organized data, and not be used for decoration. For each table, choose a header row or column. To do this, go to the Table Design ribbon in Word, and at the top left, check the checkbox that best describes how your table is organized: Header row or First Column. You can check both boxes if that best describes your table.
Creating an Accessible Word Document
After you've made your content accessible, make sure your document is accessible.
First, run the Accessibility Checker on the document. Go to the Review ribbon, and choose "Check Accessibility".
Next, follow the directions on the Accessibility Checker. These may include notifications like "Missing Alt-Text", "No headings in document", or "Missing table header". While you might have gone through your content using the checklist above, having the Accessibility Checker also go through it is key to creating a fully accessible document.
Then, update your Document Properties. Go to File > Properties. Then choose the Summary tab from the resulting pop-up box. Fill out the Title field with the document's title. Fill out the Author field with your UVM department or unit name. And fill out the Manager field with your own name. Then hit "OK".
Finally, choose a language. Go to Tools > Language. From the pop-up box, choose the language you've written the document in, make sure it's highlighted, and hit "OK". This will tell a screen reader which set of language rules to use when navigating the document.
Creating an Accessible .pdf from Word
- After you've made both your content and your document accessible, create an accessible .pdf.
- Save the document with all your content and document changes. Then choose File > Save As...
- From the pop-up box, choose .pdf. Then choose "Best for electronic distribution and accessibility". Hit "Save".
- All the effort you put into making the content and the document accessible will give you the most accessible .pdf version of your work.
Doublechecking .pdf Accessibility
To check the accessibility of your .pdf, you need to examine the .pdf using either Adobe Acrobat Pro or the PDF Accessibility Checker (PAC). Acrobat Pro requires a paid subscription. It is also available for UVM staff, faculty, and students in the Center for Multimedia Development, in the Howe Library. The PDF Accessibility Checker (PAC) is free, but only available for Windows machines.
In Adobe Acrobat Pro
To doublecheck the accessibility of your .pdf, open it in Adobe Acrobat Pro. From the lefthand tools menu, choose "Prepare for accessibility" and then choose "Check accessibility". Accept the settings shown in the pop-up menu; hit "Start Checking".
Adobe will create an automated accessibility report that will open up on the righthand side of your screen. Your .pdf should pass all tests except for two: Color Contrast, and Reading Order. These are both tests you must do manually. If any other items come up in the Adobe accessibility check, right-click on each item, and choose "Fix" from the dropdown menu. This will open up the relevant tool for you to use to address the issue.
Accessible PDFs from Microsoft PowerPoint
Follow these steps to create accessible content, then an accessible PowerPoint document, and finally an accessible .pdf.
Creating Accessible PowerPoint Content
As you enter content into a PowerPoint document, make sure that your content is accessible. This includes:
- Adding a title. The first slide, your title slide, should have a Heading 1 title. It should be the only Heading 1 in the document. Other text on that slide should be either "Normal" or "Heading 2". This is called "nesting your headings".
- Adding nested headings. Each slide should have its own title. And every slide after the title slide should be in Heading 2 style. If you need to divide your content up into sections, the title of your section should be in Heading 2. Slides within that section should be titled in Heading 3. Say for example that you are creating a presentation on fermented foods. After your title slide, with "All About Fermented Foods" in Heading 1, you might have sections on both pickles and sauerkraut. To start the pickle section, you might have a slide titled "Information About Pickles" in Heading 2, and then slides called "Sweet Pickles", "Sour Pickles" and "Relish" whose titles are in Heading 3. Sweet pickles, sour pickles, and relish are all types of pickles, and pickles are a fermented food. Nesting the headings makes this relationship clearer, and is especially useful for people navigating with keyboards only, people using screen readers, and people skimming the content.
- Adding alternate-text to meaningful images, and marking decorative images as decorative. A meaningful image is one that illustrates a point you're making in the presentation. A decorative image is one that's simply in the presentation for decoration. Alternate text should be 1-3 short, active sentences that focus on the main action in each image.
- Check that colors have adequate contrast. WCAG 2.1 AA-level requires that foreground and background colors have enough contrast that most people can make out the difference. For text that's 12-14 points, that's a 4.5:1 contrast. For text larger than 14 points and any graphics, it's a 3:1 contrast. But how do you measure? Use the WAVE WebAim Color Contrast tool.
- Show your links some love: make sure links are long enough, and accurately describe their destinations. Links should be 2-4 words in length, and should show their destination. For example, if you're linking to a registration page, instead of "click here", use "register online". And if you're linking to anything other than a web page, such as a .pdf, video, audio, Word document or another PowerPoint file, identify the destination in parentheses. For example, if you link to a video about creating great links, instead of using "go here for more information" as your link, use "Watch this video on creating accessible links", or "James Jacobs has more information on how to create accessible links (video)."
- Make sure your tables are data-only, and that they have a header row or column. Tables should showcase organized data, and not be used for decoration. For each table, choose a header row or column. To do this, go to the Table Design ribbon in PowerPoint and at the top left, check the checkbox that best describes how your table is organized: Header row or First Column. You can check both boxes if that best describes your table.
Creating an Accessible PowerPoint Document
After you've made your content accessible, make sure your document is accessible.
First, run the Accessibility Checker on the document. Go to the Review ribbon, and choose "Check Accessibility".
Next, follow the directions on the Accessibility Checker. These may include notifications like "Missing Alt-Text", "Missing slide title", or "Missing table header". Click on each error message, and the Accessibility Checker will tell you how to fix the error. While you might have gone through your content using the checklist above, having the Accessibility Checker also go through it is key to creating a fully accessible document.
Then, update your Document Properties. Go to File > Properties. Then choose the Summary tab from the resulting pop-up box. Fill out the Title field with the document's title. Fill out the Author field with your UVM department or unit name. And fill out the Manager field with your own name. Then hit "OK".
Finally, choose a language. Go to Tools > Language. From the pop-up box, choose the language you've written the document in, make sure it's highlighted, and hit "OK". This will tell a screen reader which set of language rules to use when navigating the document.
Creating an Accessible .pdf from PowerPoint
- After you've made both your content and your document accessible, create an accessible .pdf.
- Save the document with all your content and document changes. Then choose File > Save As...
- From the pop-up box, choose .pdf. Then choose "Best for electronic distribution and accessibility". Hit "Save".
- All the effort you put into making the content and the document accessible will give you the most accessible .pdf version of your work.
Doublechecking .pdf Accessibility
To check the accessibility of your .pdf, you need to examine the .pdf using either Adobe Acrobat Pro or the PDF Accessibility Checker (PAC). Acrobat Pro requires a paid subscription. It is also available for UVM staff, faculty, and students in the Center for Multimedia Development, in the Howe Library. The PDF Accessibility Checker (PAC) is free, but only available for Windows machines.
In Adobe Acrobat Pro
To doublecheck the accessibility of your .pdf, open it in Adobe Acrobat Pro. From the lefthand tools menu, choose "Prepare for accessibility" and then choose "Check accessibility". Accept the settings shown in the pop-up menu; hit "Start Checking".
Adobe will create an automated accessibility report that will open up on the righthand side of your screen. Your .pdf should pass all tests except for two: Color Contrast, and Reading Order. These are both tests you must do manually. If any other items come up in the Adobe accessibility check, right-click on each item, and choose "Fix" from the dropdown menu. This will open up the relevant tool for you to use to address the issue.
Accessible PDFs from Adobe InDesign
Generating an accessible .pdf from InDesign is very different from how you work with accessibility in Word or PowerPoint. InDesign creates EPUB documents, HTML files, and .pdfs, as well as print publications.
InDesign exists for making visually complex and high-end reports and publications, much more complex documents than you make with Word or PowerPoint. And while you can remediate an inaccessible .pdf, it's far easier to set up your InDesign document for accessibility, and create accessible content as you go.
The process for streamlining accessibility in InDesign involves setting up the InDesign document for accessibility first, then creating accessible content, and finally exporting an accessible .pdf. It's unlikely that you would distribute an InDesign document itself as an online downloadable.
Set Up Your InDesign Document for Accessibility
First, create Paragraph Styles that map to Heading tags. Every Paragraph Style needs to map to an associated Heading tag for accessibility. To do this, go into Properties > Paragraph Style, and create all your Paragraph Styles before you add content. At a minimum, you will need:
- Heading 1 (maps to h1)
- Heading 2 (maps to h2)
- Heading 3 (maps to h3)
- Caption (maps to P)
- Basic Paragraph (maps to P)
If you create secondary Styles for your document, map those to the appropriate Heading. For example, if you have "Heading 2" in navy blue, and a secondary Style called "Heading 2 (Yellow)", both Styles should map to h2 in the final .pdf.
Each Style must be given an export tag manually. To do this, go to Properties > Paragraph Styles, and for each Style, open up the editing dialogue and choose "Export Tagging" (bottom link) from the pop-up box. Choose the appropriate tag for both "EPUB and HTML", and for "PDF".
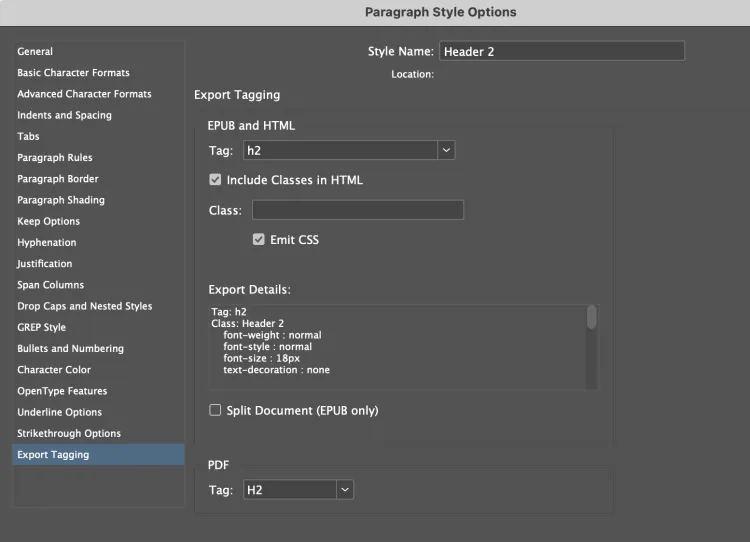
Hit OK to save each setting.
- For text in a bulleted list or a numbered list, choose "Automatic".
- For a Blockquote Style, choose "Automatic".
- For a Table of Contents, choose "Automatic".
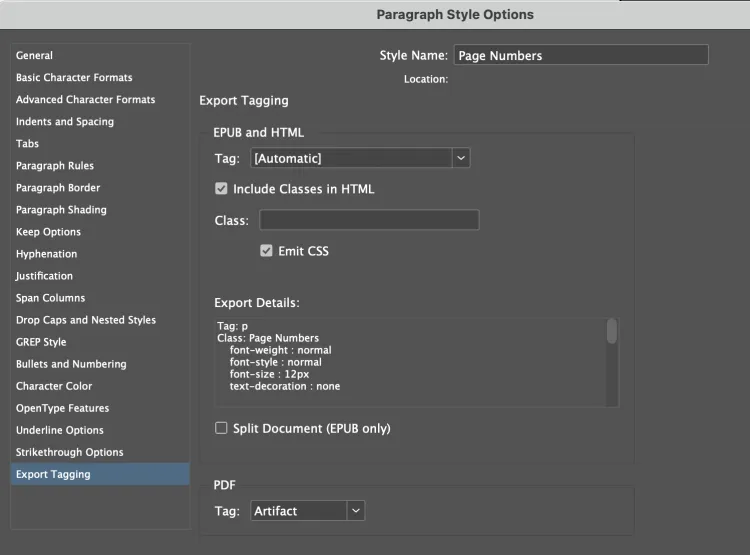
Set up Styles for non-meaningful text so that it won't transfer to the .pdf. Non-meaningful text is text that is repeated over the course of a document, such as page numbers, headers, and footers. Visually, it can be part of your design, but to someone using a screen reader, navigating with a keyboard alone, or skimming the document, it may be repetitive. Create a Style for page numbers, and one for headers and footers, and set the Export Tagging status to "Artifact".
Finally, update your file information. For accessibility, as well as for search engine optimization, a PDF file requires a document title and a description of its contents. When you save this information in the InDesign File Information dialog, it is automatically transferred to Acrobat as required metadata. To do this, go to File > File Info...
- Fill out the title field with the title of your document.
- Fill out the Author field with the name of your UVM department or unit.
- Fill out the Author Title field with your name.
Hit "OK" to save.
Creating Accessible Content in InDesign
As you enter content into the InDesign document, make sure that your content is accessible. Everything that is entered into a Page or spread must be tagged in some way before exporting.
Add a title. The first page, your title page, should have a Heading 1 title. It should be the only Heading 1 in the document. Other text on that slide should be either "Normal" or "Heading 2". This is called "nesting your headings".
Add nested headings as you go. Each page should have its own title. And every page after the title page should have a Heading 2 title. If you need to divide a page up into sections, the title of each section should be in Heading 3. If you need to subdivide a section, use headings in Heading 4. Every heading except the title should have one heading above it somewhere. All other text should be given either a caption Style, or the Basic Paragraph Style. (Tables are, like in so many other cases, the exception).
Add alternate-text to meaningful images, and mark decorative images as decorative. A meaningful image is one that illustrates a point you're making in the publication. A decorative image is one that's simply in the publication for decoration.
| Image Type | Meaningful or decorative? |
|---|---|
| Page background | Decorative |
| Page divider or horizontal rule | Decorative |
| Chart, graph, or map | Meaningful |
| Photo | Meaningful |
| Decorative shapes or blocks of color | Decorative |
Alternate text should be 1-3 short, active sentences that focus on the main action in each image.
For each image you add to a page, you must add alt-text or mark it decorative. To do this, highlight the image box (not the placed image), and choose Object > Object Export Options...
You'll get a pop-up box that has three tabs: Alt-Text, Tagged PDF, and EPUB and HTML. If you're creating a .pdf, ignore the EPUB and HTML tab.
- If an image is decorative: on the Alt-Text tab, choose "decorative" from the dropdown menu. Then go to the Tagged PDF tab, and choose "Apply Tag to Artifact".
- If an image is meaningful: on the Alt-Text tab, choose "Custom" from the dropdown menu. Write your alt-text in the large blank box directly under the dropdown menu.
(You can also set up an Object Style for Text Objects, one for Meaningful Image Objects, and one for Decorative Objects as part of creating an accessible document.)
Thread text boxes as you go. Wherever possible, use InDesigns threading function to connect different boxes of text together, rather than starting a new standalone text box for each chunk of text. This will help InDesign specify a correct reading order in the final .pdf.
Check that colors have adequate contrast. WCAG 2.1 AA-level requires that foreground and background colors have enough contrast that most people can make out the difference. For text that's 12-14 points, that's a 4.5:1 contrast. For text larger than 14 points and any graphics, it's a 3:1 contrast. But how do you measure? Use the WAVE WebAim Color Contrast tool.
Show your links some love: make sure links are long enough, and accurately describe their destinations. Links should be 2-4 words in length, and should show their destination. For example, if you're linking to a registration page, instead of "click here", use "register online". And if you're linking to anything other than a web page, such as a .pdf, video, audio, Word document or another PowerPoint file, identify the destination in parentheses. For example, if you link to a video about creating great links, instead of using "go here for more information" as your link, use "Watch this video on creating accessible links", or "James Jacobs has more information on how to create accessible links (video)."
Make sure your tables are data-only, and that they have a header row or column. Tables should showcase organized data, and not be used for decoration. For each table, choose a header row or column. To do this, go to the Table Design ribbon in PowerPoint and at the top left, check the checkbox that best describes how your table is organized: Header row or First Column. You can check both boxes if that best describes your table.
Set your reading order in the Articles panel: After laying out all your content in the document but before you export the content to a .pdf, use the Articles panel to set your reading order. Go to Window > Articles, open the Articles options menu (in the upper right corner of the panel), and check "Use for Tagging Order in Tagged PDF". Pick the Selection tool, hold the Shift key down, click content items -- both text boxes and meaningful image objects -- and drag and drop the items into the Articles Panel. Check the order in the Articles Panel and rearrange if necessary by dragging. Then choose the Options button (the small three stacked bars button to the top-right) and check the "Use For Reading Order In Tagged PDF" option.
Each Article corresponds to one Page. Every item on a page that needs to be present and tagged in the finished .pdf needs to be dragged into the same Article.
Figure 1: Page to Article Mapping in InDesign
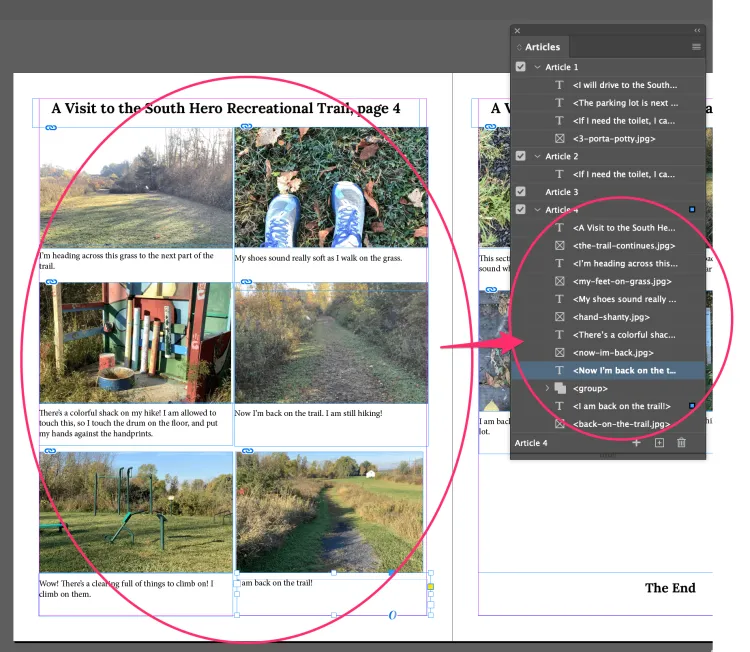
In Figure 1, each of the pieces of content on page 4 of the InDesign file -- both text boxes and images -- are represented in Article 4 of the Articles window. For each piece, there's an indication of whether it's text (marked with a capital T) or an image box (marked with InDesign's default box symbol). One piece consists of an image plus text that's been grouped together. The order that the objects appear in the Article window, reading top to bottom, is the reading order for the .pdf.
Creating an Accessible .pdf from InDesign
After you've made both your content and your document accessible, create an accessible .pdf.
- Save the document with all your content and document changes. Then choose File > Export.
- Choose a name for the file and a destination. Set the Format to Adobe PDF Interactive
- Click Save. This will open the Export to Interactive PDF pop-up box.
- Go through the options in the lefthand menu of the pop-up box.
- Under General, Export as Pages (not Spreads); Layout should be "Single Page Continuous"; under Options, check the boxes for "Embed Page Thumbnails", "Create Tagged PDF", and "Use Structure for Tab Order".
- Under Compression, choose "JPEG 200 (Lossless), and set the DPI to 100.
- Under Advanced, set Display Title to "Document Title", and Language to the language the document is written in.
- Under Security, make sure a password is not being used to restrict editing and printing. Having this setting checked prevents assistive technology from accessing the document.
- Click Export to create the accessible PDF.
Doublechecking .pdf Accessibility
To check the accessibility of your .pdf, you need to examine the .pdf using either Adobe Acrobat Pro or the PDF Accessibility Checker (PAC). Acrobat Pro requires a paid subscription. It is also available for UVM staff, faculty, and students in the Center for Multimedia Development, in the Howe Library. The PDF Accessibility Checker (PAC) is free, but only available for Windows machines.
In Adobe Acrobat Pro
To doublecheck the accessibility of your .pdf, open it in Adobe Acrobat Pro. From the lefthand tools menu, choose "Prepare for accessibility" and then choose "Check accessibility". Accept the settings shown in the pop-up menu; hit "Start Checking".
Adobe will create an automated accessibility report that will open up on the righthand side of your screen. Your .pdf should pass all tests except for two: Color Contrast, and Reading Order. These are both tests you must do manually. If any other items come up in the Adobe accessibility check, right-click on each item, and choose "Fix" from the dropdown menu. This will open up the relevant tool for you to use to address the issue.
PDF Remediation (Making Your PDFs Accessible)
Making .pdfs accessible can be easy with simple documents, especially if you're starting with a Word document, or a set of PowerPoint slides. But .pdfs that you create with InDesign take much more time to make accessible, so you need to budget that time into your workflow. Additionally, .pdfs that other organizations or collaborators may send you may not be accessible.
The process of making a .pdf accessible is called "remediation". If your department winds up with an inaccessible .pdf, you have two options for remediation:
- Remediate the .pdf yourself. You will need access to either the file where the the .pdf was originally created, or Adobe Acrobat Pro, or ideally, both.
- Have the Office of Accessibility Services remediate the .pdf for you.
Get in touch about .pdf remediation via our online contact form.
Upcoming Workshops & Classes on Accessible .pdfs

More about .pdf accessibility
Looking for more information on how to make your .pdfs accessible? Let OAS help.
Read about the official WCAG2ICT standard (WCAG website) Get your .pdf questions answered in the UVM Accessibility MS Team Start a .pdf remediation request via the OAS online form Take a self-paced online course in .pdf accessibility (free for UVM staff, faculty, and students)