Figure 6-40 identified the four controls on the header of the Sector Frame: the Transparent/Opaque Toggle, the Selector, the Navigation Arrow, and the Lock. The operation of each is described below:
Transparent/Opaque Toggle: This switch is the left-most of the
controls on the Sector Frame. When you toggle from transparent (the position
shown in Figure 6-40) to opaque, an opaque fill will cover whatever lies within
the confines of the Sector Frame. If you have imported a picture or assigned a
QuickTime movie to the Sector Frame, it will be displayed when you make the
sector opaque (in the case of a movie, only a single preview frame will be
displayed). Click the switch when the Sector Frame is opaque, and it once again
will become transparent.
Notes: When you toggle the Sector Frame to the opaque state, the Selector disappears (you would not be able to see any entities within the sector, even if they were selected), and the lock automatically locks and grays. This ensures that any entities that are within the Sector Frame remain there if you resize or move the Frame while it is opaque.
Selector: The second control is the Selector. Click the button to
select all building blocks that the software recognizes as part of the Sector.
Figure 6-41 illustrates the use of the Selector.
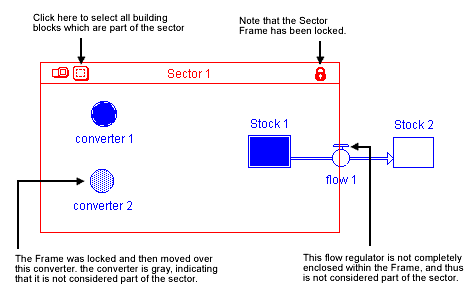
It's important to know which building blocks are recognized as part of a particular Sector. Whenever you set up your model to "Run Selected Sectors" (see Chapter 3's Run menu discussion for details), only those building blocks which are part of the selected Sectors will be run. All others will be held constant at their initial values. As Figure 6-41 indicates, there are two cases in which a building block that appears to be in the Sector will not actually be part of the Sector. First, if the Stock, Converter, or circle portion of the Flow is not completely enclosed within the Frame, the building block will not be considered part of the Sector. Second, if a locked Sector has been moved over a building block, that building block will not be considered part of the Sector. To remedy the first situation, move the building block into the Sector. To remedy the second situation, you either can move the building block out of the Sector, and then back in again, or, unlock and re-lock the Sector.
|
Figure 6-41 |
Navigation Arrow: The third control on the Sector Frame's header is the Navigation Arrow. This control is available to you if the "Link High-Level Map to Model option" is checked within the Interface Prefs... or Default Settings dialogs (see Chapter 3). A click on the Navigation Arrow will take you from the Map/Model level up to the corresponding Process Frame on the Interface level.
Lock: The final control, located on the right side of the header, is
the Lock. The default position for the lock is "open." A click on the
lock closes, or locks, the lock. When a Sector Frame is locked, any building
block considered part of the Sector will retain its position relative to the
frame. If you move or copy the Frame, all building blocks within it also will
move or be copied. In addition, if you attempt to shrink a locked Sector Frame,
the software will not allow you to decrease its size to the point where any of
the building blocks contained within its boundary are "ejected." If
you encounter difficulty in attempting to shrink a Sector Frame, this
"anti-eject" feature is most likely the cause.
Sector Frames are automatically locked - and their locks become gray - whenever they become opaque, or whenever you open a sub-model space. If you subsequently close all sub-model spaces or make the Sectors transparent, the Frames will remain locked. Simply click on their locks to unlock them.
Creating, Naming, Moving & Resizing Sectors