Figure 6-40
Sector Frame Components & Controls
The Sector Frame enables you to create sectors. A sector is a grouping of functionally-related elements in a model. For example, in a model of a business organization, you might use a sector to represent each of the major processes under consideration. You might have a manufacturing sector, a marketing sector, a human resources sector, and a financial sector in the model. In a model of a food web, each of the major trophic levels might be represented by different sectors.
Creating a Sector Frame: There are two ways to create a Sector Frame
on the Map/Model level. First, if the "Link High-Level Map to Model"
option is checked in the Interface Prefs... or Default Settings... dialog (see
Chapter 3 for details), a Sector Frame will be created automatically for you
whenever you deposit a Process Frame on the Interface level.
Second, you can create a Sector Frame manually on the Map/Model level. Simply select the Sector Frame object from the Tool Bar. As you move the cursor onto the diagram, it will change to a Sector Frame icon. Click once to deposit the Frame in the desired location. If the "Link High-Level Map to Model" option is checked in the Interface Prefs... or Default Settings... dialog (see Chapter 3 for details), you'll also get a Process Frame on the Interface level.
Note: The Sector Frame object can not be placed within a sub-model or Space Compression Object and is unavailable to you whenever one or more sub-model spaces are open on the Map/Model level. To obtain the Sector Frame cursor, you must first choose Close Sub-models from the Interface menu.
Helpful Hint: If you attempt to deposit a Sector Frame such that it will overlap another Sector Frame, the software will alert you that there is not enough room to place the Sector at the location you have chosen. When you get this alert, you can move or resize other sector frames to gain some room. Or, you can deposit the Frame in a different location.
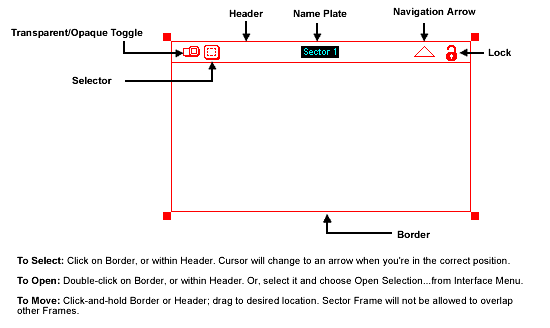
Deposit a Sector Frame, and you get what's shown in Figure 6-40. The features of the Sector Frame have been identified in the Figure.
|
Figure 6-40 |
|
|
Naming a Sector Frame: Whenever a Sector Frame is selected in
isolation, its name plate will become highlighted. You can replace the
highlighted name by typing. Or, you can move the cursor over a highlighted name.
When the cursor changes to an I-beam, click to deposit it. Then, edit as you
would with a text processor. You also can edit the Sector name from within its
dialog, as indicated in Figure 6-42.
Note: Whenever you edit the name of a Sector Frame, the results of your editing will be reflected in the name of the corresponding Process Frame on the Interface level if "Link High-Level Map to Model" is selected.
Moving: To re-position a Sector, click-and-hold, either in a blank
space within the header or on the border, and drag to the desired position. In
moving the Sector, the software will not allow you to overlap other model
Sectors.
Resizing: To resize the Sector, first select it. Then drag on one of
the four resizing handles, to make the Sector larger or smaller as required. As
you resize the Sector, the software will prevent you from overlapping the
boundaries of other Sectors.