
Creating a Webform
Directly under the “My Workbench” button, you’ll see the “Add content” button. Select "Webform".

You will give the page a name and, in the body section, add any text (or other content) that you'd like to appear prior to the actual form fields. Also be sure to select the group it belongs to. Save your page.
Adding Fields to a Webform
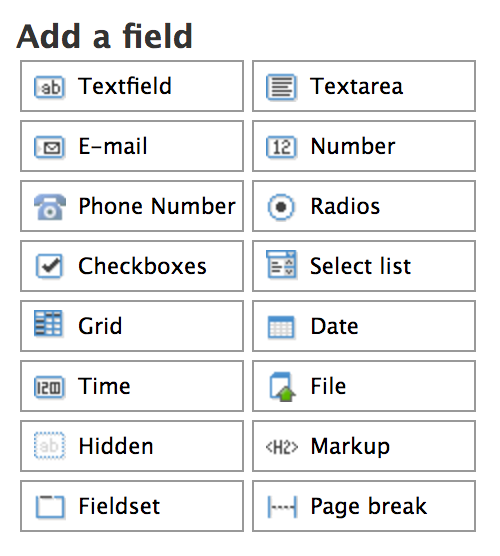
After saving the page, you will have the opportunity to add fields to your form. Note, that fields are accessed from the "WEBFORM" tab that appears on the top right under the menu bar.
Drag the fields that you'd like to add to your form from the right to the left preview area. To configure each field, hover over the field and click on the pencil icon. The title for the field is required, it will be the field's label and is required for accessibility. The optional description will appear under the field and should be used to provide specific visitor instructions. You can also provide a default value, although it is usually better to use a "placeholder" which has no impact on submissions and can be found under the "display" tab along with some other additional formatting options. You can also make a field required by selecting the appropriate box under the validation tab.
Configuration options vary greatly according to field type. Carefully look over the options for each field when building your form.
To delete a field, click on the X in the upper righthand corner of the field box and confirm deletion. (Fields cannot be deleted once results for the field have been submitted.)
You can group multiple fields together using the "Fieldset" field option. You can also easily reorder fields by dragging the field around in the preview area.
Receiving E-mail Confirmation for Form Responses
When a visitor to your form subits a response, it is recorded in Drupal and responses can be accessed by group administrators via the submissions tab. It is also possible to forward the response via email to one of more email addresses. Select the "E-mails" tab on the top right of the screen and click "add".
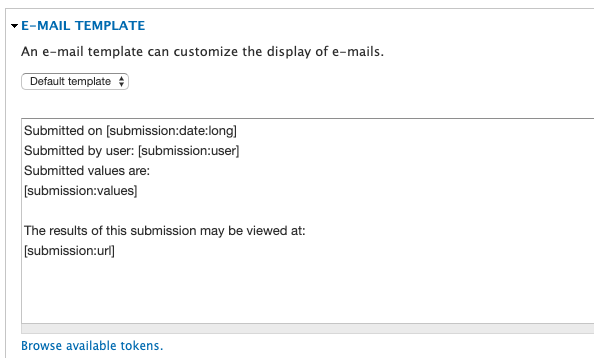
 The next screen offers the possibility to customize the appearance and contents of the email. For most, the default values will be more than adequate.
If you have required that those completing your form provide an e-mail address, it is possible to also send a confirmation e-mail to this address. Use the "Component value:" option and select the e-mail field to which the e-mail will be sent. This message can also be customized independently from the e-mail sent to others receiving results of form submissions.
Updating Form Email
This information is helpful for people wishing to format email results, and to be able to choose which results appear in emails.
The key to customizing your webform email is knowing that the fields in brackets are tokens and [submission:values] is the token that puts most of your fields and values into the email. You can customize the email using tokens; use the pattern [submission:values:fieldset1:form-field]. "fieldset1" is not necessary if the field is not within a fieldset, however, if the field is within a fieldset (or nested fieldsets) then the fieldsets must be listed in order before the field form key. For example: [submission:values:your-name] would output the value of a field called your-name. When using this method you need to provide your own label like:
Your Name: [submission:values:your-name]
You can get the field name from the Form Components tab:
Using field-by-field display can be used to break up the display created by the [submission:values] token used in the default email template. Please *note*, however, that this may be a tedious process on long and complex forms.
Providing Confirmation Messages and Restricting Form Access
Two important things to consider when creating a form is restricting who can complete a form and the response upon form completion. Each of the items are configured under the "form settings" tab of your form page. Here, it is also possible to restrict how many times a user can complete a form or allow an authenticated user (see password protection below) to save uncompleted forms to be finished and submittted at a later time.
Confirmation Messages
Providing immediate feedback to those who complete your forms is an important aspect to web form creation.
By default, Webforms will return a simple confirmation page that provides a link back to the form and display the following messge: "Thank you, your submission has been received." It is possible to customize this message and add a more personal message to those completing your forms by completing the "Confirmation message" field in the "Submission Settings" area. This is a HTML field that can contain images, links or any generic HTML content.
Alternatively, you can create a separate confirmation page (eg. a Basic Interior 1 page) and to which you direct those who complete your forms by changing the "Redirect location" to "Custom URL:" and supplying the URL in the corresponding field.
Password Protected Forms
By default, anyone who can view your form page can make a submission. It is possible to restrict access to only those with a UVM login by unchecking the "anonymous" checkbox under "Submission Access" and leaving only the "authenicated user" box checked.
Viewing Webform Submission Results

Results for submitted forms can be reviewed under the "RESULTS" tab on your form. You can delete specific or all results, view all results in a table, or download your results for use in another application, sich as Microsoft Excel. The "Analysis" offers some basic statitics on submitted results.
Conditional Form Fields
Conditionals allow you to show or hide form fields or entire sections based on the answer a person chooses for another field on the form. It is a great way to keep forms short and user-friendly, ensuring you capture the information you need.
Creating conditional fields in forms is easy. First, create all the fields that you will need in your form, including those that will be triggered by other fields. (If you want several fields to be triggered by another field, group those fields together using the "fieldset" option.) Triggering fields are usually radios, a select list, or checkboxes.
Example 1: Collect specific information based on responses to previous questions.
Example 2: Provide an option using conditionals for users to provide contact information.
Uploading Files in a Webform
If you need to collect files from a person completing a webform, you can add an html markup field, then add the following html which will allow you to send them to the UVM File Transfer system. Be sure to add the email you'd like the file transfer sent to.
<p><strong>If you have planning documents you would like to share, please upload here. </strong></p>
<p>To upload your file: </p>
<ol>
<li>visit <a href="https://filetransfer.uvm.edu" target="_blank">UVM’s file transfer (opens in a new window)</a></li>
<li>select whether or not you’re a UVM affiliate</li>
<li>select “Share Files”</li>
<li>complete fields with your info and recipient (sample@uvm.edu)</li>
</ol>