iClickers
A Guide to Using them at UVM
(version 7.x)
On this page:
Is your classroom is equipped with a base station?
Download/update software and set it up
Integrate iClicker with Blackboard
How students buy iClickers
How students register their iClickers
Loan an iClicker
iClicker Reef: mobile app
Run polls in class
Get help
Troubleshooting
iClicker documentation
What are iClickers? How are they used?
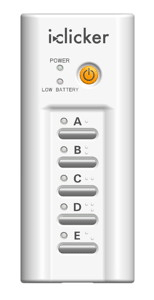
The iClicker is one brand in a classification of tools referred to as “classroom response systems.” Essentially, the iClicker is an electronic polling technology that allows students to give instant feedback or answers to questions during class (by choosing A, B, C, D, or E on a handheld remote device).
When a button is pushed, a signal is sent to a receiving base station that is connected to a computer. Faculty can opt to display students’ collective responses to the class.
Some of the ways they’re used at UVM are to:
- take attendance
- review/check understanding of material
- facilitate think-pair-share activities
- spark discussion
- dismantle common misconceptions
- practice multiple choice questions
- get anonymous feedback on sensitive topics
- administer multiple choice quizzes
Is your classroom is equipped with a base station?
| Aiken: 102, 110, 112 Bailey Howe Library: 123 Billings: 101 CCT Delehanty Hall: 219 Dewey: 212 314 Fleming: 101* Given: E131 Harris: 115 Hills Agricultural Science: 017, 122, 226, 228, 234 Jeffords: 110, 112, 127 Kalkin: 001, 002, 003, 004, 007, 107, 325 Lafayette: 100, 102, 107, 108, 111, 200, 202, 207, 210, 300, 302, 307, 308, 309, 311, 400, 403, 411 Living and Learning Commons: 216, 302, 314, 315 |
Living/Learning A: A101, A161 Living/Learning B: B132 Mann Hall: 102C, 104, 211 Marsh Life Science: 105, 107, 235 March Austin Tupper: 112 Morrill: 010 Old Mill: 523 Old Mill Annex: A200, A200, A207 Perkins: 003, 101, 102, 107 Rowell: 003A, 003B, 102, 103, 110, 111, 115, 118 Royall Tyler Theatre: 210 Stafford: 101 Terrill: 108, 207, 308 Votey: 105, 205, 207, 209, 223, 254, 361 Waterman: 400, 401, 402, 403, 413, 423, 427, 455, 456, 457, 458 Williams: 301, 402 |
* Note: Due to poor wireless/cellphone reception, the Reef app for iClicker (using cellphones) doesn’t work well in the Fleming Museum 101 classroom.
Download/update software and set it up
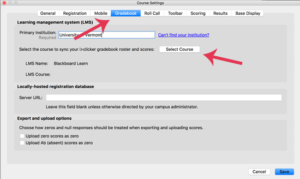
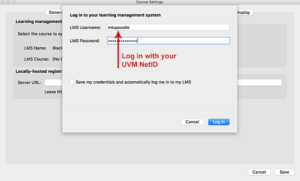
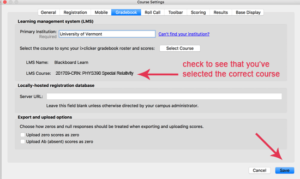
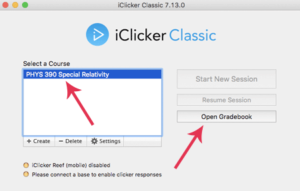
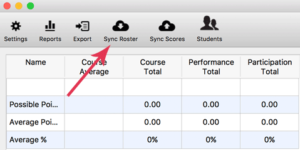
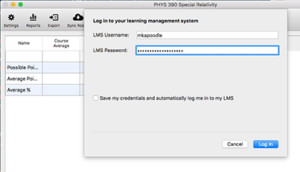
Integrate iClicker with Blackboard
This section has three parts:
How students buy iClickers
As of August 2017, the UVM Bookstore price is $46.65. Faculty need to order student iClicker remote devices for their upcoming classes at the bookstore, the same way they order textbooks.
The Amazon price is around $48.00 (Amazon sells used ones at varying lower prices.)
How students register their iClickers
For iClicker data to be collected, student have to register their devices. (We don’t recommend that they register their devices on the iClicker website.) They should register their iClickers in Blackboard because it allows the iClicker program to associate student votes with their names.

If you’re integrating iClicker scores with Blackboard, students must register their clickers on the My Blackboard page (see image). They need to log in to Blackboard to be able to register.
Loan an iClicker
Follow these directions:
- Be sure that you’re connected to a base station
- Open iClicker and click the green Start New Session button
- Click the gear icon in the iClicker tool bar
- Choose Loan Clickers
- Now, on the clicker remote, hold the on/off button until the light flashes
- Then press A A
- The ID# for that remote will show up in the instructor’s “loan clicker” window
- Then choose the student from the list and select the time period (the term or the session)
- Click Save
iClicker Reef: mobile app
iClicker has a mobile app that allows students to join clicker polls and sessions using their phones, tablets, and browsers. This tool, known as iClicker Reef, is available for download on the respective iOS/Android app stores. Students can also participate in polls in iClicker Reef-enabled sessions from within their desktop/laptop browsers. iClicker Reef is a subscription based service, requiring students to pay a recurring fee to use it. The prices on the iTunes store as of August 2017 are:
- iClicker Reef 6-Month Subscription (180 days) $14.99
- iClicker Reef 1-year subscription (365 days) $23.99
- iClicker Reef 2-Year Subscription (730 days) $32.99
- iClicker Reef 4-Year Subscription (1460 days) $47.99
The mobile apps are separate from the iClicker remote devices, which do not require a fee or subscription aside from the initial purchase at the bookstore. iClicker remote devices and the iClicker Reef can be used simultaneously by different students in the same classroom.
Allowing students to participate in sessions using mobile devices
In order for students to use a web browser or mobile device during your session, you will have to enable Reef in the iClicker software:
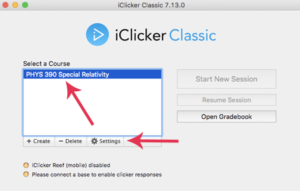
- Open your iClicker software, select the course for which you want to enable iClicker Reef and click the “Settings” button.
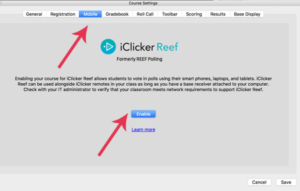
- Click the Mobile tab, then click Enable
- Log into iClicker Reef if you already have an account, or click Create Account.
IMPORTANT:
This is not a UVM system so do not use your UVM password when creating a iClicker Reef account. And do this only once for each course.(You will use this password to log into iClicker Cloud, to manage your courses.)
- Fill out the form to create the course in iClicker Reef and click the Create button.
- Click Save to update the course settings.
Run polls in class
Connect the iClicker base receiver to your computer. (This can be either the classroom computer or your laptop.) The LCD on the base will light up indicating that the base has power.
Open iClicker. Locate the iClicker folder on the computer and double click on iclicker.app (Mac) or iclicker.exe (Windows) on your hard drive (or flash drive) to launch the program.
Select a course and click Start New Session.
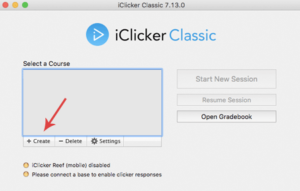
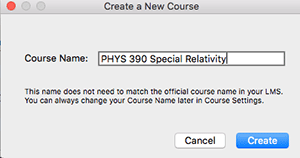
(NOTE: if this is the very first session, click Create, and type in a course name.)
 The Session Toolbar appears in the top left corner of your computer screen. (see toolbar image, right) You can reposition the toolbar anywhere on your desktop. The floating toolbar allows you to run iClicker with your presentation application(s). For example, if you use PowerPoint or Keynote, both your presentation and the iClicker toolbar will be active. The toolbar floats on top of other applications, such as Word, Acrobat, web browsers, etc.
IMPORTANT: The Start New Session and Resume Session options are enabled only if a base station is attached to your computer.
The Session Toolbar includes options to perform the following:
- Close or end the session
- Minimize and maximize the toolbar
- Start/stop a poll
- Select the question type
- Show/hide the results chart
- Display the Options menu
Instruct your students to turn on their devices.
Display your question to the class on a PowerPoint slide. (iClicker will take a screenshot of your desktop when polling is started. You can view the screenshot in the iClicker Gradebook when polling is over.)
Press Start (green triangle) to begin a poll.
When polling is active, the Start button switches to a Stop button (red square) and a timer appears. A counter on the far right of the toolbar displays how many students have voted. You can choose to show or hide the results during a poll by pressing the Chart button. All other options are disabled during a poll.
TIP: If you want to see the polling results before displaying them to the students, look at the base station LCD. It will display a number corresponding to A, B, C, D, E results of the most recent poll.
Anonymous Polling Options: If you want to utilize anonymous polling for any question, click the gear in the the toolbar. The label AP mode appears on the toolbar indicating the Anonymous Polling mode is enabled. To discontinue the anonymous mode and resume recording answers, click the gear icon again and deselect it. The gradebook results for each student shows an “X” instead of the actual response for that question.
Press Stop (red square) on the toolbar to end a poll. Decide if you want to show poll results for that question.
At the end of class, select the Close (X) button on the toolbar. The student responses are now stored in the iClicker Gradebook.
Get help
Workshop Opportunities
View the CTL Events Calendar to see if iClicker workshops are coming up,.
Open Hours at CTL
To get help on campus, visit the CTL’s walk-in help program, http://uvm.edu/ctl/openhours
Troubleshooting
iClicker documentation
Download the iClicker Quick Start Guide and Full User Guide 7x

