| Moving Through Cells
Use the mouse to select a cell you want to begin adding data to and
use the keyboard strokes listed in the table below to move through the
cells of a worksheet.
| Movement |
Key stroke |
| One cell up |
up arrow key |
| One cell down |
down arrow key or ENTER |
| One cell left |
left arrow key |
| One cell right |
right arrow key or TAB |
| Top of the worksheet (cell A1) |
CTRL+HOME |
| End of the worksheet (last cell containing data) |
CTRL+END |
| End of the row |
CTRL+right arrow key |
| End of the column |
CTRL+down arrow key |
| Any cell |
File|Go To menu bar command |
Selecting Cells
Before a cell can be modified or formatted, it must first be selected
(highlighted). Refer to the table below for selecting groups of cells.
| Cells to select |
Mouse action |
| One cell |
click once in the cell |
| Entire row |
click the row label |
| Entire column |
click the column label |
| Entire worksheet |
click the whole sheet button |
| Cluster of cells |
drag mouse over the cells |
 
Open an Excel spreadsheet and do the following:
Adding Worksheets, Rows, and Columns
-
Worksheets - Add a worksheet to a workbook by selecting Insert|Worksheet
from the menu bar.
-
Row - To add a row to a worksheet:
-
Highlight the row by clicking on the row label.
-
From the Insert menu, select Rows.
-
Multiple rows can be inserted by highlighting the number of rows you wish
to add, then selecting Rows from the the Insert menu.
-
Column - Add a column by:
-
Highlight the column by clicking on the row label.
-
From the Insert menu, select Columns.
-
Multiple columns can be inserted by highlighting the number of columns
you wish to add, then selecting Columns from the the Insert menu.
Resizing Rows and Columns
There are two ways to resize rows and columns.
-
Resize a row by dragging the line below the label of the row you
would like to resize. Resize a column in a similar manner by dragging
the line to the right of the label corresponding to the column you want
to resize.
- OR -
Click the row or column label and select Format|Row|Height or
Format|Column|Width
from the menu bar to enter a numerical value for the height of the row
or width of the column.
Deleting Rows, Columns or Cells
-
Rows - delete a row by:
-
Highlight the row by clicking on the row label.
-
From the Edit menu, select Delete
-
Multiple rows can be inserted by highlighting the rows you wish to
delete, then selecting Delete from the the Edit menu.
-
Columns- delete a column by:
-
Highlight the column by clicking on the row label.
-
From the Edit menu, select Delete
-
Multiple columns can be inserted by highlighting the
columns you wish to delete, then selecting Delete from the the
Edit menu.
-
Cells- delete cells by:
-
Highlight the cells to be deleted.
-
From the Edit menu, select Delete.
-
Select the radio button for "Shift cells left" or "Shift cells up". Click
on "OK"
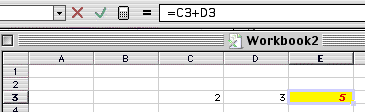
Open your e-mail and find the message from
me which contains an attachment named "paste-ex.xls". Open the attachment
which should look like this:
Cutting and Copying Cells
-
Cutting and Pasting a Cell
![[cut]](cut.gif) ![[paste]](paste.gif)
-
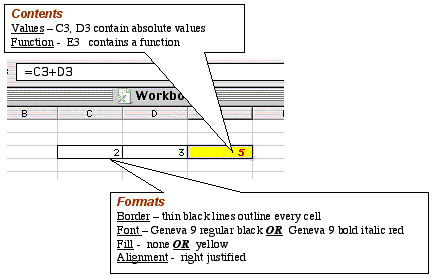
Select E3 (the cell with the yellow fill). Notice that the formula in E3
appears in the formula box.
-
In the Edit menu, select
Cut.
-
Select the cell named H3 (where do you look to make sure you have selected
the correct cell?).
-
In the Edit menu, select Paste.
-
Copying Cells
![[copy]](copy.gif)
-
Select C3, D3 and E3.
-
In the Edit menu, select
Copy. Select the cell named H3 (where
do you look to make sure you have selected the correct cell?).
-
In the Edit menu, select Paste.
-
Clear Rows, Columns or Cells
-
Formats - clear cells H3, I3 and J3 of their formats by:
-
Select H3, I3 and J3.
-
Under the Edit menu select "Clear".
-
Select the radio button for "Formats". Click on "OK". This will remove
the fill, italics, font color and border; however it leaves the function
unchanged.
-
Contents - clear cells H3, I3 and J3 of their contents by:
-
Select H3, I3 and J3.
-
Under the Edit menu select "Contents".
-
Select the radio button for "Contents". Click on "OK". This will remove
the function; however it leaves the formatting unchanged.
-
All- clears cells of both formats and contents simultaneously.
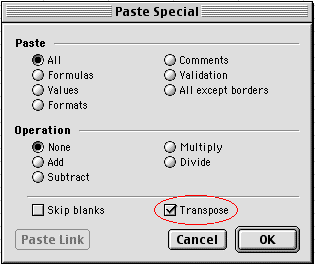
Paste Special
-
Formulas - Copy C3, D3 and E3. Select H3. From the Edit menu,
select Paste Special. Click on the "Formulas" radio button. Click
on "OK". Formulas - but not formats - will be pasted into
the selected cell.
-
Formats - Copy C3, D3 and E3. Select H3. From the Edit menu,
select Paste Special. Click on the "Formats" radio button. Click
on "OK". Formats - but not formulas - will be pasted into
the selected cell.
-
Values - Copy C3, D3 and E3. Select H3. From the Edit
menu, select Paste Special. Click on the "Formulas" radio button.
Click on "OK". Values - but not formats or formulas - will
be pasted into the selected cell.
-
All - Copy C3, D3 and E3. Select H3. From the Edit menu,
select Paste Special. Click on the "All" radio button. Click on
"OK". This has the same effect as simply choosing "Paste".
Transpose. - Copy C3, D3 and E3. Select C4. From the
Edit
menu, select Paste Special. When the Dialog Box appears, click on
the "Transpose" check box. Click on
the "All" radio button. Click on "OK". The contents of C3, D3 and
E3 are pasted into a vertical column (C4, C5, C6).
|
