Terence L. Bradshaw, Lorraine P. Berkett, Sarah L. Kingsley-Richards, Morgan C. Griffith
Intensive, high-density orchard plantings have been studied since the 1960's, with the Slender Spindle system developed in Holland and the Vertical Axe system developed in France in the 1980's. Each of these systems are modifications of the basic central leader tree training system with primary changes in trellis design, tree spacing, and shoot manipulation being the main differences. Growers and researchers began to realize that a tree's photosynthetic energy could produce either wood or fruit, and that trellises could replace much of the structural function of strong trunks. Closely planted trees with no large limbs, consisting almost entirely of very productive 2-3 year-old fruiting wood borne on a supported central leader could yield significant quantities of high-quality fruit with excellent light penetration into the canopy. Extensive multi-year research in New York has shown the potential of intensive, high density (800-1200 trees per acre) plantings in this region. The cost associated with establishing these plantings, including trellises, is roughly $15,000 per acre, but early returns of a few hundred bushels per acre in year two and up to 1000 bushels per acre by year five can potentially pay off the high, early investment and improve economic returns over the life of the orchard. Intensive training systems may also serve to improve pest management in organic orchards because tree canopies are narrow by design, with good sunlight, air, and spray material penetration which reduces the conditions favorable for disease and insect pests and improves efficacy of management materials. High density system will be a major component of the orchard industry in years to come.
In 2011, an additional orchard (Orchard 4) to the original 2006 OrganicA Orchards 1 and 2 was planted at the University of Vermont Horticultural Research Center, in South Burlington, VT. Insights gained from management of the original organic orchards were used in planning the new orchard. In particular, Orchard 4 includes three important components that differ from Orchard 1 which may increase its horticultural performance and potential profitability:trees in Orchard 4 are on the more vigorous, yet still dwarfing rootstock M.26; the orchard was planted as a high-density vertical axe system with four feet between trees (this is more dense than Orchard 1); and all of the eight cultivars planted (Crimson Crisp, Crimson Gold, Crimson Topaz, Williams Pride, Winecrisp, Querina, Galarina, Liberty) are resistant to a major disease of apple, apple scab, and therefore, sulfur and lime sulfur fungicides can be eliminated along with the non-target impacts associated with these materials (such as reduced photosynthesis, ‘burning’ of fruit, and flaring of phytophagous mite populations). Better tree growth and fruit yield and quality are expected in Orchard 4 compared to Orchard 1.
The following are the steps that were taken to plant this new orchard, and some of the steps during first-year maintenance. This orchard will be managed using organically-accepted methods. Please note that there are other options or other techniques that can be used to plant an orchard. This publication is solely intended to be a pictorial presentation of the methods used for this particular orchard.
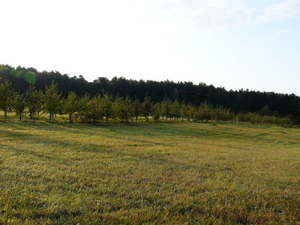
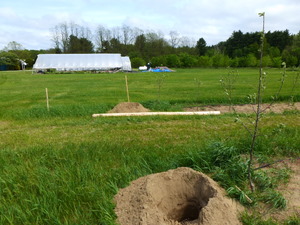
The new orchard was established on ground that had been fallow since 2003 when a previous block of apple trees was removed. Replanting apple trees on a site where apple trees were recently growing can lead to poor growth from apple replant disease. Apple replant disease is associated with a buildup of nematodes and other microbes in orchard soils that established trees can tolerate, but which can lead to problems for newly planted trees. Management techniques include selection of tolerant rootstocks, intensive cover cropping, or allowing the land to lie fallow for three or more years prior to replanting. In this photo, the open area is the site where Orchard 4 will be planted; Orchard 2 can be seen in the background.
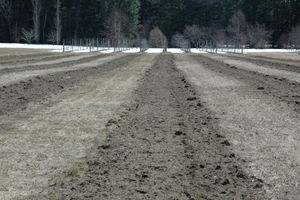
As stated above, an orchard was removed from the site in 2003. However, in 2008, the one-acre site was used for a different horticultural study and was planted with ornamental shrubs which produced edible fruit. These plants, including most of their roots, were removed in early spring in 2010. The rows which had been cultivated for the ornamental shrub planting were re-used for the new orchard and were cultivated four times in 2010 with disc harrows to reduce weed pressure. Drive-rows were not replanted and contain a feral mix of grasses and broadleaf plants.
Labor time: 0.5 hr for each cultivation pass, 2 hours total
It is especially important to correct any mineral soil deficiencies prior to planting an orchard. This helps to ensure that trees are supplied the optimum levels of nutrients to support early growth, and also makes incorporation of minerals, especially calcium and phosphorous, into the root zone much easier.
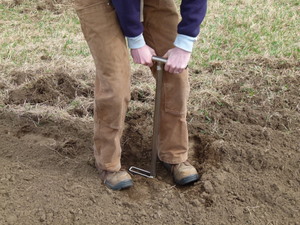
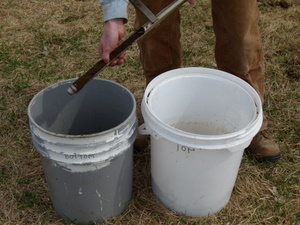
Fruit trees, like all plants, absorb most of their required nutrients from the soil solution. Therefore, a grower should know the nutrient status of the soil, and apply materials to best optimize soil nutrition. Soil samples should be collected at least one year prior to planting. Sites with differing topography or tree health status should be analyzed separately. An accredited soil testing lab can provide specific sampling instructions for their tests, and perform the analysis. The University of Vermont utilizes the Maine Soil Testing Service and Analytical Laboratory to conduct soil and plant tissue analyses. Other laboratories can be found in the latest edition of the New England Tree Fruit Management Guide, available from the Cooperative Extension Service of each New England state. Most important to the fruit grower concerning soil management should be soil acidity and organic matter management. Many soils in Vermont are acidic and can best release nutrients when managed with a liming program. Apple trees prefer a slightly acid soil of pH of 6.0-6.5. Liming instructions and nutrient input recommendations for various soil types can be found in the Tree Fruit Guide referenced above. It is important to check with your certifying agent before purchasing or applying any material to make sure it is organically acceptable.
This particular site was tested prior to planting the previous ornamental shrub collection and thus, the general properties of the soil were known. Another sample was collected and tested prior to planting in order to assess the status of the soil at that time as well. As expected, soil pH was in the optimum range at 6.3, and phosphorous was not required prior to planting. Therefore, no soil amendment additions were made. Again, it is the grower’s responsibility to ensure that any crop production practice or material used in the orchard is acceptable in their particular state’s organic certification program.
Labor time: 0.5 hrs for soil sample collection
 Soil test results for Orchard 4
Given a fairly uniform plot without ledge, excessively sloped areas, wet zones, or other features that could impact the uniformity of the planting, tree rows should be straight, equally separated by the preferred drive-row width along their length, and properly oriented to other plantings or to maximize interception of sunlight. In the northern hemisphere, a north-south row orientation captures maximum sunlight and allows for even light distribution across the planting as the sun moves across the sky from east to west. Where plantings are designed to line up with existing orchards, it is helpful to maintain the same orientation to facilitate equipment travel and maximize land-use productivity by avoiding narrow strips or triangles of unused land. Some sloped plantings may require a different row orientation to avoid crossing excessive slopes with equipment or to minimize erosion from rows that run straight up and down a hill.
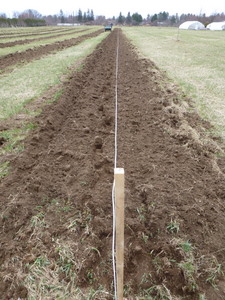
Orchard 4 was planted to the east of Orchard 2 and north of Orchard 1 and in-line with the rows of Orchard 1. By using a surveyor's transit, the rows were sited visually to match the orientation of Orchard 1. The transit sight was then rotated 90 degrees to determine the square corners of the planting. From those corners, a field tape was stretched from east to west across the north, then south row ends, and fifteen-foot row spacings marked and staked within the previously cultivated weed-free strips. Twine was stretched across the stakes to mark the tree rows, and spots of limestone were dropped along its length to guide equipment operation during compost application and subsoiling operations. The twine was then removed and pulled to the north end of the planting where it could later be unrolled when marking tree holes.
Labor time: 2 hours
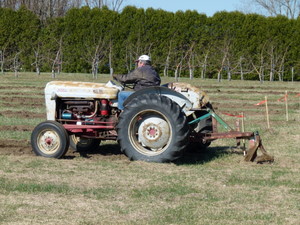
Utilizing the Cornell Soil Health protocol, soil quality has been tracked in the OrganicA orchards since 2006. We observed a restrictive hardpan in Orchard 1 that is likely a result of regular equipment operation during previous management and soil preparation. Since Orchard 4 will be just north of Orchard 1, a single-shank subsoiler was pulled down the tree row at a depth of 14 inches to reduce subsurface compaction and improve water flow and root penetration into the deep root zone in Orchard 4.
Labor time: 0.5 hours
Soil organic matter is a natural source of nutrients and also provides water and nutrient holding capacity to light soils and increased tilth to heavier soils. Cover crops, application of compost, and groundcover management practices can contribute to increasing or maintaining soil organic matter. Generally, soil organic matter of 2%-5% is considered good for fruit crops, with lighter, sandier soils benefiting more from increased organic matter.
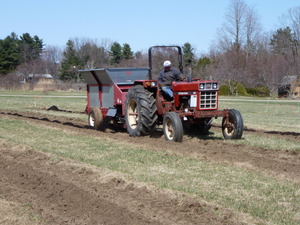
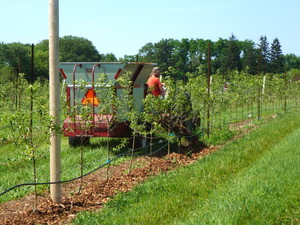
Organic matter is naturally low in the Adams-Windsor sandy loam soil of the orchard site, and prior research from the University of Maine showed improved growth for the initial three years of an orchard's life from pre-plant compost applied to the tree row. Thus, sixty-four cubic yards of commercial municipal compost (Intervale Compost Products, Burlington, VT) were applied down the tree rows with a tractor-pulled mulch spreader (Mill Creek Manufacturing Co., Lancaster, PA).
Labor time: 3 hours
Compost was then incorporated with a rototiller to distribute evenly in the tree row and to provide a uniform planting bed.
Labor time: 1 hour

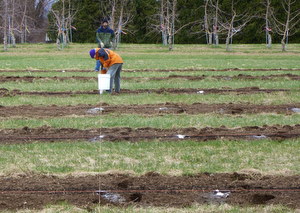
In high-density systems, the sheer number of trees (from 726 trees per acre in this orchard to upwards of 2000 trees per acre in Super Spindle systems) often dictates mechanization of tree planting. Many growers use tractor-pulled tree planters that open a furrow into which an operator places a tree at a marked spot, and then closes the furrow. The randomized complete block design of Orchard 4, where trees are planted in sets of eight, each set including one each of the eight cultivars in the planting, then repeated across the orchard, is not conducive to such a technique. Thus, individual tree holes were marked on a grid.
Because this is going to be a certified organic orchard, it was important to use only approved materials in the layout of the trees. Thus, no paints or other prohibited substances were used for tree marking.
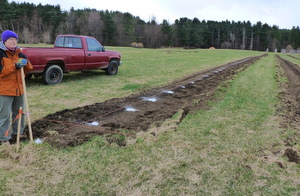
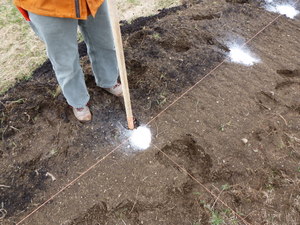
Twine from row marking was pulled back down each row in a north-south orientation. The two outside rows were marked by stretching a measuring tape down the row and placing a spot of lime for each tree on a four-foot spacing. After the two outside rows were marked, a separate line held by two operators was stretched east-west across the planting, lined up to the marks on each outside row. A third person then marked each intersection of the lines with lime until all of the holes were marked.
Labor time: 6 hours
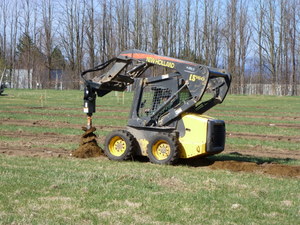
Although we opted not to use a tree planter, with 768 trees to plant, some mechanization was necessary. Holes were individually drilled with a skid steer-mounted hydraulic auger with an 18" diameter bit. Andy, our experienced operator, augered all of the holes in one day, then repeated the task in a separate orchard the following day. In all, he dug 1893 holes in two days!
Labor time: 8 hours
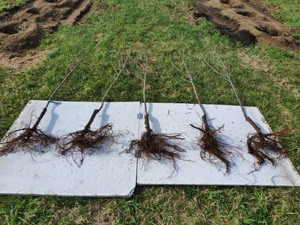
Trees had to be sorted and their roots soaked for 24-48 hours prior to planting. We soaked tree roots in large stock tanks in the walk-in produce cooler, and transferred to tanks on a trailer at planting time. It could be easy to underestimate the time required to sort trees, and the space they will need to soak. We were able to fit 100 trees into each of these 100 gallon tanks, although some of those were a tight fit.
High density, tall spindle or slender pyramid plantings require feathered, well-branched trees to perform their best. The trees we planted typically had more than eight lateral branches and well-developed root systems which increases the space required for storing, shipping, and handling.
Labor time: 4 hours
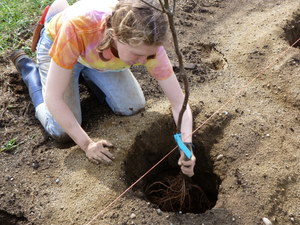
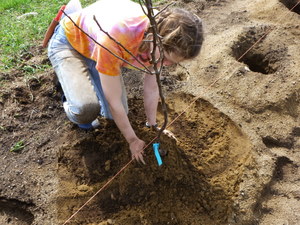
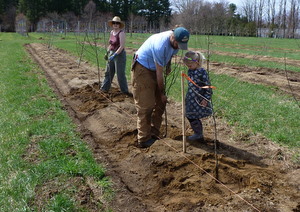
At planting, we placed each tree in a hole according to our randomization map. Commercial growers would likely skip this step and plant solid blocks or sections with each cultivar, but it is critically important for anyone at this step to ensure that the intended tree is going into the correct hole. During the handling of the trees, the roots must never be allowed to dry out.
Holes must then be backfilled and tamped to remove any air pockets that could collapse and allow the tree to settle. While tamping, the tree should be pulled up to maintain its graft union above the soil line.
All size-controlling rootstocks require that the graft union be above the ground to prevent rooting of the scion and loss of the dwarfing characteristics that they provide to the tree. Generally, the greater the amount of 'shank', or unrooted portion of the rootstock, that is exposed, the relatively greater dwarfing performance that will be provided. Typically 4-6 inches of exposed rootstock is desired. This can be difficult to do with some trees which may have been grafted low on the rootstock, and thus have little exposed shank. This also places the root zone fairly high in the soil profile, so supplemental irrigation and tree support are needed as soon as possible.
Labor time: 42 hours (three people @ 14 hours each)
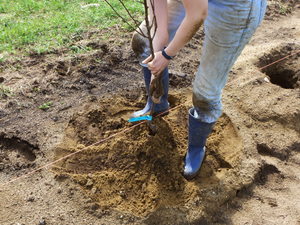
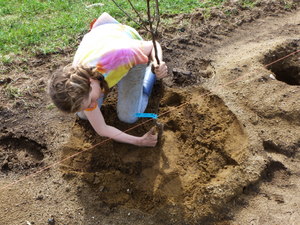
Sometimes little feet help to get better tamping of the soil.
When well-developed trees with ample top growth from their multiple branches are used in high density systems, it is especially important to monitor and provide water as they leaf out because the leaves evapotranspire moisture that the limited root systems cannot replace if soil moisture becomes too dry. In most plantings, the trees should be watered immediately after planting, often with a tractor-pulled water tank with side discharge nozzle. This orchard was fortunate in that over one inch of rain fell immediately after (and during) planting, thus watering the trees in well.
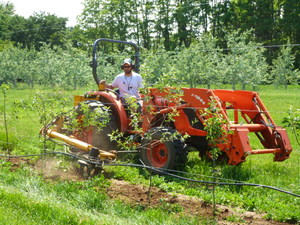
Too much water is not good !! This is a separate orchard block on the same farm as Orchard 4. This picture (including the ducks) was taken on the first planting day for the new orchard. Record wet conditions were experienced during the spring of 2011. Fortunately, the site of Orchard 4 was not flooded.

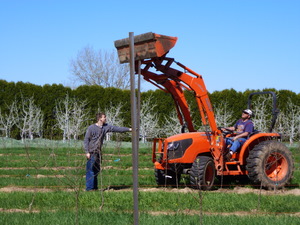
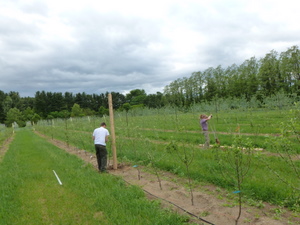
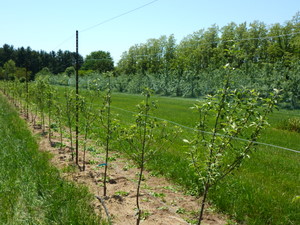
A primary consideration of the vertical axe system and other high density apple systems is that the energy produced through photosynthesis is directed into producing fruit rather than wood, so large trunks are not developed to support a developing crop. Trellising is an essential part of this new system of apple growing. Because this will be a certified organic planting, we must not use prohibited materials, including pressure-treated posts. The majority of the posts in this orchard are steel 1.5" x 2" x 10' tree stakes (Best Angle, Pennsdale, PA) with two feet buried in the soil. These stakes are very heavy, and the angle iron construction reduces potential for bending. They are perforated along one side to allow for easy attachment of trellis wires and tree training. Stakes were set in place by one person while a very skilled operator pushed them into the sandy soil with a tractor bucket. In heavier soils or with wood poles, a hydraulic post pounder is typically used for installation. Steel line posts were placed 32 feet apart in the tree row. The trellis will be a four-wire system with no vertical poles to which to attach the trees. This is because the expense of individual poles with tree densities of 700-1200 or more per acre becomes cost-prohibitive. One of the greatest challenges to adopting these systems is in moving away from the idea of managing individual trees where each tree receives certain fixed inputs (support poles, mouse guards, limb spreaders, etc.), to thinking of the planting on an acreage basis, and understanding the need to minimize fixed input costs where possible.
Labor time: 5 hours
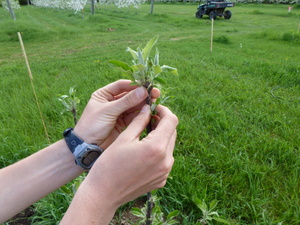
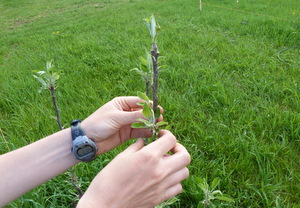
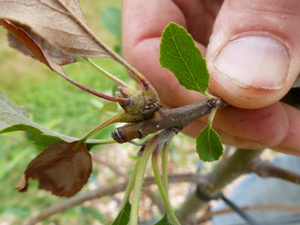
In order to develop a dominant central leader it is important to remove competition from lateral shoots to encourage growth in the primary apical shoot (the leader) on the newly growing tree. Increased growth in the leader is promoted by removing excess growing points immediately below the leader. Trees that do not have their leaders stripped of side shoots below the apical bud may grow with an excess of vertical shoots in the top of the tree, and areas of shootless or 'blind' wood can form directly below those shoots. By stripping competitive side shoots that develop 6-8 inches below the new growth from the apical bud, a tree with more evenly distributed side shoots in the second year should develop.
Flowers on newly planted trees must also be removed for three reasons. First, the energy expended by the tree in opening and sustaining blossoms is better spent on developing vegetative and root growth. Second, any fruit that set will significantly stress the tree by serving as a sink for water and nutrients that would be better allocated in developing the tree itself in the first year and their weight could stress or break developing limbs. Finally, and probably most important, open blossoms are potential infection sites for fire blight, a bacterial disease that can be devastating to orchards, especially in their early establishment years. The risk for fire blight infection are increases during warm weather, and because newly planted trees open flower buds from one to several weeks after established trees, the blossoms are often open during periods of warmer weather. Thus, all flower blossoms were removed during this and every subsequent pass through the orchard.
Labor time: 5 hours
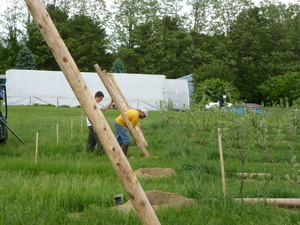
For this trellis system, slanted end posts were used for the row ends. This construction design creates a very strong anchor with a minimum of wasted space and with no specialized components needed. Holes were drilled three feet from the last tree in each row with a three-point hitch auger with a 24" bit. The 12' long x 5" diameter white cedar posts were laid out by each hole after drilling.
Labor time: 3 hours
Although the Horticulture Farm is enclosed by an eight-foot high chain link fence, deer occasionally enter the property. We noticed some deer browsing damage in the orchard that was severe on some trees, but would have to be tolerated until the culprits could be found and removed. In some cases a fence around the planting, if only a baited single-wire electric one, could to be installed to deter deer feeding damage.
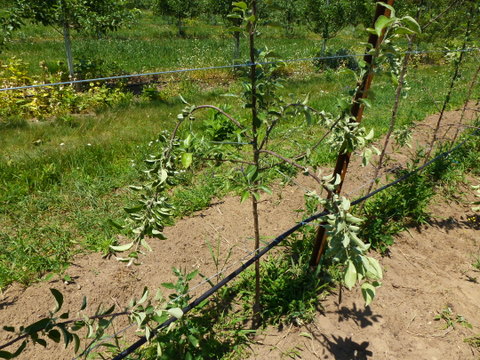
The wet weather during this planting season, with record rainfall and historic local flooding, was not enough to meet the daily demands of the trees at all times. An important distinction with planting feathered trees as opposed to traditional branchless whips is the water requirement for the former, especially at leaf out and early shoot growth timing. At this time, the rapidly developing shoots and leaf tissues require water to expand, and opening leaves lose moisture through evapotranspiration. The trees' root systems, however, weakened by digging, storage, shipping, and planting, may not have developed enough to adequately absorb soil moisture, and thus the trees are more prone to drought stress. We were in the process of building our trellis at this time, and thus the irrigation lines which were tied to existing main lines from a previous orchard had been pulled aside. Growers who plant high density systems must plan ahead and have irrigation ready the year prior to planting in order to water trees as needed to ensure good tree establishment.
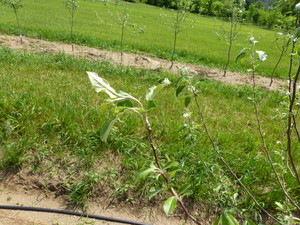 Wilting shoots on a newly-planted apple tree.
With the trees in the ground for over a month, it is important to get them supported as soon as possible. As mentioned previously, feathered trees have large top growth compared to their root systems, and thus need support to keep erect and to facilitate training activities. The trellis in this orchard will use four horizontal wires and no vertical structures to which the trees attach. Given the large number of trees, individual poles for each tree would be cost-prohibitive, with electrical conduit costing over $3.00 per tree and cheaper bamboo prone to breakage. Some growers have used wires tied vertically from the top to the bottom wire to provide a training support, but the labor for such a system seemed excessive.
Trellis poles include the previously driven steel posts with a single vertical wood pole for increased support in the middle of the row and a slanted back brace at each end. Organic regulations preclude the use of pressure-treated lumber for trellis construction. Locally-sourced white cedar was used due to its relative rot resistance, low cost, local availability, and uniform quality. Poles were 6 inch diameter and ten feet long.
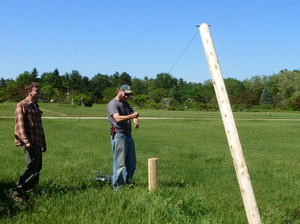
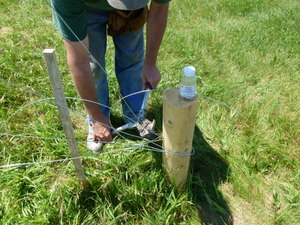
The slanted end brace posts were installed in the 24" drilled holes that had been cleaned out on the treeline-side with a shovel to allow for deeper anchorage of the post bottom against undisturbed soil. Slanted posts are a preferred anchor technique because the top trellis wire, which is tied to the base of a short end post and is run up over the top of the trellis post, pulls the slanted post into the soil with increasing canopy weight or wire tension. A cinder block was inserted behind the pole to stabilize it in the hole, then the pole adjusted to the desired angle, backfilled, and then the soil firmly tamped. Slanted end posts can be set using a protractor to sight the desired angle for the two outer rows, then middle poles set by visually lining up to the end rows. When a wire is stretched from the short anchor post (installation discussed below) and up over the slanted end post, the pole, wire, and soil line should ideally form an equilateral triangle.
Labor time: 7.5 hours

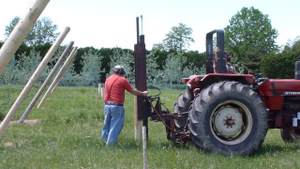
End anchor posts are an especially critical part of the trellis construction, since they ultimately support the entire weight of the row. We used six inch diameter, six foot-long posts driven four feet into the ground. A post pounder was available that could drive these shorter poles positioned at the ends of the rows, as opposed to the longer poles used in the rest of the trellis which were placed in dug holes. This implement uses tractor hydraulics to position the post channel and pounding head, and to lift the head into position. The head is dropped by gravity, then lifted again hydraulically and repeated until the post is driven to the desired depth. Post driving only takes a minute or two, but positioning the post takes a bit more time.
In total, each 384-foot orchard row required two anchor posts, two slanted end posts, a single vertical wood post in the center of the row, and ten steel line posts to complete the trellis.
Labor time: 3 hours
Now that all of the trellis posts have been set, it is time to pull wire. In a vertical axe planting, the trees are not allowed to grow thick trunks, yet they are encouraged to fruit heavily. Thus, the full weight of the crop must be borne on the trellis, so skimping on trellis materials or construction in the first year is not recommended.
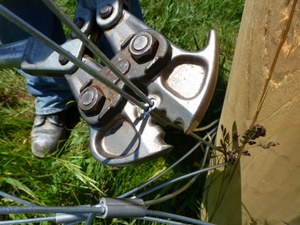
High tensile 12 ga wire was used for all lines. Wires were pulled out along each row and hand tightened, then crimped. It is especially important to use wire, crimps, and tools designed for trellises, since many types of basic fencing wire cannot handle the unique stresses of orchard trellises.
For this planting we used four wires spaced roughly at 18", 42", 66", and 90" from the soil surface. The bottom wire height was set to hold the irrigation lines which would be closely suspended on them, keeping them out of the way of cultivators and other orchard equipment. This prevents dripping water onto foliage and thus reduces potential disease risk. A larger gap was allowed between the first and second wires in order to allow workers to cross the trellis, at least before the trees completely fill their space.
At the ends of each row, wires were passed through a single hole drilled through the back anchor post, then wrapped and crimped, making a very secure connection.
Labor time: 15 hours
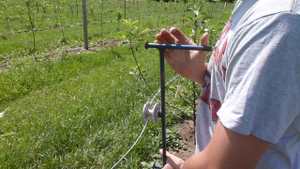
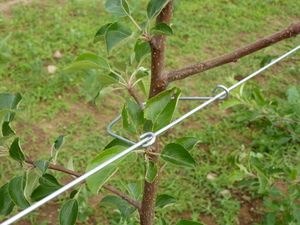
Wires were now tensioned using inline strainers and a tensioning handle. These strainers allow for subsequent adjustment of wire tension, and can be installed after wires have been pulled. It is important to tighten wires as much as possible at the initial installation, especially when using the tree clips shown. Loose or broken wires can grab clips on wires below and, when tensioning, pull the clips upwards which can damage the trunk or limbs or even uproot a newly-planted tree.
Wire trellis clips were used to tie the trees to the trellis wires. These clips lock onto the wire and do not slide horizontally while allowing a tree room to grow. The largest clips are used on the lower trunk, while the upper section has smaller clips. The trees cannot be allowed to grow larger than the clips or girdling will occur, but under this high-density system, thick trunks do not develop.
Labor time: 1.5 hours
In-row weeds had not yet been managed in the planting, so a pass with the hydraulically operated Weed Badger was made. This tool, while very effective in maintaining good weed control, requires very careful operator attention. In this pass, three trees were very quickly destroyed by contact with the rotating tines of the cultivator. In order to minimize tree damage and detrimental soil health effects from cultivation, we are planning to use mulch to manage weeds in this orchard, but a clean, relatively weed-free surface was needed on which to apply the mulch.
Labor time: 0.5 hours
Possibly the most important component to high density apple plantings is early tree training. A commonly asked question is "Won't the trees grow together?" To some degree they will, but excess vegetative growth on branches is minimized by manipulating them to change the hormone flow in the branch and both discourage growth directly as well as encourage the development of fruiting buds. A precocious tree that sets fruit early and maintains that production annually will settle into maturity early, and thus maintain a desirable balance of vegetative to fruiting growth.
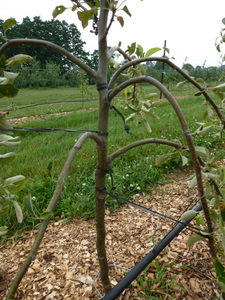
Just as we removed competing shoots below the central leader earlier in the season to encourage apical dominance in the upper section of the tree, and thus reach our desired height within three years, we manipulate auxin but in a different way elsewhere in the tree where the desired canopy structure and branching have developed. Lower limbs, or 'feathers', which were on the tree at planting are bent below horizontal to interrupt the flow of auxin, a plant hormone generated in apical growing points. The reduction in auxin concentration in adventitious buds on these branches encourages the development of fruit spurs and buds that may become next year's fruit.
Many training tools can be used to achieve this branch bending including strings, toothpicks, wires, or the rubber bands shown here. Cost for each training tool is a primary consideration when eight or more branches per tree may be spread, with upwards of 1000 trees per acre in a planting. In this orchard, the difference between a $0.10 wire spreader and a $0.01 rubber band is $720! Other downsides to some spreading tools include the learning curve in using them, excessive time requirements, less desirable shoot positioning, and possible shoot breakage during or after installation.
These rubber bands required 12 hours of labor to install in the one-acre orchard. Some shoots were damaged during training, but the speed of completing the task seems to have been worth it. Roughly 6600 (7.5 bags) of bands were used at a material cost of $78.75
Labor time: 12 hours
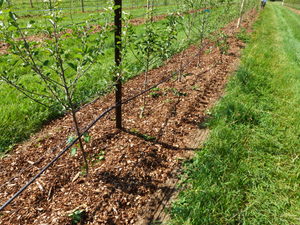
Over the six seasons of managing OrganicA Orchard 1, we have used multiple strategies for management of in-row groundcover beneath the tree canopy. Because of the naturally low organic matter content of our soil, we are interested not only in reducing competition for water and nutrients from weeds, but also in increasing the organic matter content, the biological activity, and the moisture retention properties of the soil.
After cultivating under the trees previously in the season to establish a clean strip, we applied whole-tree wood chip mulch to the rows. The material was spread with an automated side-delivery mulch wagon, which greatly saves on labor compared to hand application. For this application, 90 cubic yards of mulch were applied in 1.5 hours.
Mulching to this degree is only economically feasible if a source of inexpensive, high-quality chips is available. We contract with a local tree service for whole-tree chippings of hardwood species. Most chips are from low-grade trees (poplar, boxelder, birch) with some more valuable species such as oak and maple chipped from the tops after logs have been cut. By working with a tree service as opposed to using 'landscape quality', i.e. uniform, primarily bark mulch, we can cut our material costs from roughly $30 per yard for the landscape material to $5 per yard for the whole-tree chippings.
Although weeds, especially quackgrass, will grow in the mulch, their roots rarely extend far into the root zone of the tree, and they can more easily be pulled from the mulch than from the soil itself. The use of electronic moisture monitors in Orchards 1 and 2 consistently show better moisture retention and less need for irrigation in the mulched Orchard 1 than in Orchard 2, which is grown in sod cover.
Labor time: 1.5 hours
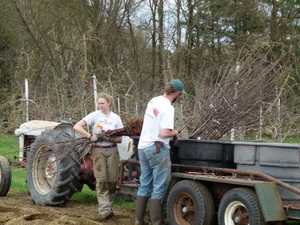
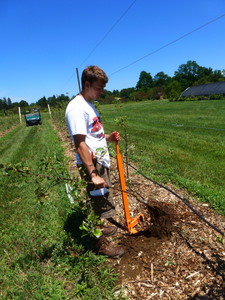
We were especially surprised, and not in a good way, to find extensive apple scab incidence on what we thought were Nova Spy trees in the planting. The premise for this orchard is that the use of apple scab-resistant cultivars will allow us to reduce potentially phytotoxic fungicide sprays and achieve better growth and yield under organic conditions compared to scab-susceptible cultivars. The presence of apple scab in this orchard was a shock, since this would suggest the presence of a race of the pathogen capable of causing infection on cultivars considered resistant based on the Vf gene in their breeding background. However, we quickly contacted the nursery and confirmed that we did not receive Nova Spy, but rather Rome Beauty, a cultivar that is susceptible to the apple scab races found in North America. Rome does not grow especially well in the Champlain Valley of Vermont, and have low fruit quality for the fresh market, so we pulled the trees out to maintain a true scab-resistant orchard and no effort was made to save the trees for another plot at farm. In the picture on the left,a 'Weed Wrench', which grips woody brush by the base and pulls it up, roots and all, is being used to pull out a Rome Beauty tree. In 2012, Liberty trees will be planted in the empty spaces.
Labor time: 1 hour
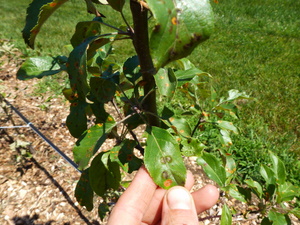
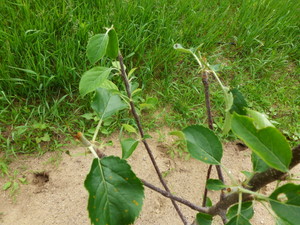
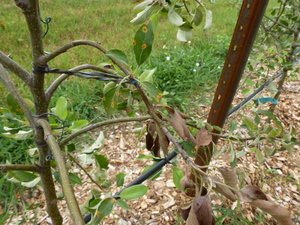
During routine assessment for fire blight in the other orchards, some symptoms were found in the orchard adjacent to Orchard 4. Because fire blight can be so damaging to young trees, and allowance of the antibiotic Streptomycin is set to expire under National Organic Standards, we know we need to be extra vigilant in scouting and removing potentially diseased tissue. In walking through the new orchard, a number of shoots were observed that were dying back and possibly could have been infected by the fire blight bacteria. Luckily, most shoots were damaged by some other cause. In many cases, shoot tips were broken during tree training or girdled by the rubber bands used to position shoots. In some instances, rust or possibly nectria canker lesions were observed at the base of dead spurs or shoots that appeared to have choked out the growing tissue. While of concern and requiring a management strategy in the future, the lesions are caused by fungal pathogens which are not as potentially damaging as a fire blight outbreak.
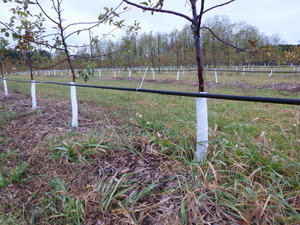
After the extensive work involved with planting the trees, building the trellis, and early tree training, the orchard was simply allowed to grow for the rest of the summer. Trees began to drop their leaves in early November, and would be dormant soon. In preparation for winter, spiral plastic vole guards were installed on each tree. At a cost of $1.05 each, these are an expensive addition to the orchard, but vole damage on trees in an adjacent orchard in spring 2011 convinced us that the expense was worthwhile. Voles are active year-round, and feed on plant tissues under the snow line in winter. Excessive feeding on trunk bark and cambium tissue can girdle trees and kill them in one season. Spiral guards must be removed during the growing season to allow trunks to dry out and to expose potential trunk-boring insects to natural predators. Therefore, this will be an annual expenditure of labor until the trees are well-established and develop a thick bark on the trunk that may resist vole feeding.
Labor time: 4 hours
As we have outlined in this guide, the establishment of OrganicA Orchard 4 has required significant expenditure of time and labor. Our goal is to produce high-quality, organic fruit from this planting of scab-resistant apple cultivars in the coming years. More importantly, this planting will serve as an important site for the research conducted in the OrganicA project, and is focused on addressing some of the primary challenges of producing apples organically in New England and beyond. The second year of orchard establishment and research will be supported in part by a grant from the Vermont Agency of Agriculture Specialty Crop Block Grant program.
| Date | Task | Labor Hours @ $15 |
Labor & Equipment Hours @ $60 |
Cost |
|---|---|---|---|---|
| 5/1/2010 | Cultivate trees rows | 2 |
$30.00 |
|
| 3/1/2011 | Soil sample | 0.5 |
$7.50 |
|
| 4/14/2011 | Marking rows | 2 |
$30.00 |
|
| 4/15/2011 | Subsoiling | 5 |
$300.00 |
|
| 4/15/2011 | Compost application | 3 |
$180.00 |
|
| 4/19/2011 | Compost incorporation | 1 |
$60.00 |
|
| 4/21/2011 | Mark tree holes | 6 |
$90.00 |
|
| 4/25/2011 | Auger tree holes | 8 |
$480.00 |
|
| 4/26/2011 | Sort trees | 4 |
$60.00 |
|
| 4/27/2011 | Tree planting | 42 |
$630.00 |
|
| 5/12/2011 | Install steel trellis poles | 5 |
$300.00 |
|
| 5/19/2011 | Strip leaders and flowers | 5 |
$75.00 |
|
| 5/23/2011 | Auger post holes and lay out posts | 3 |
$180.00 |
|
| 6/2/2011 | Setting trellis posts | 7.5 |
$112.50 |
|
| 6/3/2011 | Pound end anchors | 3 |
$180.00 |
|
| 6/6/2011 | Pulling trellis wires | 15 |
$225.00 |
|
| 6/16/2011 | Cultivate trees rows | 0.5 |
$30.00 |
|
| 6/15/2011 | Tension wires | 1.5 |
$22.50 |
|
| 6/20/2011 | Train shoots w/ bands | 12 |
$180.00 |
|
| 6/24/2011 | Mulching | 1.5 |
$90.00 |
|
| 7/14/2012 | Pull Rome trees | 1 |
$15.00 |
|
| 11/8/2011 | Apply mouseguards | 4 |
||
Total Labor |
$3,337.50 |
| Item | QTY | price per | sub |
|---|---|---|---|
| Preplant compost, yd | 32 |
$37.00 |
$1,184.00 |
| Trees | 796 |
$10.00 |
$7,960.00 |
| Slanted trellis post, 6" cedar 12' | 16 |
$27.35 |
$437.60 |
| End anchor post, 6" cedar 6' | 16 |
$13.68 |
$218.80 |
| Line Trellis Post, angle iron | 96 |
$15.00 |
$1,440.00 |
| Wire, 4000 ft roll | 3 |
$120.00 |
$360.00 |
| Wire crimps | 100 |
$0.20 |
$20.00 |
| Tension strainers | 32 |
$2.80 |
$89.60 |
| Irrigation line, 3000 ft roll | 3 |
$150.00 |
$450.00 |
| Asst irrigation fittings | 1 |
$50.00 |
$50.00 |
| Soil moisture sensors | 2 |
$40.00 |
$80.00 |
| Training bands, per bag | 8 |
$10.35 |
$82.80 |
| Mulch, yd | 170 |
$5.00 |
$850.00 |
| Vole guards | 796 |
$1.05 |
$835.80 |
Total Materials |
$12,874.60 |