Images: The Basics
1) Image Size
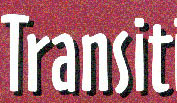
Computer images, like other computer files, are stored as a series of
ones and zeros. They are measured, and display as, as a rectangle of
dots (pixels). Here's a
representation of an image
that is 10 pixels by 10 dots. The display size of the image depends on
where it is displayed: on a computer screen, printed on paper, or
projected on a wall. The file size (how much space it takes up on a
disk) is determined by the number of pixels and the amount of color
information that is stored (bit depth).

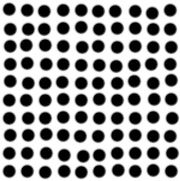
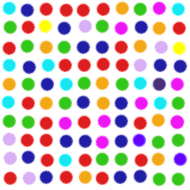
2) Bit Depth
Here are a 2-bit image (black and white) and an 8-bit image (256
possible shades of red, green, or blue for each pixel--millions of
possible combinations, sometimes called "true color"). Think of each
dot as a beam of light from a flashlight. The 2-bit flashlight has
only two lenses: black and white. You can turn the lenses so that one
or the
other shows. Think of the 8-bit flashlight as having three lens dials,
each dial with 256 colors on it. The lenses are one on top of the
other,
and each one can be spun to one of 256 shade of red, green, or blue.
So,
you might spin them to get red #25, blue #230, and green #243. In fact,
those are the values of that first turquoise dot.
A note about scanners and bits: scanner specifications actually say
8-bit=24 bit, that is, a 24-bit scanner is capable of capturing 8-bit
(256) color for each category, red, green, blue (8x3=24). You will see
some
scanners now advertised as 48-bit scanners, that is, they can capture
16-bit color for each red, green, and blue. Zillions of colors!
PhotoShop can work with 16-bit images but most printers and web pages
can't display them and the files are huge.
3) Resolution
The main thing to remember: a digital image has no absolute size or
resolution. When you choose the resolution before scanning, the scanner
will capture a certain number of dots. Once it has captured those dots
you can use PhotoShop to change the width, height, resolution and even
print size of the image. But beware: scanning at low resolution and
then increasing the image size will force PhotoShop to stretch your
dots over a larger space, making a fuzzy or "pixelated" image.
PhotoShop will do its best to guess your intentions (also called
"interpolation") but it can only do so much!
Rule of thumb? Scan bigger than you need. You can always size down.
4) Image Format:
GIF vs. JPEG
Images are stored in formats that retain all their original color
information (lossless) or in a format that throws away some color
information to compress the file size (lossy).
Lossless formats: PhotoShop's own PSD, or TIFF
Lossy formats:
GIF: Graphic Interchange Format: 256
colors (PhotoShop calls it Indexed
color mode): standard palette, web palette, custom palette, etc. You
get to choose which 256 colors the image should use. Compression is
achieved by throwing away all but the 256 colors you choose.
JPEG: Joint Photographers Expert Group:
millions of colors. Compression
is achieved by a complex algorithm that compares each color dot to
those around it and stores that information about blocks of color
instead of each individual dot.
What do they look like and what is each good for? It's all in the name:
GIF for graphics, JPEG for photographs.
5) Descreen
If you are scanning images from newspapers or books, watch out! These
use halftone printing technology that actually prints multiple-sized
dots of ink. This is easy to see in newspapers--if you look closely at
the image you can see the dots. In general viewing, your eye averages
them out to appear as continuous tones of color. Your scanner can "see"
more than you can: when you scan the image it may display the image
with an interference, or "moire" pattern. The solution: when scanning
these images, look around in your scanner
settings for a option called "descreen" and turn it on.
Here are two examples:
Descreen On
|
Descreen Off
|

|
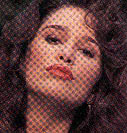
|
More information: Google on some
of the above terms or on "scanning" "scanner guides" "scanner tutorials"
Questions: hope.greenberg@uvm.edu