Cascading Style Sheets (CSS) offer you an easy and reliable option to preload images. Using the DISPLAY property, you can tell the browser to request an image, but NOT to display it on the page. The browser just requests the image from the server and caches it for future use.
Consider this scenario :
You run your own Web site that advertises your Poodle breeding and boarding service. Your home page contains a basic description of your business and the services you offer.
After studying your server log data, you find that most visitors enter your site via the home page. Their next stop is usually the page that contains pictures of the puppies you have for sale. After that page, they leave the site entirely.
Why? Maybe they don't like the looks of your puppies, but more likely, they just got bored waiting for the page to load!
The puppy page is full of images of adorable puppies, but maybe visitors don't wait to see all of them.
So let's use CSS to preload some of the puppy images on the home page.
Preloading With The DISPLAY Property
First, let's create a class with display set to none and add it to the HEAD section of the home page:
<style type="text/css">
.hiddenPic {display:none;}
</style> |
Next, we'll add image tags for our puppy pictures to the bottom of the home page. Always place them at the bottom of the page! If the visitor is at the home page, you certainly want it to display as quickly as possible. Let the browser display the home page and its images before it starts trying to retrieve the images for the next page.
<img src="poodle-puppy-Clara.jpg" alt="Clara at 8 weeks" title="Clara at 8 weeks" height="350" width="350" class="hiddenPic"> |
<img src="poodle-puppy-Kenny.jpg" alt="Kenny at 10 weeks" title="Kenny at 10 weeks" height="350" width="350" class="hiddenPic"> |
<img src="poodle-puppy-Aiko.jpg" alt="Aiko at 6 weeks" title="Aiko at 6 weeks" height="350" width="350" class="hiddenPic"> |
Note that we used the "hidden" class name for each image. Again, the browser will request the image files and save them locally, but will not display them on the home page as long as the DISPLAY property is set to none. Don't use that class for every image on your home page or none will display!
You also don't have to preload every image on the puppy page. If several attractive, important images load immediately, visitors have something to look at while they wait for the others to load. The important thing is to avoid making visitors stare at a blank page!
Position Images With ALIGN
The ALIGN attribute is an optional attribute to the IMG tag. It defines image placement relative to browser margins and text. ALIGN = "right" places the image on the right border of the browser window. ALIGN = "left" places it on the left border. Text flows around the images depending on their placement.
Note that ALIGN is deprecated (marked for deletion) in HTML 4.0, but it won't disappear anytime soon. Use it until you become proficient positioning your page elements with Cascading Style Sheets.
The code is simple: <IMG SRC="YourImageName" ALIGN="left">
Both LEFT and RIGHT control where the image displays in relation to the browser margin. The surrounding text wraps around it from top to bottom. Here's a list of possible values:
|
Play It Safe!
Browser support is spotty for Absbottom, Texttop, Absmiddle, and Baseline. LEFT and RIGHT are the safest options because you can reliably predict exactly how the text will wrap. The other attributes may place one line of text where you expect, but then drop the rest below the image.
For instance, when ALIGN = "middle," browsers only display one line of text next to the middle of the image. Any extra text drops down below the image and gives your layout a jerky, unstructured feel. Always consider browser display differences during the design process. Visitors will be using different size browser windows and screen resolutions. On your machine, the sentence that looks great next to an image may be broken in half on a visitor's monitor.
Here's an example. In the top image, ALIGN="right," while the bottom image has ALIGN="middle." See the differences in the text?
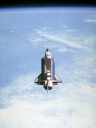 The Space Shuttle orbits high above Earth before docking with the International Space Station.
The Space Shuttle orbits high above Earth before docking with the International Space Station.
Test your page thoroughly to make sure that text is displaying exactly how you intended.
More Control With <BR>
For even more control over text placement, combine ALIGN with the <BR> tag's CLEAR attribute. Used alone, the <BR> tag tells the browser to resume text flow at the left margin of the next line of the browser or the right margin of a page element. When you include the CLEAR attribute, you can control whether text flows against the image or drops below it to begin on a completely new line.
This is particularly useful if you want to place captions on top of images, to the side, and below them. Possible values for CLEAR are: left, right, and all. The CLEAR attribute tells the browser to resume text flow at the next blank line at the specified margin.
Look at this example image from our Browser Photo page and note where the text is positioned:
A View From Space The International Space Station is one of the brightest objects in the night sky.
It's easy to spot without any special equipment. Check out sighting opportunities in your area! |
Here's the HTML code:
<b>A View From Space</b><BR> <img src="earthfromspace_no8.jpg" alt="A view of Earth from space." align="left"> The International Space Station is one of the brightest objects in the night sky. <BR><BR> It's easy to spot without any special equipment.<BR clear="left"> <b>Check out <a href=" http://spaceflight.nasa.gov/realdata/sightings/ SSapplications/Post/SightingData/sighting_index.html" target="_blank">sighting opportunities</a> in your area!</b> |
|
Here's how the same image and text looks if we remove all the <BR> tags:
|
A View From Space
|
Avoid confusion by using <BR CLEAR="all"> at the end of text you want associated with an image. That stops text that belongs in the next section from flowing up and around the image above it. Instead, text will begin on the next line where both margins are empty.