How and why to create accessible recordings of lectures, trainings, and webinars

All videos are not the same. Here's how to create accessible and useful recordings of lectures, trainings, webinars and other events featuring speakers, slides, and Q&A. 

What makes an accessible recording?

Screenshot from a video showing clearly marked speaker, slides, captions, and ASL interpreter.

An accessible event recording is a video where:

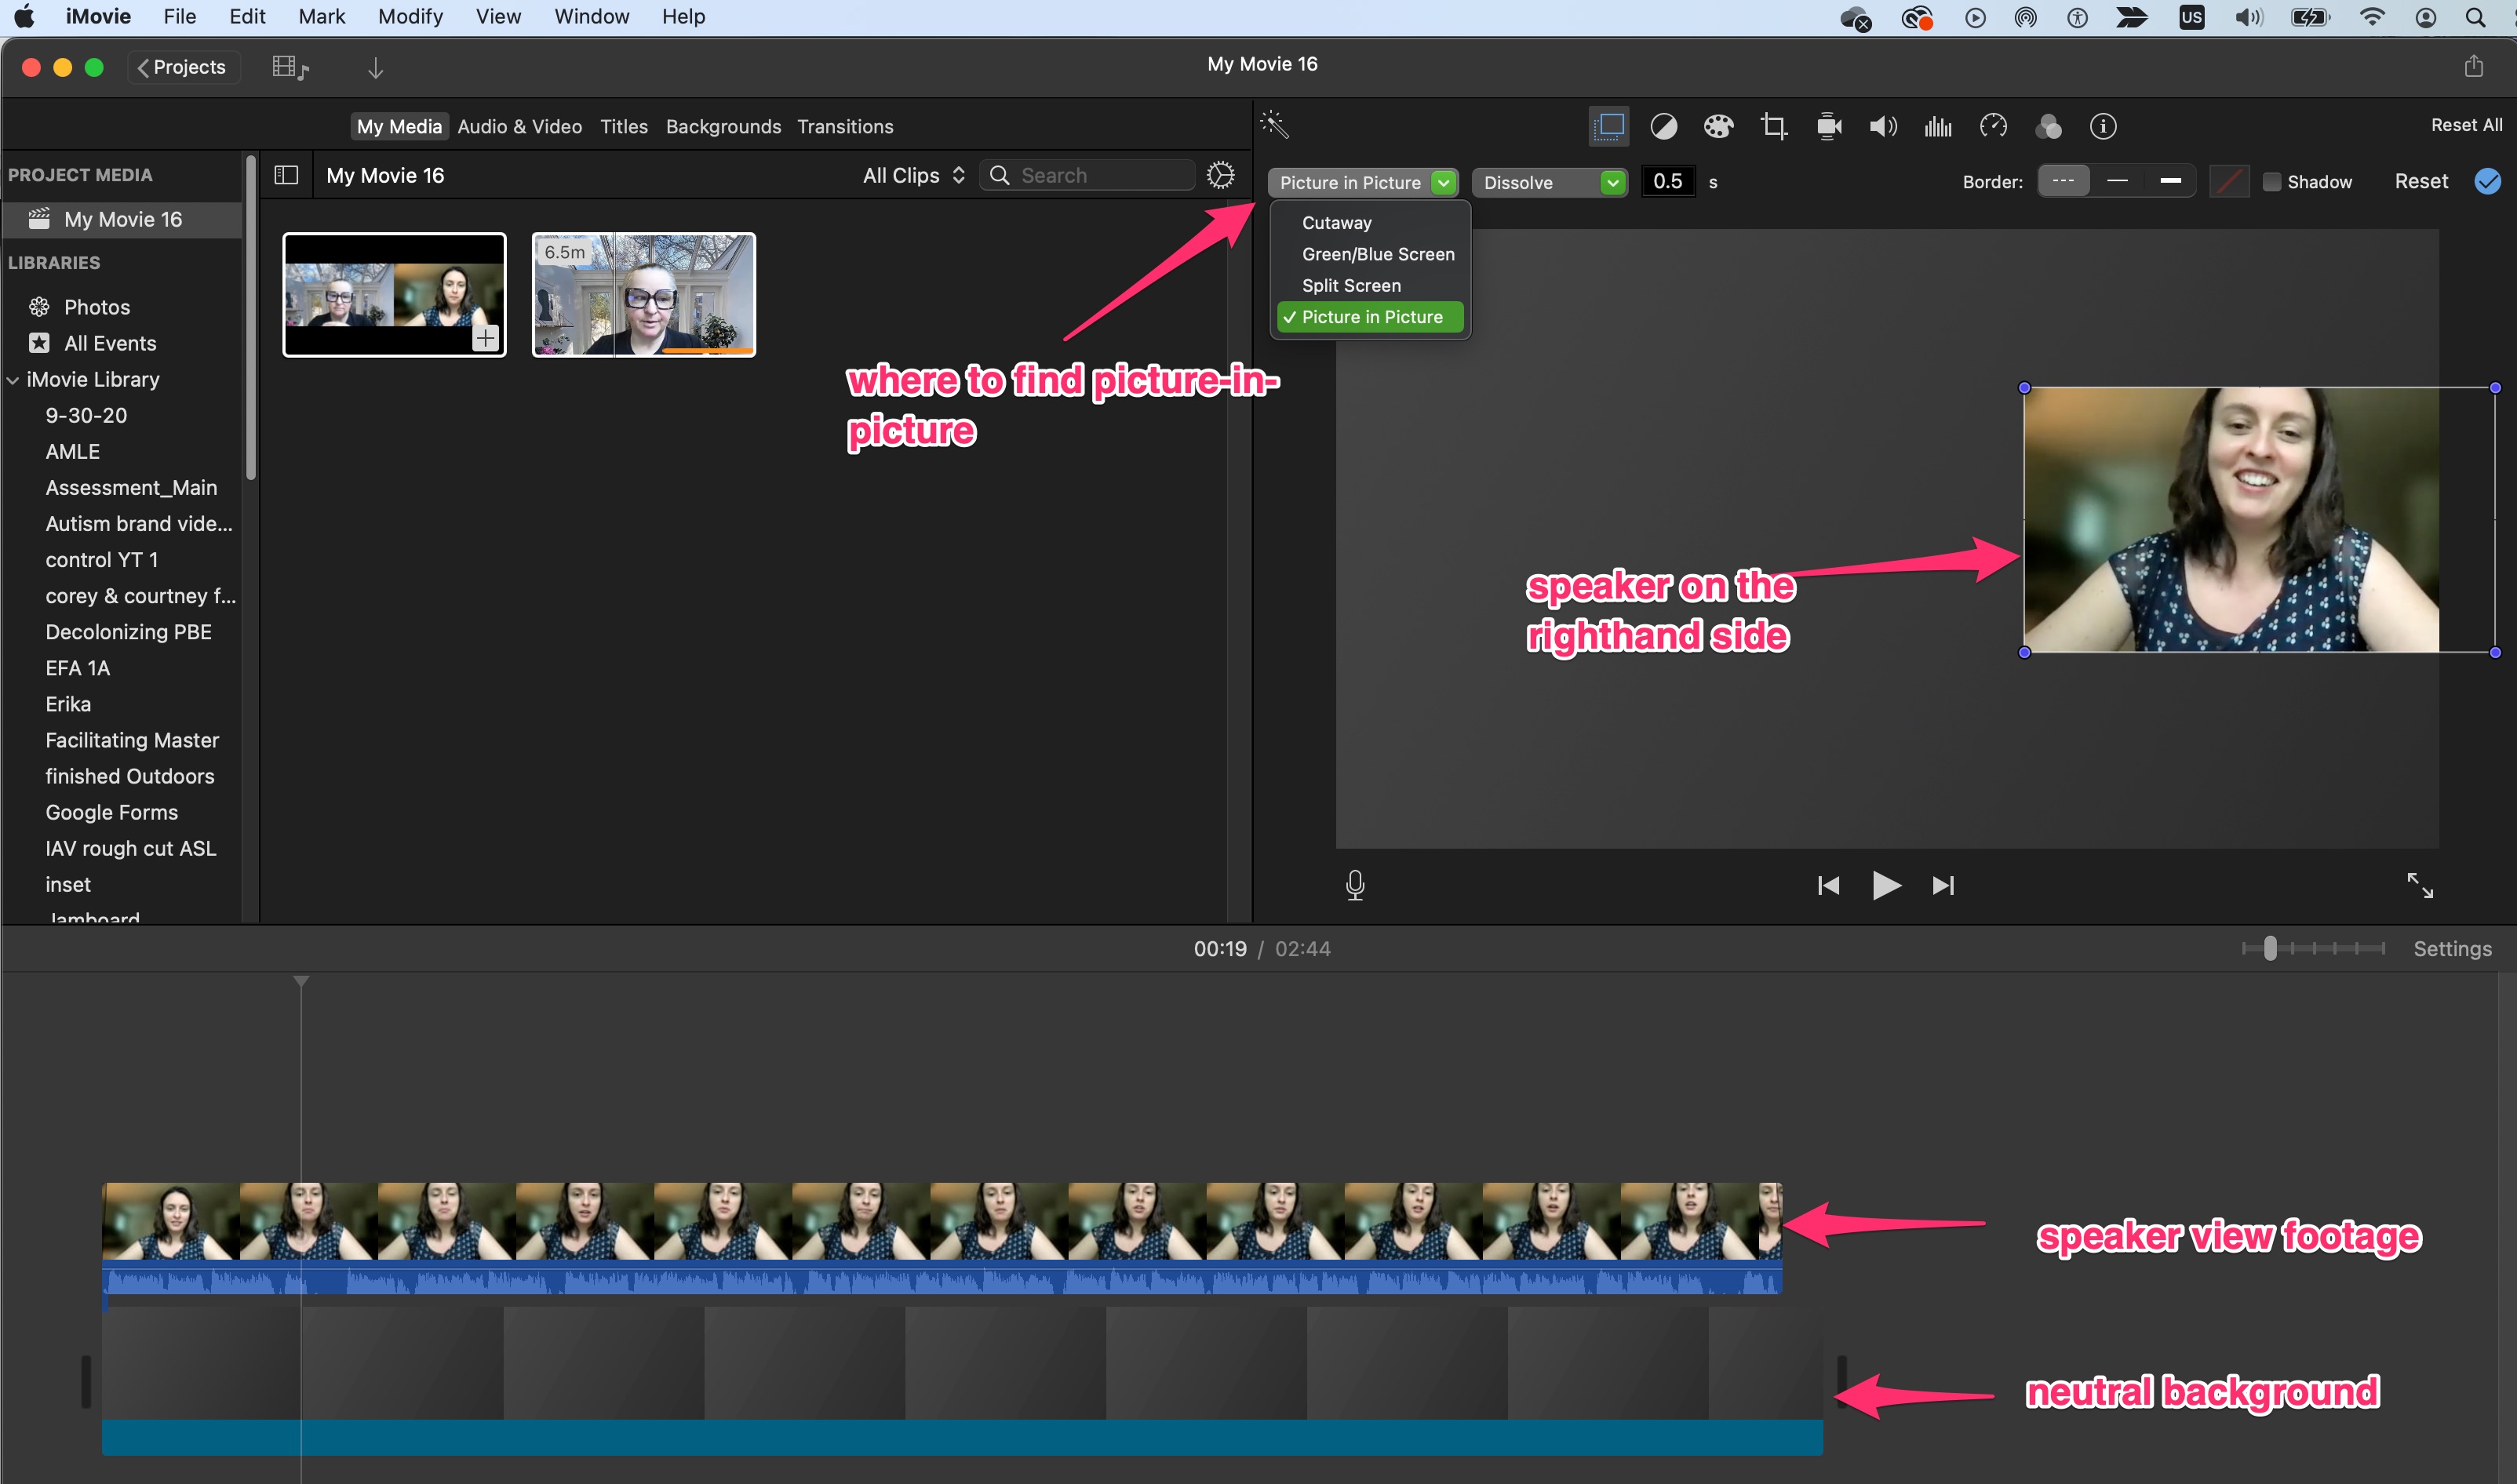
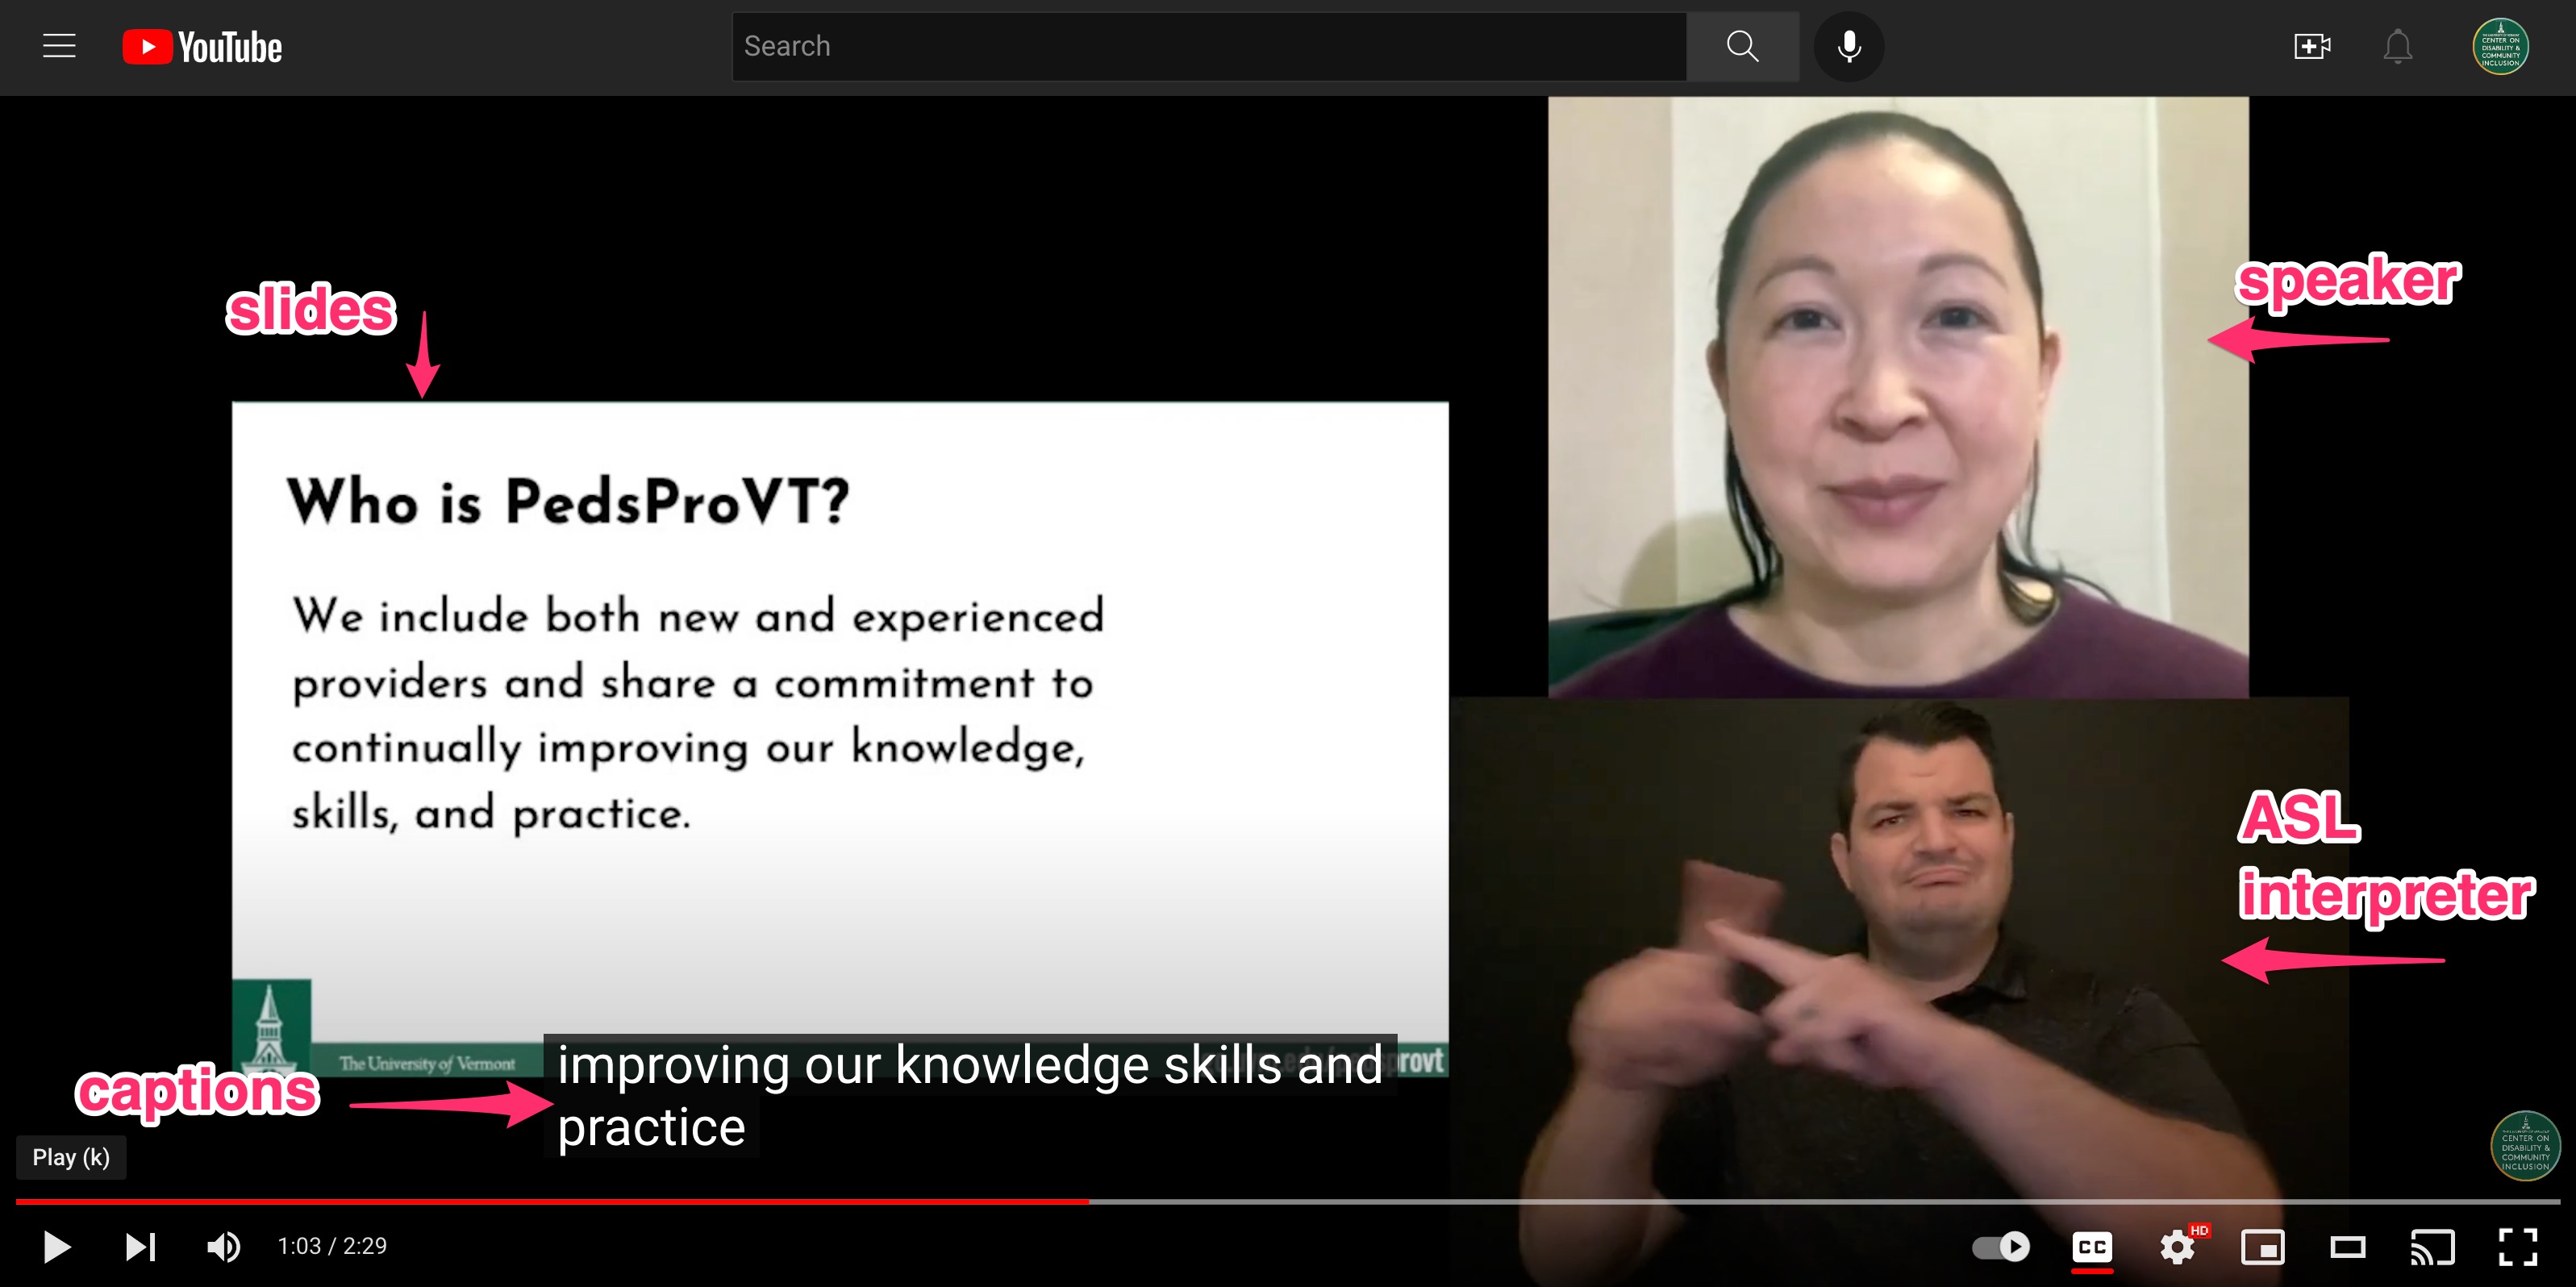
  • you can clearly see the presenter's face, for people who lip-read or who need facial cues for understanding;
  • you can clearly see the presenter's content;
  • you've left room for an ASL interpretation track, and
  • the captions don't interfere with the content.

Additionally, you likely want to provide the session as an audio-only track,  as well as a transcript. This is especially true for longer presentations, but is good accessibility practice for all event recordings.

Before Recording

The 12 Best Zoom settings for recording

Pro-tip: Whenever possible, use Zoom to record events where you want to use the footage afterwards. Microsoft Teams won't give you separate video files, bakes in open captions, and has a lower recording resolution than Zoom. 

Here are the settings you want to use to get all the files you need to produce a good event recording:

Text: Cloud recording settings for Zoom
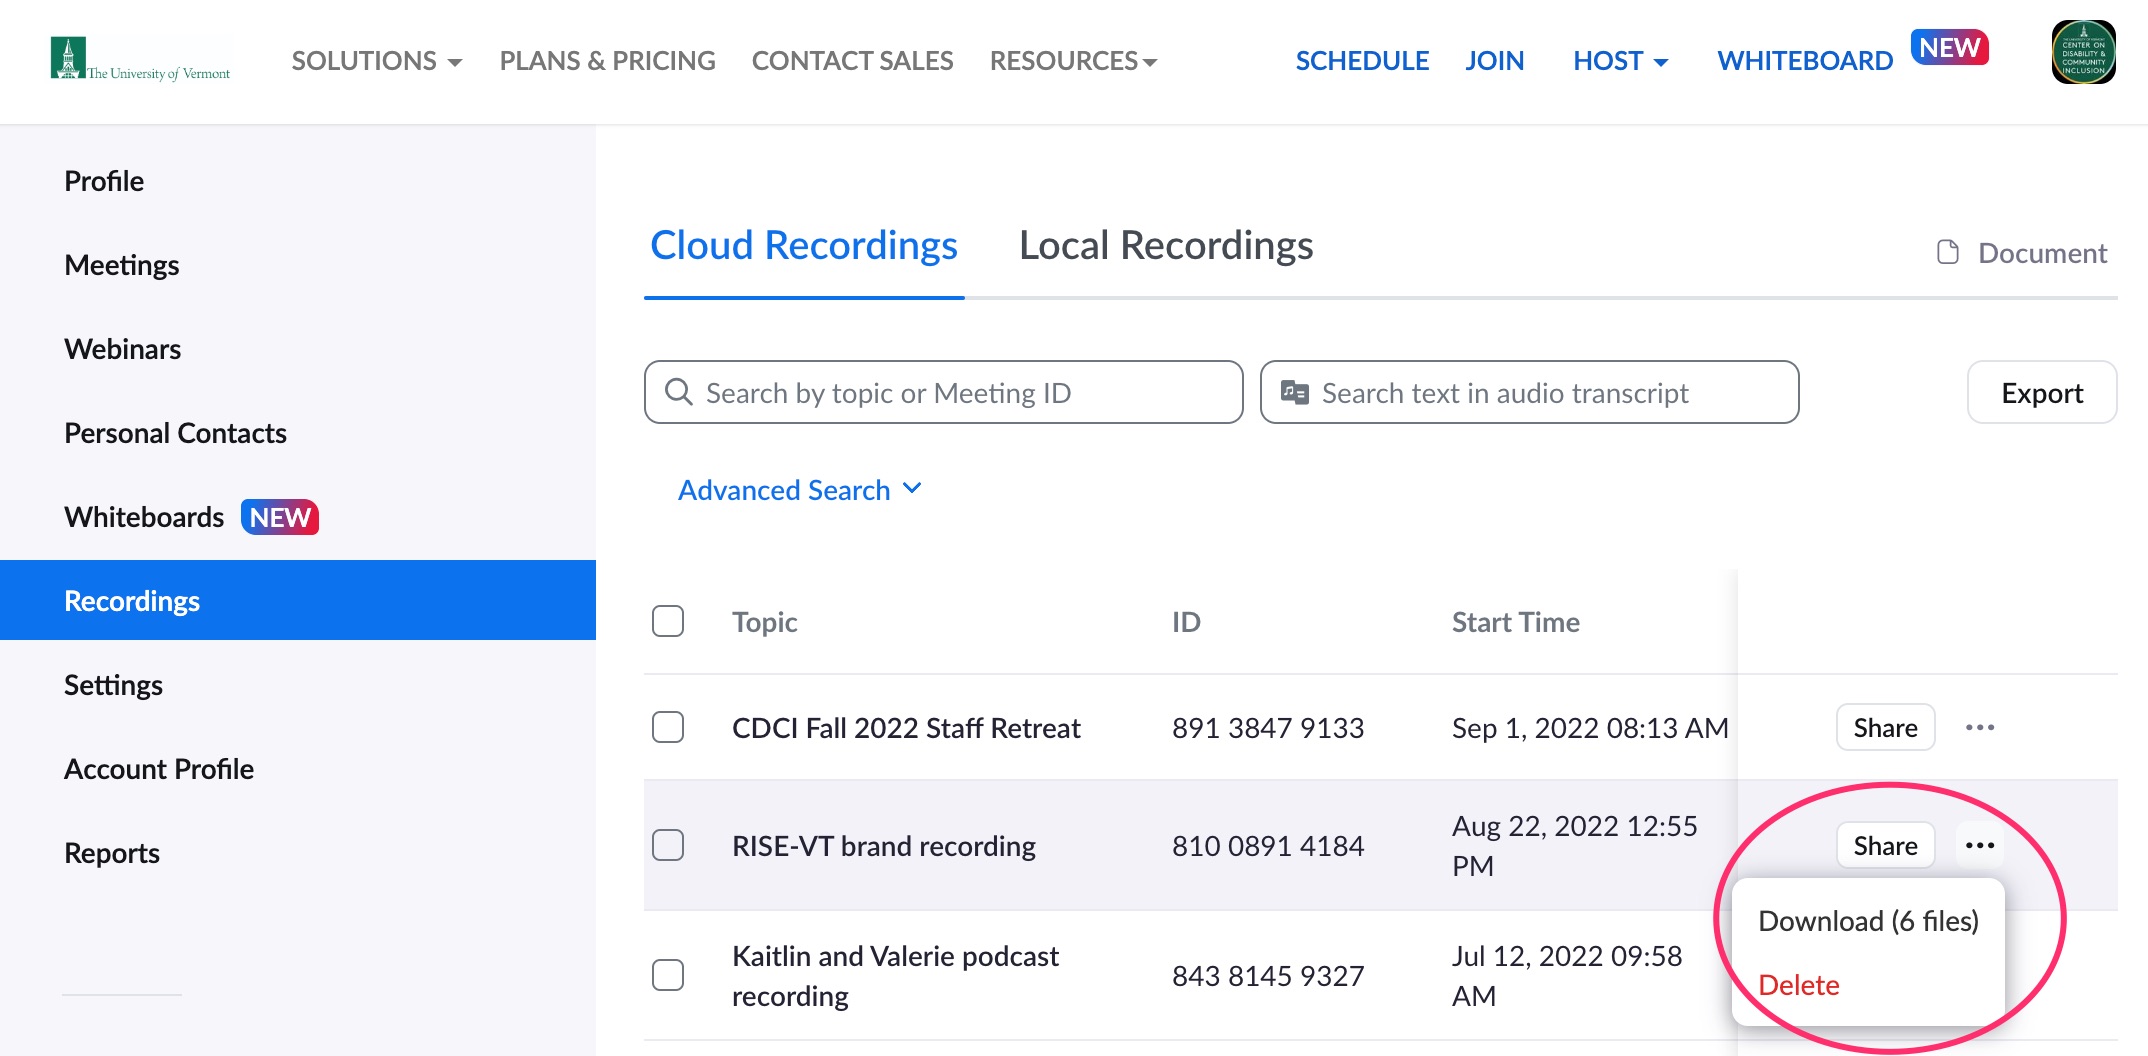
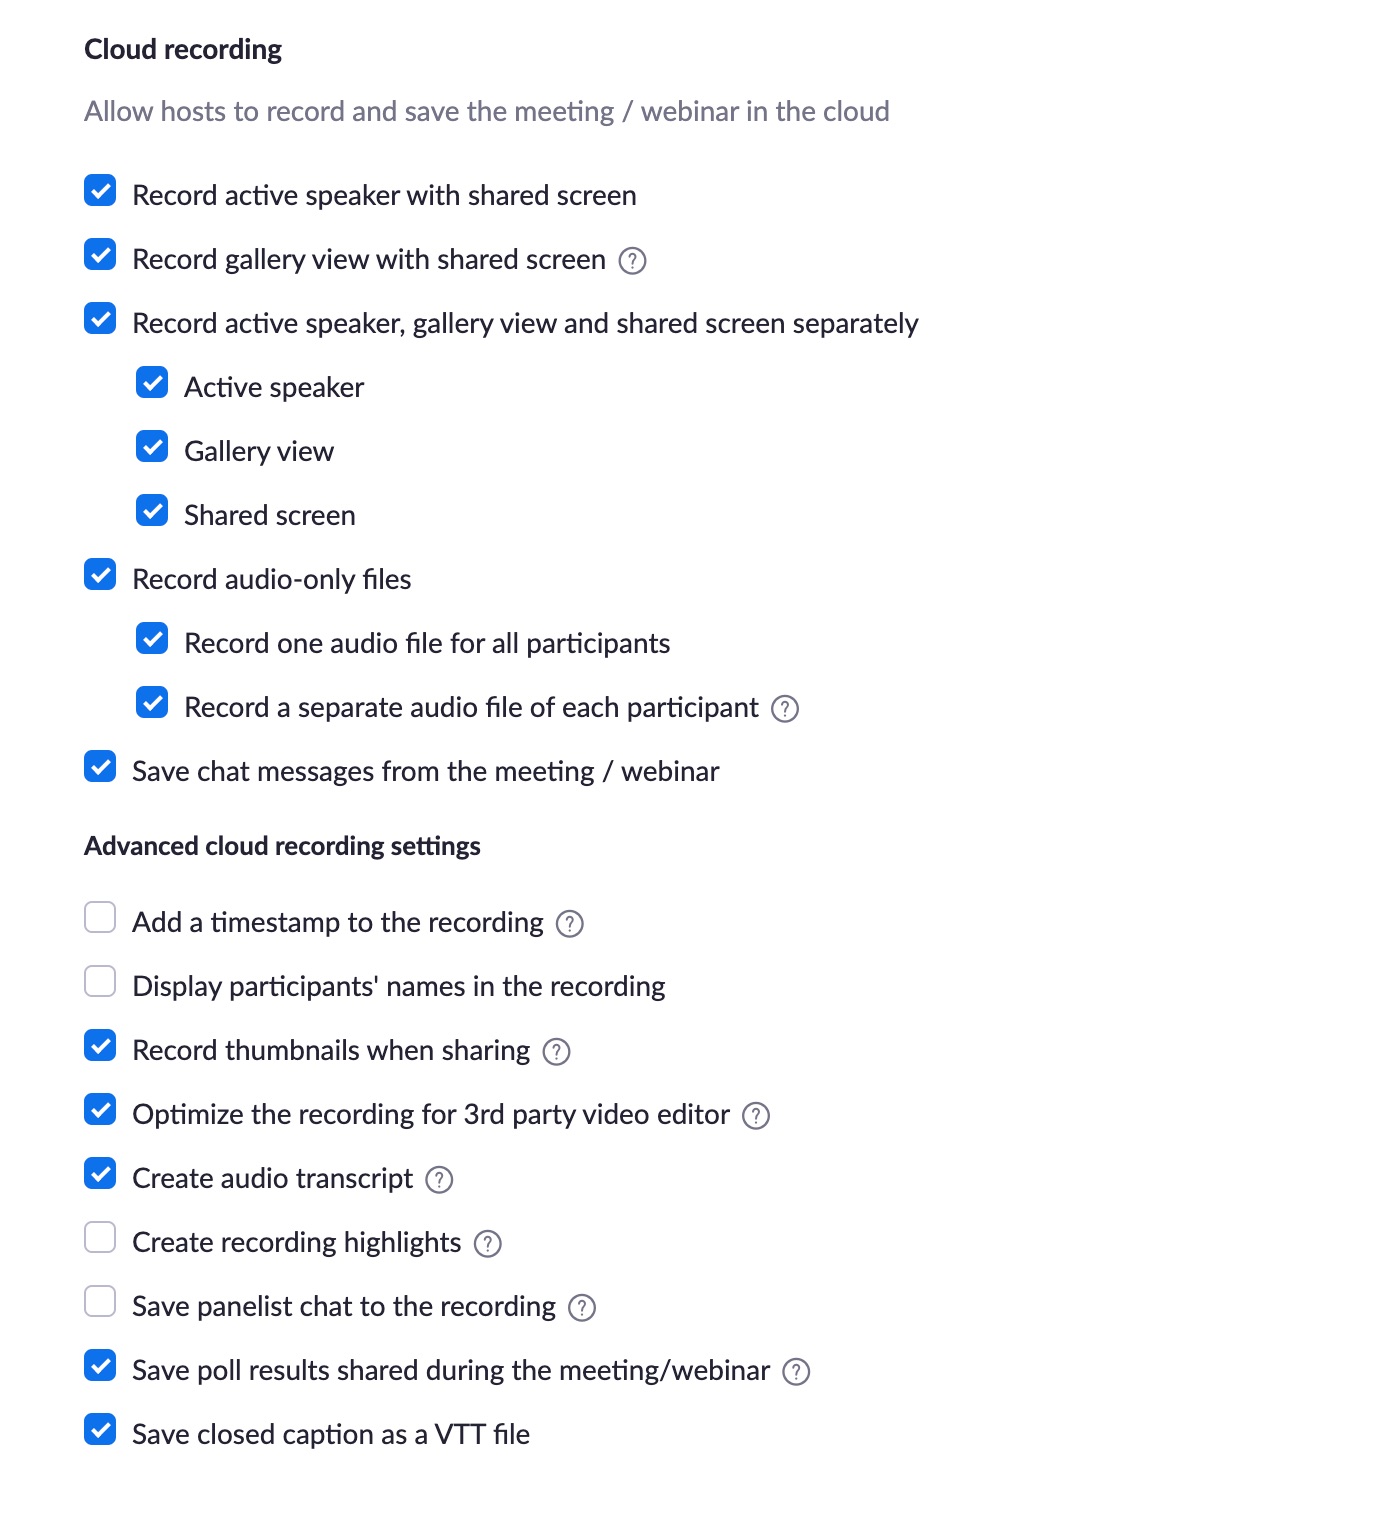
What each setting means

1. Record active speaker with shared screen

This is the standard Zoom view you see in most event recordings: a little talking head up in the righthand corner, with the slides large to the left. This is useful to have on hand to share in a hurry, or because you have an attendee who prefers this format.

2. Record gallery view with shared screen

This is a great version of the video to have for editing the Q&A portion of an event, especially if you have a lively discussion.

3. Record active speaker, gallery view, and shared screen separately

This is the key setting for creating a great recording to share. It gives you the most flexibility and the highest resolution footage to work with.

4. Record audio-only files

This way you wind up with an audio-only version automatically, rather than having to export it from a video file. Of course, if you edit the footage, you'll want to export your audio from the edited version, but there's no harm in having more material to work with, especially if you need to get a recording out in a hurry.

5. Save chat messages from the meeting / webinar

If your presenter or moderator doesn't read messages in the chat aloud as part of their presentation, you might miss a reference. There's nothing worse than having a presenter say, "That is SUCH a great point in the chat!" and not have the chat on hand to know what they're referring to. Plus with the chat file, you can copy/paste directly into your transcript.

Advanced Cloud Settings

6. UNCHECK: Add a timestamp to the recording

Zoom puts the timestamp down at the bottom of a recording, where it generally block the captions. Unless it's critical to know time and date, uncheck this setting.

7. UNCHECK: Display participants' names in the recording

Zoom puts participant names to the bottom left of the recording, where again, they can block the captions. This isn't critical (you can re-focus your recording if you need to work around them) but it's helpful. 

Pro-tip: Make sure presenters and attendees remember to introduce themselves when they speak. This is helpful for guests who are blind or low-vision, or who have other cognitive disabilities. It will also make it easier for you to edit the transcript.

8. Optimize recording for 3rd party video editor

You'll get better footage.

9. Create audio transcript

Will save you having to send out and purchase a transcript to work from.

10. Save poll results 

More data is better data, plus you can add it to your visuals or transcript later.

11. Save closed captions as a .vtt file

This will give you a downloadable .vtt file that you can then easily turn into an .srt captions file using an online tool. We recommend VEED.io

12. Make sure you're recording to the cloud, not to an individual laptop

This ensures that your recording is backed up somewhere other than one person's hardware, and will make file-sharing easier if you're working as a team.

Be sure to let guests know the event will be recorded

As part of making your events accessible, you want to let guests know in advance that the session will be recorded, as well as how that recording will be shared. Will it be made public? Just sent to attendees? Used as part of a class or online module? #InformedConsent

During Recording

Double-check that you're recording.

As the event gets underway, make sure you either see the "Recording in Progress" note at the top left of the screen, or make sure you hit the Record button.

Hit Record early; you can always cut footage out, but you can't add footage that was never recorded.

Then relax, and enjoy your event!

Make sure you have consent in the moment

Remind guests that the event is being recorded for distribution, and they're welcome to turn their cameras on or off as they need. And that if they have their camera on, they're consenting to have that footage distributed publicly.

After Recording

Download your files from Zoom

Download all your files from the event from Zoom. You can find your recordings by logging into your Zoom account and looking in the lefthand menu for "Recordings". Once you're in the Recordings section, you'll see a list of your recorded sessions. Find the session you're about to edit, and click on the two dots in the righthand column. This will bring up an option to download all your files, rather than just one video. 

A screenshot of a Zoom account, showing the Recordings section, as well as where to download all your files. The download section has been circled.


Pro-tip: after you download your files, move them out of your Downloads folder (or off your Desktop) to a dedicated folder for this one particular project.

Import your files into a video editor

We'll use iMovie to walk through how to edit the video into a finished product, because iMovie is very popular and readily available. If you have FinalCut Pro or Premiere, you will easily be able to translate from iMovie.

Open up iMovie and create a new blank project. 

Add all your downloaded video files to the Media section of your iMovie project.

Create a presenter cut of the session first.

First, choose a neutral background.

Go into iMovie's Background options and choose a neutral-colored background to set your recording up on, such as dark gray or dark brown. You want something that's not going to distract from your speakers, their slides, the ASL interpreter, or the captions. Add that background to your timeline. 

Next, add your presenter to the timeline as picture-in-picture.

Bring your speaker-view video to the timeline and add it above the background. This is how iMovie creates cutaway footage, and it brings up a menu of options for your cutaway that includes picture-in-picture. Set your speaker view up as picture in picture, and move them to the righthand portion of the screen. Center them vertically on the screen. You want to leave enough room for the slides to go on the lefthand side. 

Screenshot of an iMovie workspace with a neutral background loaded to the timeline, speaker view footage on top, and where to find the picture-in-picture setting.

Then export the resulting video to your working directory. It's helpful to label your file "Event speaker view" or something similar.  Using iMovie's file menus, go to File > Share > File...

Choose the settings which will give you the best quality / least amount of loss possible. 


Add the slides to your presenter cut.

Import your shared-content video to the project, and add it to the timeline.

You're going to add your shared-content video to the timeline as cutaway footage -- on top of the presenter cut -- and then set your shared-content video to picture-in-picture.

  1. First, bring your presenter cut back into the timeline.
  2. Next, add your shared content-only video, your slides view, into the timeline above the presenter cut.
  3. Then change your slides view to picture-in-picture, and move it to the lefthand section. Make sure you leave space at the bottom for captions to run. Depending on the platform, captions can take up nearly a fifth of the screen, and you don't want captions running over the content of your slides.
  4. Make sure your audio lines up exactly. Play the video in your timeline. It should have no echoes or "doubling up" of the audio.
  5. Set the audio on one of your files in the timeline to mute. That way only one audio will play in the finished product.
  6. Export your file.


Text: Accessibility Resources

If you have questions on this process or accessible media production in general, please get in touch with Audrey Homan, either through this web form or via email: audrey.homan@uvm.edu.