
This is a step-by-step tutorial on how to create a hero banner for the home page of your UVM Drupal website. We are offering two approaches here — beginner and advanced.
Both of these tutorials use Adobe Photoshop. (Photoshop CS6 or Creative Cloud) Check out the "Plan for Images" page if you prefer to use free image editing tool like iPiccy ... you'll just be limited in your image editing options.
Need access to Photoshop?
If you don’t have a Photoshop license with Adobe, Photoshop is available on computers in the Waterman Computer Labs, located in rooms 113Q and 113T in the basement of Waterman Building, 85 South Prospect Street, weekdays, 7:00 AM – 5:00PM. See the Lab Facilities for details on hardware and available seating.
Beginner Approach
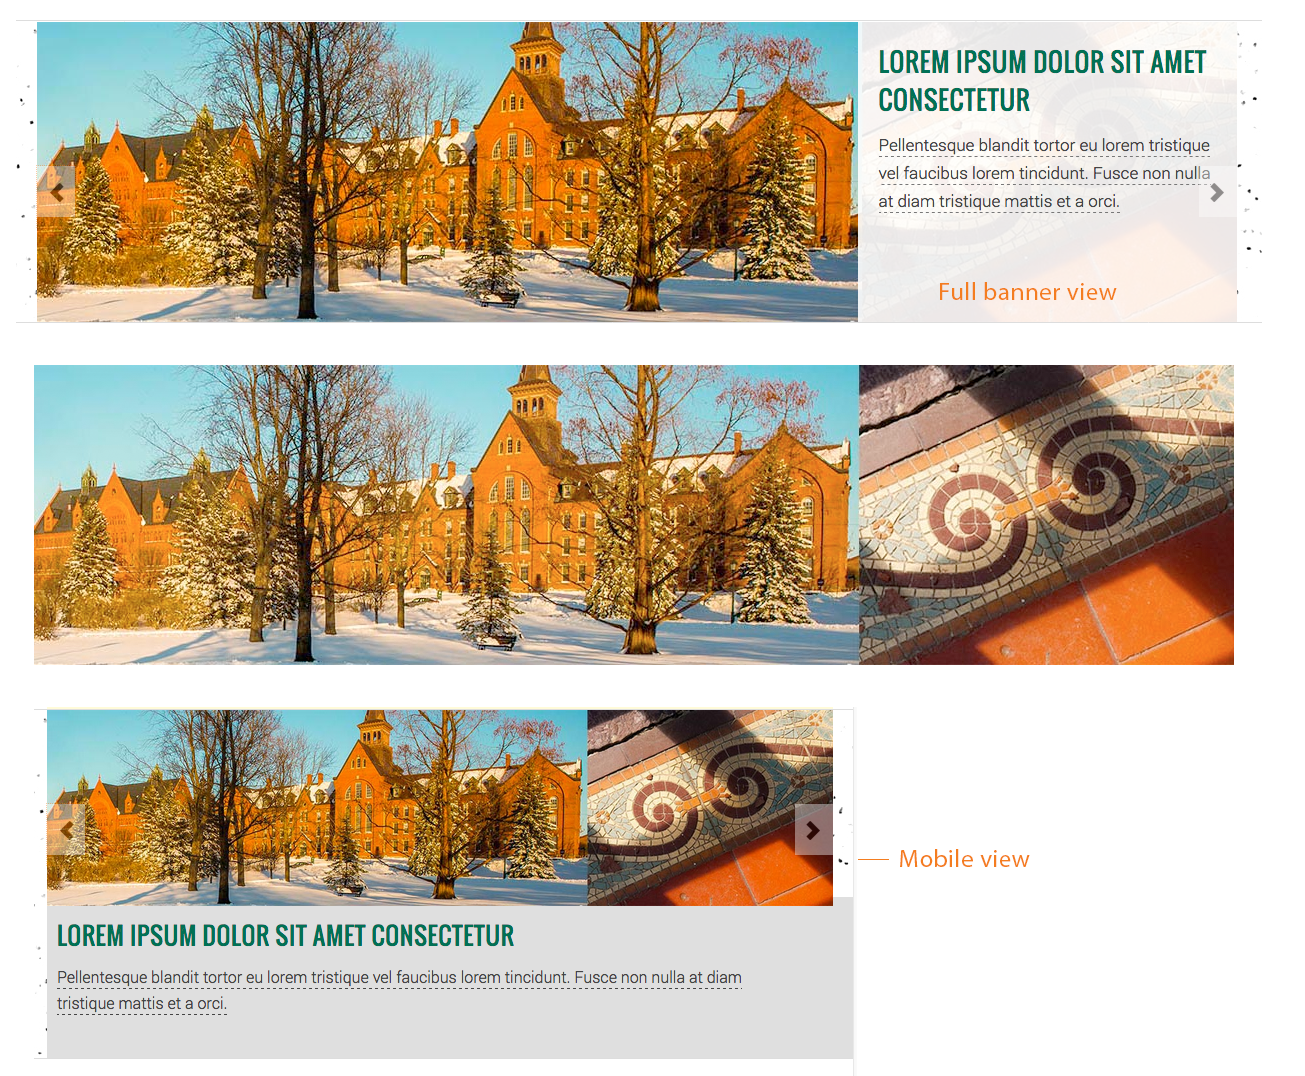
Our web banner for site homepages is 1200x300 pixels. (Lower level landing pages have 1200x260 banners) It can be difficult to find a photo that works easily in this wide, horizontal format. Often, you finally find a great photo that you want to use only to realize that it doesn't really lend itself to this format, or part of the photo will be cut off by the caption overlay box on the right. What do you do? Here's a quick primer on sizing that banner photo.
Building a photo that works in your banner space using Photoshop
- Find a photo (the photo can be the same size or larger; never scale a photo up).
- Crop the photo to 821 x 300 pixels (image > crop).
- Expand the box width to 1200 pixels wide, keeping the image flush left. (image > canvas size).
- Find a second photo. This one will be used on the right side of the banner image, on computers (vs tablets/mobile), this image will be covered by the shadowed message box on the right.
- Size the second photo to 379 x 300 pixels.
- Copy and paste this image into the expanded 1200 x 300 pixels box with the flush left image. Place this second image to the right.
- Save photo as a jpg at 100% maximum quality (Drupal will optimize).
Scaling an existing photo inside the 1200 x 300 space using Photoshop
- Find a photo that is at least the size that you want to end up with (the photo can also be larger).
- Copy the raw image.
- Paste it into a pre-sized 1200 x 300 pixels box.
- Go to edit > transform > scale.
- You can scale from there by using shift dragging corner in/out.
Advanced Approach
The alternate approach works with smart objects and masks in Photoshop. There's a little learning curve but worth the effort, especially if:
- You are using more than one image
- Your chosen image is hard to fit in the slim rectangular banner shape
- You have many images and the diagonal banner approach is desired
- You need more control over the part of the image that is under the caption overlay on the right
We'll show you how to edit the banner template files and work with smart objects to replace the template content in Photoshop with your images. The end result will be a 1200x300 web-ready banner image that you can place on your UVM website.
Drupal Templates that Use a 1200x300 Banner Image
All of our homepage templates have a 1200x300 pixel banner. Depending on the Drupal layout you are placing your image into, the banner image can be static or a slider with multiple images.
What you need to complete this tutorial:
- Access to the Photoshop 1200x300 Banner templates
- Photoshop CS6 or Creative Cloud
Step-by-Step Tutorial
STEP 1: Select the banner template you want to work with
The home page banner can be a single image or composed of multiple, side by side images. The number of images you choose to have in your banner will depend on your communication needs, the image assets you have to work with, visual preference and the image asset format and quality.
Examples for each template are shown on the next few pages. If you are not sure which template you want to work with and have space on your computer’s hard drive, download the Master File which contains all template options.
See below for links to individual file templates.
Here’s a snapshot of the Layers panel showing the different template options.
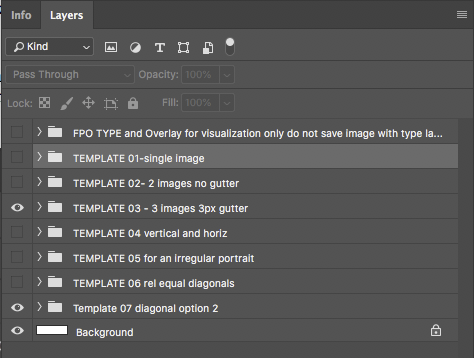
The master file with all the template options can be quite large. Alternatively, if you know what template you want to work with, you can just download the template for the desired banner approach.
Banner Captions
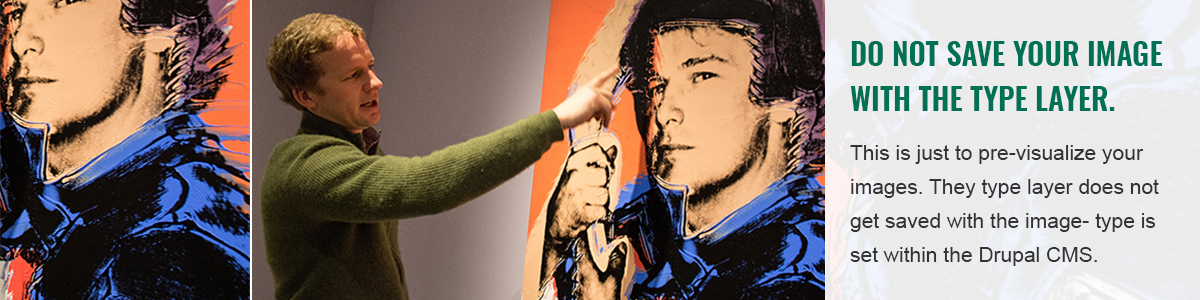
All banners on the Drupal site are intended to have a caption overlay on the right side.
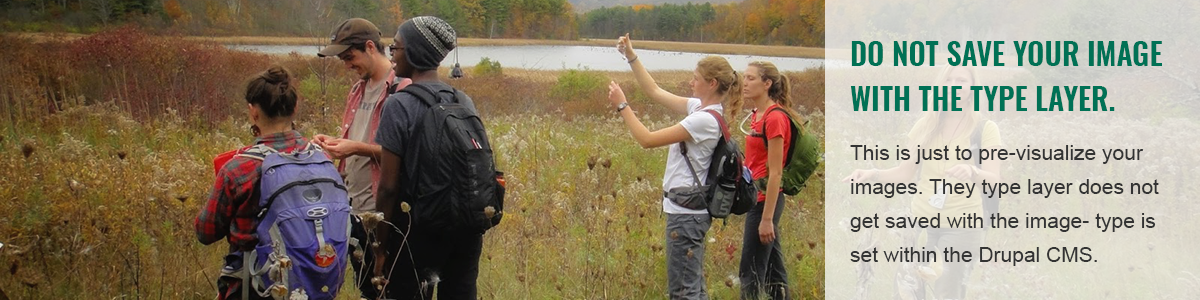
We have provided the “FPO TYPE and OVERLAY” layer in the Photoshop document so you can previsualize what the caption type overlay will look like in Drupal. This helps when composing your banner image. (FPO = For Position Only)
Important: Make sure you don’t save your banner though with this overlay visible. This is a really important point for your successful creation of a banner image and for your banner caption to meet accessibility requirements.
STEP 2: Download the photoshop banner template file to your computer
Download the desired Photoshop template. We have provided a visual reference for each template.
Template 01- Single Image
Photoshop Template (2.9 MB)
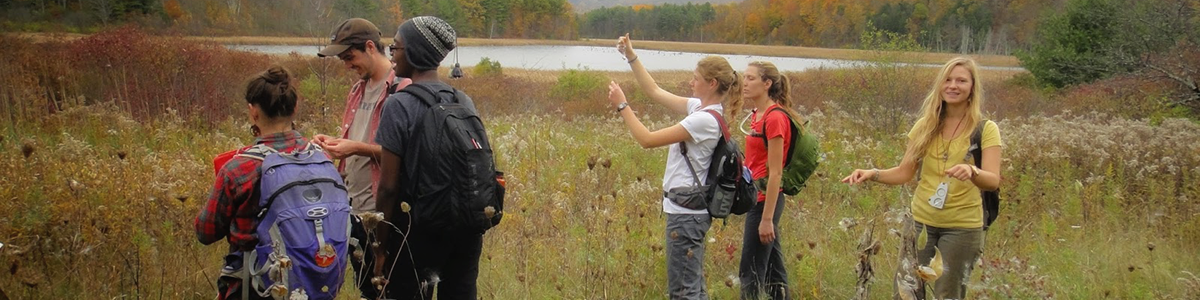
If you are fortunate to find an image that works full size, then you can use a single 1200x300 pixel image for the banner.

Template 02- 2 images, no gutter
Photoshop File (9.7 MB)
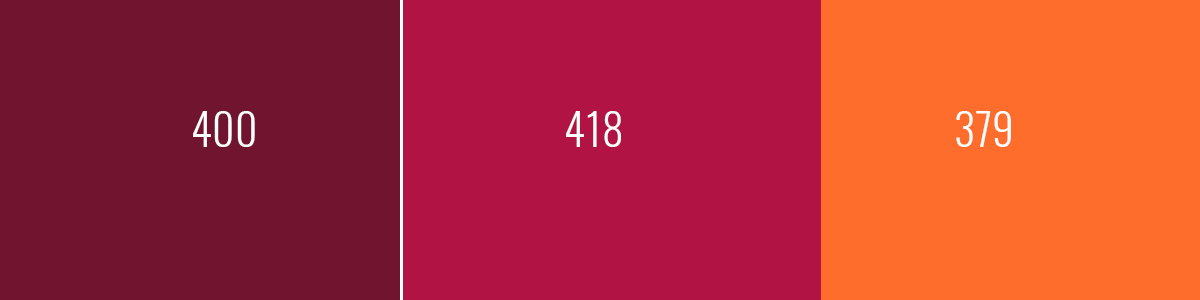
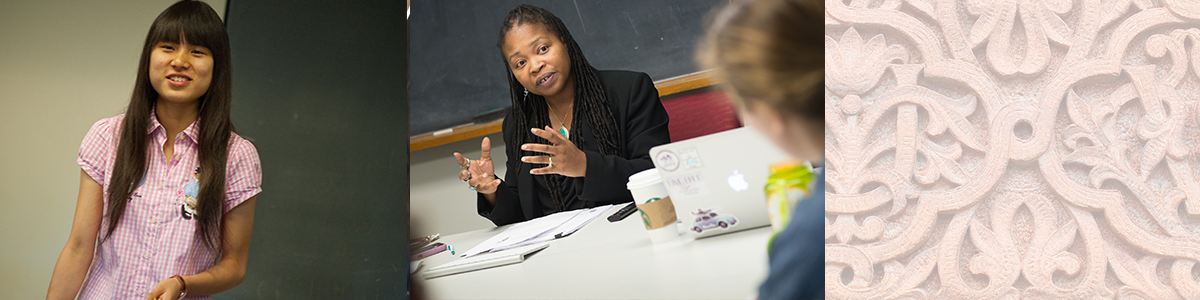
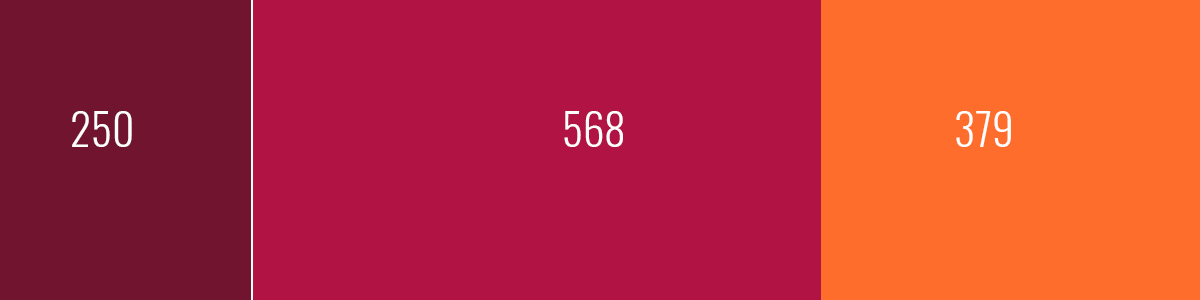
Often though, your image doesn’t lend itself to working as a 1200 wide image. Template 02 offers a solution to this problem by compositing two images into one 1200 wide image. The image is 300 pixels high with the left side at 821 pixels wide and the right at 379 pixels wide.
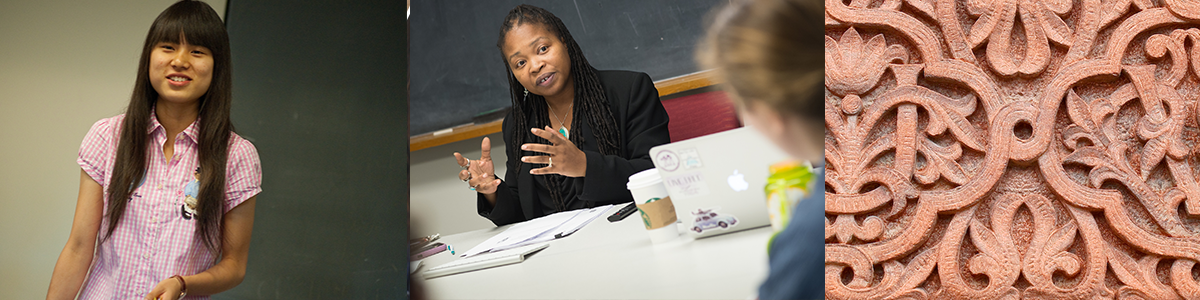
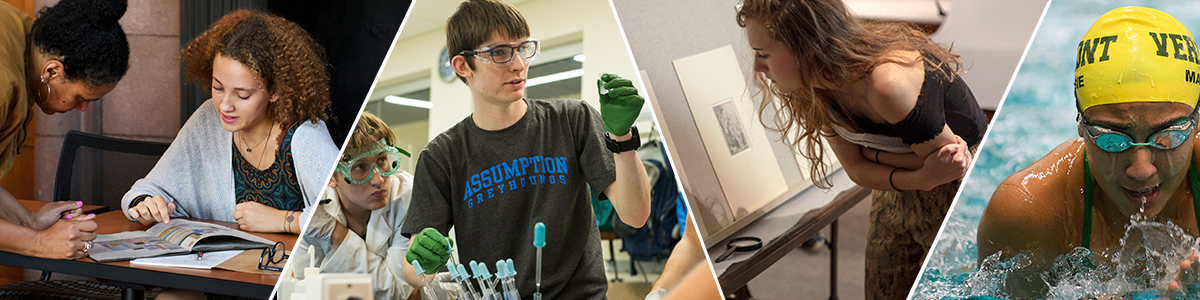
Note that the 379x300 content will be covered up by an overlay if you have a caption. If your image will have a caption, there is less concern about the content of the 379x300 region. One solution for this area is to pick up a detail of the larger image to the left, or place a detail of something related. You just want to give some texture and make sure that the caption remains legible.


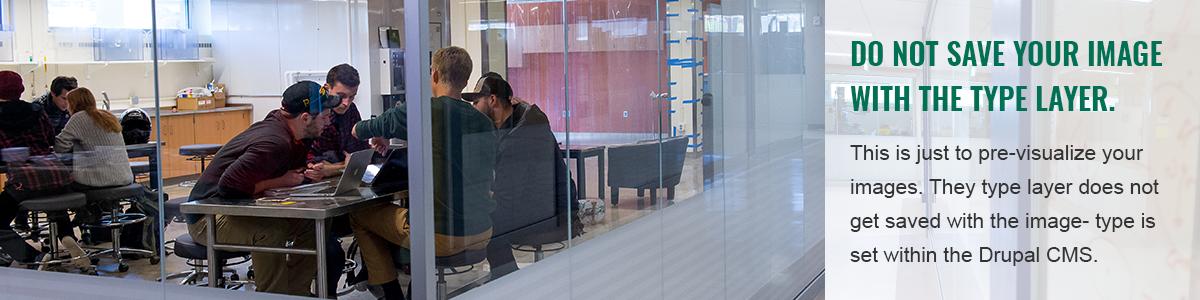
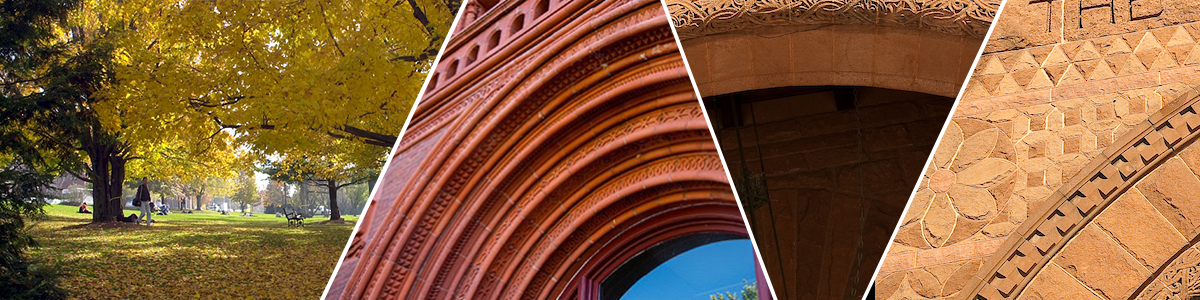
Another good formula for the image on the right side under the caption is to use an architectural detail of a building on our campus. Here is a good example of this approach:
Template 03- 3 images, 3px gutter
Photoshop File (95.5 MB)
Sometimes we need to “tone down” or “push back” the image in the right to make the caption overlay more readable. We have included white and black transparent overlay layers that you can make visible and the adjust the level of transparency as needed.
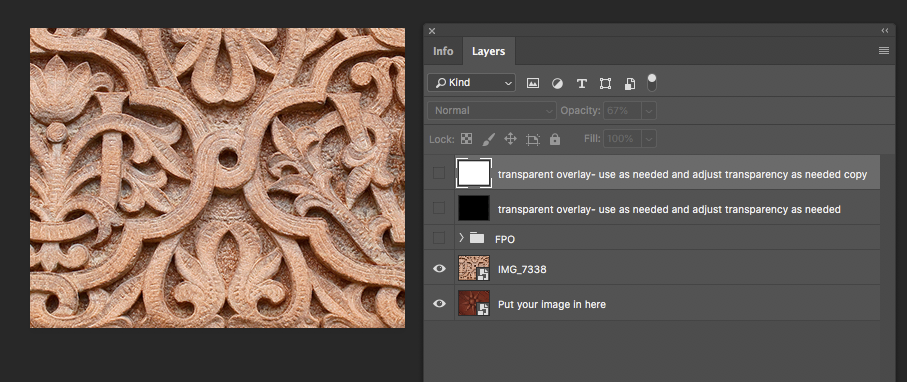
This screen grab shows the layer with a transparent white overlay.
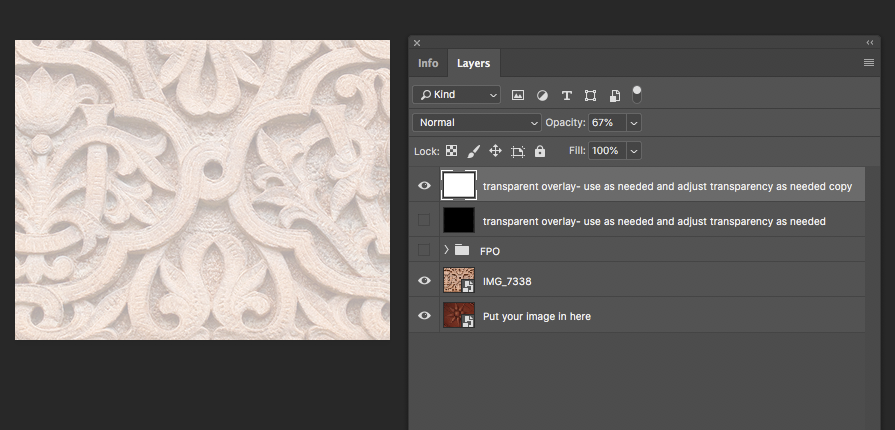
In place, it looks like this: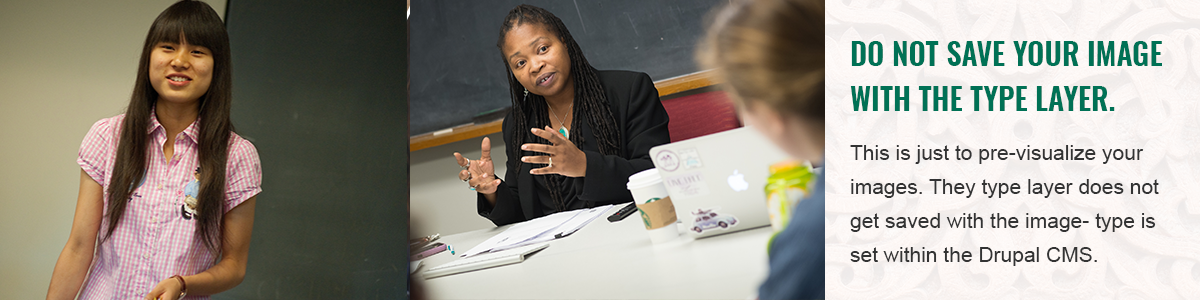
Template 04- Horizontal and Vertical images
Template 05- Irregular Bio Photo Size
TEMPLATE 05 for an irregular portrait
Photoshop File (89.6 MB)
If your banner calls for a portrait and all you have to work with a small image or headshot, this template offers a work-around for making the best of a difficult photo situation.
The image gets placed as a Smart Object in the middle panel. It can vary in width but will fill the 300-pixel height.
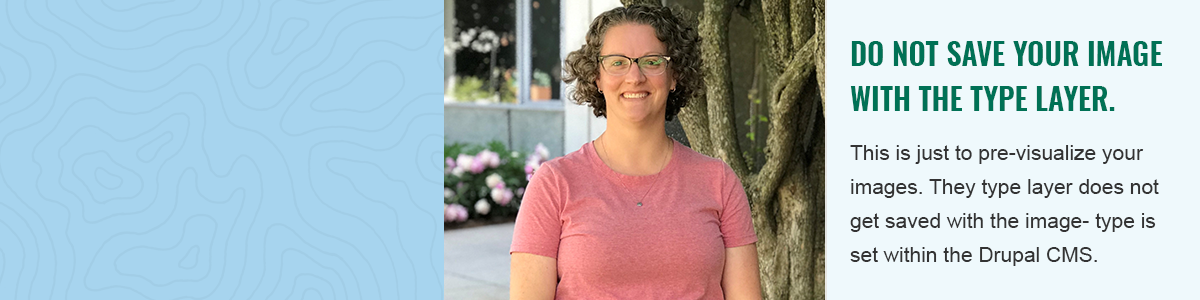
The pattern on the left is on-brand filler content.
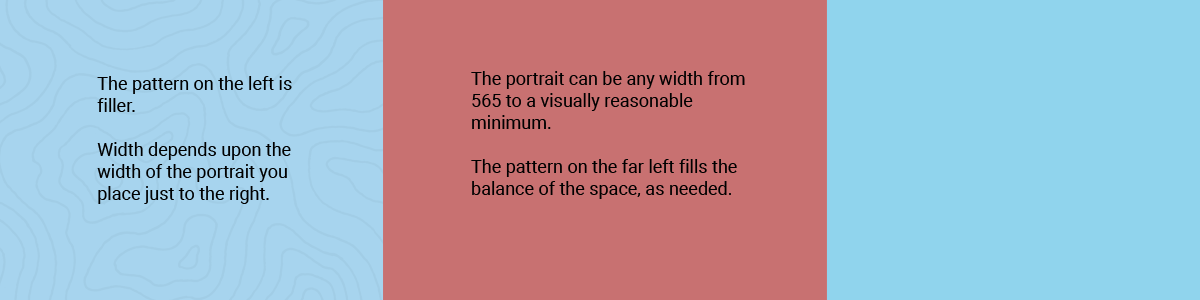
A few different patterns and background combinations have been provided as layers for you to choose from.

Template 06- Relatively Equal Diagonals
Template 07- Diagonals Alternate Option
TEMPLATE 07 Irregular diagonals
Photoshop File (15.3 MB)
The diagonal templates would be used when your banner calls for using a few images without the caption.
Template 08- 2 relatively equal diagonals
TEMPLATE 08- 2-up diagonals
Photoshop File (11 MB)
A banner composed of two diagonally cropped images
The diagonal templates would be used when your banner calls for using a few images without the caption.
STEP 3: Rename the file on your desktop
Rename the file on your desktop appropriately for your project. Suggested filename format:
Sitename_HP-Banner_1200x300_01.psd
For example: For the Center for Cultural Pluralism website, the filename would be:
CCP_HP-Banner_1200x300_01.psd
“01” is the file version number and you can increment this so you always know the latest.
 Filenames cannot have spaces! Use camelCaseNaming, hyphens or underscores if you need visual separation in your filename.
IMPORTANT! Filenames cannot have spaces. Make sure you name your files with either camelCaseNaming or with hyphens or underscores. use-hyphens_or_underscores.
STEP 4: Placing your image into the Photoshop template
Once you have your Photoshop file open from your desktop, open the layers panel and expand the layer group “TEMPLATE 03 - 3 images, 3px gutter”. Then expand the “LEFT image” layer.
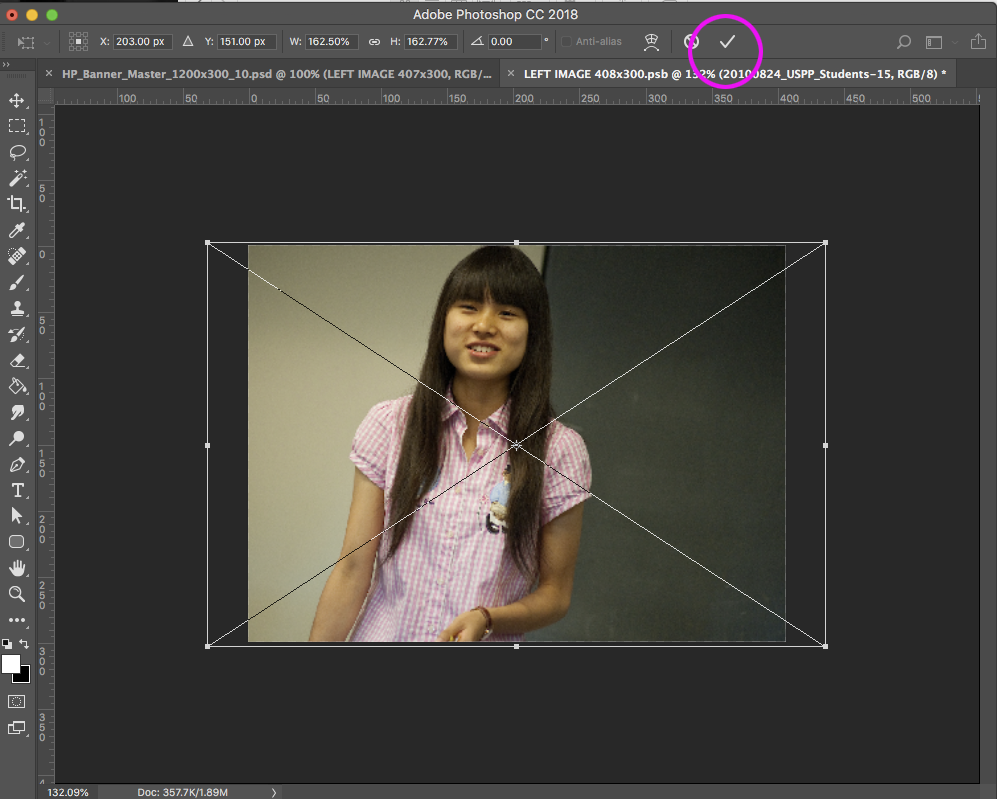
You will see another sub layer called “LEFT IMAGE 407x300: replace the image in the smart object”. Select this layer in the Layers panel as shown in the screen grab below.
Then go up to the Layer menu in the Menu Bar, choose Smart Objects, and then choose Edit
Contents.
Or, a faster way to open a smart object is to simply double-click on its thumbnail in
the Layers panel.
The smart object opens in its own separate document. If we look in the tabs along the top, we see that the name of the smart object’s document is “banner_left_408x300_a.psb”.
Now that you have the Smart Object open, select File/Place Embedded. Locate the image you want to work with then double click on the image to place it in your file. The image will paste as an embedded Smart Object, ready for re-sizing.
To resize the image within the frame, press "command + t" on the keyboard (Mac), "control + t" (Windows) or select Edit / Free Transform from the menu to scale your image. Press and hold the Shift key on your keyboard to constrain the aspect ratio of your image, and then click and drag any of the corner handles.
The Shift key locks the aspect ratio of the image as you drag so you don’t distort the
original shape.
If you want to move the image inside the frame, click anywhere inside the Free Transform box and drag the image into place.
Smart Objects are like a Photoshop document within a Photoshop document. You can resize them and transform them without losing image quality.
When you’re done, click the checkmark in the Options Bar at the top of the Photoshop canvas window to accept it.
STEP 5: Save the Smart Object in the main document
When you are done editing your Smart Object, just save it (File/Save or command-S) and the close it (File/Close or Command-W). The nested smart object will close and the edits will appear in the main document.
Double-click the Smart Object layer again if you need to do any more edits, scale it or change the position of it.
Repeat these steps for the other image blocks in your banner.
STEP 6: Saving a Web-Ready Image Asset
When you are satisfied with your work, make sure you save the Photoshop file. To export a web-ready asset of your banner, make sure you have the desired combination of layers visible in your Photoshop document and the “FPO Type and Overlay” layer is not visible.
Save your banner by selecting File/Export/Quick Export as PNG. You can also save it as a JPEG (whichever looks best) by File/Export/Save for Web.
Make sure your JPEG is saved at 100% quality. Unless your image is over 1MB, there is not need to optimize it before uploading to Drupal. Drupal will optimize it on upload.
If you image is over 1MB, then optimize for web with TinyPNG prior to uploading to your Drupal website. Tiny PNG is a web application that is super easy to use. Just drag the image you want to optimize into a window on the app, and Tiny PNG will reduce the file size for you without a loss of image quality.
1200x260 Banner template for other landing pages
We have also made a 1200x260 banner template to help with the creation of banners for the lower level landing pages. The above instructions will help you work with this template also as the file is constructed the same way.
Resources and More about Smart Objects
Smart Objects are one of the most useful tools in Photoshop but can difficult to understand and take full advantage of. Once you get over the initial learning curve though, you will find that they are not really that hard to use and offer many advantages, including non-destructive editing of your original file. You can scale, rotate and transform an image layer without losing the original data or image quality because the transforms don’t affect the original data.
You may want to check out LinkedIn Learning (formerly Lynda.com) for Photoshop tutorials about working with Smart Objects. This video has a segment that is less than 5 minutes ad covers the following:
- Editing Smart Objects
- Working with multiple layers
- Replacing contents
- Using Smart filters
- Nesting Smart Objects
You can login to the LinkedIn Learning platform with your university login to have access to all the training videos.
Photoessentials.com also has a video from Steve Patterson that is useful. Many of the steps shown in this tutorial are replicated here.
Suggested File Organization
It can get confusing when working with a lot of image files. We suggest the following file structure to help you keep things tidy and clear.
![]() Working (holds your Photoshop file)
Working (holds your Photoshop file)
![]() Cropped (holds the png or jpeg files ready to be optimized)
Cropped (holds the png or jpeg files ready to be optimized)
![]() Optimized (final, web-ready images that have been optimized in Tinypng.com)
Optimized (final, web-ready images that have been optimized in Tinypng.com)
![]() Original Assets (the original, high resolution images you have chosen to work with)
Original Assets (the original, high resolution images you have chosen to work with)
![]() Packages (Export of your Photoshop file. It saves the Photoshop file with all the Smart Object “photoshop big”- .psb files)
Packages (Export of your Photoshop file. It saves the Photoshop file with all the Smart Object “photoshop big”- .psb files)
If you end up working with Linked Smart Objects, we suggest exporting a "Photoshop Package" to collect your Photoshop file and Smart Object asset files in one folder. This will make sure you don't have missing linked files.
Important: Export a "Package" of your Photoshop File-- or embed your Smart Obects
Our master file works with Photoshop’s Smart Objects. Photoshop saves Smart Objects as .psb – or Photoshop BIG files. Smart Object images can be linked or embedded. If your images are embedded in your smart objects- then they get saved along with the Photoshop file. The up side is that you won't have linked images go missing and show as broken links. The down side of embedded images is that your Photoshop file can get pretty large. Conversely, if your images are linked in your smart obects, if you break the connection with those linked images- by sharing the file with someone or opening the Photoshop file on a different computer, the images will show a broken link.
Embedding your Smart Objects: Everyone has their way of working but we think it is a good idea to make sure all your smart obects are embedded so you eliminate the risk of broken image links in your files. Be warned that your file size can get large. So, To convert all linked smart obects to embedded smart objects, just select Layer / Smart Objects / Embed all Linked and Photoshop will take care of it.
To output a Photoshop Package: If you are working with Linked Smart Objects, we recommend outputting your Photoshop file as a Package and filing it in a new folder called “packages.” This will make sure that your .psb Smart Object files get saved in a known location along with your photoshop file. That way, whomever opens this file next, has the associated smart object .psb files and you won’t get any warnings that “you are missing files” or “links to the smart objects” are broken. Select File > Package and select the location where you wish to save it. Photoshop will bundle with .ps Photoshop file with all linked images in in folder. Again, we recommend the above ^^ file organization structure and saving your Photoshop package to a newly created “packages” directory.
If you have embedded all images (rather than linked), then Photoshop may complain and give you this message:
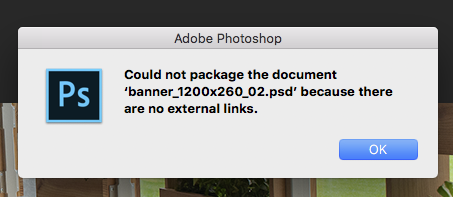
That's good news! Consider it a confirmation that you have successfully embedded all of your images in your Smart Objects and the file is free of linked images.