
Top 10 Tips for the Blackboard Grade Center
Tip #1: This Simple Setting Could Improve Your Life
In the Full Grade Center, by default, there are 10 rows of students displayed. On a large resolution screen this may be fine, but if you’re using a laptop it often means that you can’t view the column titles while at the same time using the bottom scrollbar! To fix this, go to the lower right of the grade center and click “Edit Rows Displayed” and change it to 6. You’re welcome. 🙂
Tip #2: Organize Your Columns (for your own sanity and that of your students)
The Full Grade Center is a spreadsheet. When you add new columns, they appear on the far right of the spreadsheet. If you click on “My Grades” in your Course Menu, you see the vertical layout that students see with the newest column appearing at the bottom of the list.
If you want to rearrange the order of your columns, click Full Grade Center > Manage > Column Organization. On this page, click and drag the 4-headed arrow on the left of each column name to rearrange the order.
Tip #3: Be Careful—Back It Up!
It’s a good idea to back up your Grade Center regularly, especially before adding or removing columns with grade data and at the end of each semester. That way you’ll have a copy of the Grade Center in case you need to reference it later after your course is removed from the server (generally, after two years). Follow these directions on the Knowledge Base to make a backup your Blackboard Grade Center.
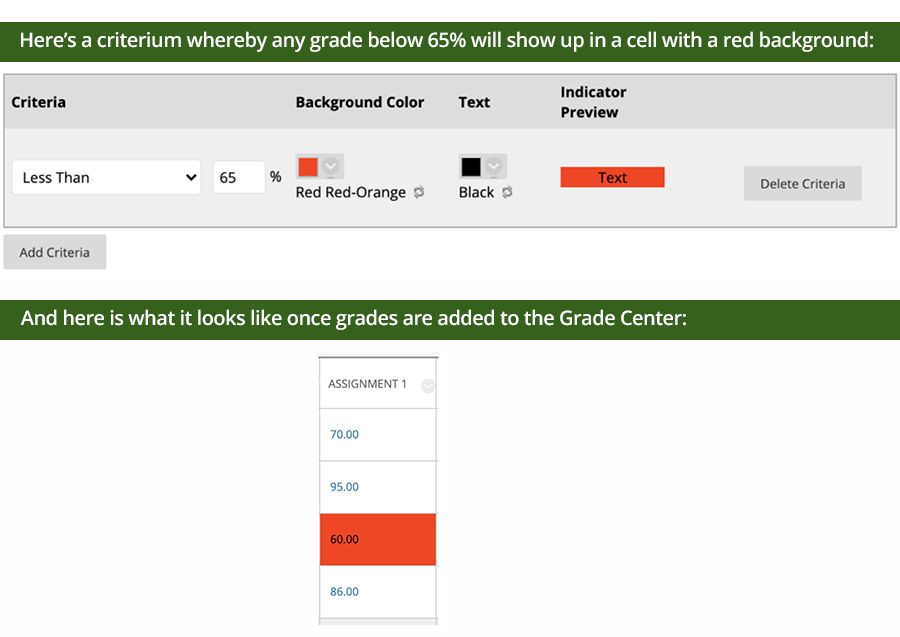
Tip #4: Use Color Codes to Highlight Grade Outliers
One of the easiest ways to see how student are doing, especially in large classes and when TAs are helping with grading, is to utilize Color Coding. You can set this up so that when certain criteria are met, grade cells will display a different background or text color. Faculty regularly use color coding to identify students who are receiving lower grades and who may need extra support. Go to Manage > Grading Color Codes check the box to Enable Grading Color Codes, then set your criteria. Read more on the Knowledge Base.
Tip #5: Check your Grading by Using Student Preview Mode
![]() The Student Preview mode in Blackboard is a hidden gem. The button (pictured left) to enter this mode is next to the Edit Mode ON/OFF button on the top right of the screen.
The Student Preview mode in Blackboard is a hidden gem. The button (pictured left) to enter this mode is next to the Edit Mode ON/OFF button on the top right of the screen.
The Student Preview mode creates a student account for you, allowing you to interact with your course as a student. For example, by going back and forth between your Student Preview account and your instructor account, you can submit assignments, then grade them, and finally view the grades as a student again. Read about how to use your Student Preview account on the Knowledge base.
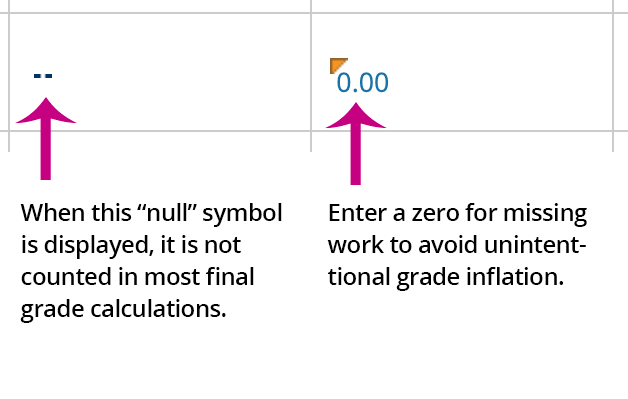
Tip #6: An Empty Cell (- -) is not a Zero
To help students know what their current grade is, use the Weighted Total column and make sure you’re entering missed grades as zeroes instead of leaving the cells empty. Most calculated columns use a running total by default and this means that the calculation only includes cells that have a score. Therefore, if a student has missed assignments and zeroes haven’t been entered in those cells, their final grade will appear inflated. Read more about running totals in the Knowledge Base.
Tip #7: Give Accurate Letter Grades
Make sure you and Blackboard are on the same page about letter grades. When the Grade Center displays grades as a score or a percentage, it’s a precise number, whereas a letter grade represents a range of numbers. We’re drawing your attention to this because not all departments or colleges at UVM use the exact same ranges. For instance, if a test is worth 100 points and a student earns an 84, should it appear as a B or a B-? You can review the letter grade schema and customize it by going to Full Grade Center > Manage > Grading Schemas and edit the “Letter” schema to align with your requirements.
Tip #8: Save Time (and Scrolling) with Smart Views
Smart Views are filters for your Grade Center. You might want to use a Smart View to filter the columns that are displayed (such as viewing only Discussion Board activity). Or, you might want a Smart View to filter the rows that are displayed (to show a subset of students, such as Groups or by TA).
You can even customize the Grade Center submenu on your left course menu to have quick links to “favorite” Smart Views (by default, two already exist for Assignments and Tests).
Read more about Smart Views on the Knowledge Base including how to create them and how to choose which ones are marked as “favorite.”
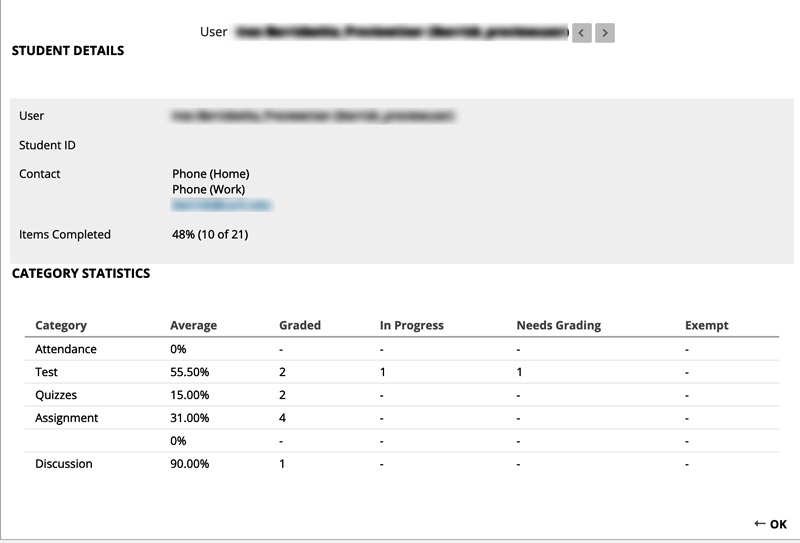
Tip #9: See One Student’s Statistics
To get an overview of grades for a specific student, click the menu button in the cell where their name appears and choose View User Statistics.
Tip #10: View Grade History Reports to Find Deleted Grades
You can recover deleted grades with the Grade History report. All grade entries and submissions are recorded in the Grade History area of the Full Grade Center. You can view these entries in your browser or download them all into Excel. Read more about where to find the Grade History Report and how to use it on Blackboard’s help site.
BONUS TIP
Blackboard has a YouTube channel with many excellent video tutorials. Search for your topic and skip tutorials relating to “Ultra” (a different version of Blackboard).