
Photoshop elements can be used to make banners, interesting text, and enhance photos for use on the Internet, in documents and presentations.
1. Welcoming Screen
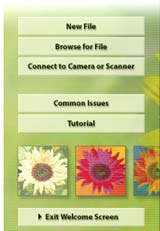
Your Welcoming screen offers you some options. You can start a new file or you can open an existing one with the Browser. You can also connect directly to a camera or scanner to import graphics.
There is even a tutorial to help you understand some of the basics of the program.
I have included links to additional tutorials at the end of this handout.
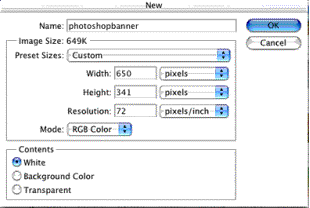 2.
To Begin a New File, Select that option
and your canvas dialogue box will appear to let you customize your canvas.
2.
To Begin a New File, Select that option
and your canvas dialogue box will appear to let you customize your canvas.
For graphics going on the web your
· Resolution should be 72
· Mode RGB color
· Your width should not be greater than 800 pixels .
· If you do not wish to use pixels, you can look at sizes in inches
· Click OK and your canvas will appear.
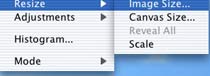
3. Photoshop Elements Tools
A detailed description of all the
tools on the tool bar can be found at http://www.arraich.com/elements/ref2/aatoolbar2.htm
The tools are identified below.
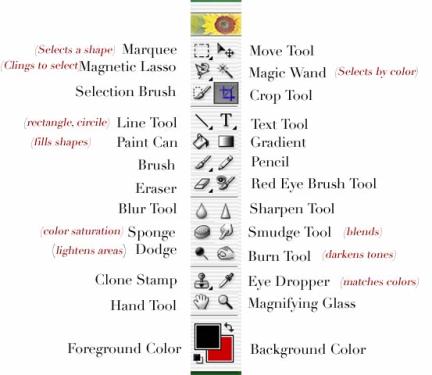
 In
addition to the tools on the tool bar, everywhere you see a small arrow, as in
Text Tool; there are additional tools also available. Double click on the T tool and you will see the following options.
In
addition to the tools on the tool bar, everywhere you see a small arrow, as in
Text Tool; there are additional tools also available. Double click on the T tool and you will see the following options.
4. To create Text
a. Begin a New File as described in #2.
b. Select the text tool ![]()
c. Where you click on your canvas will determine where your text will start. You can always move this later with the move tool.
At the top of your canvas, the text option menu will appear.

d. You can select any font but make sure you use web safe colors in selecting your color.
e. One new and interesting tool is the warp tool.
To Warp Text on an editable layer: On the Layers palette, click the layer you want to warp. To open the warp text dialog box choose layer/type/warp. In the Warp text dialogue box, select the warp effect you wish to use and adjust it’s effect.
![]()
f. Once you are happy with your font choice and look, click the check button to commit these choices.
You will be able to go back and edit later.
Use your move tool ![]() to move your text field to the desired
place on your canvas.
to move your text field to the desired
place on your canvas.
TIP: For greater flexibility, place individual words or characters on separate layers so they can be moved around independently. (Create a New layer from the Layer Menu)
5. Opening Windows. Photoshop has many tools, so many that it has windows of tools that are hidden. Under the windows menu you can highlight a window’s name to open it. A couple of windows that are useful to keep open are layers and layer styles.
6. Working in Layers
One of the strengths of Photoshop is that it lets you create separate layers and apply effects and modifications to just that layer.
If you wish to go back to a previously written text layer, double click on the T tool from the Layer menu. You will then be able to edit your text as long as you have not flattened your layers. Select the text you wish to change and then the features you wish to change. You can select all of the text or just a letter.
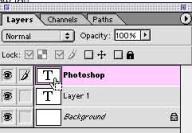
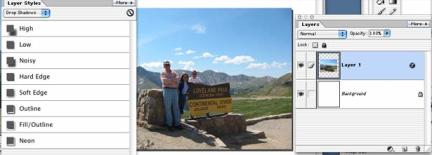
7. You can also place a style to a layer of text graphic.
Select the name of the layer you wish to change- as shown in the screen shot below. My Electronic Portfolio layer has been selected. Then the Layer Style menu was opened and a shadow effect was applied.
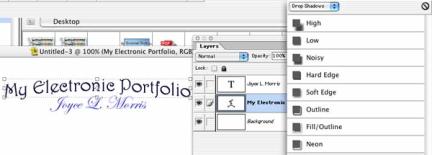
You can see the different layer effects available by
browsing through the styles menu: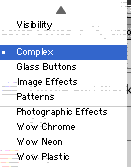
There are a number of interesting effects available to apply
to your text. To remove all styles press the ![]() in the upper right
hand corner of all style menus.
in the upper right
hand corner of all style menus.
8. How to Crop your text. If you are finished with your text you will want to crop off un-used space ![]() .
Pull the crop tool over the piece you want to save, it will appear brighter and
hit return.
.
Pull the crop tool over the piece you want to save, it will appear brighter and
hit return.
9. How to save your text for the web.
In the File menu there is an option to save for the web, at this time there are only two reliable graphic formats supported by most browsers and that is .gif and .jpeg
Generally, jpegs are for photos and. gifs are for text and drawings. Jpegs take up more memory but distribute colors better.
 You
will be able to see your graphic as it looks in Photoshop in a gif or jpeg
format. You will also be advised of how long it will take the graphic in the
different formats to be downloaded.
You
will be able to see your graphic as it looks in Photoshop in a gif or jpeg
format. You will also be advised of how long it will take the graphic in the
different formats to be downloaded.
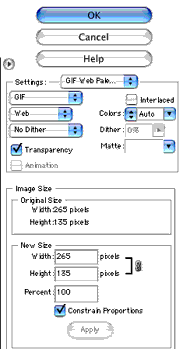
Under Settings you can select Jpeg or gif
format. What ever you select will be displayed in the box on the right.
An interlaced picture comes in all at once
but blurry at first and then clearer and clearer.
See if your gif looks better dithered or
not. Dithering refers to the pattern used to define your picture.
10. How to work with photos
- Use the Browser view to identify a graphic. Photoshop can identify graphics from many formats. If you are looking for a screen dump, they are automatically saved to your desktop. Below, is a screen shot of my trip to Colorado and is in my picture file in a folder identified by the date.
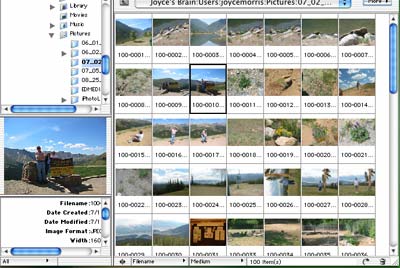
You can make the thumbnails larger or smaller by adjusting them from the menu box in the right hand corner of the browser window.
Double click on a picture to open it.
b. Resizing Photos
· If you wish to resize your picture go to the Image/resize/image Size menu.
· The dialogue box that opens shows you the size of your current image. Make your image as small as you can without detracting from its content.
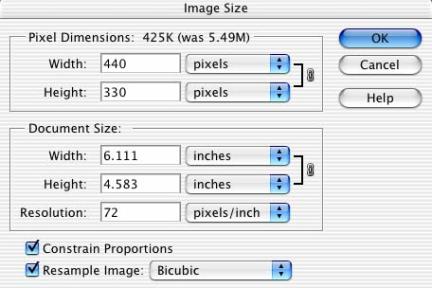
· Resolution should not be greater than 72 for the web however for printing purposes you might want a higher resolution.
· You can look at the size in pixels or inches.
· Keep Constrain Proportions so you only need to change one number to keep it proportionally correct.
· If it turns out that you made your picture too small, go to the Edit menu and undo. Do not try to make a smaller picture larger. It will usually be somewhat blurry.
c. Crop: Your next step would be to crop your picture and remove any un-needed parts.
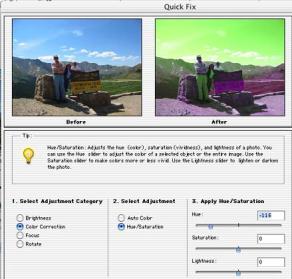
d. Enhance Your Picture
Enhance/Quickfix will let you adjust your pictures in a number of ways.
![]()
 This
modulation of hue allows you to create
some interesting effects.
This
modulation of hue allows you to create
some interesting effects.
Experiment with Hue, Saturation and Lightness to both improve and add emotion to your photo.
Brightness lets you increase the brightness of your photo
Color Correction lets you adjust Hue, Saturation and Lightness
Focus lets you sharpen and blur your photo
Rotate lets you turn you photo in different directions.
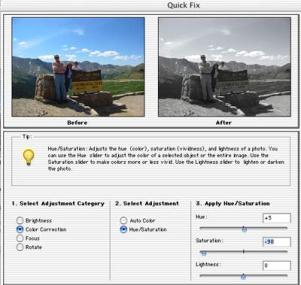
By reducing color saturation you can make your color photo into a black and white classic.
e. To. add layer effects to a photo
Just as you added layer effects to your text, you can also add then to your photo.
Select your photo once you’ve brought it into Photoshop Elements. Select/All from the select menu at the top of the page.
Next go to File/New and open a canvas somewhat larger than your graphic.
After it is opened, paste the graphic you selected onto the middle of the blank canvas.
Go to Layers and make sure your picture is selected
Open Layer Style and try some effects out.
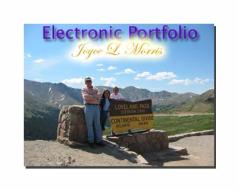
11. Combining Graphics and Text
You can work with your photo first and then add the text or you can add a photo to text that you’ve already created.
Lets say you would like to add some text to a photo.
Open the photo; use your text tool and everything you learned about using text above could be applied. The text will be on its own layer and can have its own styles applied. You do have to resave your file to save the new changes.
12. Saving
It is always advisable to save a copy of your work as a Photoshop file. This will keep the layers intact and allow you to modify your graphic at a later time.. You can keep this on your computer; you do not have to keep it with your web page or document.
If you are saving files for the web, you can save them as a .gif or .jpeg
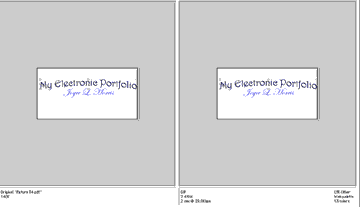
See examples below to help you decide.
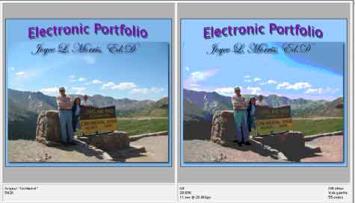
The gif on the right has breakup of color
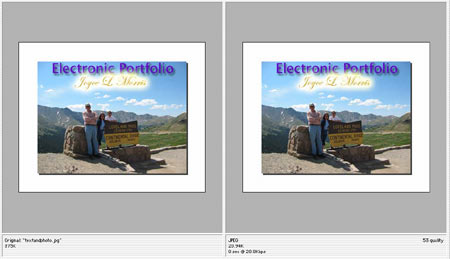
The jpeg is a better choice for photographs although they take up more memory.