Tudor Gable Headdress Illustrated: Step by Step Directions

(In Progress!)

The following directions show you how to make a late Tudor Gable headdress of the style popular in England from about 1520-1540. I know of no extant examples, so our construction ideas are necessarily conjectural. The Museum of London has some artifacts of frames that may be from this period. (see below)

These directions will result in a hat that looks very much like those drawn and painted by Hans Holbein. A selection of those drawings can be found at Tudor Gable Headdress: A Portfolio of Images. For examples of the gowns with which you would wear your Tudor Gable, see: Tudor Dress: A Portfolio of Images.

Some observations
Working conclusions
- based on previous headdresses, the hat appears to be constructed in layers: a separate close fitting linen cap that does not show, a striped silk band that crosses over the forehead, a stiffened linen underhat (the white portions of which show in the images), a lappet made of firm fabric, and the veil or tails of black velvet.
For this version I divided the linen underhat into two pieces so that I could experiment with shapes and designs: a front face-framing piece, and a back box-shaped piece. I considered using glue or starch-stiffened linen for the underhat, but chose instead buckhram stiffened with hoop boning, and covered with linen so that I could experiment more easily.
- the front of the hat does not hang over or overshadow the forehead
- the hat is not so stiff that it perches on the head, but is flexible enough to conform slightly to the head shape
Some recreations of this hat construct a frame for the entire top of the hat. I chose to use an underlying frame only for the front, gable, portion of the hat and to provide the box shape in back. I found that this made a more flexible hat that conformed better to the shape of the head (that is, it doesn't feel like you are balancing a box on your head) and didn't jut out over the forehead. If you look at the images of these hats, particularly those by Holbein, you see that they do not overshadow the face, that is, the gable peak does not extend out over the forehead.
- the fabric for the front lappets is a geometric pattern
- the fabric for this portion is usually predominantly brown or gold
- unlike the other popular hat of the time, the French Hood, the fabric of the gable headdress does not usually match the gown being worn, either in color or pattern
I tried to chose fabric based on these observations, taking care not to be tempted to make a hat that matched a gown!
- the portion of the gable nearest the face is linen , with a silk underband

- the fabric of the forehead wrap is probably silk, probably padded, vertically striped, and usually brown/tan, and fits closely to the head
- For the silk band that crosses over the forehead, I chose to make a continuous band that encircles the entire inside of the hat, rather like a traditional hatban except that it shows in front.  I was pleasantly surprised to find that this not only made the hat fit better and be more stable (the band conforms to your head and helps support the hat at the back of the neck) but also ended up looking quite like the images! The silk I used was lightweight (7-8mm) so I lined it with a layer of thin batting.
- the length of the linen front and the lappets changes over time. In earlier portraits, the linen dips below the chin and the lappet is folded at about mouth level (see Catherine of Aragon and Lady Guildford). In later years, the linen front only goes down to the mouth line and the lappet is folded at about nose level.
As the gowns I have planned tend to be closer to 1540s than 1520s I should have made the lappets shorter. Next time!
- the hat has a back, and the fabric of the veil is fitted to that back (see Holbein back view)
- the shapes of the tails both in front and back views, does not seem to be the result of making a half circle and then cutting it. In fact, in several images a clear seam up the underside of the tail is shown.
Still experimenting with this one. In the first version I covered the "box" with the velvet and made the tails separate. In the next version I'm going to try cutting it all in one piece...


A word about the Museum of London frames:
I got to see the two frames identified at the Museum of London as Tudor Gable headdress frames. Unfortuntely, I have not yet got details on their provenance. However, they were fascinating. They were made of continuous bent brass wire, one about coat hanger thickness, the other slightly thinner. For the first, (Figure 1), the wire was bent into the gable shape, then bent at 90 degrees and 90 degrees again, then bent in the gable shape again. The result was two gable shaped frames about 1.5-2 inches apart. The second frame, of the lighter wire (Figure 2), followed the same pattern except doubled back on itself a third time, so there were three gable shaped frames/layers. The lightness of the wires bolsters my believe that these hats were light and conforming. Also, the lack of any framing for the back portion of the hat may mean that the front gable portion was the only portion with an inner frame structure. This could support the theory that the back portion of the hat was made like a cap, using stiffened buckram-like material. In any case, for this first experiment I will be using a square frame at the back of the hat for stability.


The finished headdress

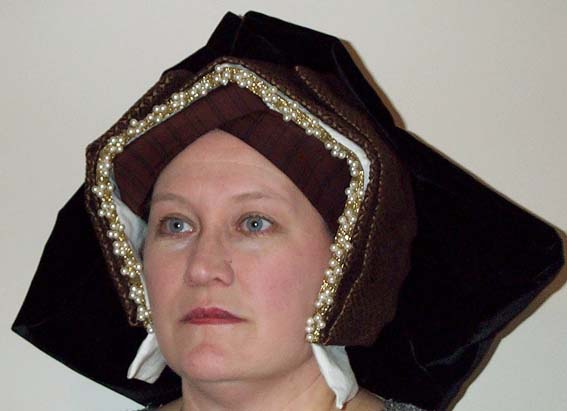
In this casual shot, the back "tails" are flipped up and over the top.

Before cutting out the materials you will need to determine what size, and what angles around the face will work best for you. If we look at the images, we see that the top peak of the gable can be shallow or high. The side angles usually fall about midway between the eyebrows and the top peak. Take a piece of heavy paper or cardboard and experiment to determine which dimensions you should use.

All measurements given in this example can be changed to what works best for you!

The Frame Materials

The frame is based on a box. The bottom of the box, which becomes the back of the hat, is a perfect square. The dimensions are based on your experiments described above. For this example, the size is 6 inches square. 

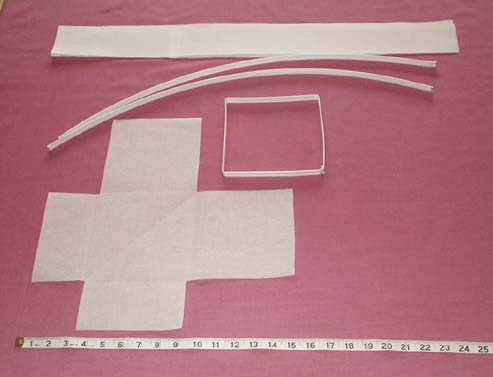
The pieces are: a piece of buckram cut 15 inches square, a piece of fabric covered hoop boning cut 24 inches long, a folded piece of buckram 28x7 and folded in half, and two more pieces of boning each 26 inches long.

The 15" square piece of buckram has several corners cut out as follows: starting from the upper right corner, cut out a piece 6x6; for the lower right corner, cut out a piece 6x3; for the lower left, cut out a piece 3x3; for the upper left corner, cut out a piece 3x6.

Take the piece of 24" boning and bend it into a square, being careful to make all sides even. Whipstitch the ends together.

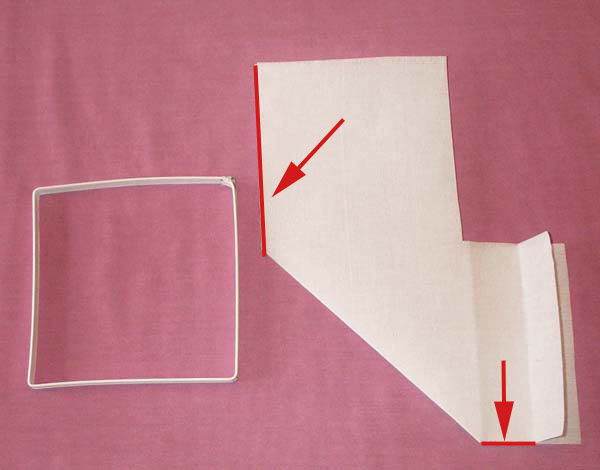
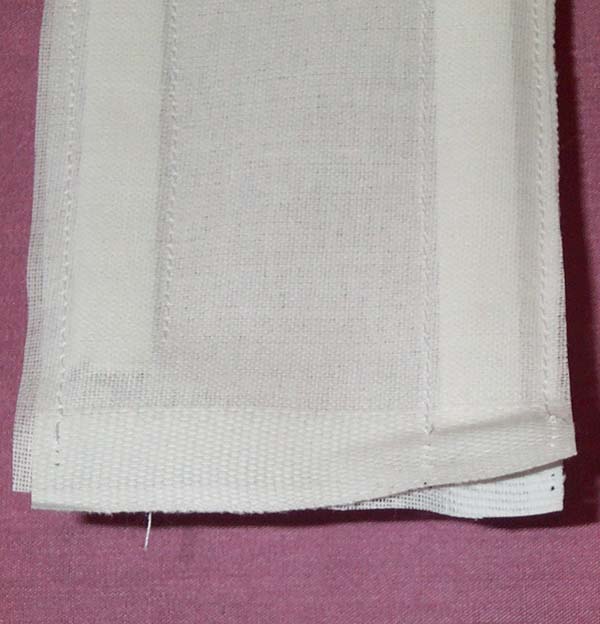
Fold the buckram in half along the diagonal. Stitch the outside edges together (the left edge in this picture.) Stitch the left half of the bottom right edges together. (Click on the thumbnail to see the larger version, where the edges to be sewn are marked in red.)

Turn the hat inside out.

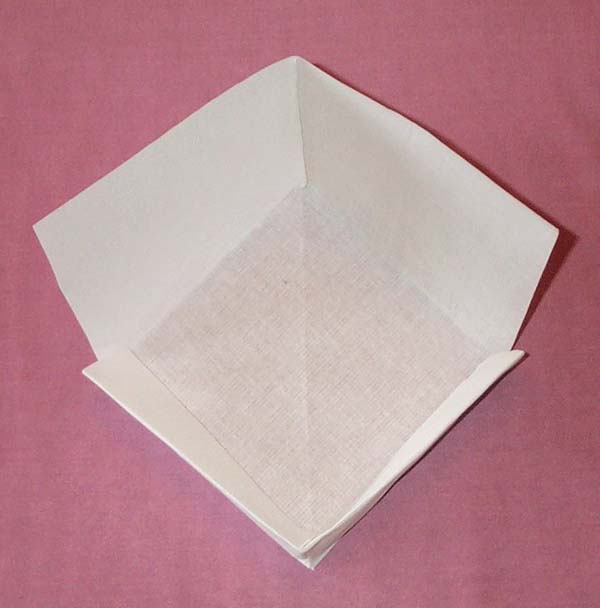
Fold the short flaps in half, to the inside.

Insert the boning square, tucking it under the folded flaps. Stitch the boning square into the bottom of the hat.

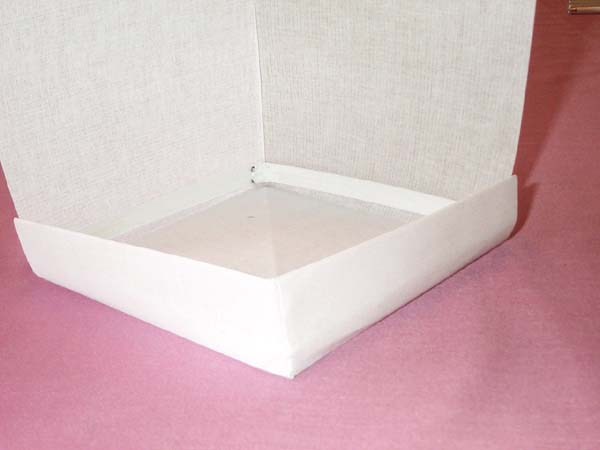
Whipstitch the short flaps to the long flaps at the open corners.

You may add additional stability to the hat by running a small piece of boning along the center top seam. This is not necessary (and was not done in the completed example shown above) but will make the hat more stiff and crush resistant.
Take the long piece of buckram, fold it, and sew two chaneels along each edge. (In this particular picture I used two pieces sewn together, rather than one large piece folded--just happened to have the right size scraps!) Make sure the channels are wide enough to hold the boning.

Insert the two pieces of boning, one into each channel. If you make the boning slightly shorter than the buckram, you will have a bit more flexibility when the hat is done. You will also get that small wrinkle effect seen in many of the images. (Example)

Measuring, or holding the long piece of boned buckram against the sides of the box to ensure the right length, bend the long piece into the gable shape.
DO NOT attach the gable to the box yet! But if you want to see if it looks and fits right, you can pin them together and try it on.

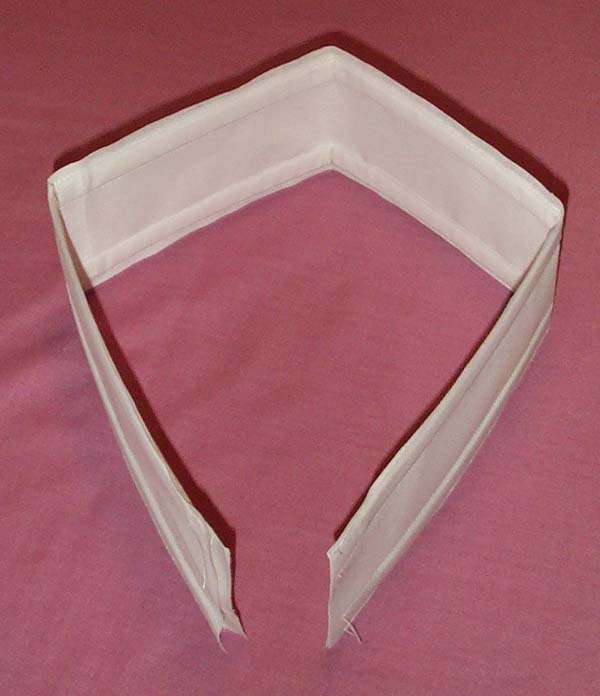
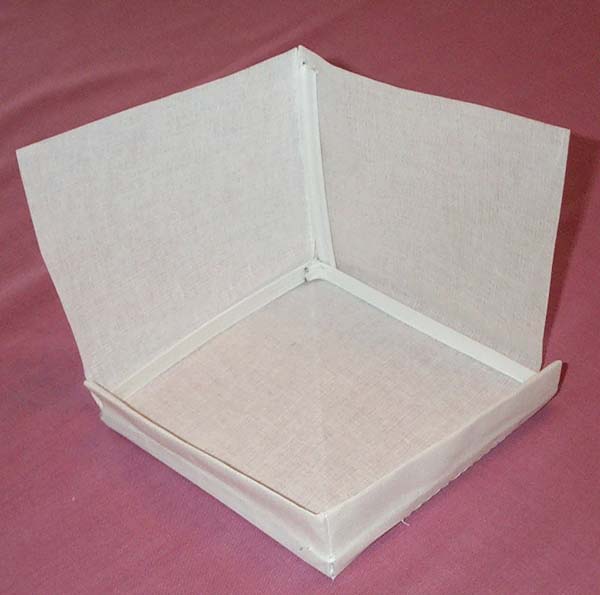
(Note: You can see in this image that the corners have not yet been whistitched together. Also, the boning square is a bit bigger than the buckram. If this happens to yours, don't worry. It does not effect the final product. Just whipstitch as much together as you can.)

Materials for covering the hat

- A piece of the geometric patterned "lappet" material, 8 inches wide and at least 45 inches long.
- A piece of white linen the same dimensions for lining.
- A piece of white linen, 7 inches wide and 28 inches long to cover the gable.
- A piece of striped silk, 5 inches by 36 inches.
- 1 yard black velvet or velveteen
- 1/2 yard white craft felt or lightweight batting
- 1/2 yard linen or other interfacing for velvet "tails"

Cover the front piece of buckram with the linen by folding the linen, right sides together, and stitching the short ends and the long side. Leave an opening  in the middle of the long side (that's where you'll slide the buckram in) that is the same length as two sides of the box. Turn right side out and press. Make sure to turn under the seam allowance on the opening and press that too. It's best if the linen is a bit larger than the buckram on all sides--makes it easier to sew the trim on later and gives you the nice crinkly bit on the ends that shows up in several paintings.
Black Veil/tails Method 1: (see below for alternate method)

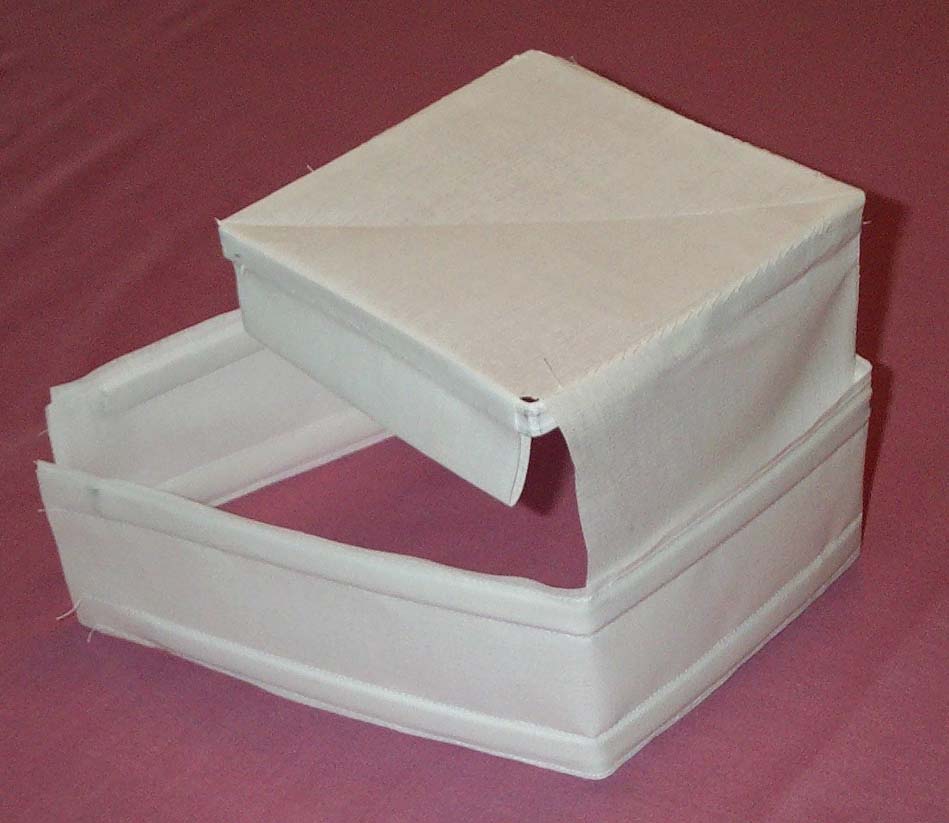
Cover the larger piece of buckram (the box) with black velvet, i.e. cut a piece of velvet the same shape as the box only slightly larger so you can turn a hem under the edges, then cover the box. Slipstitch in place.

Make two tails, the length being from the bottom of the hat to a point about 3/4 of the way between your shoulder and elbow. To make the tails, take a double the width of one side of the box, and add about three inches. Fold in half, sew up the long side and one short side, leave one side open, turn right side out. The open side is going to be sewn to the bottom of the box, but don't do that yet.
Slide the front piece of buckram into the linen. Now slide the top two sides of the covered box into the opening in the linen/buckram piece. Stitch the linen to the covered box inside and out. You could possibly do this
by machine, but I find doing it by hand allows you to take up the ease better. 
Take the open top of one tail and stitch it to the bottom of the box, across the small gap between the box and the front piece, along the side of the front piece, and back to the box. If you leave enough seam allowance at the top of the tail, you can stitch the top closed. Repeat for other tail.
Front lappets:

Take your geometric patterned fashion fabric, fold and sew it into a rectangle, then stitch it to the top of the hat. You may want to interline it, and it would even be appropriate to line it, and instead of sewing it completely together into a closed rectangle, just fold it so part of the lining shows. Once it's stitched in place it should cover the edge where the linen and velvet meet, as well as covering the edge where the tails are stitched on.

The silk headband:

Line with linen or crafters felt. 

Fold, sew together, turn, press, etc. to make a long rectangle. You may want to experiment a bit to make sure you get the right length. Make it larger than you think you need, and take up the ease as you tack it in. Tuck one end up under the top peak with about an inch sticking inside, stitch that end to the inside peak, then along the top inside. Continue easing and stitching around the inside of the hat. I made the headband go to the back bottom of the hat, in fact just a bit hanging down outside the back edge. Continue around to the top and tuck the end behind the end that you started from, overlapping as shown.

The headband works quite well to hold the hat on your head, particularly if you have short hair.

For the front decorative edge, I stitched on a thin piece of gold trim, then sewed pearls to that. If you made the linen slightly larger than the buckram it covers, there should be enough give in the linen to stitch the trim directly onto it. With a bit of luck the trim will hide any stitching that shows from where you sewed the headband in.
Try the hat on, bend the ends of the linen/buckram front piece to wherever is comfortable. The hat should stay on quite well without pins. If your hair is short in front, with fringe or bangs, you may want to sew a linen headband to wear under the hat to hold your hair back. It will also protect the inside of the hat from soiling.
You may line your hat with linen or silk. 
Black Veil/tails Method 2: 

coming soon!

Comments or questions to: hope.greenberg@uvm.edu