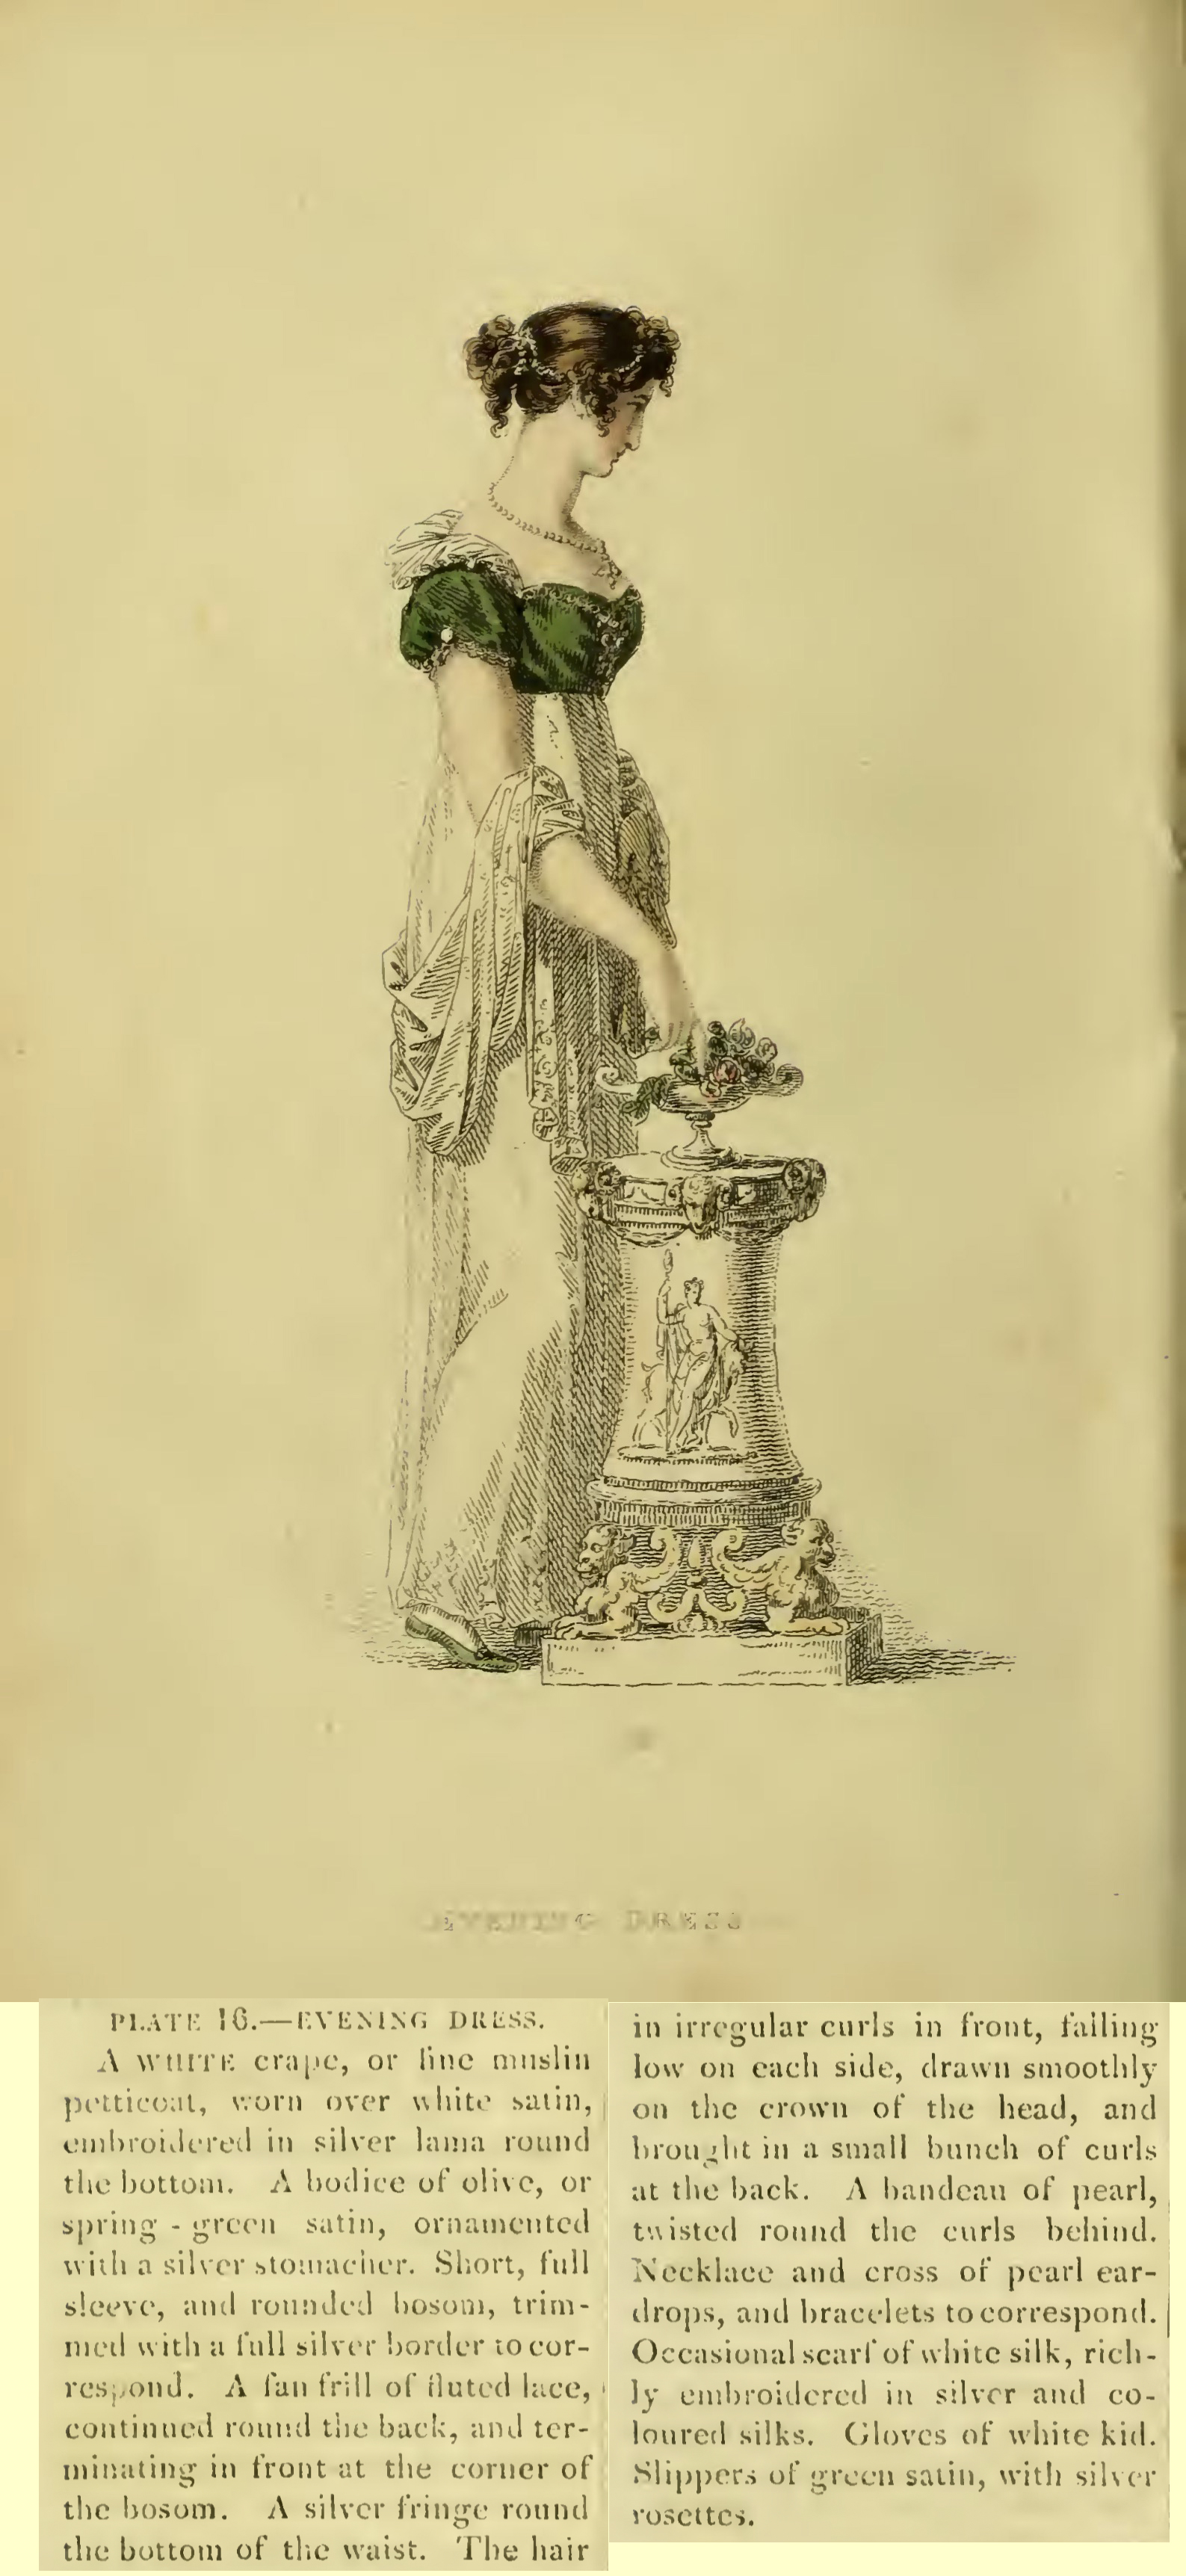
It's All in the Details: Gowns
By Hope Greenberg
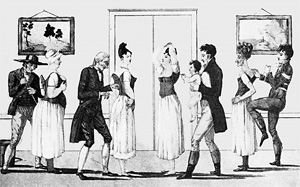
In
1775, the year of Jane Austen’s birth, women wore gowns with a fitted
bodice, the waist at or below the natural waistline, and full skirts
over a visible, often ornate, petticoat. They were made in a variety of
heavy silks, cotton or wool. Beneath these gowns they wore structured 'boned' stays over a knee-length shift. By the time Austen had reached her late teens
the ornate gowns were being replaced by simple, lightweight, often
sheer cotton or silk gowns that reflected the ideals of classicism.
This
guide provides images and details to consider when creating an early
19th century ballgown. The examples provide a general guide, not an
exact historic timeline. Fashion is flexible: styles evolve and are
adopted at a different pace depending on the wearer's age, location,
and economic or social status. These examples focus on evening or ball
gowns. Day dresses, walking dresses, and carriage dresses, while
following the same basic silhouettes, have their own particular design
details. Even evening gowns or opera gowns can usually be distinguished
from ball gowns which, after all, must be designed for dancing!
By
focusing on the details we can see both the evolution of fashion for
this period and how best to re-create it. What is the cut of the
bodice, the sleeve length, or the height of the bustline? How full is
the skirt, and where is that fullness? What colors are used? What type
of fabric? Is there trim? If so, how much, what kind, and where is it
placed? Based on the shape of the gown, what can we tell about the
foundation garments? Paying attention to all these details will help
you create a gown that is historically informed as well as beautiful.
General Silhouette
|
1795
|
1800-1805
|
1810
|
1813-1815
|
1819
|

|

|
 |  
|
|
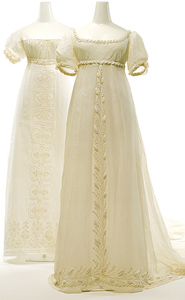
Light
fabric, full, high-waisted skirt usually cut as one with the bodice,
elbow length sleeves (full length for day wear), rounded bosom filled
in with a large handkerchief.
|
Diaphanous muslins, white on white embroidery.
Think Greek or Roman draperies, or columns. Gathered bodice, still cut as one with gown.
Moderately high bustline, gathered neckline, short or elbow length sleeves,
train. Some overtunics. Hair dressed "Greek fashion" towards the back of the
head.
|
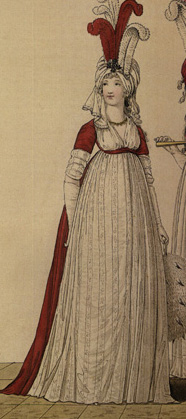
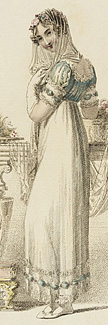
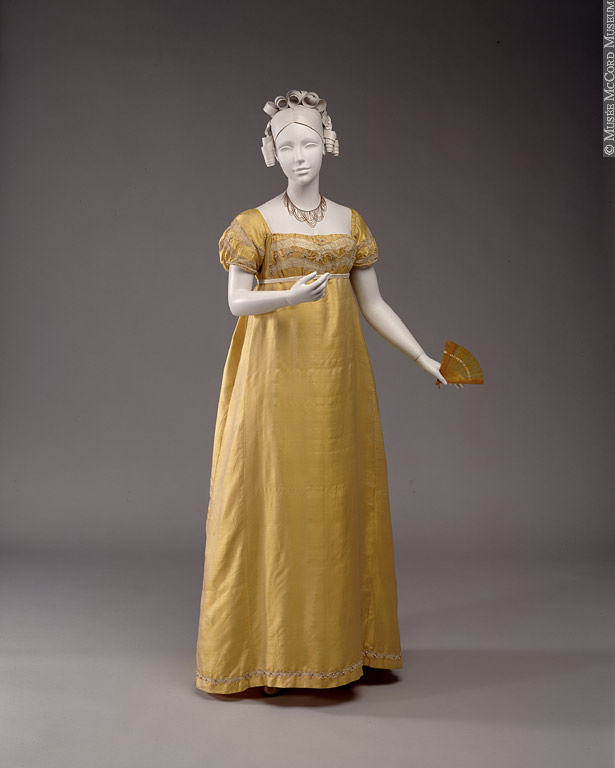
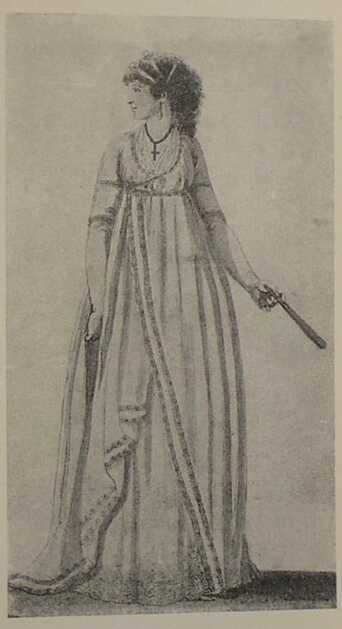
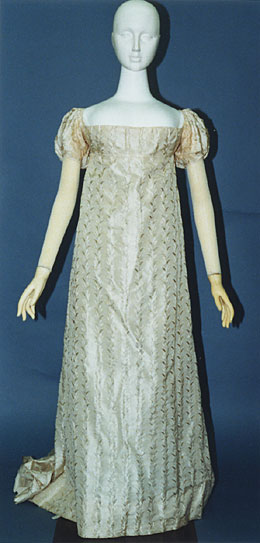
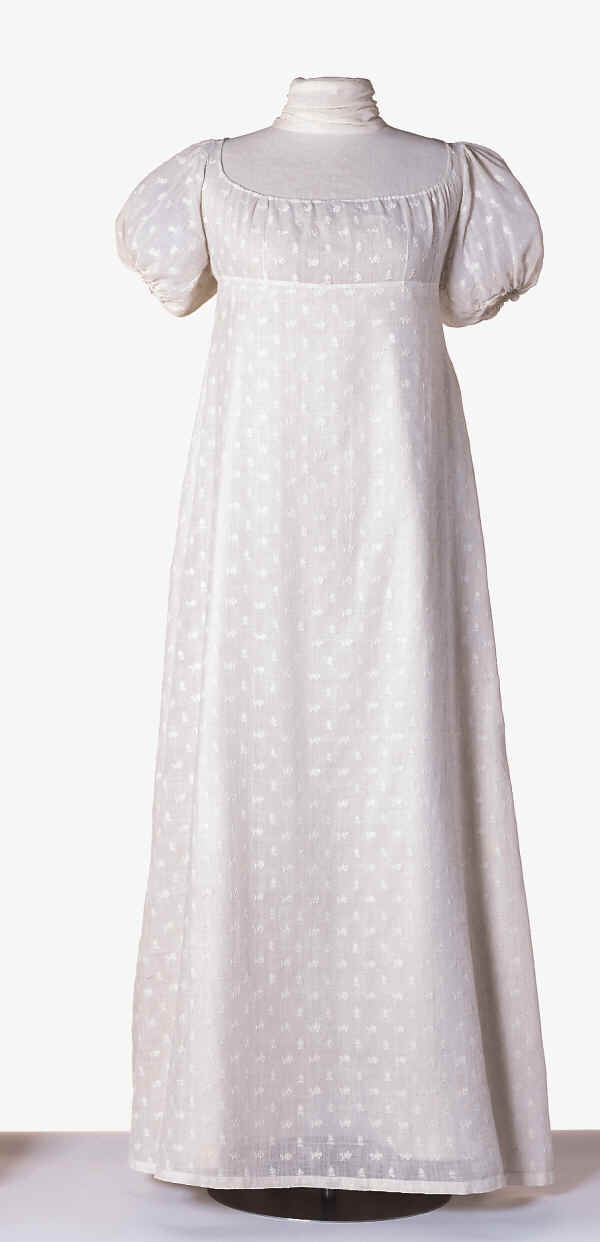
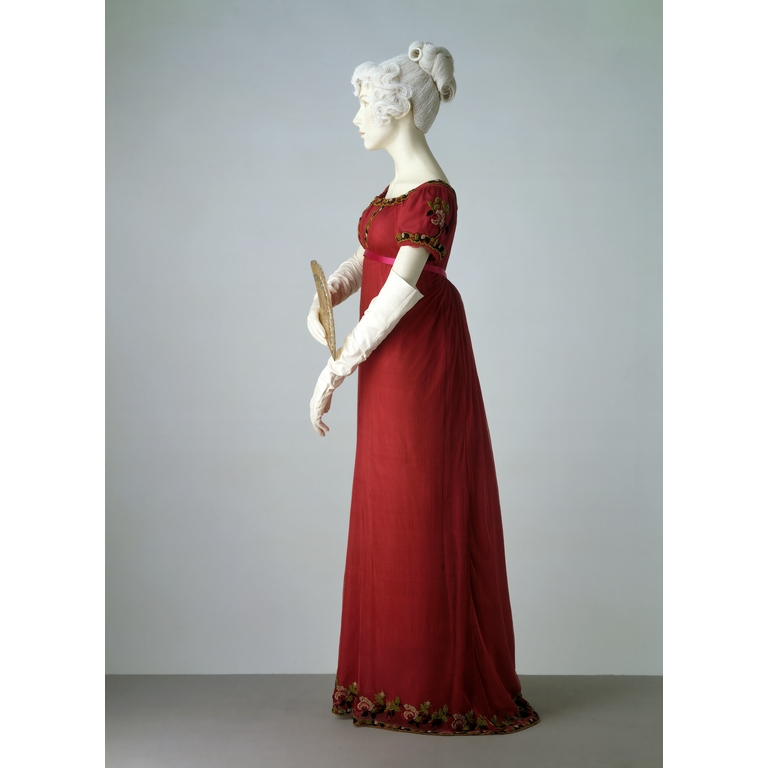
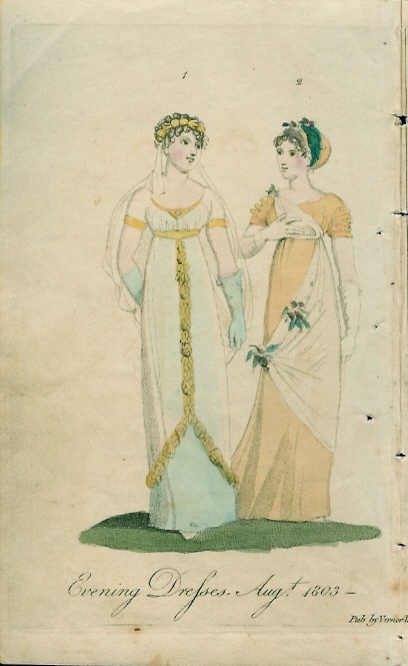
Neckline broadens, often square, puff sleeves,
bodice sometimes gathered, sometimes trimmed, and bustline even higher. In the years just on either side of 1810 there is often a strong
vertical element like embroidery on the front center skirt. Silks and more color. Hair
dressed close to head but with curls and twists on top of head and to sides
of face. Turbans, toques, and bandeau are also worn in evenings.
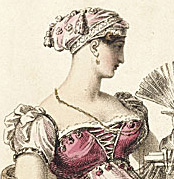
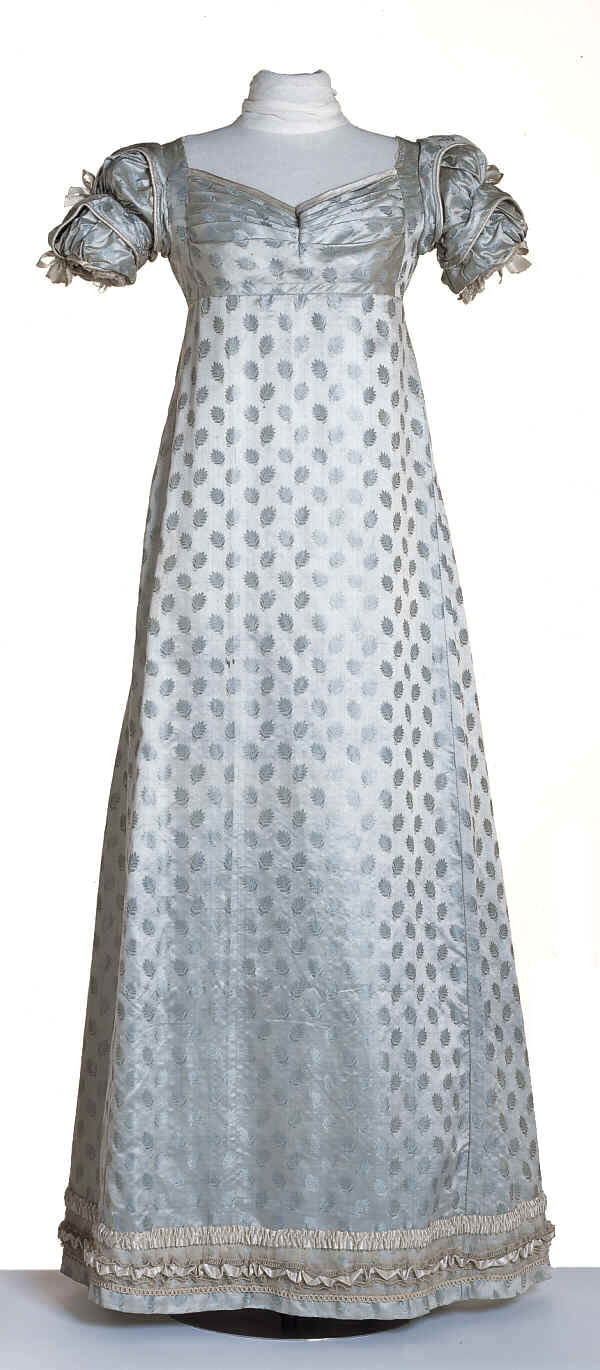
|
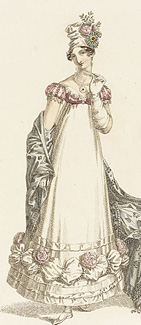
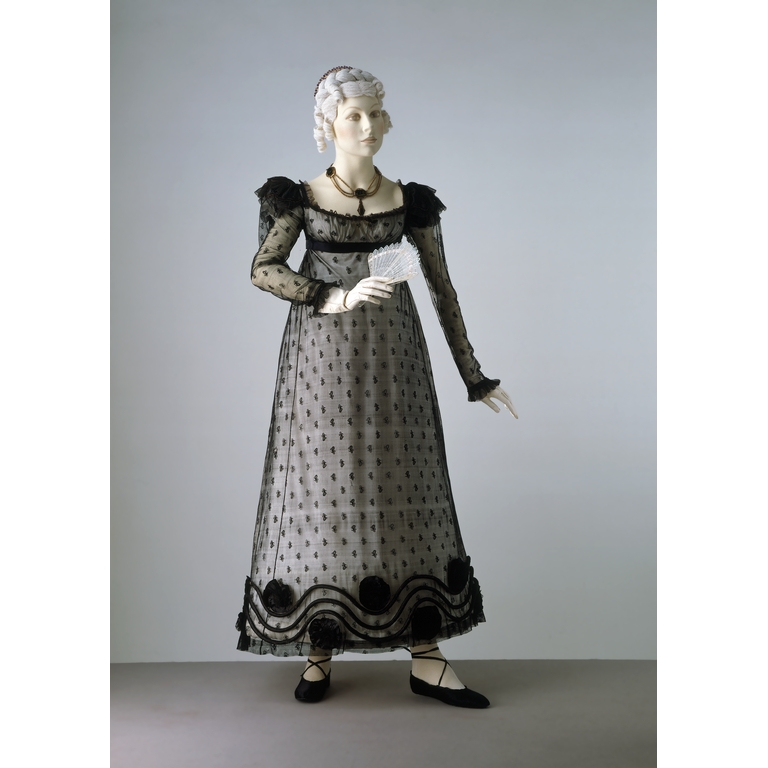
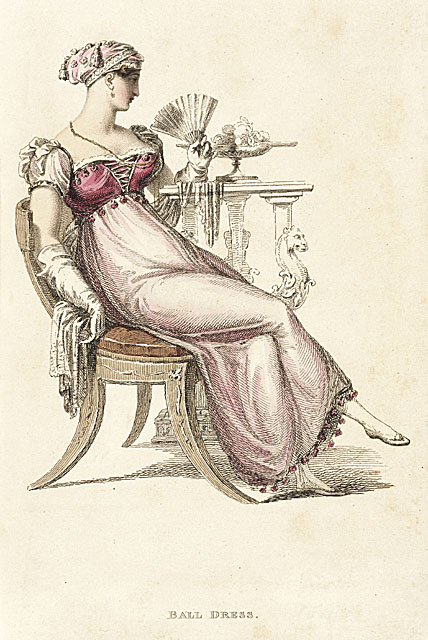
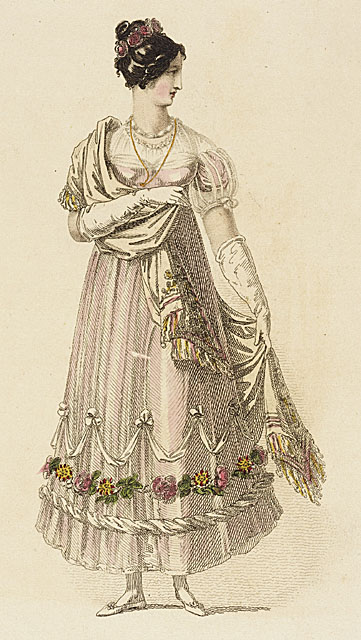
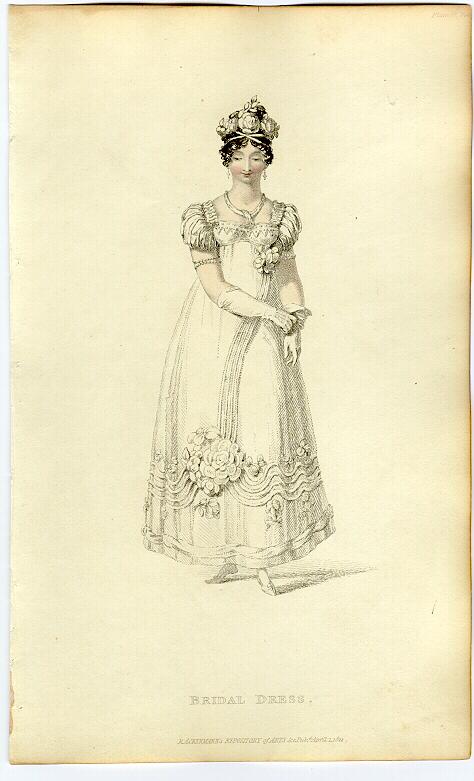
Mid teens: emphasis is shifting to the bodice. Waved horizontal trim, other ornate trimming, or contrasting bodices are popular.
| Late teens: bodice at its smallest and
highest. Sleeves and bodice highly decorated. Skirt is cut wider and
stiffened and trimmed to make it stand out. By 1820 the waist will start to
drop as skirts widen. Hair continues to be dressed on top of head, turbans
still worn.
|
Undergarments: Shift, Corset (Stays),
Petticoat
|
Shift:
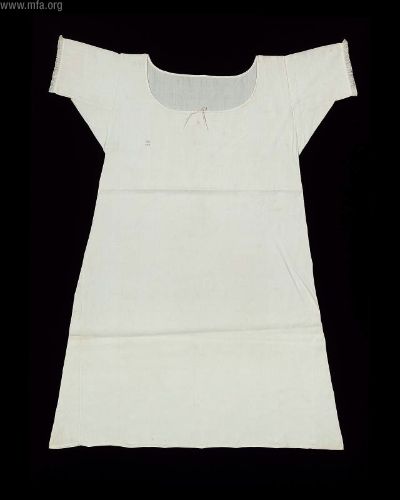
|
The layer closest to
the body for this entire period is a linen or cotton shift. It is
constructed of rectangles and triangles, with short sleeves and a drawstring
or gathered neckline being most common.
 The stays or corset are worn over the shift.
Unlike later corsets, late 18th-early 19th corsets were not designed to give
one a small waist. The 18th century corset was heavily boned and designed to
provide a smooth, barrel-shaped torso with rounded bosom. The transitional
corset kept the rounded bosom, but was short-waisted. The early 19th century
corset was softer, often stiffened only with cording and a center busk (a
smooth thin strip of wood in a pocket running between the breasts down the
center of the corset), and designed to provide a columnar shape. The
diameter of the column was not as important as achieving a smooth, vertical
look with a very high bustline. Variations on the corset emphasized a "lift
and separate" look (affectionately called "the divorcer"). By the late
teens, early 20s, the corset began to return to a more substantial garment,
with attempts to rein in the waist. The stays or corset are worn over the shift.
Unlike later corsets, late 18th-early 19th corsets were not designed to give
one a small waist. The 18th century corset was heavily boned and designed to
provide a smooth, barrel-shaped torso with rounded bosom. The transitional
corset kept the rounded bosom, but was short-waisted. The early 19th century
corset was softer, often stiffened only with cording and a center busk (a
smooth thin strip of wood in a pocket running between the breasts down the
center of the corset), and designed to provide a columnar shape. The
diameter of the column was not as important as achieving a smooth, vertical
look with a very high bustline. Variations on the corset emphasized a "lift
and separate" look (affectionately called "the divorcer"). By the late
teens, early 20s, the corset began to return to a more substantial garment,
with attempts to rein in the waist.
The layer above the corset is a linen or cotton petticoat, usually
with bodice. The cut of the neckline depends on the dress under which it
will be worn. The shape of the petticoat's skirt, especially the location of
gathers, should follow the style of the gown being worn over it.
|
1795
|
1810
|
1819
|
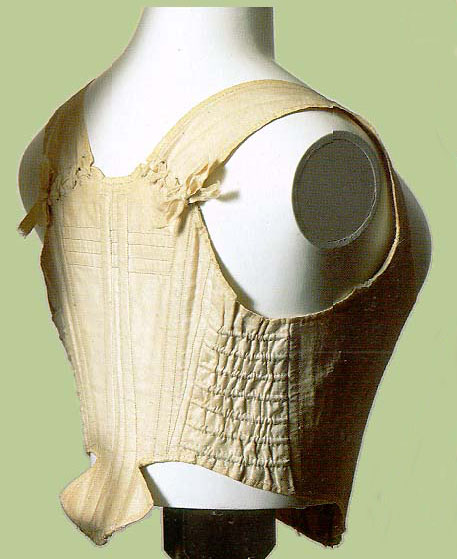
The 1790s corset supports, but does not push up, the bustline. The neckline
would be filled in with a large handkerchief, and the "tail," along with a
bustle pad, helps hold out the skirt.
|
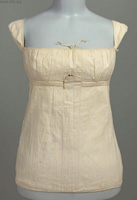
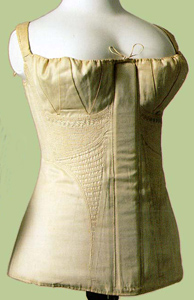
The 1810 corset creates a smooth columnar line and pulls the bustline up
quite high. The straps are well out of the way to accommodate the broad
neckline. There is a busk pocket on this corset, though the busk itself is
missing.
|
By looking at the corsets we can see how the
shape of the gown is achieved. Notice that even though a certain amount of
exposed bosom is fashionable, visible cleavage is NOT a desired beauty trait.
Corsets are made of sturdy cotton (coutil, twill, canvas) with cords
and quilting for stiffening. The busk, a thin wooden strip about
1-2"” in width, is inserted in a vertical pocket between the
breasts. The busk helps maintain an erect posture and a smooth line. Even
corsets without any other form of stiffening usually have a busk.
Corsets of this era are laced in the back with a single spiral lace (i.e.
not two laces criss-crossed). |
The waistline of the 1819 corset begins to drop and be more defined,
although the bustline is still quite high. Additional quilting across the
front begins to suppress and add definition to the waist.
|
Bodice Front
|
1790s
|
1805
|
1808
|
1815-20
|
|
|
|
|
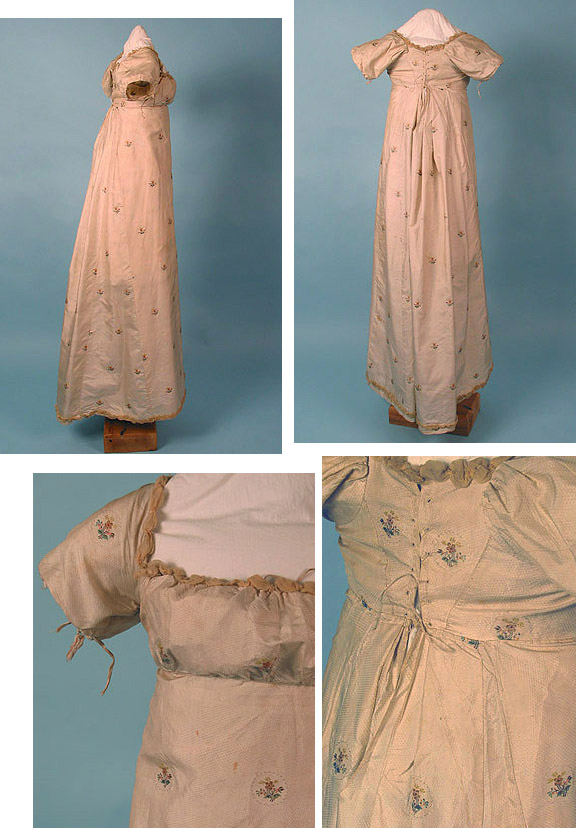
This gown with a crossover neckline, as well as
other gowns of this period, feature a bodice that is low, round, and filled
in with a handkerchief. The bodice is not separate. It is cut as one piece
with the skirt and gathered.
|
This formal silk gown features a broad
neckline, gathered slightly at the neck. The waist is drawn in slightly by a
drawstring but there are no gathers: again, the ideal is a smooth column.
The waistline is only about a third of the way between the shoulder and
elbow. |
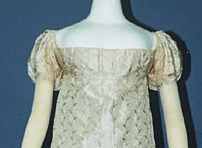
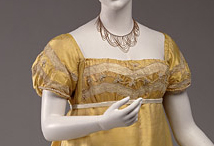
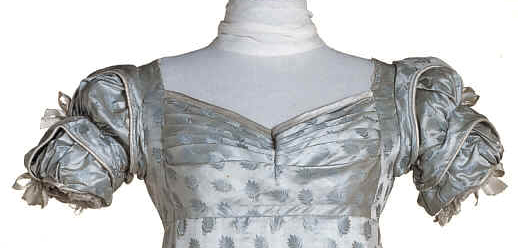
The bodice has a broad, rounded neckline,
gathered slightly by a drawstring (this actually improves the fit). There
are no gathers at the front of the skirt.
|
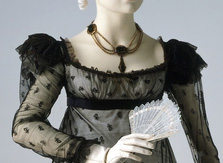
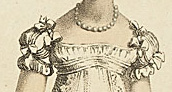
The black bodice shows the wide but short
style of the late teens. The waistline is quite high, and there is now
trimming that adds volume to the shoulder, enhancing the horizontal effect.
|
Bodice Back
|
1795-1800
|
1800-1810
|
1800-1810
|
18-teens
|
|
|
|
|
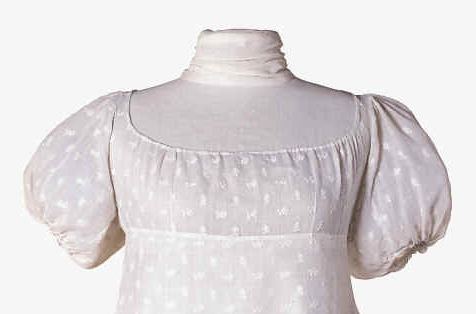
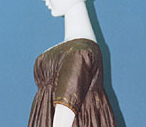
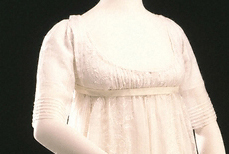
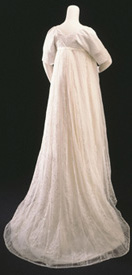
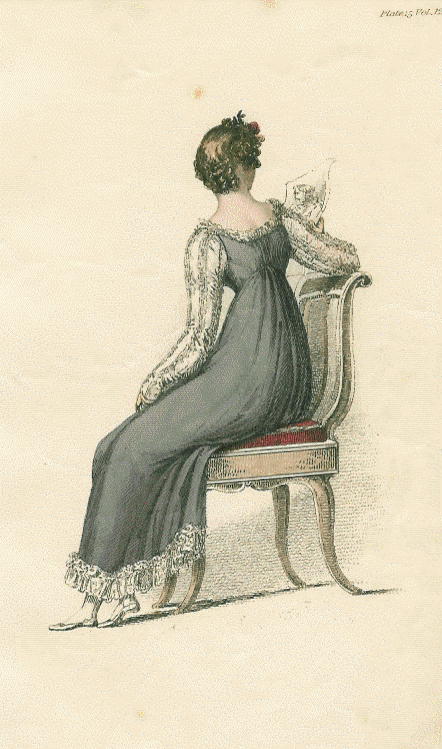
This silk gown shows the longer, less full
sleeve. The bustline is high and the waistline is only very slightly lower
in the back. The skirt is very full, with the fullness being distributed
evenly around the waistline.
|
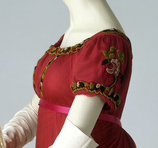
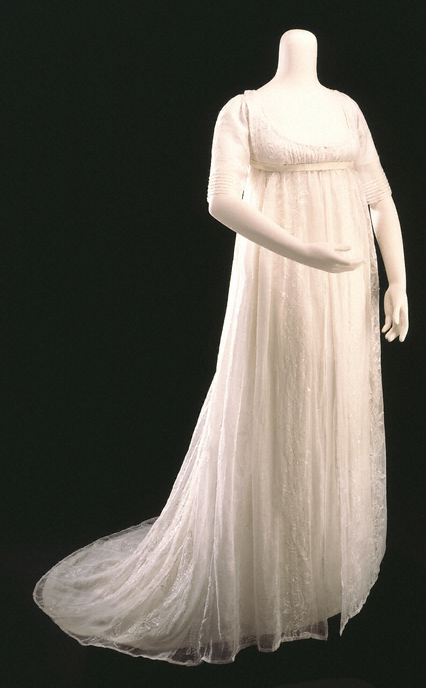
Net gowns with chenille embroidery
were popular in the 1806-1810 years. This gown has the narrower skirt than
many gowns of the time. The fullness is all at the back, with a small bustle
pad added to help the skirt stand out from the body. Waistlines were still
even front-to-back, or dipped slightly, as seen here. The neckline is fairly
high at the back. |
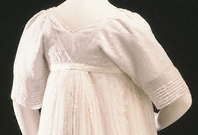
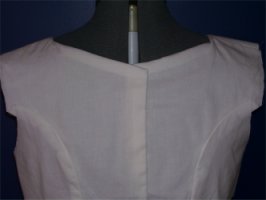
This bodice shows the classic "diamond back"
cut for this period. Shoulder seams were set behind the modern shoulder line
and a diagonal back seam went from near the center back to the back of the
arm. Backs were narrow (posture: upright, shoulders back). Unlike modern
armholes that are cut almost vertically from the shoulder, armholes from
this period were cut deeply towards the center back. Note there is no
underarm seam (see sewing guide below).
|
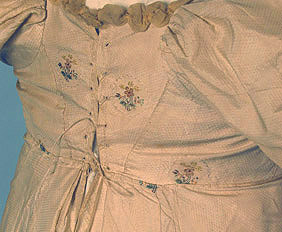
As the decade advances, fashion magazines
describe gowns as having a "broad back." The diamond shape remains standard,
but is cut wider. The waistline is cut higher in the back than in the front.
This half-mourning evening gown shows the characteristic back arch. Also
note that the lower seam is not cut with the deep curve of a princess seam,
but is either straight or only slightly curved.
|
Sleeves
|
1795-1800
|
1810
|
1816/1818
|
|
|
|
18th century sleeves
covered the elbow. With the transition to the new, lightweight gowns,
sleeves began to shorten. Long sleeves were still in use for daywear, but
sleeves for evening wear were generally shorter. During the early phase,
sleeves were straight, set into the armhole with little or no gathering. As
puff sleeves replaced straight sleeves, the gathering was still concentrated
at the back, particularly in English gowns. Also note that as the armhole is
cut much closer to the center back than a modern armhole the sleeves need to
accommodate that.
Throughout this period the direction of the fullness of the sleeve is
increasingly outward, not upward. Even the highly ornate sleeves of the late
18-teens follow this line. It will be taken to extremes in the
wide-shouldered gowns of the late 1820s and 30s.
Note that after about 1805 the lower edge of the puff sleeves
generally falls horizontally in line with the bodice. Many gowns of the
18-teens that have tiny bodices show equally tiny sleeves. Necklines also
widen, though bare shoulders will not be seen until later in the century.
|
Skirt
|
1795
|
1800
|
1805-10
|
1816
|
|
|
|
|
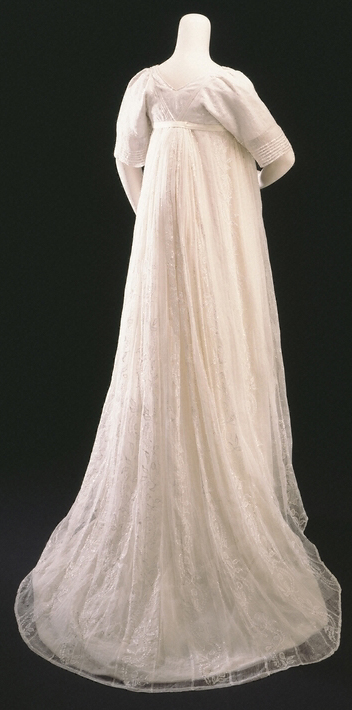
Light cotton or silk undergown is gathered
around entire waist and has a slight train. Overgown has longer train.
|
A similar gown, without the overdress, gathered
slightly in the front and extensively in the back. Round train. Trains are
found on day and evening dresses during the first few years of the century.
They disappear in daywear around 1806, although they do hang on for a bit in
evening or "opera" gowns (not ball gowns).
|
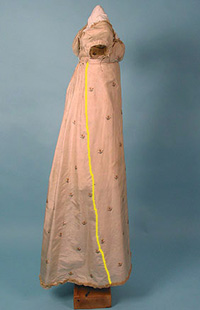
A yellow line is drawn on this image to show
how the side seam falls. The front of skirt is now a single rectangular
panel set into the bodice with no gathers. The side seam is well to the
back, and, as the panel is a rectangle, falls slightly to the front (i.e. it
is a straight seam but due to the shape of the skirt it appears to curve.)
The side back panels are triangular to provide fullness and all the
gathering is in the back.
|
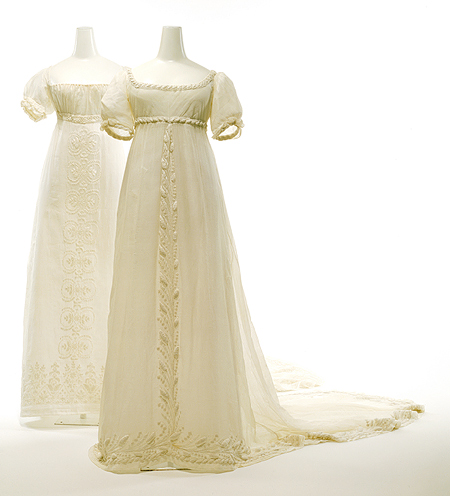
Skirts continue to be cut with a front
rectangle, side gores, and gathered back. After about 1815 they begin to
widen at the hem. The front is still set smoothly into the bodice but the
panel is more traingular. The increasingly heavy decoration at the bodice is
balanced by decoration at the lower skirt.
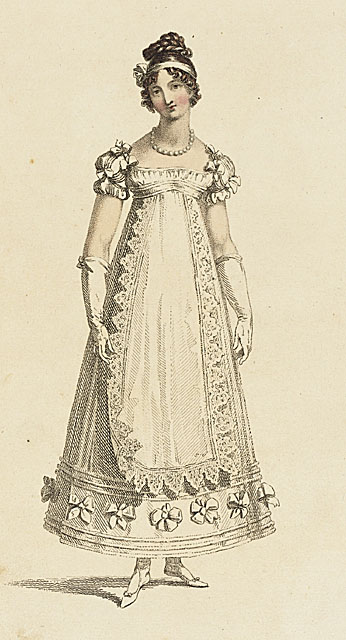
The fashion plates show ball gowns with short hemlines, at or just
above the ankles, beginning around 1810.
|
Hair and Hats
|
1795
|
1803
|
1812/1816
|
1818/1822
|
|
|
|
|
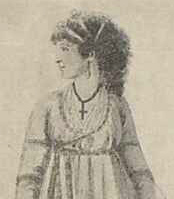
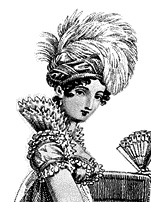
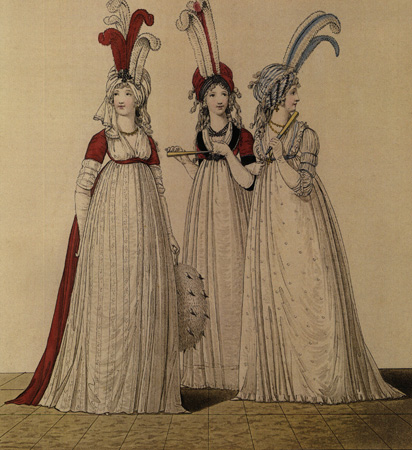
Big hair: grey powdered curls, puffs, and rolls
with turbans and tall plumes.
|
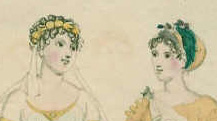
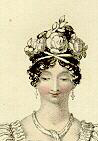
Hair is dressed in "classical" style, with
curls close to the head but with the mass of hair drawn back. Styles move
from 'Grecian' where the hair is at the back of the head, to 'Roman' where
the volume moves forward.
|
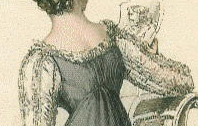
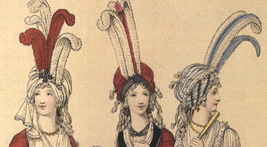
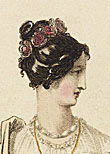
As the decade
progresses, hair is dressed more elaborately, with the bulk moving to the
top of the head. Flowers and ribbons are popular. A variety of turbans are
worn, following the shape of the hairstyle. This means they are small and
closer to the head at the beginning of the decade, but become larger and
higher as the decade progresses. Plumes also make a comeback.
|
Fabrics and Colors
1) Fabrics:
The cottons of the period are called muslin, but are actually lighter and more sheer than
most modern cottons and quite different from the utility fabric we call muslin in the
U.S. Smooth cotton gauze, cotton voile, light batiste or fine silk/cotton blends are
reasonable substitutes. Modern silks tend to be soft and drapey. Period silks were light
but stiffer. Good quality dupioni or shantung can be a reasonable substitute, though
they are more "slubby" and stiffer than period silks. Silk taffeta provides a more
authentic drape and feel. The difficulty is finding these at a reasonable price! A few
online sources for fabrics are listed below. Polyesters and rayon/acetates come in a
greater variety of colors and weights, but do not breath well which makes them hot for
dancing in. (Note: Polyester can be washed; acetate generally cannot.)
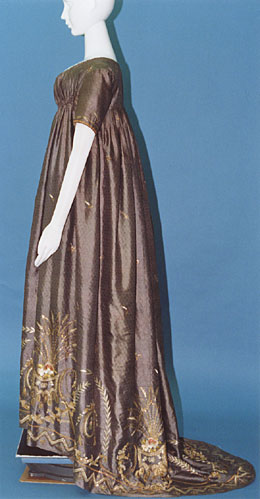
A net or sheer silk or cotton overlay, was also popular. The net overlay embroidered
with chenille was in vogue for the years just before 1810 (see red example above). The
fashion plates from just before 1820 show many gowns made of silk satin (not as shiny as
modern satin) with a sheer overdress. Again, the difficulty is finding a
period-equivalent. Chiffon and georgette tend to be too fluid. Some lightweight silk
organzas, though rather stiff, may work.
2) Colors:
White, of course, and a variety of pastels, but stronger colors were also popular. For
example, the Ladies Magazine of 1812 lists salmon, blue, pink, green, red-lilac or
heliotrope, buff, grey, crimson, orange, lemon, jonquil and puce as fashionable colors.
Patterned fabrics are trickier: the white-on-white embroidered muslins show a variety of
trellised vines and flowers, but where a contrasting figure appears (an embroidered
flower or woven in design) the pattern is usually a small figure made with few colors,
regularly spaced.
Cutting and Sewing Tips
1) Think about foundations!
With the possible exception of young women at the turn of the century, none of the gowns
above are worn without some kind of foundation to provide the correct silhouette. Under
all of these gowns women would have worn a shift, a corset (especially after the first
few years of the century), and a petticoat. Wearing these layers seems to be the biggest
difference between achieving a true Regency look and just looking like you are wearing a
nice high-waisted dress.
While I would encourage everyone to make a corset there are some short cuts you can take.
A bodiced petticoat with some boning, a non-period alternative to wearing a corset, is
one option. Jean Hunnisett's invaluable book shows a bodiced petticoat which includes
boning for support. Sense and Sensibility, Laughing Moon and others have a pattern. Properly constructed, this
option can give you the "left and separate" look but will probably be uncomfortable as
the bones tend to dig in to the waist. An underwire bra with the straps pulled short is
another, though modern bras tend to emphasize "push up and in for maximum cleavage"
rather than the more period look.
Perhaps surprisingly, the most comfortable foundation can be a corset. Properly fitted,
the corset will evenly distribute support and provide plenty of flexibility for dancing.
Jean Hunisett's book provides diagrams and instructions. Drea Leed's online corset
pattern generator can also be used as a starting point. This site is designed to produce
an Elizabethan corset which is the wrong shape for Regency wear: an Elizabthand corset
is designed to flatten the breasts and create a wide cone silhouette whereas an early
19th century corset is designed to lift an separate the breasts and provide a columnar
shape to the torso. To adapt the results of the corset generator you will want to
lengthen the corset, provide gores for the hips, and add gores to support the bust. The
placement of boning channels is also different. See the historical garments or the
Hunnisett book for proper placement. (A note about bones: whale baleen, reeds, or
cording were the period materials used. Modern women, especially those with fuller
figures, may want to substitute spiral steel. It is readily available, flexible, and
somewhat more 'effective.')
2) Make a muslin
Since the advent of off-the-rack clothing or graded patterns we have become used to
accepting that not all clothes will be a tailored fit. Regency women, at least those who
could afford the beautiful ball gowns in these images, would have made, or had those
gowns made, personally and individually. The result would have been gowns that fit well
and made the most of any given woman's figure. You can achieve this type of fitting by
making a muslin, a personalized pattern fitted to your own body that you can then adapt
for gown patterns.
To achieve the best fit, wear the undergarments you intend to wear with your finished
gown. Using a modern pattern with a fairly fitted bodice, cut out your bodice pattern,
placing the shoulder seams along the top of the shoulders, as in a modern gown. Baste it
together. Try it on and note where the fitting problems are. Does the fabric pull or gap
around the bust or neck? Try adjusting the shoulder angle. Is the waistline just under
the bust? Adjust up or down as needed. Is the bodice snug around the bottom? Add or
gather as needed.
Once the bodice fits well, draw new shoulder and back seams to create the diamond back.
Leave your shoulder seam sewn together and cut along your new "diamond back" lines.
Also, cut in the armholes towards the back.
You do not actually need to use a pattern at all. There are several online sites that
describe how to make your own muslin pattern. Search on 'make sloper', 'make toile', or
'make muslin'.
3) Adapting Modern Patterns
There are several pattern makers that offer Regency style patterns. Even the "Big 4"
pattern companies’ patterns can be adapted. There are three major areas where
changes need to be made:
- bodice depth: the Regency waist is very high. This may seem like an obvious
statement but it's important to note that while the waistline is just under the
bust, that position is with the bust pushed up by the corset. As the style
progressed the bodice became even smaller, as can be seen in the images from 1816
on. After 1820 the waistline begins to drop. Sleeves move with the waistline, so
when choosing a gown style try to keep the appropriate waistline with the
appropriate sleeve style.
- back seams: the seams in the Regency bodice are not in the same place as
modern seams. Modern seams are usually on top of the shoulder and under the arm. The
curved (Princess) seams on modern backs form a deep curve. Regency seams, on the
other hand, are generally off the shoulder, not under the arm, and, on the back, are
straight or form a more gentle curve.
- skirts: after about 1806, skirts are made of
a front piece that is rectangular, a wide back piece that is rectangular, and then
side gores that are triangular. These triangular gores become wider at the bottom as
the century progresses, giving skirts a wider hemline. The skirt's side seam is not
necessarily directly under the arm. The front piece is set into the waist smoothly
while the back is gathered heavily. A small pad tied or sewn to the inside back
waist will help the skirt stand out from the body, giving your gown the period look
(this is how they did it too).
- back closure: modern gown back closures
(those without zippers!) generally overlap in the back. Early 19th century gowns
more frequently show a back closure that meets at the back but does not overlap.
What about the gap? Remember that under these gowns women would have worn a shift, a
corset, and a petticoat. Modesty retained!
Compare these two images. The first is an extant gown from between 1800-10, the second is
a gown made from a modern commercial pattern company:

|
|
|
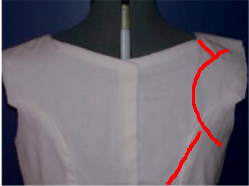
Though not quite visible in this image, the
shoulder seam in this extant gown is actually well behind the shoulder. The
back seam goes straight from the waist to the armhole. The armhole is cut
deeply to the back and most of the gathering for the sleeve is at the back.
There is no side seam under the arm. The bodice side front and side back are
a single piece.
|
On this modern pattern the shoulder seam is
directly on top of the shoulder. The modern princess back seam rises steeply
from the waist and then makes a sharp curve.
|
The lines drawn on this image indicate how to
alter this pattern to make it more like the extant example. The shoulder
line is no longer on top of the shoulder but about an inch below it. The
back seam is straight and begins closer to the center back. The armhole is
cut deeper towards the center back.
|
4) Finishing Details
Trims on gowns followed an
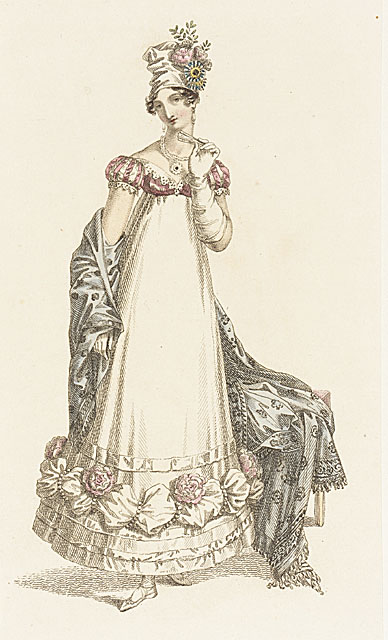
evolutionary pattern of their own. The early period sheer muslins were often embroidered
elaborately. The embroidery was often more dense near the hem. In the years just before and
after 1810 a definite vertical line in the center front of the skirt was popular. Piping,
“van dyke” (pointy) lace and trim, and “windowpane”
sleeves all became popular in the 18teens under gothic influences. In the years leading up
to 1820, skirts widened. Padded hems or padded rouleau (tubes of fabric stuffed with
lambswool, cotton or even rope) were used to stiffen the lower skirt. Trim became
increasingly elaborate both on bodices and on skirts.
Resources
Fabric
Joann's or other national chains sometimes have silk or reasonable man-made fibre fabrics that approximate period fabrics.
Fabrics.com: http://www.fabric.com (good selection of dupioni, reasonable prices, good sales)
Denver Fabrics: http://www.denverfabrics.com (great collection of dupionis and taffetas, reasonable prices if you catch a sale)
The Linen Store http://www.fabrics-store.com (an excellent source for linen. Their 3.5 oz. linen is perfect for shifts.)
Fashion Fabrics Club: http://www.fashionfabricsclub.com/ (big selection, moderate prices)
Fabric Club: http://www.fabricclub.com (changing selection, often some good buys)
Fabric Mart: http://www.fabricmartfabrics.com/ (small ever-changing selection but generally good prices)
Thai Silks: http://www.thaisilks.com/ (gorgeous collection of silks though more of a modern style; pricey)
Hyena Productions: http://www.hyenaproductions.com/index.html?cd=HYENA (absolutely stunning decorator $ilk$ more suitable for 18th century gowns)
Dharma Trading: http://www.dharmatrading.com (they sell textile craft supplies but carry white cotton voiles, lawns and batistes at excellent prices)
Heirloom Sewing: http://www.heirloomsewingforchildren.com/fabric_index.htm (beautiful embroidered cottons and laces)
Regency Web Sites
(there are many, just google on regency fashion. These are a few of my favorites):
Demode Extant Women's Clothing: http://www.demodecouture.com/realvict/1800s.html
Cathy Decker's Regency Fashion Page: http://hal.ucr.edu/~cathy/reg3.html
Jessamyn's Regency Costume Companion: http://www.songsmyth.com/costumerscompanion.html
The Costumer's Manifesto: http://www.costumes.org/history/100pages/regencylinks.htm (a page of links to other sites)
The Costume Gallery: http://www.costumegallery.com/
University of Washington Fashion Plate Collection: http://content.lib.washington.edu/costumehistweb/
...and Drea Leed’s Elizabethan Corset Generator: http://www.elizabethancostume.net/custompat/index.html
Books
Arnold, Janet. Patterns of Fashion 1: Englishwomen's Dresses and Their Construction C. 1660-1860. London: Macmillan, 1984.
Blum, Stella, and Rudolph Ackermann. Ackermann's Costume Plates: Women's Fashions in England, 1818-1828. New York: Dover Publications, 1978.
Bradfield, Nancy Margetts. Costume in Detail; Women's Dress, 1730-1930. Boston: Plays, Inc, 1968.
Byrde, Penelope. Jane Austen Fashion: Fashion and Needlework in the Works of Jane Austen. Ludlow: Moonrise Press, 2008.
Fukai, Akiko, and Tamami Suoh. Fashion: The Collection of the Kyoto Costume Institute: A History from the 18th to the 20th Century. Köln: Taschen, 2002.
Hunnisett, Jean. Period Costume for Stage and Screen: Patterns for Women's Dress, 1800-1909. Studio City, Ca: Players ress, 1991.
Johnston, Lucy, Marion Kite, Helen Persson, Richard Davis, and Leonie Davis. Nineteenth-Century Fashion in Detail. London: V&A Publications, 2005.
Questions, comments, etc.:
hope.greenberg@uvm.edu


 The stays or corset are worn over the shift.
Unlike later corsets, late 18th-early 19th corsets were not designed to give
one a small waist. The 18th century corset was heavily boned and designed to
provide a smooth, barrel-shaped torso with rounded bosom. The transitional
corset kept the rounded bosom, but was short-waisted. The early 19th century
corset was softer, often stiffened only with cording and a center busk (a
smooth thin strip of wood in a pocket running between the breasts down the
center of the corset), and designed to provide a columnar shape. The
diameter of the column was not as important as achieving a smooth, vertical
look with a very high bustline. Variations on the corset emphasized a "lift
and separate" look (affectionately called "the divorcer"). By the late
teens, early 20s, the corset began to return to a more substantial garment,
with attempts to rein in the waist.
The stays or corset are worn over the shift.
Unlike later corsets, late 18th-early 19th corsets were not designed to give
one a small waist. The 18th century corset was heavily boned and designed to
provide a smooth, barrel-shaped torso with rounded bosom. The transitional
corset kept the rounded bosom, but was short-waisted. The early 19th century
corset was softer, often stiffened only with cording and a center busk (a
smooth thin strip of wood in a pocket running between the breasts down the
center of the corset), and designed to provide a columnar shape. The
diameter of the column was not as important as achieving a smooth, vertical
look with a very high bustline. Variations on the corset emphasized a "lift
and separate" look (affectionately called "the divorcer"). By the late
teens, early 20s, the corset began to return to a more substantial garment,
with attempts to rein in the waist.

