Search MS Office A-Z | Search Web Pages/ Design A-Z
If you've ever wanted to turn your photographed subjects into magazine models, here's your chance. Professional photographers regularly make their subjects appear more appealing in photos by using Photoshop, and it's easier to do than you might think. This month, we show you how one of the program's retouching tools, Smudge, can produce some subtle but amazing effects.
Before you begin, create a temporary folder and make copies of the photos you plan to use for experiments so as not to damage original photos. Right-click the Windows Desktop, select New, and click Folder. Name the new folder Temp.
|
Launch Photoshop and open one or more digital photos. Closeups of faces will work well for this exercise. For each of your photos, open the File menu, select Save As, browse to the Temp folder you just created, and click Save.
![]() Smudge Slightly
Smudge Slightly
The Smudge tool simulates a brush smearing wet paint. The brush picks up color where the stroke begins and pushes it in the direction you swipe or nudge it. Use the Smudge tool to gently reshape important edges into more appealing and softer lines.
In the Photoshop toolbox, the Smudge tool is a pointing-finger icon. If you can't spot it, press the SHIFT-R keyboard shortcut (you may need to do this twice) to highlight the retouching tools. With the Smudge tool selected, look at the top of the Photoshop window where you'll see configuration options for the Smudge tool in the context-sensitive Options bar.
|
Start by selecting a brush. Click the arrow next to Brush, and from the resulting pop-up palette, select a brush size to suit your image. We chose the soft, round, 35-pixel brush (the brush marked "35"). Keep the mode set as Normal. Next, specify brush pressure; the greater the pressure, the heavier the smudge effect will be. Click the Pressure arrow and use the slider to select 80%. Because we are working with just one layer, leave the Use All Layers checkbox deselected.
The last option for Smudge is Finger Painting, which uses the foreground color in the Tools bar at the beginning of each stroke. Leave the Finger Painting checkbox deselected for now.
It's now time to shift your focus back to your photo. If necessary, select the Magnifying Glass tool and enlarge the photo to 100%. Just to see how the Smudge tool simulates smearing paint, swipe a single stroke down the middle of the image. Yikes! Yes, that's why it's better to use this tool sparingly and only at contrasting edges. From the Edit menu, click Undo Smudge Tool.
![]() More Sculpting Than Painting
More Sculpting Than Painting
Although Photoshop uses a brush icon to signify the Smudge tool, the effect is that of sculpting. And, because each stroke blurs the pixels it touches, overuse of the tool renders an image fuzzy and indistinct. Resize the brush or readjust the tool pressure to suit the size of the image and subtlety of the effect.
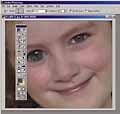 The Smudge tool is fun but beware grotesque effects, such as adding puppy-dog-like eyes to a human subject. |
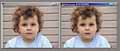
To follow our next experiment, reset the Smudge tool pressure to 20%. Next, place the Smudge brush inside the iris of an eye and carefully stroke outward to enlarge the iris (but don't overdo it). Again, over-smudging not only blurs edges, it can produce strange, overblown effects. If the person in your photo has an eye that squints as she smiles, try enlarging the eye itself. Start within the white area and stroke outward to pull down the eyelid.
There also are effects you can apply to the lips. For example, you can down-stroke slightly along the lower lip to fatten it. Or, if you want to apply cupid-like bow lips to your model, gently stroke up at the points where the upper lip rises.
Again, shadows and lines in smudged images tend to lose definition. To minimize fuzziness, use the Smudge tool's Finger Painting option, which adds color to the beginning of each smudged stroke. Go to the Options bar and select the Finger Painting checkbox. Then, go to the Tools bar and select the Eyedropper tool. Next, click an area of your photoperhaps a lip or a shadow near the noseand pick up a color to begin your smudges with. (The color appears in the foreground color square on the Tools bar.) Reselect the Smudge tool and gently stroke an area to boost contrast in your picture. Sure, it takes some practice, but so does plastic surgery.
If at any point you think you've ruined the image beyond repair, you can undo everything. Just open the File menu and click Revert.
![]() Other Effects
Other Effects
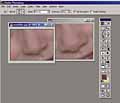
Want to shrink the nose? Place the brush just outside the shadow of a nostril and gently move the brush inward. Do the same on the other side. Amazing, isn't it? You also can use the Smudge tool to enhance a dimple. Want a cleft chin? Find the shadow at the base of the chin and stroke up. Or create a more classic eyebrow by smudging in an arch. You can even use the Smudge tool to narrow a waist or flatten a bump.