Search MS Office A-Z | Search Web Pages/ Design A-Z
It's fun to add tricks to your Photoshop bag, and one way to learn advanced techniques is to explore actions (groups of advanced commands). Basically, an action is a type of macro, which is a recorded script that performs a series of commands.
Photoshop provides a large selection of ready-made actionseach one a little goldmine of tricks, commands, and settings. This month, we'll introduce you to the Actions palette and show you how playing and tweaking predefined actions can improve your image-editing skills.
|
Before you begin, create a temporary folder and make copies of the photos you plan to use for experiments so as not to damage original photos. Right-click the Windows Desktop, choose New, and click Folder. Name the new folder Temp. Launch Photoshop and open one or more digital photos. For each of your photos, open the File menu, select Save As, browse to the Temp folder you just created, and click Save.
![]() The Actions Palette
The Actions Palette
To view the Actions palette, open the Window menu and select Show Actions. By default, Photoshop's actions are grouped in sets and appear as a list of folders. As well as Default actions, predefined action sets include Production, Commands, Frames, Textures, Text Effects, and Image Effects.
If you don't see these predefined action sets, click the triangular button in the upper-right corner of the Actions palette. Then, look toward the bottom of the resulting pop-up menu. Click to select one of the predefined action sets and place it in the Actions palette. Do this for all the action sets we mention in the previous paragraph.
Next, click the arrow next to any folder icon and browse through its predefined actions. For example, the Production actions reformat images and the Frames actions create borders.
Click the arrow just to the left of Image Effects to see its actions. Scroll down and you'll see actions for making a photo appear aged, creating an oil-pastel effect, and adding a soft focus to an image, among other options. To find out how to achieve one of these effects, simply click its arrow to see a list of all the commands the action performs.
At the bottom of the Actions palette are controls for playing an action (the arrow icon), recording a new action (the dot icon), and stopping the recording or playing (the solid square icon).
Let's play the Aged Photo action. First, however, make sure a check mark appears in the Toggle Item On/Off checkbox on the far left side of the Aged Photo folder. The check mark signifies the action is "on." Also, to have the action play automatically, remove the icon in the Toggle Dialog On/Off box, the box just to the left of the folder. When the icon is present, the action pauses with each command and requires input from you. This type of icon represents a dialog toggle, which also is called a modal control. (We'll provide more information about modal controls in a moment.)
Now click the arrow next to the Aged Photo action to reveal its commands. Choose a photo you'd like to "antique." Go to the Actions palette, highlight Aged Photo, and click the play icon. Watch the Status bar at the bottom of the window, and you'll see the commands play through, one by one. Amazing, isn't it?
|
To undo an action, open the File menu and click Revert. To save the photo with its new "aged" effect, open the File menu and click Save As. Select the JPEG (Joint Photographic Experts Group) file type, rename the image, and click Save.
![]() Modal Controls
Modal Controls
In Photoshop, a modal tool is one that requires input from the user. It may be a numerical setting, such as pixel height and width, or a slider adjustment, such as brightness and contrast.
Modal controls are commands indicated by a dialog icon, and Photoshop's actions are full of them. By disabling dialog boxes from opening as we did in the action above, we disabled the modal controls for all the commands in the action. Instead, the action's commands progressed automatically and used default settings.
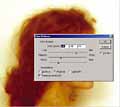
However, you can learn important techniques by enabling an action's modal controls and examining them. To do this with the Aged Photo action, take a look at the expanded commands. Next to the Color Balance command, select the Toggle Dialog On/Off box to make the icon appear. Doing this will cause the action to pause so you can manually change the Color Balance settings during the action's "aging" process. Try it now.
When the action pauses, look carefully at the slider settings that Photoshop uses to achieve the aged, or sepia-toned, effect. If you like this effect, take notes so you won't forget which settings worked the best. (Be sure to examine the settings for Highlights and Shadows, as well.)
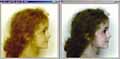
Next, we decided to move the sliders to give our image a blue-gray hue instead of a sepia hue. To do this, you'll need more cyan and blue. Once you've adjusted the color, click OK, and the action will continue with its remaining commands. When it finishes, save the new image.
To learn more about creating antique-looking images, activate the modal controls for other Aged Photo commands, including Dust & Scratches and Hue/Saturation.
![]() Actions Galore
Actions Galore
With more experience, you can customize Photoshop's actions and record your own actions from scratch. Actions are great time-savers because they can help you process several images at once. We'll write more about actions in future articles.