Search MS Office A-Z | Search Web Pages/ Design A-Z
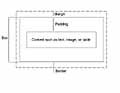
The box model, when used with styles, provides a definitive way to position objects on a Web page. In this article, well show you how to employ this model. Youll use styles to address the box dimensions, create a margin between the box and other elements, add padding between the content and the box border, and define the box border itself.
This type of box model applies to HTML elements called blocks. Blocks are generated by tags that create new sections of text. These tags include <DIV>, <P>, <BLOCKQUOTE>, <TABLE>, <H1> through <H6>, and others. Each of these blocks has an implied box around it that you can configure by applying a style thats embedded into a Web page or used in an inline fashion.
Open a page using your favorite HTML-editing program. As you know, you can apply styles to specific tags within the body of the content. Well use these inline styles in this article for simplicity, but you can easily change them to a style that addresses an entire page or one that uses an external style sheet.
![]() When You Break It Down
When You Break It Down
Lets look at the various parts of the box model and set style values for them. Well start with the dimensions of the box. Its attributes are measured in width and height, and its values are expressed either in pixels or as a percentage of the browser windows width and height. The code will look similar to this:
<P STYLE="WIDTH: 125px">This paragraph is 125 pixels wide.</P>
<P STYLE="HEIGHT: 75px">This paragraph is 75 pixels tall.</P>
Margins are the spaces outside of the border; they separate boxes from one another. Browsers use default margins, depending on which element you are using. For example, every time you create a new paragraph with the <P> tag, a small margin is created above it. If you create a section using the <DIV> tag, however, a margin wont be created. Below is an example of margin attributes and values you can use with the <DIV> tag. Each attribute uses a number set in pixels, such as:
<DIV STYLE="margin-top: 75px; margin-right: 100px; margin-bottom: 75px; margin-left: 100px">
There also is a shorthand method for specifying margins using the margin attribute. It specifies the size of the top, right, bottom, and left marginsin that order. Using this method, the code in the previous paragraph now looks like this:
<DIV STYLE="margin: 75px 100px 75px 100px">
In addition, you can use a single value if you want the margins to be the same on all four sides. The code for that looks like this:
<DIV STYLE="margin: 75px">
![]() Pad Your Cell
Pad Your Cell
The padding between the content and the box border provides breathing room for the text, which looks better than if you smashed the text against a border (more on borders below).
There are four padding properties: padding-top, padding-right, padding-bottom, and padding-left. You should assign pixel values to each of the attributes in the same way you did for margins. There also is a shorthand method you can use for padding that works in the same manner as it does with margins. The code looks like this:
<P STYLE="padding: 75px 100px 75px 100px">
Or if you want the padding to be the same on each side, you can modify the code like this:
<P STYLE="padding: 75px">
|
![]() Head For The Border
Head For The Border
Border properties include three attributes: width, style, and color. Border width is controlled by these attributes: border-top-width, border-right-width, border-bottom-width, and border-left-width. There also is a shorthand attribute, border-width, which works in the same way as our previous shorthand examples. As you did before, you can set the values in pixels. Or you can use these options: thin, medium, or thick. An example looks like this:
<DIV STYLE="border-top-width: 20px">
Youll need to set a border style value in order for the border to actually appear on the Web page. These attributes are: border-top-style, border-right-style, border-bottom-style, border-left-style, and the shorthand border-style. The values for these attributes are: double, groove, inset, none (no border displays), outset, ridge, and solid. An example of this code looks like this:
<DIV STYLE="border-top-style: double">
![]() Now Youre In Position
Now Youre In Position
Once you determine what you want the box to look like, you can employ position styles. The position attribute needs one of three values: absolute, relative, or static.
The absolute value lets you place the box anywhere you want on the Web page, with an exact location thats defined in pixels from the left and from the top. An example looks like this:
<DIV STYLE="position: absolute; left: 600px; top: 150px">
The relative attribute places the box in its normal position according to the rules of HTML and then offsets it according to the values you set. The code looks like this:
<P STYLE="position: relative; left: 75px">
Finally, the static attribute positions the box where it normally would appear using regular HTML.
As you can see, working with boxes by applying styles gives you far greater control over layout than using standard HTML alone.