 |
date | |
| A Publication of UVM Extension's Vermont Vegetable and Berry Program | ||
 |
Transplanting Sweet Cornby Vern Grubinger |
Sweet corn is an important crop for many diversified vegetable farms. Not only does farm-fresh corn attract consumers, but corn is useful as a rotation crop, too, because it hosts few insects and diseases that affect other vegetables. Weeds, well that’s another matter. Sweet corn fields can get quite weedy, especially if timely cultivation is not possible or if herbicides are less than effective. Why transplant? Transplanting corn can improve weed control by reducing the time that the crop is in the field. Using transplants also helps assure a good stand, whereas direct seeding may leave gaps in the row. And, transplanting leads to earlier harvests, so you can attract (and keep) customers earlier in the season. Transplanting has the advantage of avoiding cold soil germination problems at the beginning of the growing season. The use of treated seed can help with cold-soil survival, but for organic growers that’s not an option. Use of floating row covers also promotes growth in cold weather, and this technique can be combined with transplanting to further enhance stand establishment and earliness. Because weeds grow so fast under the row cover, setting transplants instead of direct seeding is particularly beneficial for growers that cover their corn but don’t use herbicides. Obviously, using transplants costs more than direct seeding, so you need to weigh the pros and cons before trying it on a large scale. Here are some tips from Jon Satz, a grower in central Vermont who’s been transplanting sweet corn for many years. Seeding. The process starts by seeding corn in a heated greenhouse. Initially, Jon
seeded trays by hand, but that took too long so he built a drop seeder
that sows a whole tray at once. (Sweet corn seed is too large and heavy
to work with vacuum seeders typically used to sow flats of smaller-seeded
vegetables and flowers.)
Effect of cell size. Jon has tried various trays for transplanting corn. One year he got a Northeast SARE farmer grant to compare 162-cell and 98-cell trays (the 98 cell has about 70% more soil volume per cell). After about one week of growth in the greenhouse, he found that the primary roots of plants in the 98s were 6 to 8 inches long, with many fine lateral roots. The plants from the 162s had roots only 3 to 5 inches long with few lateral roots. When taken to the field, it was easier and faster to handle the larger transplants from the 98-cell trays. Likewise, these plants grew quicker after transplanting than the smaller transplants, keeping slightly more ahead of the weeds. That allowed for more aggressive cultivation to control weeds. However, in the end, there was no difference in yield between the different cell sizes. Although larger size cells seem to promote transplant vigor, the downside is that they take up more greenhouse space. Jon now uses a 128-cell tray with 2-inch deep cells because it is a compromise that offers efficient use of greenhouse space as well as enough cell volume to grow two non-stunted transplants per cell. This size cell requires 82 trays per acre, so Jon sows about 85 to 90 trays to assure that there are plenty of plants. Jon has also used durable injection-molded plastic trays, such as Plastomer 150s (which are no longer available).
It's very important that trays do not sit directly on the ground so that the corn roots do not root there. Set the trays on tables or benches, or else an upside down 1020 tray set on the ground works well under the growing tray, as the roots will naturally be air pruned instead of growing into the ground surface. If seedlings are grown on the ground, it is important to protect from rodents. Row covers are not enough for this. Traps make for better protection. Growing the transplants. No matter what size cell you use, grow the transplants under relatively warm conditions until they’re big enough to pull out, and then give them several days of hardening. Typically, transplants are grown for 14 to 18 days, with the first 12 days or so at 65+ degrees during the day and about 60+ degrees at night. If weather is somewhat settled outside, transplants are then transferred outside to harden off. Especially with early May transplants, this hardening off stage is crucial. Limiting water also helps the seedlings stiffen up a bit to better stand handling at transplanting. The goal is get a full-grown seedling that is not root-bound. Letting the transplants get too old will result in stunted plants in the field. Exactly when your seedlings are ready for transplanting will depend on the growing conditions in your greenhouse, as well as variety. More vigorous varieties, like Arrowhead and Temptation, are usually ready to be pulled out of the trays in 16 days, while less vigorous varieties such as Mystique or Kristine can take up to 20 days before the root ball will hold together. A cohesive root ball is a key factor for successful transplanting (more so with some types of transplanters than others, depending on the mechanism for grasping the plants). In the field. Jon now uses a carousel type transplanter which allows for rapid field transplanting. He used to use a pocket type tranplanter. Though sufficient, that type of planter demanded twice the labor. With either method, double-seeded cells are set at 16-inch spacing in the row. At 36-inch between-row spacing, this gives a population of 21,000 plants per acre. Be sure to provide adequate fertility to the transplants. Fertilizer should either be dropped in the rows before setting plants, applied in a band at transplanting, or as a liquid fertilizer if using a water wheel. Immediately after transplanting Jon covers the seedlings with floating row cover. Row cover is then pulled aside after two or three weeks so the corn can be cultivated and sidedressed. Then the cover is reapplied for another couple of weeks. In Jon’s location, the first corn seeding is usually started in the greenhouse in mid-April and then transplanted into the field at the end of April. A second greenhouse seeding is made the last week of April and transplanted into the field around May 10th. On average, transplanting leads to a week in earliness over direct seeded corn under row cover, and a 2-week gain over simply direct seeding. He now does a third transplanting in early May which is not covered with row cover. This has helped offset occasionally cold and cloudy May weather, when corn does not pop right out of the ground due to cold soils. This third planting is done primarily to make cultivation quicker and easier, not necessarily to promote earliness. It works. Yields have been consistent over the years with many varieties of transplanted corn, at 800 to 1,000 dozen per acre. Some varieties do not do well, and these are typically the ones that lack vigor as transplants in the greenhouse. The quality and uniformity of transplanted corn has also been excellent, with every plant making an ear.
While some growers transplant early-season varieties like Fleet or Seneca Arrowhead to get even more earliness, Jon only plants a limited amount of these to grab the earliest sales. He prefers to transplant main season corn so that he comes on the market with more desirable varieties in terms of size and flavor. He believes this helps keep his customers coming back. There’s a wide range of opinion among growers about which varieties work best for transplanting, and most, like Jon, make changes from year to year, seeking the proper mix of days-to-maturity and characteristics their customers want. A few of the varieties that have done well for Jon are: Arrowhead and Trinity for earliest corn (65-68 day), Temptation and Sweet Rhythm for mid-season (72 day), then Kristine (76 days), which needs a couple of extra days as a seedling, and Montauk (79 day). Recenty, Jon has shifted to only using Trinity for early corn and then making multiple seedlings of Temptation to stagger the transplant and harvest dates. He found the other varieties lacked the uniformity of germination and rootball strength of Temptation. He strongly suggests trialing varieties for performance as transplants, keeping in mind that this cannot be determined by their performance in the field. |
| Last Updated: April 25, 2014 |
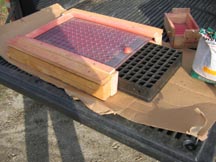 Jon’s home-made seeder is a wooden box
into which a transplant tray can slide. The top of the box is fitted with
two plates that sit above the tray. The bottom plate can be made of metal,
wood or Lexan plexiglass, and it’s drilled with 9/16th inch holes in the
same pattern as the cells of the growing tray being used. Above this slides
a top plate of 3/8th inch thick material (Lexan works very well and does
not warp) drilled with 7/16th inch holes in the same pattern. With the
two plates offset at first, seed is poured on top. Generally, two
seeds fall in each of the top plate's holes. Extra seed is swept off into
a container for use later. Then the top plate is slid back so that the
holes from both plates align and the seeds drop through to the growing
tray below.
Jon’s home-made seeder is a wooden box
into which a transplant tray can slide. The top of the box is fitted with
two plates that sit above the tray. The bottom plate can be made of metal,
wood or Lexan plexiglass, and it’s drilled with 9/16th inch holes in the
same pattern as the cells of the growing tray being used. Above this slides
a top plate of 3/8th inch thick material (Lexan works very well and does
not warp) drilled with 7/16th inch holes in the same pattern. With the
two plates offset at first, seed is poured on top. Generally, two
seeds fall in each of the top plate's holes. Extra seed is swept off into
a container for use later. Then the top plate is slid back so that the
holes from both plates align and the seeds drop through to the growing
tray below.
 Seeds per cell.
At one time Jon seeded one seed per cell. Now he prefers to double-seed
each cell in a tray because that saves on the greenhouse space needed to
grow the transplants, and the labor to raise them. The double-seeded plants
are then set in the field at double the normal in-row spacing for single
plants. “Simply put,” he says, “it’s twice as much labor from greenhouse
to ground with a single-seeded cell tray, and probably not worth it. You
may get a slightly larger ear but it won’t bring a larger return since
consumers are used to a smaller ear early in the season. Any ear size decrease
with two seeds per cell is offset by the fact that when transplanting, a
grower can choose main season varieties which have superior taste and larger
ear size anyway. To me, a small ear of Mystique is still larger and tastier,
and therefore more desirable, than a larger ear of Fleet. However, growers
with a different type of market may not agree.”
Seeds per cell.
At one time Jon seeded one seed per cell. Now he prefers to double-seed
each cell in a tray because that saves on the greenhouse space needed to
grow the transplants, and the labor to raise them. The double-seeded plants
are then set in the field at double the normal in-row spacing for single
plants. “Simply put,” he says, “it’s twice as much labor from greenhouse
to ground with a single-seeded cell tray, and probably not worth it. You
may get a slightly larger ear but it won’t bring a larger return since
consumers are used to a smaller ear early in the season. Any ear size decrease
with two seeds per cell is offset by the fact that when transplanting, a
grower can choose main season varieties which have superior taste and larger
ear size anyway. To me, a small ear of Mystique is still larger and tastier,
and therefore more desirable, than a larger ear of Fleet. However, growers
with a different type of market may not agree.”