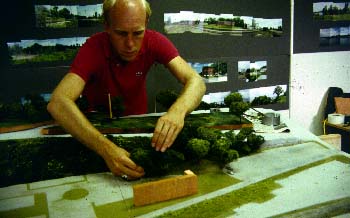
Model Construction
The following techniques produce models suitable for studio photography and limited public display using materials that are readily available at most building supply yards. More durable materials would be required for models that would receive continuous public use.
Bases
Bases should be strong, lightweight and resist warping. Flush hollow-core wooden doors satisfy these requirements and their size (typically 3 feet by 6 foot 8 inches) allows for easy transportation and storage. Smaller sections based on a grid system might also be used, perhaps with painted plywood as a base.
The land contours may be sculpted from polyurethane or polystyrene foam. "Bead-board" and most building insulation foams, however, are difficult to work as they tend to tear rather than carve. The contours of the land may be transferred to the foam with a depth gauge, then the excess material may be carefully carved away with wood-working tools. The carving and sanding should be completed to within a vertical and horizontal tolerance of about 1/8 inch. The surface may then be plastered. A thin mixture of plaster of Paris rapidly applied with a large paint brush can produce a smooth, eggshell-like, protective layer. After sanding and priming, ground foam model railroading flocking can effectively simulate surface vegetation, while paved areas may be painted.
Trees
For many sites, trees are a significant part of the landscape. Accurate models will require trees which match the location, height, shape, color and species of those on site. Extra fine steel wool stretched over armatures fashioned from twigs from such shrubs as Japanese spirea, may be spray-painted and dusted with ground foam to produce life-like trees.
Buildings
Realistic buildings may be constructed from scale-rectified color photographs. By photographing building facades with a wide-angle, perspective-control lens from a predetermined fixed distance, scale-rectified prints may be quickly and economically obtained. For most sites, acceptable photos can be obtained with a 35 mm camera with a 28mm perspective control lens, mounted on a tripod. The proper distance to the building facade should be measured with a tape measure, and a sight level helps align the camera view. The perspective control lens can then be shifted to take in the upper parts of the building. Test shots should be taken to determine the proper distance, compensating for the enlargement ratio of the processor's equipment. (For standard 3" by 5" color prints made by a local "quick-print" processor, tests found that for a 28mm lens, 72' 3" was the required distance for 1/16th scale, while 90' 3" was required for a 35mm wide-angle lens.) The facade images are cut from the color photographs and mounted on illustration board. Marking pens and sculpting clay work well for modifications, "touching up" glue joints and edges and for odd-shaped details.
Backdrops
For studio simulations, a large theatrical flat of muslin stretched over a wooden frame, painted as a sky with clouds provides the basic backdrop. Most simulations will also require custom background paintings which extend to the horizon for each viewpoint. These may be painted onto paper or illustration board to include a skyline with distant hills, tree lines and buildings. The horizon backdrops are a very important element to establish a identifiable sense of place in a simulation.
Photography and Lighting
Studio lighting must be compatible with the film type to produce realistic colors. (Use a tungsten-rated color film for incandescent lighting or appropriate filters.) A primary light source should act as a "sun" to cast shadows appropriate for the location and time of day. Secondary lighting should be diffused, yet evenly distributed. For a simple scene, at least five 500 or 750 watt photofloods may be required.
To photograph models using 35mm cameras, a macro lens is generally required. This will allow a sufficient depth-of-field for many views when set to the minimum aperture (typically f-16 or f-22). With shutter speeds of at least several seconds, a tripod is also required. Ideally the model will be constructed in sections to allow the camera to be positioned at the edge of a base section for key views.